与我之前相关的一个标签的博客(时间选择标签):
https://blog.csdn.net/weixin_42418774/article/details/98747230
今天我来说说进阶标签的选择和添加标签:
首先我们看到wxml页面布局:
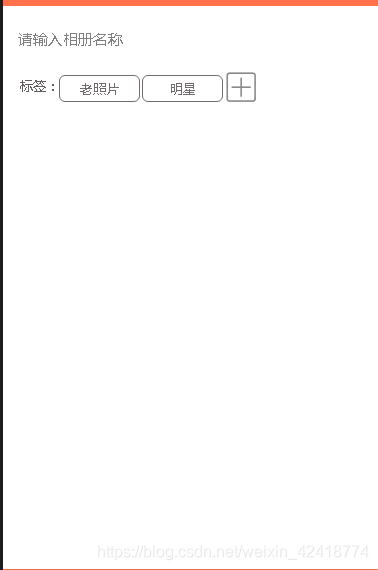
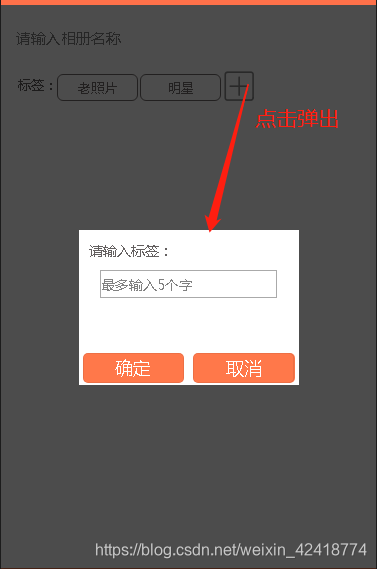
wxml:
<view class='btn_view'>
<text>标签:</text>
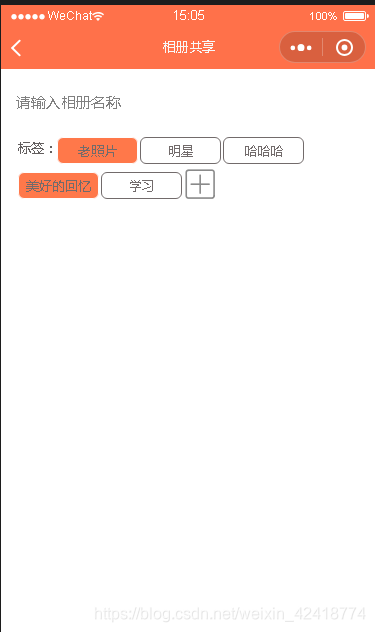
<block wx:for="{{obtnArry}}" >
<view class='label_view {{item.selected ? "active" : ""}}' data-value="{{item.name}}" bindtap='dealTap' checked="{{item.selected}}" data-index="{{index}}">
{{item.name}}
</view>
</block>
<van-popup show="{{ show }}" bind:close="onClose" close-on-click-overlay="{{false}}" overlay="false">
<view class="input_view">
<text>请输入标签:</text>
<input class="input" placeholder="最多输入5个字" maxlength="5" bindinput="bindValue"></input>
<!-- <view class="btn"> -->
<button catchtap="onInputValue" class="determine_button">确定</button>
<button catchtap="onCancel" class="determine_button1">取消</button>
<!-- </view> -->
</view>
</van-popup>
<image bindtap='addinput' class="img" src="/imgs/jia.png" ></image>
</view>wxss:(布局样式仅供参考,你可以有更好的优化代码)
.determine_button{
  background: #ff784a;
  color: white;
  border-radius: 10rpx;
  height: 60rpx;
  line-height:60rpx;
  position: fixed;
  bottom: 5rpx;
  left: 8rpx;
  width: 46%;
}
.determine_button1{
  background: #ff784a;
  color: white;
  border-radius: 10rpx;
  height: 60rpx;
  line-height:60rpx;
  position: fixed;
  bottom: 5rpx;
  right: 8rpx;
  width: 46%;
}
.label_view{
  display: flex;
  justify-content: center;
  align-items: center;
  padding: 1rpx 10rpx;
  width: 140rpx;
  height: 50rpx;
  border: 1rpx solid rgb(114, 107, 107);
  font-size: 26rpx;
  border-radius: 12rpx;
  color: rgb(114, 107, 107);
  margin-right: 5rpx;
  margin-top: 15rpx;
}
.btn_view{
  margin: 10rpx 15rpx;
  font-size: 26rpx;
  color: rgb(99, 95, 95);
  width: 700rpx;
  display: flex;
  flex-direction: row;
  align-items: center;
  flex-wrap: wrap;
}
.btn_view text{
  display: flex;
  align-items: center;
}
.active{
  background: #ff784a;
  border: 1rpx solid rgb(255, 253, 253);
}
.btn_view .img{
  margin-top: 8rpx;
  width: 65rpx;
  height: 65rpx;
}
.input_view{
  font-size: 28rpx;
  width: 400rpx;
  height: 270rpx;
  margin: 20rpx 20rpx;
}
.input{
  margin-top: 20rpx;
  margin-left: 22rpx;
  width: 350rpx;
  border: 1px #aaa solid
}
最后就是主要的js代码了:
data定义|:
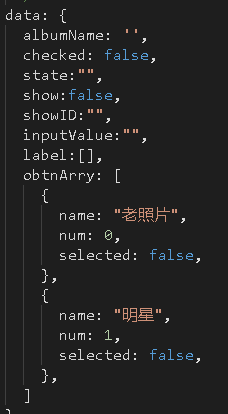
js:
//同步输入框内容
  bindKeyInput(e) {
      this.setData({
        albumName: e.detail.value
      })
  },
// 选择标签并输入到label数组中
 dealTap:function(e){
    let string = "obtnArry[" + e.target.dataset.index + "].selected";
    // const checkedicon = "obtnArry[" + e.target.dataset.index + "].selected";
    console.log(!this.data.obtnArry[e.target.dataset.index].selected);
    this.setData({
      [string]: !this.data.obtnArry[e.target.dataset.index].selected
    })
    let detailValue = this.data.obtnArry.filter(it => it.selected).map(it => it.name)
    this.setData({
      label: detailValue
    })
    console.log(this.data.label)
  },
  addinput(e){
    this.setData({
      show: true,
    });
  },
//关闭弹出层,但是我这里有取消按钮,所以这个没用了
  //onClose() {
   // this.setData({ show: false });
 // },

//实时获取输入框的值
  bindValue(e){
    this.setData({
      inputValue: e.detail.value
    })
  },
//确定按钮,添加数组达到添加标签的作用
  onInputValue(){
    this.setData({
      show: false ,
      inputValue: this.data.inputValue
    });
    var obtnArry = this.data.obtnArry;
    console.log(this.data.inputValue)
    var newData = { num: obtnArry.length, name: this.data.inputValue, selected: false };
    obtnArry.push(newData);//实质是添加lists数组内容,使for循环多一次
    this.setData({
      obtnArry,
    })
    console.log(this.data.inputValue)
  },
//取消按钮
  onCancel(){
    this.setData({ show: false });
}借鉴博客:https://blog.csdn.net/liushuanglian/article/details/101021928
版权声明:本文为weixin_42418774原创文章,遵循CC 4.0 BY-SA版权协议,转载请附上原文出处链接和本声明。