Spring整合redis
Redis整合
- Redis(Remote Dictionary Server)是一个开源(BSD许可),内存存储的数据结构服务器,可用作数据库,高速缓存和消息队列代理。它支持字符串、哈希表、列表、集合、有序集合,位图,hyperloglogs等数据类型,redis支持快照,依赖快照进行持久化。
1>下载安装
- 服务端下载
- 下载地址:https://github.com/microsoftarchive/redis/releases
- redis官网上只能下到linux的redis,这里我们去github下载windows的,这个网址下的是旧版的redis-windows但是也够用了
- 这里我下载的是3.2.100版的

- 解压后,点击redis-server.exe运行
2>下载Redis可视化软件
- RedisDesktopManager


- 可视化工具连接服务器
- 这个步骤跟mysql没有多大区别,我们把Redis服务开启,双击redis-server.exe,打开如下命令窗口


- 连接成功后的界面

- redis设置密码
- 配置redis.windows.conf
- 注意这里前面不能有空格,被坑惨了

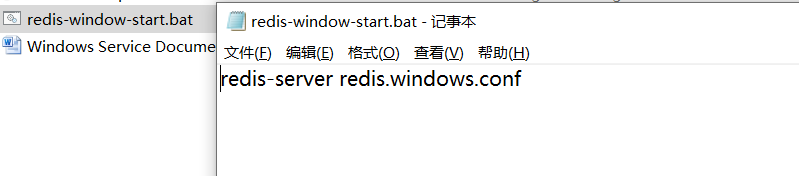
- 新建txt文件后缀改为.bat
- 这一步的目的是让redis用本地的配置文件,而不是用线上的
- 如下编写
3>Redis集成
- 1、在idea中新建一个module无需实现web
- 2、在pom.xml加入redis依赖
- 注意这里的依赖redis和jedis版本有要求
- 即:redis的版本和jedis版本有对应关系,不然会有兼容问题
<properties>
        <project.build.sourceEncoding>UTF-8</project.build.sourceEncoding>
        <maven.compiler.source>1.8</maven.compiler.source>
        <maven.compiler.target>1.8</maven.compiler.target>

        <!-- redis 版本 -->
        <redis.version>2.9.0</redis.version>
        <spring.redis.version>1.8.4.RELEASE</spring.redis.version>
    </properties>

    <dependencies>
        <dependency>
            <groupId>redis.clients</groupId>
            <artifactId>jedis</artifactId>
            <version>${redis.version}</version>
        </dependency>
        <dependency>
            <groupId>org.springframework.data</groupId>
            <artifactId>spring-data-redis</artifactId>
            <version>${spring.redis.version}</version>
        </dependency>
    </dependencies>
- 3、配置spring-redis文件
<?xml version="1.0" encoding="UTF-8"?>
<beans xmlns="http://www.springframework.org/schema/beans"
       xmlns:xsi="http://www.w3.org/2001/XMLSchema-instance"
       xmlns:context="http://www.springframework.org/schema/context"
       xsi:schemaLocation="http://www.springframework.org/schema/beans http://www.springframework.org/schema/beans/spring-beans.xsd
                           http://www.springframework.org/schema/context http://www.springframework.org/schema/context/spring-context.xsd">
    <!-- 加载配置文件 -->
    <context:property-placeholder location="classpath:redis.properties" ignore-unresolvable="true"/>
    <!--扫描-->
    <context:component-scan base-package="com.hliedu.ee"/>

    <!-- redis数据源 -->
    <bean id="poolConfig" class="redis.clients.jedis.JedisPoolConfig">
        <!-- 最大空闲数 -->
        <property name="maxIdle" value="${redis.maxIdle}" />
        <!-- 最大空连接数 -->
        <property name="maxTotal" value="${redis.maxTotal}" />
        <!-- 最大等待时间 -->
        <property name="maxWaitMillis" value="${redis.maxWaitMillis}" />
        <!-- 连接超时时是否阻塞,false时报异常,ture阻塞直到超时, 默认true -->
        <property name="blockWhenExhausted" value="${redis.blockWhenExhausted}" />
        <!-- 返回连接时,检测连接是否成功 -->
        <property name="testOnBorrow" value="${redis.testOnBorrow}" />
    </bean>
    <!-- Spring-redis连接池管理工厂 -->
    <bean id="jedisConnectionFactory" class="org.springframework.data.redis.connection.jedis.JedisConnectionFactory">
        <!-- IP地址 -->
        <property name="hostName" value="${redis.host}" />
        <!-- 端口号 -->
        <property name="port" value="${redis.port}" />
        <!-- 超时时间 默认2000-->
        <property name="timeout" value="${redis.timeout}" />
        <!-- 连接池配置引用 -->
        <property name="poolConfig" ref="poolConfig" />
        <!-- usePool:是否使用连接池 -->
        <property name="usePool" value="true"/>
        <!--密码,被这坑了好久,配置信息一定要完整-->
        <property name="password" value="${redis.password}"/>
    </bean>
    <!-- redis template definition -->
    <bean id="redisTemplate" class="org.springframework.data.redis.core.RedisTemplate">
        <property name="connectionFactory" ref="jedisConnectionFactory" />
        <property name="keySerializer">
            <bean class="org.springframework.data.redis.serializer.StringRedisSerializer" />
        </property>
        <property name="valueSerializer">
            <bean class="org.springframework.data.redis.serializer.JdkSerializationRedisSerializer" />
         <!--
			该配置中的value序列化方式采用的是JDK默认的序列化
		   (JdkSerializationRedisSerializer),后续需要作出调整
		-->
        </property>
        <property name="hashKeySerializer">
            <bean class="org.springframework.data.redis.serializer.StringRedisSerializer" />
        </property>
        <property name="hashValueSerializer">
            <bean class="org.springframework.data.redis.serializer.JdkSerializationRedisSerializer" />
        </property>
        <!--开启事务  -->
        <property name="enableTransactionSupport" value="true"></property>
    </bean>
</beans>
- 4、配置redis.properties
# 根据自身情况进行修改
redis.host=127.0.0.1
redis.port=6379
redis.password=111
redis.maxIdle=400
redis.maxTotal=6000
redis.maxWaitMillis=1000
redis.blockWhenExhausted=true
redis.testOnBorrow=true
redis.timeout=100000
defaultCacheExpireTime=60
- 5、声明缓存管理类
//管理类接口
public interface RedisCache {
    /**
     * 普通缓存放入
     * @param key 键
     * @param value 值
     * @return true成功 false失败
     */
    boolean set(String key, Object value);

    /**
     * 获取 String 类型 key-value
     * @param key
     * @return
     */
    String get(String key);
}

//工具类实现,需要缓存功能的类注入该类即可
@Repository("redisCache")
public class RedisCacheManager implements RedisCache {

    @Autowired
    private RedisTemplate<String,Object> redisTemplate;

    @Override
    public boolean set(String key, Object value) {
        try {
            redisTemplate.opsForValue().set(key, value);
            return true;
        } catch (Exception e) {
            e.printStackTrace();
            return false;
        }
    }
    @Override
    public String get(String key) {
        return (String)redisTemplate.opsForValue().get(key);
    }
}
- 6、将配置好的redis包导入项目中
- 将如下依赖添加到项目的pom.xml中
    <dependency>
      <groupId>com.hliedu.ee</groupId>
      <artifactId>hos-cache</artifactId>
      <version>1.0-SNAPSHOT</version>
    </dependency>
- 7、测试redis是否能够使用
package com.hliedu.hosweb.controller;

import com.hliedu.ee.redis.RedisCache;
import com.hliedu.hosweb.domain.Emp;
import com.hliedu.hosweb.service.EmpService;
import org.springframework.beans.factory.annotation.Autowired;
import org.springframework.stereotype.Controller;
import org.springframework.ui.ModelMap;
import org.springframework.web.bind.annotation.RequestMapping;
import java.util.List;

@RequestMapping("/emp")
@Controller
public class EmpController {

        @Autowired
        private EmpService empService;
        @Autowired
        private RedisCache redisManager;
        @RequestMapping("/query")
        public String query(ModelMap modelMap){
            redisManager.set("123","1234");
            System.out.println();
            List<Emp> emps = empService.queryEmp();
            modelMap.addAttribute("emps" , emps);
            return "empList";
        }
    }

- 8、整合异常处理
- 异常1,多模块时不同模块中的配置文件找不到
//java.io.FileNotFoundException xxx\hosiptal-parent\hosweb\target\hosweb-1.0-SNAPSHOT\WEB-INF\classes\spring-redis.xml (系统找不到指定的文件。)
- 该问题原因是由于配置文件在2个模块的resources目录下,所以需要在路径前加入classpath*:
<!--调整前-->
<import resource="spring-redis.xml"/>

<!--调整后,加入classpath*:-->
<import resource="classpath*:spring-redis.xml"/>
- 异常2,多模块时不同模块中的properties文件无法读取
hosiptal-parent/hosweb/target/hosweb-1.0-SNAPSHOT/WEB-INF/lib/hos-cache-1.0-SNAPSHOT.jar!/spring-redis.xml]: Could not resolve placeholder 'redis.maxIdle' in value "${redis.maxIdle}"
- 造成该问题的原因是多个xml配置文件中使用context:property-placeholder文件加载器,而服务器一经启动,就会将所有的bean加载,此时后面的文件加载器还没来得及录入属性,造成无法编译
!--给所有文件加载器添加属性ignore-unresolvable为true-->
<context:property-placeholder location="classpath:jdbc.properties" ignore-unresolvable="true"/>
版权声明:本文为oLengNuanZiZhi12原创文章,遵循CC 4.0 BY-SA版权协议,转载请附上原文出处链接和本声明。