问题咨询及项目源码下载请加群:
群名:IT项目交流群
群号:245022761
STM32单片机学习篇3:按键 外部中断
封装
===================
条件运算符: (三目运算符)
<条件> ? <表达式1> : <表达式2>
条件为真 -----》表达式1 1
条件为假 -----》表达式2 0
n ? <高电平> :<低电平>
#define LED0(n) n?<高电平> :<低电平>
C语言知识
====================================
源文件:(.c .s) 定义的函数以及变量
头文件:(.h) 声明源文件的函数名以及变量名,宏定义
==========条件编译=========
#ifndef __STM32F4xx_GPIO_H
#define __STM32F4xx_GPIO_H
#endif
操作步骤:
1.去工程下面的SYSTEM里面建立源文件.c和头文件.h
2.去keil5下面去添加SYSTEM
3.添加头文件路径:魔法棒----》c/c++
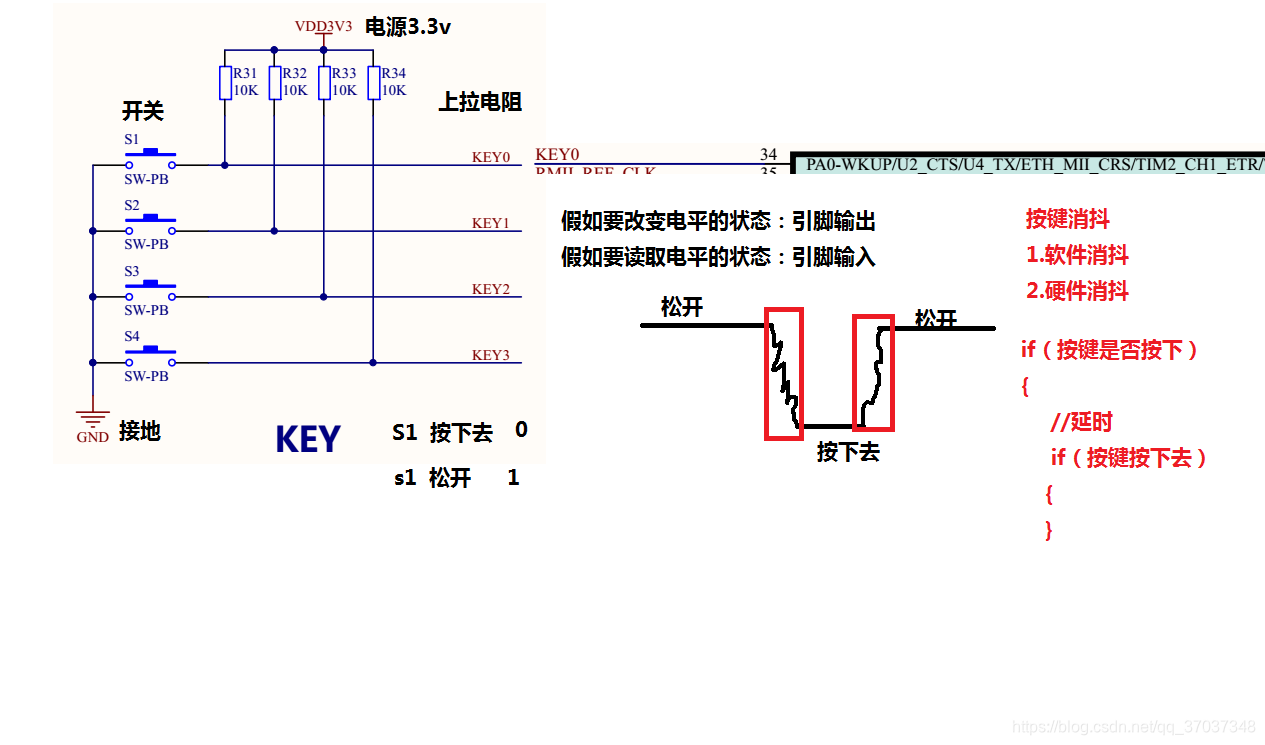
按键
==========================
1.看图
2.读取GPIO的状态 GPIO_ReadInputDataBit()
uint8_t GPIO_ReadInputDataBit(GPIO_TypeDef* GPIOx, uint16_t GPIO_Pin)
参数1:GPIO_TypeDef* GPIOx 组别
GPIOA --GPIOG
参数2:uint16_t GPIO_Pin 引脚号
GPIO_Pin_x where x can be (0..15).
--------------------位带操作----------------------
1.意义
51单片机
P0 =0x55; //将P0端口设置为01010101
P1^2=1; //将P1组引脚2设置为高电平
a=P1^3; //将P1组引脚3电平赋值给a
可以快速定位修改或获取引脚的高低电平的状态
我们可以通过快速的方法定位或者获取stm32引脚的电平
GPIO_ResetBits(GPIOF,GPIO_Pin_9) 修改为 PFout(9)
GPIO_ReadInputDataBit(GPIOA,GPIO_Pin_0) == 0 修改为PAin(0)
练习:完善剩下的按键 可以选择位带操作或者读取操作
KEY0 PA0
KEY1 PE2
KEY2 PE3
KEY3 PE4
======================外部中断====================
1、定义
专业说法:中断指的是计算机运行中,正在运行事情被打断,需要紧急处理
现实的例子:玩 王者荣耀 的时候,女朋友给你打电话
2.中断七步曲
1.使能中断时钟 RCC_APB2PeriphClockCmd
void RCC_APB2PeriphClockCmd(uint32_t RCC_APB2Periph, FunctionalState NewState)
参数1:uint32_t RCC_APB2Periph 中断时钟
RCC_APB2Periph_SYSCFG
参数2:FunctionalState NewState 权限设置
ENABLE 开启使能 DISABLE 关闭使能
2.初始化GPIO口 GPIO_Init();
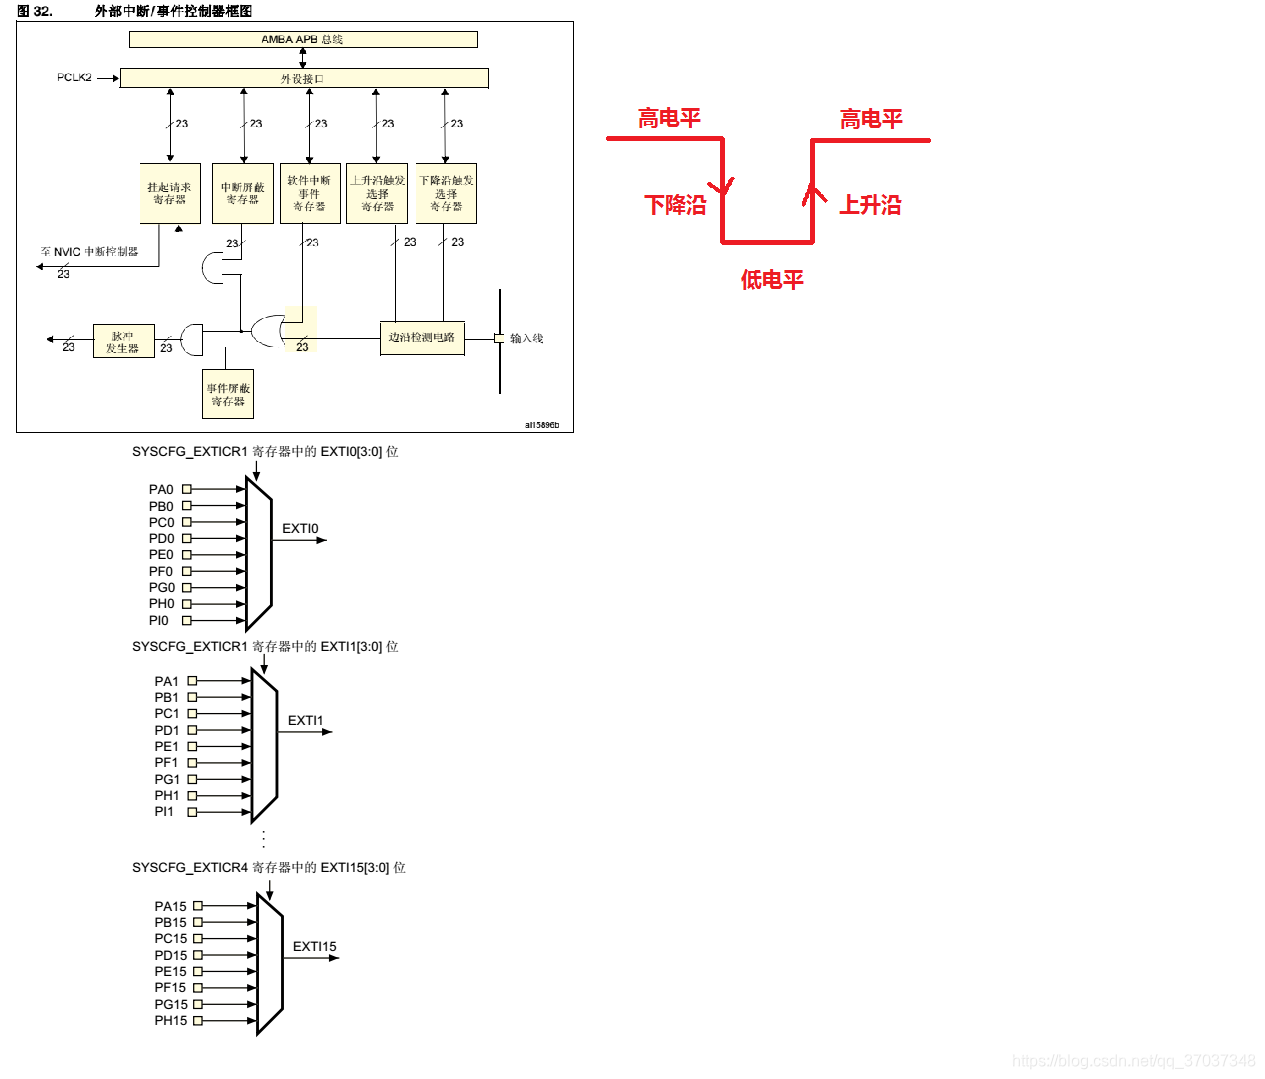
3.设置GPIO口和中断线的映射关系 SYSCFG_EXTILineConfig
void SYSCFG_EXTILineConfig(uint8_t EXTI_PortSourceGPIOx, uint8_t EXTI_PinSourcex)
参数1:uint8_t EXTI_PortSourceGPIOx 组别
EXTI_PortSourceGPIOA --EXTI_PortSourceGPIOG
参数2:uint8_t EXTI_PinSourcex 引脚编号
EXTI_PinSourcex where x can be (0..15)
4.初始化中断口,设置触发条件 EXTI_Init()
void EXTI_Init(EXTI_InitTypeDef* EXTI_InitStruct)
参数:EXTI_InitTypeDef* EXTI_InitStruct
typedef struct
{
uint32_t EXTI_Line; /*!< 设置中断线 */
EXTIMode_TypeDef EXTI_Mode; /*!< 中断模式 */
EXTITrigger_TypeDef EXTI_Trigger; /*!< 中断沿的设置 */
FunctionalState EXTI_LineCmd; /*!< 中断权限设置 */
}EXTI_InitTypeDef;
1.
#define EXTI_Line0 ((uint32_t)0x00001) /*!< External interrupt line 0 */
#define EXTI_Line1 ((uint32_t)0x00002) /*!< External interrupt line 1 */
#define EXTI_Line2 ((uint32_t)0x00004) /*!< External interrupt line 2 */
#define EXTI_Line3 ((uint32_t)0x00008) /*!< External interrupt line 3 */
#define EXTI_Line4 ((uint32_t)0x00010) /*!< External interrupt line 4 */
#define EXTI_Line5 ((uint32_t)0x00020) /*!< External interrupt line 5 */
#define EXTI_Line6 ((uint32_t)0x00040) /*!< External interrupt line 6 */
#define EXTI_Line7 ((uint32_t)0x00080) /*!< External interrupt line 7 */
#define EXTI_Line8 ((uint32_t)0x00100) /*!< External interrupt line 8 */
#define EXTI_Line9 ((uint32_t)0x00200) /*!< External interrupt line 9 */
#define EXTI_Line10 ((uint32_t)0x00400) /*!< External interrupt line 10 */
#define EXTI_Line11 ((uint32_t)0x00800) /*!< External interrupt line 11 */
#define EXTI_Line12 ((uint32_t)0x01000) /*!< External interrupt line 12 */
#define EXTI_Line13 ((uint32_t)0x02000) /*!< External interrupt line 13 */
#define EXTI_Line14 ((uint32_t)0x04000) /*!< External interrupt line 14 */
#define EXTI_Line15 ((uint32_t)0x08000) /*!< External interrupt line 15 */
2.
/**
* @brief EXTI mode enumeration
*/
typedef enum
{
EXTI_Mode_Interrupt = 0x00, 中断请求
EXTI_Mode_Event = 0x04 事件请求
}EXTIMode_TypeDef;
3.
/**
* @brief EXTI Trigger enumeration
*/
typedef enum
{
EXTI_Trigger_Rising = 0x08, 上升沿
EXTI_Trigger_Falling = 0x0C, 下降沿
EXTI_Trigger_Rising_Falling = 0x10
}EXTITrigger_TypeDef;
4.
ENABLE 开启使能 DISABLE 关闭使能
5.配置中断分组
6.写中断服务函数
7.清空标志位
学习思维图:
按键学习
中断学习:
代码实现:
//按键代码实现

#include "key.h"

/****key***/
void KEY_Init()
{
	GPIO_InitTypeDef GPIO_InitStruct;
	//1.¿ªÆôʱÖÓ
	RCC_AHB1PeriphClockCmd(RCC_AHB1Periph_GPIOA | RCC_AHB1Periph_GPIOE,ENABLE);

	//2.GPIO³õʼ»¯
	GPIO_InitStruct.GPIO_Pin=GPIO_Pin_0;//0Òý½Å
	GPIO_InitStruct.GPIO_Mode=GPIO_Mode_IN;//ÊäÈë
	GPIO_InitStruct.GPIO_Speed=GPIO_Speed_100MHz;
	GPIO_InitStruct.GPIO_OType=GPIO_OType_OD;
	GPIO_InitStruct.GPIO_PuPd=GPIO_PuPd_UP;
	GPIO_Init(GPIOA,&GPIO_InitStruct);

	GPIO_InitStruct.GPIO_Pin=GPIO_Pin_2 | GPIO_Pin_3 | GPIO_Pin_4;//0Òý½Å
	GPIO_InitStruct.GPIO_Mode=GPIO_Mode_IN;//ÊäÈë
	GPIO_InitStruct.GPIO_Speed=GPIO_Speed_100MHz;
	GPIO_InitStruct.GPIO_OType=GPIO_OType_OD;
	GPIO_InitStruct.GPIO_PuPd=GPIO_PuPd_UP;
	GPIO_Init(GPIOE,&GPIO_InitStruct);
}

/*******»ñÈ¡°´¼üµÄ״̬***/
int key_scan(void)
{
	  //ÅжÏÊÇ·ñ°´ÏÂÈ¥
	  if(GPIO_ReadInputDataBit(GPIOA,GPIO_Pin_0) == 0)
		{
			//¼ÙÉè15msºóÅжÏ
			delay(15);
			if(GPIO_ReadInputDataBit(GPIOA,GPIO_Pin_0) == 0)
			{
				return 1;
			}
		}
		//ÅжÏÊÇ·ñ°´ÏÂÈ¥
	  if(GPIO_ReadInputDataBit(GPIOE,GPIO_Pin_2) == 0)
		{
			//¼ÙÉè15msºóÅжÏ
			delay(15);
			if(GPIO_ReadInputDataBit(GPIOE,GPIO_Pin_2) == 0)
			{
				return 2;
			}
		}
		//ÅжÏÊÇ·ñ°´ÏÂÈ¥
	  if(PEin(3) == 0)
		{
			//¼ÙÉè15msºóÅжÏ
			delay(15);
			if(PEin(3) == 0)
			{
				return 3;
			}
		}
		//ÅжÏÊÇ·ñ°´ÏÂÈ¥
	  if(PEin(4) == 0)
		{
			//¼ÙÉè15msºóÅжÏ
			delay(15);
			if(PEin(4) == 0)
			{
				return 4;
			}
		}
	return -1;
}
//中断实现代码
#include "exti.h"
/******** ÖжÏ******/
void EXTI_KEY_Init(void)
{
EXTI_InitTypeDef EXTI_InitStruct;
NVIC_InitTypeDef NVIC_InitStruct;
//¿ªÆôÖжÏʱÖÓ
RCC_APB2PeriphClockCmd(RCC_APB2Periph_SYSCFG,ENABLE);
//ÉèÖÃIO¿ÚÓëÖжÏÏßµÄÓ³Éä¹Øϵ
SYSCFG_EXTILineConfig(EXTI_PortSourceGPIOA,EXTI_PinSource0);
//³õʼ»¯ÖжÏ
EXTI_InitStruct.EXTI_Line=EXTI_Line0;//ÖжÏÏß0
EXTI_InitStruct.EXTI_Mode=EXTI_Mode_Interrupt;//ÖжÏÇëÇó
EXTI_InitStruct.EXTI_Trigger=EXTI_Trigger_Falling;//ϽµÑØ
EXTI_InitStruct.EXTI_LineCmd=ENABLE;//ʹÄÜ
EXTI_Init(&EXTI_InitStruct);
//ÖжÏÓÅÏȼ¶Ñ¡Ôñ
NVIC_InitStruct.NVIC_IRQChannel = EXTI0_IRQn;//ÖжÏʼþ£¬ÔÚstm32f4xx.h²éÕÒ
NVIC_InitStruct.NVIC_IRQChannelPreemptionPriority= 0x02;//ÇÀÕ¼ÓÅÏȼ
NVIC_InitStruct.NVIC_IRQChannelSubPriority=0x02;//ÏìÓ¦ÓÅÏȼ
NVIC_InitStruct.NVIC_IRQChannelCmd=ENABLE;//ʹÄÜ
NVIC_Init(&NVIC_InitStruct);
}
void EXTI0_IRQHandler()//Õâ¸öº¯ÊýÃûÔÚstartup_stm32f40_41xxx.s
{
PFout(9) = ~PFout(9);
//Çå¿ÕÖжϱêÖ¾
EXTI_ClearITPendingBit(EXTI_Line0);
}
附上本人在大学学习期间所有学习实现的demo,这些项目的实现都通过本人亲自测试运行,也是自己学习中知识的一点一点积累,整理不易,希望能帮到大家,不足之处大家多多交流。
QQ:1805523903
邮箱:1805523603@qq.com
昵称:忘尘
世界不同角落共同努力,变成更优秀的我们。
1.51单片机学习整理
基于51单片机的智能光控路灯 :https://download.csdn.net/download/qq_37037348/11071869
基于51单片机超声波测距(内含源程序,原理图及PCB源文件):https://download.csdn.net/download/qq_37037348/11071866
基于51单片机的智能安防报警系统:https://download.csdn.net/download/qq_37037348/11071865
基于51单片机模块化编程模块 (红外、液晶显示屏、温湿度等传感器模块化)
:https://download.csdn.net/download/qq_37037348/11053222
基于51单片机pwm控制的呼吸灯程序
https://download.csdn.net/download/qq_37037348/11053195
51单片机与上位机串口通信实例包含详细讲解的完整代码
https://download.csdn.net/download/qq_37037348/11053164
基于51单片机的直交流电压表仿真 (详细代码实现,设计讲解)
https://download.csdn.net/download/qq_37037348/11053145
基于51单片机胸牌 详细代码实现,设计讲解)
https://download.csdn.net/download/qq_37037348/11053125
基于51单片机3x4按键拨号 (详细代码实现,设计讲解)
https://download.csdn.net/download/qq_37037348/11053093
基于51单片机拨号 (详细代码实现,设计讲解)
https://download.csdn.net/download/qq_37037348/11053090
基于51单片机警灯系统设计(详细代码实现,设计讲解)
https://download.csdn.net/download/qq_37037348/11053086
基于51单片机点亮一个小灯(详细代码实现,设计讲解,学习51基础实验)
https://download.csdn.net/download/qq_37037348/11053084
基于51单片机开发的排球计时器,附有详细注释讲解,为大家提供最真心的帮助
https://download.csdn.net/download/qq_37037348/11053024
基于51单片机的音乐播放器,源码详细注释
https://download.csdn.net/download/qq_37037348/11053022
2.Android 开发学习整理:
Android-serialport 手机App串口通信代码实现:
https://download.csdn.net/download/qq_37037348/11050521
Android-serialport 手机App网络通信实例代码实现:
https://download.csdn.net/download/qq_37037348/11050516
Android 第一个App详细教程、基础实验 :
https://download.csdn.net/download/qq_37037348/11050515
3.计算机视觉(深度学习、神经网络的学习)
feature extraction(深度学习,特征提取,神经网络:https://download.csdn.net/download/qq_37037348/11065968
feature extraction(深度学习,特征提取,神经网络多种训练模型详细实现):
https://download.csdn.net/download/qq_37037348/11065974
欢迎大家加入学习项目交流,为大家分享各类个人学习项目及学习资料,互相交流互相学习。
