父pom
    <properties>
        <maven.compiler.source>17</maven.compiler.source>
        <maven.compiler.target>17</maven.compiler.target>
        <java.version>17</java.version>
        <project.build.sourceEncoding>UTF-8</project.build.sourceEncoding>
        <spring.cloud-version>2021.0.0</spring.cloud-version>
        <spring.boot-version>2.6.3</spring.boot-version>
        <spring.cloud-alibaba.version>2.2.7.RELEASE</spring.cloud-alibaba.version>
        <jackson.version>2.9.5</jackson.version>
    </properties>


    <dependencyManagement>
        <dependencies>
            <dependency>
                <groupId>com.alibaba.cloud</groupId>
                <artifactId>spring-cloud-alibaba-dependencies</artifactId>
                <version>${spring.cloud-alibaba.version}</version>
                <type>pom</type>
                <scope>import</scope>
            </dependency>
            <dependency>
                <groupId>org.springframework.cloud</groupId>
                <artifactId>spring-cloud-dependencies</artifactId>
                <version>${spring.cloud-version}</version>
                <type>pom</type>
                <scope>import</scope>
            </dependency>
            <dependency>
                <groupId>org.springframework.boot</groupId>
                <artifactId>spring-boot-dependencies</artifactId>
                <version>${spring.boot-version}</version>
                <type>pom</type>
                <scope>import</scope>
            </dependency>
        </dependencies>
    </dependencyManagement>
Eureka注册中心搭建
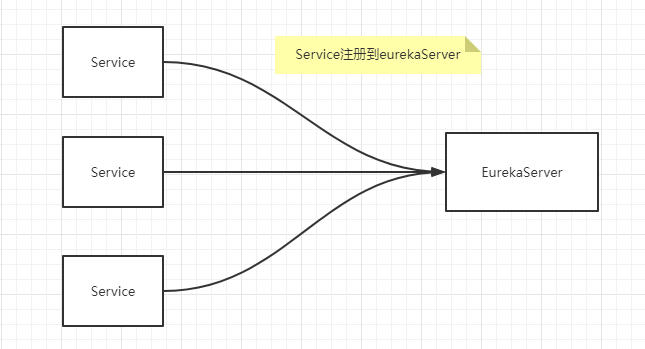
单节点eureka注册中心
eurekaServer搭建
pom依赖
在较高版本的eureka依赖中server和client已经分开,在server端只需引入server依赖即可
<dependency>
    <groupId>org.springframework.cloud</groupId>
    <artifactId>spring-cloud-starter-netflix-eureka-server</artifactId>
</dependency>
启动类
需要在启动类标注@EnableEurekaServer开启eureka服务端
import org.springframework.boot.SpringApplication;
import org.springframework.boot.autoconfigure.SpringBootApplication;
import org.springframework.cloud.netflix.eureka.server.EnableEurekaServer;

/**
 * @author Wangkangsheng
 */
@SpringBootApplication
@EnableEurekaServer
public class YjEurekaServerApplication {
    public static void main(String[] args) {
        SpringApplication.run(YjEurekaServerApplication.class,args);
    }
}
配置文件
server:
 port: 10001
eureka:
  client:
    # 是否向eureka注册  默认true 单点服务端需要设置为false
    register-with-eureka: false
    # 是否拉取注册的客户端信息 默认true 单点服务端需要设置为false
    fetch-registry: false
  instance:
    # 主机地址 (ip)
    hostname: localhost
    # 实例名称
    appname: EurekaServer
  server:
    # 是否启用自我保护
    enable-self-preservation: false
客户端注册
pom依赖
引入client端的eureka依赖即可
<dependency>
    <groupId>org.springframework.cloud</groupId>
    <artifactId>spring-cloud-starter-netflix-eureka-client</artifactId>
</dependency>
启动类
需要在启动类标注@EnableDiscoveryClient
import org.springframework.boot.SpringApplication;
import org.springframework.boot.autoconfigure.SpringBootApplication;
import org.springframework.cloud.client.discovery.EnableDiscoveryClient;

/**
 * @author WangKangSheng
 */
@SpringBootApplication
@EnableDiscoveryClient
public class PaymentApplication {
    public static void main(String[] args) {
        SpringApplication.run(PaymentApplication.class, args);
    }
}
配置文件
spring:
  application:
    name: PaymentService
server:
  port: 9001

eureka:
  client:
    service-url:
      # eureka服务端地址
      defaultZone: http://127.0.0.1:10001/eureka
    # 获得注册的服务
    fetch-registry: true
    # 注册到eureka
    register-with-eureka: true
  instance:
    # 服务名称
    appname: ${spring.application.name}
启动测试
注:需要先启动服务端,否则启动客户端会报错。原因很简单,既然要想eureka注册中心注册服务,那么肯定注册中心肯定要先存在才能注册
访问eureka注册中心地址即可看到eureka注册中心的控制台http://localhost:10001/
启动后的控制台中会看到客户端信息,status代表现在状态,如果丢失心跳或客户端下线状态会成为down

下线后的客户端状态

eureka+openFeign负载均衡
consumer服务调用端
创建consumer服务调用端,同样需要注册到eureka
注册配置和依赖同上
pom依赖
<dependency>
    <groupId>org.springframework.cloud</groupId>
    <artifactId>spring-cloud-starter-openfeign</artifactId>
</dependency>
启动类
import org.springframework.boot.SpringApplication;
import org.springframework.boot.autoconfigure.SpringBootApplication;
import org.springframework.cloud.client.discovery.EnableDiscoveryClient;
import org.springframework.cloud.openfeign.EnableFeignClients;

/**
 * @author WangKangSheng
 */
@SpringBootApplication
@EnableDiscoveryClient
@EnableFeignClients // 开启feign客户端功能
public class ConsumerApplication {
    public static void main(String[] args) {
        SpringApplication.run(ConsumerApplication.class, args);
    }
}
feign接口编写
import org.springframework.cloud.openfeign.FeignClient;
import org.springframework.web.bind.annotation.PostMapping;
import org.springframework.web.bind.annotation.RequestParam;

/**
 * @author WangKangSheng
 */
@FeignClient(name = "PaymentService") // 服务名称
public interface UnifiedOrderService {

    /**
     * feign接口调用
     * @param username String 用户名
     * @return String
     */
    @PostMapping("/unifiedOrderService") // 服务端的调用地址
    String unifiedOrder(@RequestParam("username") String username);

}
对外暴露controller编写
import com.yunju.consumer.feign.UnifiedOrderService;
import org.springframework.beans.factory.annotation.Autowired;
import org.springframework.web.bind.annotation.GetMapping;
import org.springframework.web.bind.annotation.PostMapping;
import org.springframework.web.bind.annotation.RestController;

/**
 * @author WangKangSheng
 */
@RestController
public class UnifiedOrderController {

    @Autowired
    private UnifiedOrderService unifiedOrderService;

    @GetMapping("/unifiedOrder")
    public String unifiedOrder(String username){

        return unifiedOrderService.unifiedOrder(username);
    }


}
启动多服务客户端
idea启动多服务端技巧
点击Edit Configurations
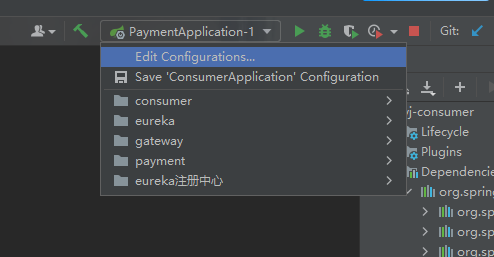
点击左上角的复制小图标,复制启动配置
复制启动实例后修改实例名称,并且在Override Parameter中修改启动端口号即可

在底部services中可以看到实例
没有services功能
在顶部View->Tool Windows -> Services开启services
打开services后看不到springboot实例:

在列表中点击springboot即可,如果找不到不要忽略底部有more items
如果还没有,在顶部启动项目后就能出现

编写controller
import org.springframework.beans.factory.annotation.Value;
import org.springframework.web.bind.annotation.PostMapping;
import org.springframework.web.bind.annotation.RestController;

/**
 * @author WangKangSheng
 */
@RestController
public class UnifiedOrderController {

    @Value("${server.port}")
    private Integer port;


    @PostMapping("/unifiedOrderService")
    public String unifiedOrder(String username){
        return "unified ["+port+"] -> "+username;
    }

}
启动服务提供方

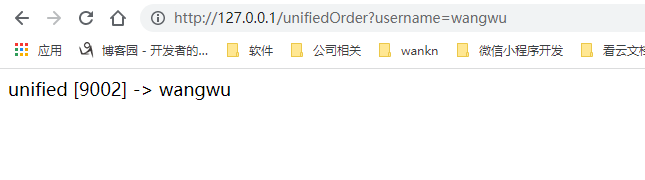
调用测试
可以看到接口调用被负载到两个不同的客户端中

版权声明:本文为weixin_44922129原创文章,遵循CC 4.0 BY-SA版权协议,转载请附上原文出处链接和本声明。