一、Spring Boot缓存注解说明
1、缓存@Cacheable
根据方法对其返回结果进行缓存,下次请求时,如果缓存存在,则直接读取缓存数据返回;如果缓存不存在,则执行方法,并把返回的结果存入缓存中。一般用在查询方法上。
查看源码,属性值如下:
| 属性/方法名 | 解释 |
| value | 缓存名,必填,它指定了你的缓存存放在哪块命名空间 |
| cacheNames | 与 value 差不多,二选一即可 |
| key | 可选属性,可以使用 SpEL 标签自定义缓存的key |
2、缓存@CachePut
使用该注解标志的方法,每次都会执行,并将结果存入指定的缓存中。其他方法可以直接从响应的缓存中读取缓存数据,而不需要再去查询数据库。一般用在新增方法上。
查看源码,属性值如下:
| 属性/方法名 | 解释 |
| value | 缓存名,必填,它指定了你的缓存存放在哪块命名空间 |
| cacheNames | 与 value 差不多,二选一即可 |
| key | 可选属性,可以使用 SpEL 标签自定义缓存的key |
3、缓存@CacheEvict
| 属性/方法名 | 解释 |
| value | 缓存名,必填,它指定了你的缓存存放在哪块命名空间 |
| cacheNames | 与 value 差不多,二选一即可 |
| key | 可选属性,可以使用 SpEL 标签自定义缓存的key |
| allEntries | 是否清空所有缓存,默认为 false。如果指定为 true,则方法调用后将立即清空所有的缓存 |
| beforeInvocation | 是否在方法执行前就清空,默认为 false。如果指定为 true,则在方法执行前就会清空缓存 |
二、springboot项目集成Redis
1、引入依赖
<!-- redis -->
<dependency>
<groupId>org.springframework.boot</groupId>
<artifactId>spring-boot-starter-data-redis</artifactId>
</dependency>
<!-- spring2.X集成redis所需common-pool2-->
<dependency>
<groupId>org.apache.commons</groupId>
<artifactId>commons-pool2</artifactId>
<version>2.6.0</version>
</dependency>
2、redis配置类
添加redis配置类,开启缓存注解,配置类注解
package com.lyf.servicebase.config;
import com.fasterxml.jackson.annotation.JsonAutoDetect;
import com.fasterxml.jackson.annotation.PropertyAccessor;
import com.fasterxml.jackson.databind.ObjectMapper;
import org.springframework.cache.CacheManager;
import org.springframework.cache.annotation.CachingConfigurerSupport;
import org.springframework.cache.annotation.EnableCaching;
import org.springframework.context.annotation.Bean;
import org.springframework.context.annotation.Configuration;
import org.springframework.data.redis.cache.RedisCacheConfiguration;
import org.springframework.data.redis.cache.RedisCacheManager;
import org.springframework.data.redis.connection.RedisConnectionFactory;
import org.springframework.data.redis.core.RedisTemplate;
import org.springframework.data.redis.serializer.Jackson2JsonRedisSerializer;
import org.springframework.data.redis.serializer.RedisSerializationContext;
import org.springframework.data.redis.serializer.RedisSerializer;
import org.springframework.data.redis.serializer.StringRedisSerializer;
import java.time.Duration;
/**
 * @Author 刘耀福
 * @create 2021/9/4 10:08
 */
@Configuration//配置类
@EnableCaching//做缓存
public class RedisConfig extends CachingConfigurerSupport {
    @Bean
    public RedisTemplate<String, Object> redisTemplate(RedisConnectionFactory factory) {
        RedisTemplate<String, Object> template = new RedisTemplate<>();
        RedisSerializer<String> redisSerializer = new StringRedisSerializer();
        Jackson2JsonRedisSerializer jackson2JsonRedisSerializer = new Jackson2JsonRedisSerializer(Object.class);
        ObjectMapper om = new ObjectMapper();
        om.setVisibility(PropertyAccessor.ALL, JsonAutoDetect.Visibility.ANY);
        om.enableDefaultTyping(ObjectMapper.DefaultTyping.NON_FINAL);
        jackson2JsonRedisSerializer.setObjectMapper(om);
        template.setConnectionFactory(factory);
        //key序列化方式
        template.setKeySerializer(redisSerializer);
        //value序列化
        template.setValueSerializer(jackson2JsonRedisSerializer);
        //value hashmap序列化
        template.setHashValueSerializer(jackson2JsonRedisSerializer);
        return template;
    }

    @Bean
    public CacheManager cacheManager(RedisConnectionFactory factory) {
        RedisSerializer<String> redisSerializer = new StringRedisSerializer();
        Jackson2JsonRedisSerializer jackson2JsonRedisSerializer = new Jackson2JsonRedisSerializer(Object.class);
        //解决查询缓存转换异常的问题
        ObjectMapper om = new ObjectMapper();
        om.setVisibility(PropertyAccessor.ALL, JsonAutoDetect.Visibility.ANY);
        om.enableDefaultTyping(ObjectMapper.DefaultTyping.NON_FINAL);
        jackson2JsonRedisSerializer.setObjectMapper(om);
        // 配置序列化(解决乱码的问题),过期时间600秒
        RedisCacheConfiguration config = RedisCacheConfiguration.defaultCacheConfig()
                .entryTtl(Duration.ofSeconds(600))
                .serializeKeysWith(RedisSerializationContext.SerializationPair.fromSerializer(redisSerializer))
                .serializeValuesWith(RedisSerializationContext.SerializationPair.fromSerializer(jackson2JsonRedisSerializer))
                .disableCachingNullValues();
        RedisCacheManager cacheManager = RedisCacheManager.builder(factory)
                .cacheDefaults(config)
                .build();
        return cacheManager;
    }
}
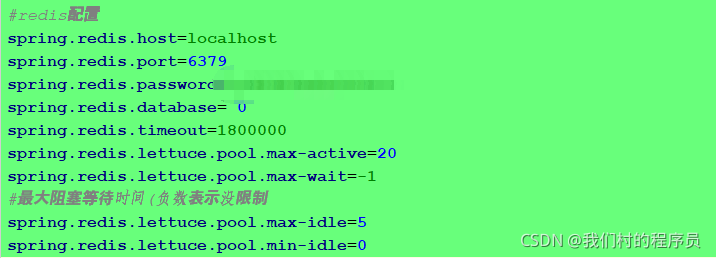
3、application.yml配置redis
三、项目上使用注解
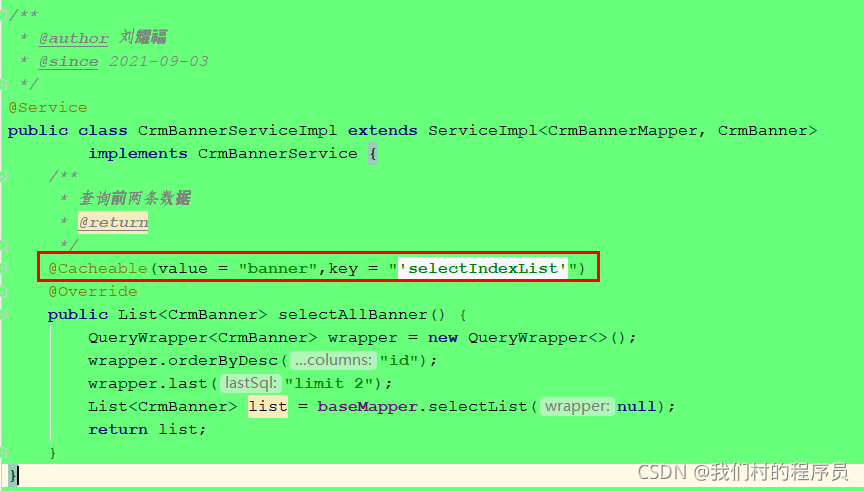
1、实现类方法上添加查询缓存注解
四、测试验证效果
1、启动redis服务
启动redis服务:redis-server.exe redis.windows.conf
启动redis客户端:redis-cli.exe -h localhost -a password
启动项目:刷新调用接口的页面
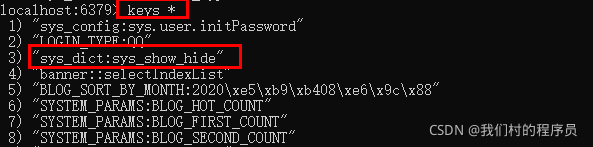
查看redis

以上内容redis作为缓存效果实现
版权声明:本文为lylyf520原创文章,遵循CC 4.0 BY-SA版权协议,转载请附上原文出处链接和本声明。