theme: Chinese-red
学习的前提
java线程需要大概知道点- 协程是线程执行的任务, 协程和用户线程的区别在于, 协程背靠强大的编译器, 协程有专属于协程的调度器和一堆方便好用的函数, 用户可以在一定的范围下把协程给自己想要的线程执行
- 了解什么是挂起? 挂起的意思是保存上下文环境, 将协程暂停, 挂起, 然后线程继续做别的事情
- 线程负责执行, 协程负责任务
协程是什么?
我觉得协程是一种开发人员可以自行决定代码在何处挂起、何处恢复的功能
如果我就这么说你肯定会不满意!为什么?
因为上面定义的是 Generator 类型的协程 ,是 python JavaScript lua 的协程
这种线程不支持真正的多线程
python有多线程,但不支持多线程并发(GIL)
对于 kotlin 来说协程即满足了上面的挂起和恢复功能,还满足了 切线程
协程的分类
在市面上, 协程的概念没有特别明细, 各个编程语言设计者都有自己的想法和思路, 虽然协程的实现细节可能不一样, 但大体分类还是能区分出来的
协程按照有栈和无栈分类
有栈协程: 这种协程和线程一样, 有着自己的线程栈
有栈协程可以在任意函数调用层任意的位置调度, 而无栈协程在这方面表现的力不从心, 市面上的 golang 就是有栈协程实现的, 不过
golang做了很多的优化, 每个协程栈的大小最小是4k, 和线程的 上百kb 级别对比起来, 轻了很多很多
无栈协程: 无栈协程, 一般没有记录的协程栈, 主要存储的数据都在状态机或者闭包的方式实现, kotlin通常被认为是无栈协程, 使用状态机代替协程栈, 它在挂起函数的挂起点生成一个状态机记录协程数据
按照调度的控制权分类
这种方式我们分为: 对称协程和非对称协程
对称协程: 任何一个协程都是独立的, 平等的, 调度的权利可以在协程和协程间转移, 就像 golang , 他就是对称协程, 借助 channel 来转移调度权
非对称协程: 协程和协程之间的调度权是调度与被调度, 所以是不对等的
为什么使用协程? 或者说协程的优势是什么?
答: 协程的优势在于
- 精细化调度, 前一秒还在用
UI线程执行一些UI更新的操作, 后一秒发现任务需要 阻塞, 该阻塞任务就切给其他线程去执行了,UI线程继续刷新UI - 像写一般代码一样写出异步代码, 更加便捷的写出高并发代码
- 如果协程库底层实现了属于协程的非阻塞
IO函数的话, 协程还合适IO操作 - 协程自身的上下文切换不需要陷入到内核中, 而且协程的使用使得 线程 的数量变少, 减少了上下文切换需要的频率
协程和线程的分工再明细些
协程并不是取代线程而产生的, 协程抽象于线程, 线程是CPU的最小单元, 从另一个角度看, 线程分割了CPU的执行力, 协程是组织好的代码流程, 协程需要线程执行, 但又不会直接操控线程, 而是借助协程调度器(看源码是借助Interruptor), 调度的协程
协程基础
Hello协程
// GlobalScope启动的线程可能存在问题, 需要添加该注解表示下
@DelicateCoroutinesApi
fun main() {
   // 创建一个全局的协程空间, 该协程的声明周期会直到 app 结束后才会释放, 所以需要注意这点, 该函数更 new Thread 一样
   GlobalScope.launch {
      // 挂起函数, 主线程执行到这里, 会挂起该作用域的协程, 然后主线程跳出该协程作用域
      delay(1000)
      // 等待协程被挂起 1 sec 后, 执行下面代码
      println("${Thread.currentThread()}: 1") // Thread[DefaultDispatcher-worker-1,5,main]: 1
   }
   // 主线程遇到上面的 挂起函数后, 直接跳到这里, 执行打印
   println("${Thread.currentThread()}: 2") // Thread[main,5,main]: 2
   // 主线程等待 2 sec
   Thread.sleep(2000)
}
对上面代码的解读:
delay是挂起函数, 和线程中的Thread.Sleep(...)一样, 但是挂起函数只能给协程执行的, 不能给普通线程执行, 否则会报错遇到挂起函数后, 协程其实还不会被挂起, 除非协程遇到异步调用, 而上面的
delay(1000)恰恰是异步调用, 这里将会产生一个挂起点, 协程将被挂起
在 kotlin 1.5 中
GlobalScope已经被kotlin团队指出存在问题, 所以使用的时候需要注意, 考虑好,GlobalScope申请的协程是否在另一个地方也被使用, 或者你申请的协程是否同时被另一个人使用?GlobalScope申请的协程会跟着app同生共死, 即使你没用再使用它, 它还是在, 并且GlobalScope获取的协程无法cancel取消, 所以需要使用的话请慎重考虑其带来的后果
挂起函数
什么是挂起函数?
在kotlin中 被 suspend 标记的函数叫挂起函数
[外链图片转存失败,源站可能有防盗链机制,建议将图片保存下来直接上传(img-V1dIufNa-1656299923252)(https://gimg2.baidu.com/image_search/src=http%3A%2F%2Fupload-images.jianshu.io%2Fupload_images%2F3994917-421263f1f0e41d16.png&refer=http%3A%2F%2Fupload-images.jianshu.io&app=2002&size=f9999,10000&q=a80&n=0&g=0n&fmt=auto?sec=1650228753&t=a500c9cf960ad108ea0a153fea9154a4)]
private suspend fun f() {}
如果代码反编译成java代码, 就成为:
private static final Object f(Continuation $completion) {
    return Unit.INSTANCE;
}
可以发现 挂起函数 的区别了 Continuation
public interface Continuation<in T> {
    public val context: CoroutineContext
    public fun resumeWith(result: Result<T>) // 将某个步骤的结果传递给 result
}
CoroutineContext可以看成是协程存储部分功能的集合
该接口非常的明显了, 存储的是一个协程上下文和一个用于异步操作结束协程恢复调用使用的函数resumeWith
为什么要使用挂起函数?
协程遇到挂起函数并且遇到异步操作, 协程就会被挂起, 但线程不会被阻塞, 可以去运行其他协程或者处理其他事物
挂起函数, 未必就一定会挂起协程, 只有在挂起函数内部出现异步操作才会被挂起, 我们把挂起函数内部的异步操作叫做挂起点
这样的好处就是这条线程不会被阻塞, 真正阻塞的是协程, 该线程可以继续做其他操作
怎么去除suspend(普通函数怎么调用挂起函数)
我们都知道, 挂起函数有一个接口Continuation, 如果我们要在普通函数中调用挂起函数的话
需要我们定义一个自己的Continuation
比如: 我要在不在 main 函数上头添加suspend关键字的话, 我们可以
fun main() {
	suspend {
		coroutineScope {
			println("${Thread.currentThread().name}: zhazha")
			return@coroutineScope 100
		}
    // 在这里创建一个对象 Continuation
	}.startCoroutineCancellable(object : Continuation<Int> {
		override val context: CoroutineContext
			get() = EmptyCoroutineContext

		override fun resumeWith(result: Result<Int>) {
			println("${Thread.currentThread().name}: ${result.getOrNull()}")
		}
	})
}
但其实上面那种方式也是创建一个协程的方式, 只不过它比较复杂而已, 我们有了更简单的方式创建一个协程
val continuation = suspend {
    log("in coroutine")
    5
}.createCoroutine(object : Continuation<Int> {
    override val context: CoroutineContext
    get() = Dispatchers.IO

    override fun resumeWith(result: Result<Int>) {
        log("resumeWith result = $result")
    }
})

continuation.resume(Unit)
当然你也可以变成创建了个Continuation
直接这么执行:
thread {
    continuation.resume(Unit)
}.join()
如果不在main上添加suspend还可以使用CoroutinesScope去创建
CoroutineScope(Dispatchers.IO).launch {
    coroutineScope {
        println("zhazha")
    }
}
如果你的协程需要等待时,使用
runBlocking的方式
runBlocking: 协程作用域构建
@DelicateCoroutinesApi
fun main() {
   // 下面的 this: CoroutineScope 就是协程作用域
   // 在后台启动⼀个新的协程并继续
   GlobalScope.launch {
      delay(1000) // ⾮阻塞的等待 1 秒钟(默认时间单位是毫秒)
      println("${Thread.currentThread()}: 1") // 在延迟后打印输出
   }
   println("${Thread.currentThread()}: 2") // 协程已在等待, 主线程还在继续执行
   // 另一个协程作用域
   runBlocking {
      // 挂起协程, 但由于 runBlocking 的效果, 里面的子协程必须全部执行完毕才会释放主线程, 所以主线程一直阻塞在 delay(2000)
      delay(2000)
   }
}
runBlocking申请了个协程作用域, 该函数阻塞了主线程, 直到runBlocking作用域内的子协程全部执行结束, 记住是子线程
记笔记:
runBlocking会阻塞主线程, 一般时候没人敢用, 仅仅在测试的时候用用就得了, 一般情况下考虑使用coroutineScope
下面的代码中使用 GlobalScope.launch 将不再是 runBlocking 的子协程, 所以不受 runBlocking 的约束
在源码中你会发现这样:
@DelicateCoroutinesApi
public object GlobalScope : CoroutineScope {
/**
     * Returns [EmptyCoroutineContext].
     */
    override val coroutineContext: CoroutineContext
        get() = EmptyCoroutineContext
}
可以看出
GlobalScope有自己的协程上下文, 而我们的runBlocking他有自己的协程上下文, 这俩协程上下文压根不同, 所以runBlocking无法阻塞GlobalScope启动的协程
@DelicateCoroutinesApi
// 申请一个阻塞执行线程的协程作用域
fun main() = runBlocking {
   // 使用全局协程执行下面代码
   GlobalScope.launch {
      // 挂起函数, 挂起了协程
      delay(1000)
      // 挂起完毕后, 线程开始执行下面的打印
      println("${Thread.currentThread()}: 1")
   }
   // 主线程执行打印
   println("${Thread.currentThread()}: 2")
   // 主线程挂起等待
   delay(2000)
}
所以上面的delay(2000)如果被注释掉, 则主线程直接退出
如果是这样:
fun main() = runBlocking {
   launch {
      delay(1000)
      println("${Thread.currentThread()}: 1")
   }
   println("${Thread.currentThread()}: 2")
}
则, 主线程会等待 launch 函数的子线程结束
如果需要 GlobalScope.launch 被主线程等待, 则需要把返回值的 Job 提出来, 然后job.join()
等待协程结束(job)
@DelicateCoroutinesApi
// 由于 job.join() 是挂起函数, 所以调用该挂起函数的函数也要是挂起函数
suspend fun main() {
   val job = GlobalScope.launch {
      delay(1000)
      println("${Thread.currentThread()}: 1")
   }
   println("${Thread.currentThread()}: 2")
   job.join()
}
在前面
GlobalScope.launch中, 我们发现其实类似于我们启动一个Thread线程, 他是全局的, 不能够监管的, 所以还是尽量少用GlobalScope.launch这种全局方式
结构化并发
fun main(): Unit = runBlocking {
	println("${Thread.currentThread().name}: 0")
	launch {
		println("${Thread.currentThread().name}: 1")
		launch {
			println("${Thread.currentThread().name}: 2")
		}
	}
	launch {
		println("${Thread.currentThread().name}: 3")
	}
}
main @coroutine#1: 0
main @coroutine#2: 1
main @coroutine#3: 3
main @coroutine#4: 2
[外链图片转存失败,源站可能有防盗链机制,建议将图片保存下来直接上传(img-4IabxZvY-1656299923256)(https://gimg2.baidu.com/image_search/src=http%3A%2F%2Fcdn.ancii.com%2Farticle%2Fimage%2Fv1%2FQj%2Fzb%2FRO%2FORzjbQVFJasX5aR2DaTg2_Zx5KSH75KdTtVIpx5BAia9LyPTgZZSHVXLmD0EXF8rqx7I6wNKrfm8sZfDDWa_VVi2VTSs7pccZdNATAby1js.jpg&refer=http%3A%2F%2Fcdn.ancii.com&app=2002&size=f9999,10000&q=a80&n=0&g=0n&fmt=auto?sec=1650383334&t=4d9ef356fbf0c3ef35200847fe8bf1d3)]
我们还可以用下面这段代码看看, kotlin协程底层怎么设计的
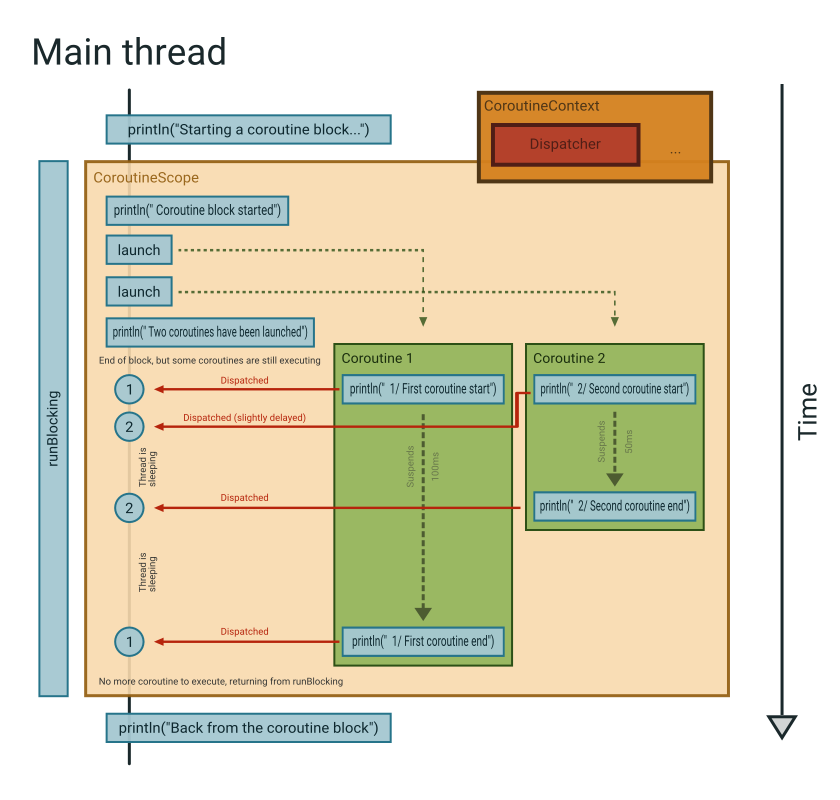
fun main() {
    println("Starting a coroutine block...") // 启动一个父协程, 并且开启协程作用域
    runBlocking {
        println(" Coroutine block started") // 协程作用域开始位置
        launch {
            println("  1/ First coroutine start") // 启动子协程
            delay(100) // 延迟挂起 100ms
            println("  1/ First coroutine end") // 第一个子协程结束
        }
        launch {
            println("  2/ Second coroutine start") // 第二个子协程
            delay(50) // 延迟挂起 50 ms
            println("  2/ Second coroutine end") // 第二个子协程结束
        }
        println(" Two coroutines have been launched") // 协程作用域结束
    }
    println("Back from the coroutine block") // 结束
}
Starting a coroutine block…
 Coroutine block started
 Two coroutines have been launched
  1/ First coroutine start
  2/ Second coroutine start
  2/ Second coroutine end
  1/ First coroutine end
Back from the coroutine block
这样上面的 runBlocking 就能够控制内部的子协程, 直到子协程结束, 线程才会退出该协程作用域
coroutineScope: 作用域构建
除了上面的 runBlocking 外, kotlin 还提供了coroutineScope 用于构建协程作用域
coroutineScope 和 runBlocking 一样, 会保证协程作用域内的子协程执行完毕后, 才会结束该作用域
suspend fun main() {
   println("1")
   coroutineScope {
      delay(1000)
      println("2")
   }
   println("3")
}
runBlocking 和 coroutineScope 的区别
runBlocking 会阻塞主线程在该协程作用域中, 而 coroutineScope 不会, 他是挂起函数, 不会阻塞线程, 而会释放线程, 用于其他用途使用, 但是如果释放的线程此时没事干, 还是会滞留在 coroutineScope 作用域内, 只不过该线程随时有空罢了
假设上面的主线程是
UI线程的话, 你还使用runBlocking, 完蛋了,UI线程阻塞,app卡顿. 但是我学kotlin不是用于android所以读者自测
协程的取消与超时
fun main() {
   val scope = CoroutineScope(Dispatchers.Unconfined)
   scope.launch {
      repeat(100000) {
         delay(1000) // 因为有延迟中断操作才会取消
         println("ping")
      }
   }
   TimeUnit.SECONDS.sleep(6)
   scope.cancel()
}
如果协程执行的是
CPU 密集计算的话, 则取消不会生效
fun main() = runBlocking {
	val startTime = System.currentTimeMillis()
	val  job = launch(Dispatchers.Default) {
		var nextPrintTime = startTime
		var i = 0
		while (i < 10) {
			if (System.currentTimeMillis() >= nextPrintTime) {
				println("job: I'm sleeping ${i++} ...")
				nextPrintTime += 500L
			}
		}
	}
	delay(1300L)
	println("main: I'm tired of waiting!")
	job.cancelAndJoin()
	println("main: Now I can quit.")
}
注意, 只要协程没有进入协程的异步操作, 也不会让协程结束
协程遇到
Thread.current.Sleep(500)也不会导致协程去修改isActive属性,因为这段代码sleep的是线程而不是协程
结束计算中协程的方式
可以使用 isActive 让计算中的协程停止:
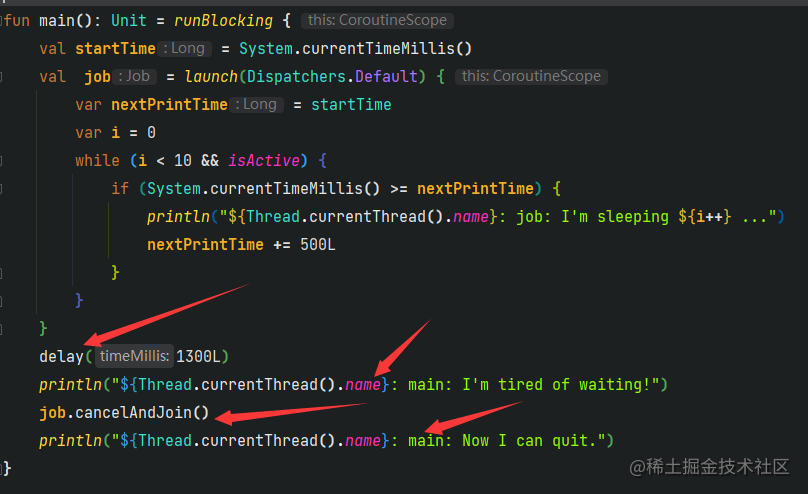
fun main(): Unit = runBlocking {
	val startTime = System.currentTimeMillis()
	val  job = launch(Dispatchers.Default) {
		var nextPrintTime = startTime
		var i = 0
		while (i < 10 && isActive) {
			if (System.currentTimeMillis() >= nextPrintTime) {
				println("job: I'm sleeping ${i++} ...")
				nextPrintTime += 500L
			}
		}
	}
	delay(1300L)
	println("main: I'm tired of waiting!")
	job.cancelAndJoin()
	println("main: Now I can quit.")
}
如果我们修改成下面的代码, 则协程不会退出
fun main(): Unit = runBlocking {
	val startTime = System.currentTimeMillis()
	val job = launch {
		var nextPrintTime = startTime
		var i = 0
		while (isActive) {
			if (System.currentTimeMillis() >= nextPrintTime) {
				println("${Thread.currentThread().name}: I'm sleeping ${i++} isActive = $isActive...")
				nextPrintTime += 500L
			}
		}
	}
	delay(1300L)
	println("${Thread.currentThread().name}: I'm tired of waiting!")
	job.cancelAndJoin()
	println("${Thread.currentThread().name}: Now I can quit.")
}
将代码中的 while(i < 10) 和 协程的 Dispatcher.Default 去掉
这里的 main 协程不会有时间停止下来执行下面这段代码:
delay(1300L)
println("${Thread.currentThread().name}: I'm tired of waiting!")
job.cancelAndJoin()
println("${Thread.currentThread().name}: Now I can quit.")
为什么会这样?
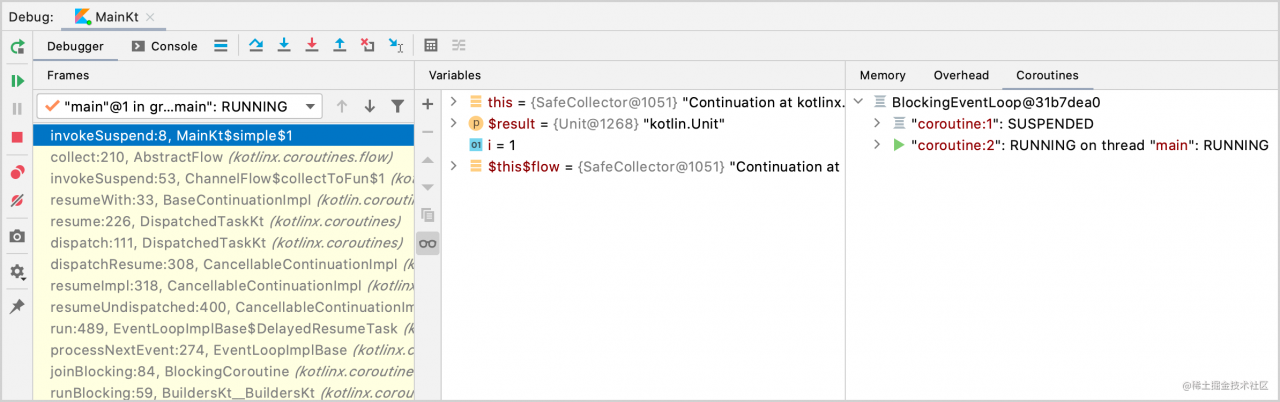
我们给jvm添加参数 -ea 让 kotlin 进入调试模式
![]()
此时,我们将看到这样的打印:
main @coroutine#2: I'm sleeping 0 isActive = true...
main @coroutine#2: I'm sleeping 1 isActive = true...
main @coroutine#2: I'm sleeping 2 isActive = true...
我们可以很直观的发现,一直都是我们的 main @coroutine#2 协程在执行
而我们前面能够正常退出的代码呢?
DefaultDispatcher-worker-1 @coroutine#2: job: I'm sleeping 0 ...
DefaultDispatcher-worker-1 @coroutine#2: job: I'm sleeping 1 ...
DefaultDispatcher-worker-1 @coroutine#2: job: I'm sleeping 2 ...
main @coroutine#1: main: I'm tired of waiting!
main @coroutine#1: main: Now I can quit.
这里能够保证 cancelAndJoin 这段代码有另一个线程的另一个协程在执行
然后我们把 while(i < 6) 代码添加上去
fun main() = runBlocking {
   val startTime = System.currentTimeMillis()
   val  job = launch {
      var nextPrintTime = startTime
      var i = 0
      while (i < 6 && isActive) {
         if (System.currentTimeMillis() >= nextPrintTime) {
            println("job: I'm sleeping ${i++} ...")
            nextPrintTime += 500L
         }
      }
   }
   delay(1300L)
   println("main: I'm tired of waiting!")
   job.cancelAndJoin()
   println("main: Now I can quit.")
}
job: I'm sleeping 0 ...
job: I'm sleeping 1 ...
job: I'm sleeping 2 ...
job: I'm sleeping 3 ...
job: I'm sleeping 4 ...
job: I'm sleeping 5 ...
main: I'm tired of waiting!
main: Now I can quit.
诶,可以正常停止,为什么会这样?
很简单,i 的条件满足了,而且 job 打印多了不是? 明显不是协程 cancel 导致的线程结束
这里可能还会有一个需要纠结的问题点:
上图中 delay 不是挂起的协程么?线程不是没挂起么?
为什么后面的 三行 代码不会被线程执行呢?
而是变成线程在 delay 这里等待么? 那岂不是阻塞了线程? 矛盾是不是?
答案很简单, delay 虽然挂起的协程,但你没告诉kotlin delay 内部真正的延迟代码到底是哪个线程执行?
所以最后还是 main 线程 在执行 delay 的等待
在 finally 中释放资源
fun main(): Unit = runBlocking {
	val job = launch {
		try {
			repeat(1000) {
				println("${Thread.currentThread()}: job: I'm sleeping $it ...")
				delay(500)
			}
		} finally {
			repeat(1000) {
				println("${Thread.currentThread()}: I'm running finally ${it}")
			}
		}
	}
	delay(1300)
	job.cancelAndJoin()
	println("${Thread.currentThread()} is finished")
}
Thread[main,5,main]: job: I'm sleeping 0 ...
Thread[main,5,main]: job: I'm sleeping 1 ...
Thread[main,5,main]: job: I'm sleeping 2 ...
Thread[main,5,main]: I'm running finally 0
Thread[main,5,main]: I'm running finally 1
Thread[main,5,main]: I'm running finally ...
Thread[main,5,main]: I'm running finally 998
Thread[main,5,main]: I'm running finally 999
Thread[main,5,main] is finished
一千次循环, 每次循环延迟500ms, 等待1300ms, 所以它会打印3次(println先打印的, 所以3次), 等到1300ms后, job被取消后, 协程就退出了, 此时finally还会执行
还是那句话, 协程执行代码都来不及, 怎么会有时间执行下面的
cancelAndJoin函数呢?
为什么会这样呢?
前面说的过, 协程在执行计算密集型代码时, 协程不会被结束
repeat(1000) {
    if (isActive) {
        println("${Thread.currentThread()}: I'm running finally ${it}")
    } else {
        return@repeat
    }
}
我们添加上面这样的代码, 协程直接被退出
不能取消的代码块NonCancellable
- 为什么需要它?
看下面这段代码:
fun main() = runBlocking {
   val job = launch {
      try {
         repeat(1000) {
            println("${Thread.currentThread()}: I'm sleeping $it ...")
            delay(500)
         }
      } finally {
         println("${Thread.currentThread()}: I'm running finally")
         delay(1000L)
         println("${Thread.currentThread()}: And I've just delayed for 1 sec because I'm non-cancellable")
      }
   }
   delay(1000)
   println("${Thread.currentThread()}: I'm tired of waiting!")
   job.cancelAndJoin()
   println("${Thread.currentThread()}: Now I can quit.")
}
你会发现println("${Thread.currentThread()}: And I've just delayed for 1 sec because I'm non-cancellable") 这段代码不执行, 说明协程虽然收到了cancel指示, 将标志修改为isActive == false状态, 但此时协程还有任务需要进行, 不会立即取消, 当协程遇到delay函数被挂起, 一被挂起就会被cancelAndJoin函数的Join功能认为协程已经处理结束, 直接强制执行cancel功能结束掉协程
解决方案是添加协程功能NonCancellable
fun main() = runBlocking {
   val job = launch {
      try {
         repeat(1000) {
            println("${Thread.currentThread()}: I'm sleeping $it ...")
            delay(500)
         }
      } finally {
         withContext(NonCancellable) {
            println("${Thread.currentThread()}: I'm running finally")
            delay(1000L)
            println("${Thread.currentThread()}: And I've just delayed for 1 sec because I'm non-cancellable")
         }
      }
   }
   delay(1300)
   println("${Thread.currentThread()}: I'm tired of waiting!")
   job.cancelAndJoin()
   println("${Thread.currentThread()}: Now I can quit.")
}
这种方式可以让协程正在执行NonCancellable标记的代码时, 不会被cancel掉
超时取消(使用时间延迟的方式取消协程)
前面的
Executors.newScheduledThreadPool(1).schedule代码去延迟1300L毫秒, 在这里我们也可以使用
@Test
fun test07() = runBlocking {
    val result = withTimeout(1300L) {
        repeat(1000) {
            println("${Thread.currentThread().name}: I'm sleeping ...")
            delay(500L)
        }
        "Done"
    }
    println(result)
}
但是这种方式会报错一个错误
main @coroutine#1: I'm sleeping ...
main @coroutine#1: I'm sleeping ...
main @coroutine#1: I'm sleeping ...
kotlinx.coroutines.TimeoutCancellationException: Timed out waiting for 1300 ms
withTimeout还有返回值, 但是上面的代码并没有得到返回值
我们还可以用withTimeoutOrNull 这样就不会报错了
@Test
fun test08() = runBlocking {
    val result = withTimeoutOrNull(1300L) {
        repeat(1000) {
            println("${Thread.currentThread().name}: I'm sleeping ...")
            delay(500L)
        }
        "Done"
    }
    println(result)
}
main @coroutine#1: I'm sleeping ...
main @coroutine#1: I'm sleeping ...
main @coroutine#1: I'm sleeping ...
null
直接打印出了 null
组合挂起函数
async 并发
suspend fun doSomethingUsefulOne(): Int {
    delay(1000)
    return 13
}

suspend fun doSomethingUsefulTwo(): Int {
    delay(1000)
    return 14
}

suspend fun main(): Unit = coroutineScope {
    val time1 = measureTimeMillis {
        val one = doSomethingUsefulOne()
        val two = doSomethingUsefulTwo()
        println(one + two)
    }
    println("$time1 ms")

    val time02 = measureTimeMillis {
        val one = async { doSomethingUsefulOne() }
        val two = async { doSomethingUsefulTwo() }
        println("${one.await() + two.await()}")
    }
    println("$time02 ms")
}
上面这段函数将 两个 协程子任务 的
delay做了同步延迟, 这样最多只要等待一秒时间就延迟结束了, 但如果是串行执行的话, 则需要delay两秒
async 和 launch 的区别在于, async 可以接收其内部 作用域 的返回值
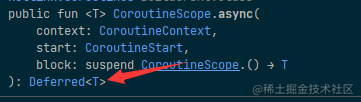
多了个
public suspend fun await(): T
函数, 用于接受返回值
延迟启动 async(CoroutineStart.LAZY)
private suspend fun doSomethingUsefulOne(): Int {
    delay(1000)
    return 13
}

private suspend fun doSomethingUsefulTwo(): Int {
    delay(1000)
    return 14
}

fun main(): Unit = runBlocking {
    val time = measureTimeMillis {
        // 协程延迟运行
        val one = async(start = CoroutineStart.LAZY) { doSomethingUsefulOne() }
        val two = async(start = CoroutineStart.LAZY) { doSomethingUsefulTwo() }
        // 协程在这里正式启动
        one.start()
        two.start()
        // 等待两个协程任务执行完毕
        println("I answer is ${one.await() + two.await()}")
    }
    println("Completed in $time ms")
}
异步风格的函数
@DelicateCoroutinesApi
fun somethingUsefulOneAsync() = GlobalScope.async {
    doSomethingUsefulOne()
}

@DelicateCoroutinesApi
fun somethingUsefulTwoAsync() = GlobalScope.async {
    doSomethingUsefulTwo()
}

@DelicateCoroutinesApi
suspend fun main() {
    val time = measureTimeMillis {
        val one = somethingUsefulOneAsync()
        val two = somethingUsefulTwoAsync()
        println("The answer is ${one.await() + two.await()}")
    }
    println("Completed in $time ms")
}
上面的编写协程的方式不被推荐
因为需要somethingUsefulOneAsync和somethingUsefulTwoAsync的结果来计算
如果One函数失败, 则Two函数也不能执行, 反之亦然
但是在上面的代码中, 可能会出现 One 出现异常, 但是被全局异常捕获了, 虽然 One 函数不再执行, 但是不影响程序执行 Two函数, 该执行的还是会继续执行
所以我们需要一个协程作用域框住这两个函数, 这样就能做到多个协程的原子性, 也就是所谓的一荣俱荣, 一耻具耻
这种情况我没有合适的环境演示, 交给你们了, 不过在没有所谓的全局异常捕获器时, 不会发生上面的问题, 不过既然
One和Two两个业务的代码有严重的依赖, 肯定是需要一个类似事务一样的功能管理下的
那么要解决上面问题的方法就很简单了, 给个更大的协程作用域将One和Two包裹起来就好
异步结构化并发
suspend fun concurrentSum() : Int = coroutineScope {
    val one = async { doSomethingUsefulOne() }
    val two = async { doSomethingUsefulTwo() }
    one.await() + two.await()
}

suspend fun main()  {
    val measureTimeMillis = measureTimeMillis {
        println(concurrentSum())
    }
    println("$measureTimeMillis ms")
}
在 kotlin 中, 推荐使用上面这种方式
这样做的好处是, 在 coroutineScope 作用域内的所有协程, 只要在该作用域内抛出了异常, 就会取消该作用域内的所有协程
这种方式如果内部有个协程不能因为一个异常终止, 可以考虑使用前面的 ### 不能取消的协程
withContext(NonCancellable)
suspend fun concurrentSum(): Int = coroutineScope {
    val one = async { doSomethingUsefulOne() }
    val two = async { doSomethingUsefulTwo() }
    launch {
        withContext(NonCancellable) {
            repeat(3) {
                delay(1000)
                println("delay 1 sec")
            }
        }
    }
    launch {
        println("抛出运行时异常终止协程")
        throw RuntimeException("抛出运行时异常终止协程")
    }
    one.await() + two.await()
}

suspend fun main() {
    val measureTimeMillis = measureTimeMillis {
        println(concurrentSum())
    }
    println("$measureTimeMillis ms")
}
最终的输出结果是:
抛出运行时异常终止协程
delay 1 sec
delay 1 sec
delay 1 sec
Exception in thread "main" java.lang.RuntimeException: 抛出运行时异常终止协程
结果显示, 不会立即结束该作用域, 而是等到 延迟3秒后, 再抛出
协程上下文调度器
协程上下文(当作ArrayList类似的集合就好)
协程的上下文是
CoroutineContext它负责在协程的调度过程中存储一些中间元素, 而他的主要元素是Job、调度器(coroutine dispatcher)、协程的名字(CoroutineName) 和 协程异常(CoroutineExceptionHandler), 它可以做 加法 减法 组合
我们可以把协程上下文调度器看作是一个集合, 一个容器, 里面存放的
Job、调度器(coroutine dispatcher)、协程的名字(CoroutineName) 和 协程异常(CoroutineExceptionHandler)
[外链图片转存失败,源站可能有防盗链机制,建议将图片保存下来直接上传(img-GCfvQoaE-1656299923275)(https://gimg2.baidu.com/image_search/src=http%3A%2F%2Fupload-images.jianshu.io%2Fupload_images%2F1211741-0bcfd77e12d83378.png&refer=http%3A%2F%2Fupload-images.jianshu.io&app=2002&size=f9999,10000&q=a80&n=0&g=0n&fmt=auto?sec=1650228753&t=35a01b0990cfa57f33b5453a9fbe1169)]
调度器和线程
调度器的主要作用是将协程安排给线程执行, 至于是哪个线程, 由调度器决定, 它可以限制协程在一个特定的线程中执行, 或将它分派给一个线程池执行又或者是不受任何限制的执行
所有的协程构建器launch或者async都有一个参数叫CoroutineContext, 主要的目的是分派哪个类型的调度器给构建器使用
@ExperimentalCoroutinesApi
fun main(): Unit = runBlocking {
    // 前面的数字是打印的顺序
    launch { // 运⾏在⽗协程的上下⽂中,即 runBlocking 主协程
        // 3 main runBlocking      : I'm working in thread main
        println("main runBlocking      : I'm working in thread ${Thread.currentThread().name}")
    }
    launch(Dispatchers.Unconfined) { // 不受限的 -- 将⼯作在主线程中
        // 1 Unconfined            : I'm working in thread main
        println("Unconfined            : I'm working in thread ${Thread.currentThread().name}")
    }
    launch(Dispatchers.Default) { // 将会获取默认调度器 DefaultDispatcher
        // 2 Default               : I'm working in thread DefaultDispatcher-worker-1
        println("Default               : I'm working in thread ${Thread.currentThread().name}")
    }
    val context = newSingleThreadContext("MyOwnThread")
    launch(context) { // 将使它获得⼀个新的线程, 该线程是专属线程, 当线程资源非常昂贵, 如果不再使用, 则需要 close 掉
        // 4 newSingleThreadContext: I'm working in thread MyOwnThread
        println("newSingleThreadContext: I'm working in thread ${Thread.currentThread().name}")
    }
    //
    context.close()
}
打印详情都在注释里了
Unconfined            : I'm working in thread main
Default               : I'm working in thread DefaultDispatcher-worker-1
main runBlocking      : I'm working in thread main
newSingleThreadContext: I'm working in thread MyOwnThread
我们依次分析:
launch { …… }: 其中的协程上下文(和调度器)继承自runBlocking的上下文Dispatchers.Unconfined: 一个特殊的调度器, 它的特点是不指定协程必须在哪个线程执行, 来者不拒, 哪个线程执行它, 它就是哪个线程在执行launch(Dispatchers.Default): 与GlobalScope.launch使用的相同的线程池newSingleThreadContext: 使用这种方式, 将会创建一个专属线程, 用于协程的执行, 但是线程是个比较昂贵的资源, 所以如果不再使用了, 这种方式的线程需要close掉, 或者设计成顶层属性, 给整个系统使用
线程池作为调度器
@DelicateCoroutinesApi
suspend fun main() {
   var i = 0
   Executors.newFixedThreadPool(5).asCoroutineDispatcher().use {dispatcher ->
      List(1000) {
         GlobalScope.launch(dispatcher) {
            log(i++)
         }
      }.forEach {
         it.join()
      }
   }
   TimeUnit.SECONDS.sleep(1)
   log("i = $i")
}
看到上面这段代码, 你是否对调度器有了新的认识???
⾮受限调度器 vs 受限调度器
当协程调度器是 Dispatchers.Unconfined 时, 调度器不会执行协程在特定种类的线程中运行, 如果是受限调度器的话, 执行之前是 IO 线程, 挂起恢复之后还是 IO 线程执行
非受限调度器是 => 假设协程挂起前运行协程的线程是
t1, 在协程挂起恢复后运行协程的线程可能是t1也可能是别的任意协程
fun main() = runBlocking<Unit> {
    launch(Dispatchers.Unconfined) {
        println("Unconfined      : I'm working in thread ${Thread.currentThread().name}")
        delay(500)
        println("Unconfined      : After delay in thread ${Thread.currentThread().name}")
    }
    launch {
        println("main runBlocking: I'm working in thread ${Thread.currentThread().name}")
        delay(1000)
        println("main runBlocking: After delay in thread ${Thread.currentThread().name}")
    }
}
最终他会输出:
Unconfined      : I'm working in thread main @coroutine#2
main runBlocking: I'm working in thread main @coroutine#3
Unconfined      : After delay in thread kotlinx.coroutines.DefaultExecutor @coroutine#2
main runBlocking: After delay in thread main @coroutine#3
看到了没? 因为 Unconfined 做了个 delay 之后线程就变了, 而对照组没有任何的变化, 还是 main 线程在执行
为什么会变化呢? 因为协程在遇到 delay 之后main就已经去执行别的任务了, 剩下的事情由执行挂起函数的线程在执行kotlinx.coroutines.DefaultExecutor, 等到Unconfined协程恢复之后, 随机安排线程执行该协程
还有很多方式证明上面这条特性:
fun main() = runBlocking<Unit> {
    launch(Dispatchers.Unconfined) {
        println("Unconfined      : I'm working in thread ${Thread.currentThread().name}")
        withContext(Dispatchers.IO) {}
        println("Unconfined      : After delay in thread ${Thread.currentThread().name}")
    }
    launch {
        println("main runBlocking: I'm working in thread ${Thread.currentThread().name}")
        withContext(Dispatchers.IO) {}
        println("main runBlocking: After delay in thread ${Thread.currentThread().name}")
    }
}
Unconfined      : I'm working in thread main
Unconfined      : After delay in thread DefaultDispatcher-worker-1
main runBlocking: I'm working in thread main
main runBlocking: After delay in thread main
如果是受限调度器执行的协程, 在协程挂起前面都是同一个线程
但, 如果是非受限调度器, 则挂起前后不是同一个线程
调试协程和线程
协程可以在一个线程上挂起在另一个线程上恢复, ide可没这么智能, 没办法全程跟踪发现协程某时某刻到底在干啥
使用 idea 特殊插件调试
使用Coroutine调试器,你可以:
- 检查每个
Coroutine的状态 - 查看运行和挂起的
Coroutines的局部变量和捕获变量的值 - 查看完整的协程创建栈以及协程内部的调⽤栈。栈包含所有带有变量的栈帧,甚⾄包含那些在标准调试期间会丢失的栈帧
- 获取包含每个协程的状态以及栈信息的完整报告。要获取它,请右键单击
Coroutines选项卡,然后点击Get Coroutines Dump
打印日志的方式调试
没什么好说的, print or log 把想要打印出来的信息打印出来完事
kotlin 为了用户更好的使用日志调试, 增加了 -Dkotlinx.coroutines.debug 参数
suspend fun doSomething() {
    withContext(Dispatchers.IO) {
        println("IO      :  2 ${Thread.currentThread().name}")
    }
}

fun main(): Unit = runBlocking {
    println("main: 0 ${Thread.currentThread().name}")
    launch(Dispatchers.Unconfined) {
        println("Unconfined      : 1 ${Thread.currentThread().name}")
        doSomething()
        println("Unconfined      : 3 ${Thread.currentThread().name}")
    }
}
使用前:
main: 0 main
Unconfined      : 1 main
IO      :  2 DefaultDispatcher-worker-1
Unconfined      : 3 DefaultDispatcher-worker-1
使用后:
main: 0 main @coroutine#1
Unconfined      : 1 main @coroutine#2
IO      :  2 DefaultDispatcher-worker-1 @coroutine#2
Unconfined      : 3 DefaultDispatcher-worker-1 @coroutine#2
会发现多出了 @coroutine#1 @coroutine#2 之类的字符, 这些就是协程标识符, 其中@coroutine#1就是主协程, 由 runBlocking 给予, 而 @coroutine#2 是子协程
标识符只有在调试模式才能出现, 除了
-Dkotlinx.coroutines.debug外, 给VM增加-ea参数也能进入调试模式, 也可以打印出协程的名字
一个协程在多个线程之间跳转
fun log(msg: String) = println("[${Thread.currentThread().name}] $msg")

@ExperimentalCoroutinesApi
fun main() {
    newSingleThreadContext("ctx1").use { ctx1 ->
        newSingleThreadContext("ctx2").use { ctx2 ->
            runBlocking(ctx1) {
                log("Started in ctx1")
                withContext(ctx2) {
                    log("Working in ctx2")
                }
                log("Back to ctx1")
            }
        }
    }
}
[ctx1 @coroutine#1] Started in ctx1
[ctx2 @coroutine#1] Working in ctx2
[ctx1 @coroutine#1] Back to ctx1
他展示了同一个协程在不同线程间执行的情况, 并且 上面使用了 use , 这样 newSingleThreadContext 申请的线程不用我们手动 close
子协程
当父协程被取消之后, 子协程都会递归取消
@Test
fun test02() = runBlocking {
    val request = launch {
        val job1 = launch {
            println("job1: I have my own context and execute independently!")
            delay(1000)
            println("job1: I am not affected by cancellation of the request")
        }
        val job2 = launch(coroutineContext) {
            delay(100)
            println("job2: I am a child of the request coroutine")
            delay(1000)
            println("job2: 父协程被取消, 这一行不会执行")
        }
        job1.join()
        job2.join()
    }
    delay(500)
    request.cancel()
    delay(1000)
    println("main: Who has survived request cancellation?")
}
job1: I have my own context and execute independently!
job2: I am a child of the request coroutine
main: Who has survived request cancellation?
为协程取名
fun main():Unit = runBlocking(CoroutineName("main")) {
    log("1")
    val v1 = async(CoroutineName("v1 coroutine")) {
        delay(500)
        log("2")
        255
    }
    val v2 = async(CoroutineName("v2 coroutine")) {
        delay(1000)
        log("3")
        7
    }
    log("4 result = ${v1.await() + v2.await()}")
}
组合协程上下⽂中的元素
fun main(): Unit = runBlocking {
    launch(Dispatchers.Default + CoroutineName("test")) {
        log("1")
    }
}
组合上下文, 将协程名字改成 test
[DefaultDispatcher-worker-1 @test#2] 1
协程的上下文继承
如果新的协程在另一个协程的CoroutineScope 中创建, 则我们成新协程叫子协程, 而另一个协程叫父协程, 此时子协程上下文除Job 外都会继承至父协程, 而Job将会是父协程Job 的子作业, 但Job 是新的
fun main(): Unit = runBlocking {
   val scope = CoroutineScope(Dispatchers.IO + Job() + CoroutineName("test"))
   val job = scope.launch {
      log("1 ${coroutineContext[Job]}")
      launch {
         log("2 ${coroutineContext[Job]}")
      }
   }
   job.join()
}
[DefaultDispatcher-worker-1 @test#2] 1 "test#2":StandaloneCoroutine{Active}@3eb7ab0f
[DefaultDispatcher-worker-3 @test#3] 2 "test#3":StandaloneCoroutine{Active}@33bb030c
线程本地数据
我们知道 ThreadLocal 其实是在 Thread 中定义的一个变量Map, 使得该Map和我们的线程绑定在一起
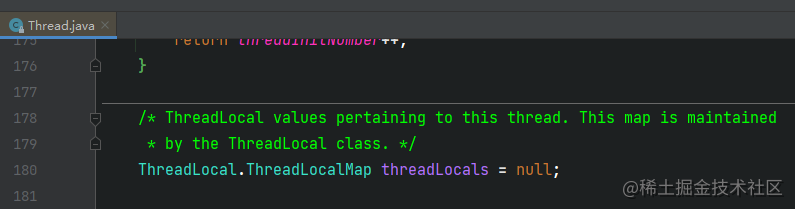
只要我们 new 出一个 Thread 线程, 那么就会有一个 threadLocals的字段,但这个字段可能是 null, 如果我们调用了 Threadlocal 的 set、get 方法时才会创建他
不过讨论这个没啥用,但是我们可以借助这种方法,将 ThreadLocal 绑定在 协程 上, why?为什么要这么玩?
这里需要注意,kotlin的协程和线程可不是一对一的,是多对多
可能出现 协程1 此刻绑定 线程1 下一刻 协程1 便绑定于 线程2
这样令 ThreadLocal 很难做啊。。。

val threadLocal: ThreadLocal<String?> = ThreadLocal<String?>()

fun main(): Unit = runBlocking {
    threadLocal.set("main")
    log("1 ${threadLocal.get()}")
    val job = launch(Dispatchers.Default + threadLocal.asContextElement("launch")) {
        log("2 ${threadLocal.get()}")
        yield()
        log("3 ${threadLocal.get()}")
    }
    job.join()
    log("4 ${threadLocal.get()}")
}
[main @coroutine#1] 1 main
[DefaultDispatcher-worker-1 @coroutine#2] 2 launch
[DefaultDispatcher-worker-2 @coroutine#2] 3 launch
[main @coroutine#1] 4 main
请注意:
[DefaultDispatcher-worker-1 @coroutine#2] 2 launch
[DefaultDispatcher-worker-2 @coroutine#2] 3 launch
在不同的 Thread 有着相同的 ThreadLocal 值
但会出现新的问题, 协程无法判断 ThreadLocal 此时是否还是可用的, 是不是该协程可以访问的存在, 所以 kotlin 提供了一个方法
threadLocal.ensurePresent()
检测 ThreadLocal 是否存在于当前的协程上下文中, 如果不存在则抛出异常 IllegalStateException
ThreadLocal还有个有⼀个关键限制,即:当⼀个线程局部变量变化(注意不是协程改变的)时,则这个新值不会传播给协程调⽤者(因为上下⽂元素⽆法追踪所有ThreadLocal对象访问),并且下次挂起时更新的值将丢失
拦截器
扩展知识, 本篇幅新手最好别看, 等学的差不多开始分析源码了, 再来
拦截器的作用是什么?
在kotlin中的拦截器可以拦截恢复调用, 所以也可以拦截我们的协程, 将协程交给我们想要的线程执行
拦截器怎么用?
fun main(): Unit = runBlocking {
	launch(LogInterceptor()) {
		log("launch ...")
	}
}

class LogInterceptor : ContinuationInterceptor {
	override val key: CoroutineContext.Key<*>
		get() = ContinuationInterceptor

	override fun <T> interceptContinuation(continuation: Continuation<T>): Continuation<T> {
		return LogContinuation(continuation)
	}
}

class LogContinuation<T>(private val continuation: Continuation<T>) : Continuation<T> {
	override val context: CoroutineContext
		get() = continuation.context

	override fun resumeWith(result: Result<T>) {
		log("intercept before")
		continuation.resumeWith(result)
		log("intercept after")
	}
}
首先我们需要知道 Continuation 是什么?
public interface Continuation<in T> {
    public val context: CoroutineContext

    public fun resumeWith(result: Result<T>)
}
会发现, 他有一个接口, 存放了一个协程上下文和resumeWith函数, 看这接口大概的用处应该是为了回调使用的
现在我们适量的往 源码 里探下,
从 launch 函数开始分析:
public fun CoroutineScope.launch(
    context: CoroutineContext = EmptyCoroutineContext,
    start: CoroutineStart = CoroutineStart.DEFAULT,
    block: suspend CoroutineScope.() -> Unit
): Job {
    // 组合协程上下文 , 这里可以把 CoroutineContext 当作一个 ArrayList
    val newContext = newCoroutineContext(context)
    val coroutine = if (start.isLazy)
        LazyStandaloneCoroutine(newContext, block) else
        StandaloneCoroutine(newContext, active = true)
    coroutine.start(start, coroutine, block)
    return coroutine
}
我们的 LogInterceptor 被存放在 context 中, 现在我们只要跟着它走, 就一定能找到 ContinuationInterceptor 拦截的关键时刻
上面那段代码记住 start: CoroutineStart = CoroutineStart.DEFAULT, 这段代码, 用户后续判断
newContext 我们可以将其当作 ArrayList, 用于组合多个 Element 参数 (前面说过的, 协程上下文可以组合的)
下面是协程上下文组合的函数, 可以不用看
public operator fun plus(context: CoroutineContext): CoroutineContext =
    if (context === EmptyCoroutineContext) this else // fast path -- avoid lambda creation
        context.fold(this) { acc, element ->
            val removed = acc.minusKey(element.key)
            if (removed === EmptyCoroutineContext) element else {
                // make sure interceptor is always last in the context (and thus is fast to get when present)
                val interceptor = removed[ContinuationInterceptor]
                if (interceptor == null) CombinedContext(removed, element) else {
                    val left = removed.minusKey(ContinuationInterceptor)
                    if (left === EmptyCoroutineContext) CombinedContext(element, interceptor) else
                        CombinedContext(CombinedContext(left, element), interceptor)
                }
            }
        }
回到核心需要分析的代码
核心代码在这里 coroutine.start(start, coroutine, block) 我们跟进去看看, 记住第二个参数里面存着我们的 LogInterceptor 拦截器的
internal fun <T, R> startCoroutineImpl(
    start: CoroutineStart,
    receiver: R,
    completion: Continuation<T>,
    onCancellation: ((cause: Throwable) -> Unit)?,
    block: suspend R.() -> T
) = when (start) {
    CoroutineStart.DEFAULT -> block.startCoroutineCancellable(receiver, completion, onCancellation)
    CoroutineStart.ATOMIC -> block.startCoroutine(receiver, completion)
    CoroutineStart.UNDISPATCHED -> block.startCoroutineUndispatched(receiver, completion)
    CoroutineStart.LAZY -> Unit // will start lazily
}
前面我们记住的代码: start: CoroutineStart = CoroutineStart.DEFAULT 你看这不是对上了么? 走的
CoroutineStart.DEFAULT -> block.startCoroutineCancellable(receiver, completion, onCancellation)
最终我们找到了这段代码:
internal fun <R, T> (suspend (R) -> T).startCoroutineCancellable(
    receiver: R, completion: Continuation<T>,
    onCancellation: ((cause: Throwable) -> Unit)? = null
) =
    runSafely(completion) {
        createCoroutineUnintercepted(receiver, completion).intercepted().resumeCancellableWith(Result.success(Unit), onCancellation)
    }
createCoroutineUnintercepted 没办法分析, 不过看起来不像, 我们就跟进 intercepted
public actual fun <T> Continuation<T>.intercepted(): Continuation<T> =
    (this as? ContinuationImpl)?.intercepted() ?: this
进入后看到最终的代码了:
public fun intercepted(): Continuation<Any?> =
    intercepted
        ?: (context[ContinuationInterceptor]?.interceptContinuation(this) ?: this)
            .also { intercepted = it }
ContinuationInterceptor 就跟我们前面的
class LogInterceptor : ContinuationInterceptor {
	override val key: CoroutineContext.Key<*>
		get() = ContinuationInterceptor
}
key 值一样, 而上面的操作就跟下面的操作一个样
List<Element> context = new ArrayList();
intercepted = context[ContinuationInterceptor];
最终拿到了我们的 LogInterceptor 并且返回了
最终会回到这里:
internal fun <R, T> (suspend (R) -> T).startCoroutineCancellable(
    receiver: R, completion: Continuation<T>,
    onCancellation: ((cause: Throwable) -> Unit)? = null
) =
    runSafely(completion) {
        createCoroutineUnintercepted(receiver, completion).intercepted().resumeCancellableWith(Result.success(Unit), onCancellation)
    }
我们把上面代码稍微改下, 更好理解 LogInterceptor.resumeCancellableWith(Result.success(Unit), onCancellation)
很明显了, 我们跟进resumeCancellableWith 函数, 发现:
public fun <T> Continuation<T>.resumeCancellableWith(
    result: Result<T>,
    onCancellation: ((cause: Throwable) -> Unit)? = null
): Unit = when (this) {
    is DispatchedContinuation -> resumeCancellableWith(result, onCancellation)
    else -> resumeWith(result)
}
因为是 LogInterceptor 调用的 resumeCancellableWith 函数, 所以 this 明显不是 is DispatchedContinuation , 我们的代码只会走 else -> resumeWith(result)
最后你会发现它回到我们的代码了
class LogContinuation<T>(private val continuation: Continuation<T>) : Continuation<T> {
	override val context: CoroutineContext
		get() = continuation.context

    // 代码回到这个函数
	override fun resumeWith(result: Result<T>) {
		log("intercept before")
		continuation.resumeWith(result)
		log("intercept after")
	}
}
epted = it }
`ContinuationInterceptor` 就跟我们前面的

```kotlin
class LogInterceptor : ContinuationInterceptor {
	override val key: CoroutineContext.Key<*>
		get() = ContinuationInterceptor
}
key 值一样, 而上面的操作就跟下面的操作一个样
List<Element> context = new ArrayList();
intercepted = context[ContinuationInterceptor];
最终拿到了我们的 LogInterceptor 并且返回了
最终会回到这里:
internal fun <R, T> (suspend (R) -> T).startCoroutineCancellable(
    receiver: R, completion: Continuation<T>,
    onCancellation: ((cause: Throwable) -> Unit)? = null
) =
    runSafely(completion) {
        createCoroutineUnintercepted(receiver, completion).intercepted().resumeCancellableWith(Result.success(Unit), onCancellation)
    }
我们把上面代码稍微改下, 更好理解 LogInterceptor.resumeCancellableWith(Result.success(Unit), onCancellation)
很明显了, 我们跟进resumeCancellableWith 函数, 发现:
public fun <T> Continuation<T>.resumeCancellableWith(
    result: Result<T>,
    onCancellation: ((cause: Throwable) -> Unit)? = null
): Unit = when (this) {
    is DispatchedContinuation -> resumeCancellableWith(result, onCancellation)
    else -> resumeWith(result)
}
因为是 LogInterceptor 调用的 resumeCancellableWith 函数, 所以 this 明显不是 is DispatchedContinuation , 我们的代码只会走 else -> resumeWith(result)
最后你会发现它回到我们的代码了
class LogContinuation<T>(private val continuation: Continuation<T>) : Continuation<T> {
	override val context: CoroutineContext
		get() = continuation.context

    // 代码回到这个函数
	override fun resumeWith(result: Result<T>) {
		log("intercept before")
		continuation.resumeWith(result)
		log("intercept after")
	}
}
接着执行完 resumeWith 我们定义的函数