前提:
你有一个可以访问的 kubernetes 集群;
你已经部署起来了 tekton pipeline, 以及 tekton dashboard;(可以参考:如何部署起来 Tekton)
目标:
在 Tekton 环境中创建一个简单的 Task, 并且运行 Task;
在 Tekton 环境中创建一个 Pipeline, 调用 2个 Task;
在 Tekton 环境中创建一个 Pipeline, 从 gitee 获取代码,并且打印代码中的 README.md 文件内容(同样地,你也可以使用代码库来构建 Docker 镜像,部署到 kubernetes 集群);
一、创建一个简单的 Task, 以及一个 TaskRun 来执行任务
创建一个最简单的 task, 名称为 hello, 这个 task 使用 alpine 的镜像启动一个容器,执行指定脚本。
#hello-world.yaml 文件内容, 定义名称为 hello 的 task
apiVersion: tekton.dev/v1beta1
kind: Task
metadata:
  name: hello
spec:
  steps:
    - name: echo
      image: alpine
      script: |
        #!/bin/sh
        echo "Hello World"
部署 Task:
kubectl apply --filename hello-world.yaml
创建一个 TaskRun 来执行 hello 这个 Task
#hello-world-run.yaml
apiVersion: tekton.dev/v1beta1
kind: TaskRun
metadata:
  name: hello-task-run
spec:
  taskRef:
    name: hello
在集群中运行 task:
kubectl apply --filename hello-world-run.yaml
二、创建一个调用2个 Task 的 Pipeline, 以及一个 TaskRun 来执行任务
再创建一个名称 goodbye 的 task, 内容如下
#goodbye-world.yaml
apiVersion: tekton.dev/v1beta1
kind: Task
metadata:
  name: goodbye
spec:
  steps:
    - name: goodbye
      image: ubuntu
      script: |
        #!/bin/sh
        echo "Goodbye World!"
部署 Task:
kubectl apply --filename goodbye-world.yaml
创建并运行一个包含2个 task 的 pipeline:
#hello-goodbye-pipeline.yaml
apiVersion: tekton.dev/v1beta1
kind: Pipeline
metadata:
  name: hello-goodbye
spec:
  tasks:
    - name: hello
      taskRef:
        name: hello
    - name: goodbye
      runAfter:
        - hello
      taskRef:
        name: goodbye
部署 Pipeline:
kubectl apply --filename hello-goodbye-pipeline.yaml
使用 PipelineRun 对象来实例化一个 Pipeline, 即运行这个 Pipeline:
#hello-goodbye-pipeline-run.yaml
apiVersion: tekton.dev/v1beta1
kind: PipelineRun
metadata:
  name: hello-goodbye-run
spec:
  pipelineRef:
    name: hello-goodbye
运行 Pipeline(创建和执行 PipelineRun):
kubectl apply --filename hello-goodbye-pipeline-run.yaml
你也可以在 tekton dashbaord 中运行一个 pipeline。具体的截图参考后面步骤三的例子。
前面的 Pipeline 和 Task 可以合并到一起
# multi-task-pipeline.yaml
apiVersion: tekton.dev/v1beta1
kind: Task
metadata:
  name: hello
spec:
  steps:
    - name: echo
      image: alpine
      script: |
        #!/usr/bin/env sh
        echo "Hello World"
---
apiVersion: tekton.dev/v1beta1
kind: Task
metadata:
  name: goodbye
spec:
  steps:
    - name: goodbye
      image: ubuntu
      script: |
        #!/usr/bin/env sh
        echo "Goodbye World!"
---
apiVersion: tekton.dev/v1beta1
kind: Pipeline
metadata:
  name: multiple-task-pipeline
spec:
  tasks:
    - name: hello
      taskRef:
        name: hello
    - name: goodbye
      runAfter:
        - hello
      taskRef:
        name: goodbye
然后一次性部署:
kubectl apply -f multi-task-pipeline.yaml
三、最简化调用2个 Task 的 Pipeline 的配置
上面的定义里面, 两个 task 的定义看起来很累赘, 可以在 pipeline 里面内嵌定义 task:
# simple-multi-task-pipeline.yaml
apiVersion: tekton.dev/v1beta1
kind: Pipeline
metadata:
  name: simple-multi-task-pipeline
spec:
  tasks:
    - name: hello
      taskSpec:
        steps:
        - image: alpine
          script: |
            #!/bin/sh
            echo "Hello world!"

    - name: goodbye
      runAfter:
        - hello
      taskSpec:
        steps:
        - image: alpine

          script: |
            #!/bin/sh
            echo "Goodbye world!"
部署 Pipeline,
kubectl apply -f simple-multi-task-pipeline.yaml
接下来如何执行这个 Pipeline , 可以定义一个 PipelineRun 通过 kubectl 来执行,也可以在 tekton dashboard 的管理页面上触发这个Pipeline 的执行,以 dashboard 为例:
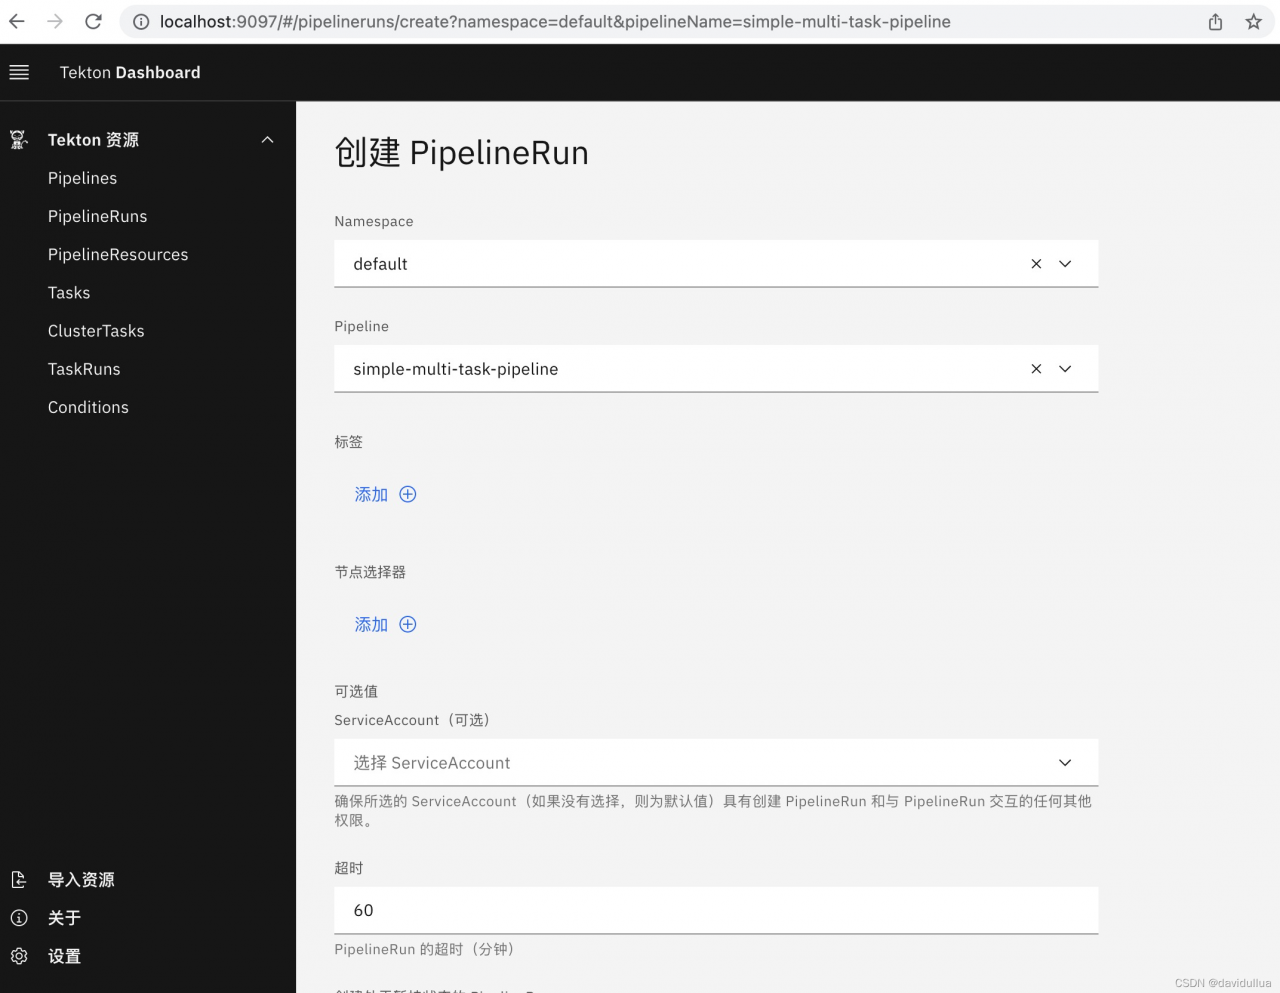
在 Dashboard 的 PipelineRuns 列表页, 点进去看执行的详情,可以看到执行结果如下:

上面截图是 Tekton Dashboard 的端口 forward 到本地之后访问的页面。
Tekton Dashboard 的部署可以参考:如何部署起来 Tekton
四、创建一个 Pipeline, 包含 git-clone, 并且显示出代码库的 README.md 文件内容
可以使用 tekton hub 中的 git-clone 这个 task 来获取 git 仓库的代码。 参考:
为了使用 git-clone 这个 task, 需要部署这个 task 到 tekton 中。
Step 1. 安装 git-clone 这个 task
kubectl apply -f https://raw.githubusercontent.com/tektoncd/catalog/main/task/git-clone/0.6/git-clone.yaml
或者使用 tekton cli 来安装:
tkn hub install task git-clone
tkn 是 tekton cli 的命令行,如果选择用 tkn 命令,需要安装 tekton cli (可选,如果使用 kubectl 来 从 tekton hub 仓库安装 git-clone 到 k8s 环境中,则不需要安装 tekton cli ):
https://tekton.dev/docs/cli/
Step 2. 部署一个包含 git clone 代码库,并且 cat README.md 来显示 readme 的 Pipeline
文件 git-clone-and-cat-readme.yaml 的内容:
apiVersion: tekton.dev/v1beta1
kind: Pipeline
metadata:
  name: cat-branch-readme
spec:
  description: |
    cat-branch-readme takes a git repository and a branch name and
    prints the README.md file from that branch. This is an example
    Pipeline demonstrating the following:
      - Using the git-clone catalog Task to clone a branch
      - Passing a cloned repo to subsequent Tasks using a Workspace.
      - Ordering Tasks in a Pipeline using "runAfter" so that
        git-clone completes before we try to read from the Workspace.
      - Using a volumeClaimTemplate Volume as a Workspace.
      - Avoiding hard-coded paths by using a Workspace's path
        variable instead.
  params:
  - name: repo-url
    type: string
    description: The git repository URL to clone from.
  - name: branch-name
    type: string
    description: The git branch to clone.
  workspaces:
  - name: shared-data
    description: |
      This workspace will receive the cloned git repo and be passed
      to the next Task for the repo's README.md file to be read.
  tasks:
  - name: fetch-repo
    taskRef:
      name: git-clone
    workspaces:
    - name: output
      workspace: shared-data
    params:
    - name: url
      value: $(params.repo-url)
    - name: revision
      value: $(params.branch-name)
  - name: cat-readme
    runAfter: ["fetch-repo"]  # Wait until the clone is done before reading the readme.
    workspaces:
    - name: source
      workspace: shared-data
    taskSpec:
      workspaces:
      - name: source
      steps:
      - image: zshusers/zsh:4.3.15
        script: |
          #!/usr/bin/env zsh
          cat $(workspaces.source.path)/README.md
---
apiVersion: tekton.dev/v1beta1
kind: PipelineRun
metadata:
  name: git-clone-checking-out-a-branch
spec:
  pipelineRef:
    name: cat-branch-readme
  workspaces:
  - name: shared-data
    volumeClaimTemplate:
      spec:
        accessModes:
        - ReadWriteOnce
        resources:
          requests:
            storage: 20Gi
  params:
  - name: repo-url
    value: https://gitee.com/geektime-geekbang/django.git
  - name: branch-name
    value: master
这里几个地方要注意,
1). 这个 Pipeline 里面定义了一个 fetch-repo 任务,这个任务使用前面安装的 git-clone task,
2). 这个 git-clone 任务里面,git url 是通过 Pipeline 里面定义的参数来引用的。这个动态的参数,可以在 PipelineRun 里面指定, 意味着在 PipelineRun 的定义, 或者 Tekton Dashboard 的界面上运行一个 Pipeline 时可以指定。 参数也可以设置默认值。
3). 除了 fetch-repo 这个任务,还定义了一个名称为 cat-readme 的任务,这个任务使用了自定义的镜像 zshusers/zsh:4.3.15 来启动一个容器,运行脚本。
部署这个 Pipeline (由于里面也定义了一个 PipelineRun,因此同时会执行这个 Pipeline) :
kubectl apply -f git-clone-and-cat-readme.yaml
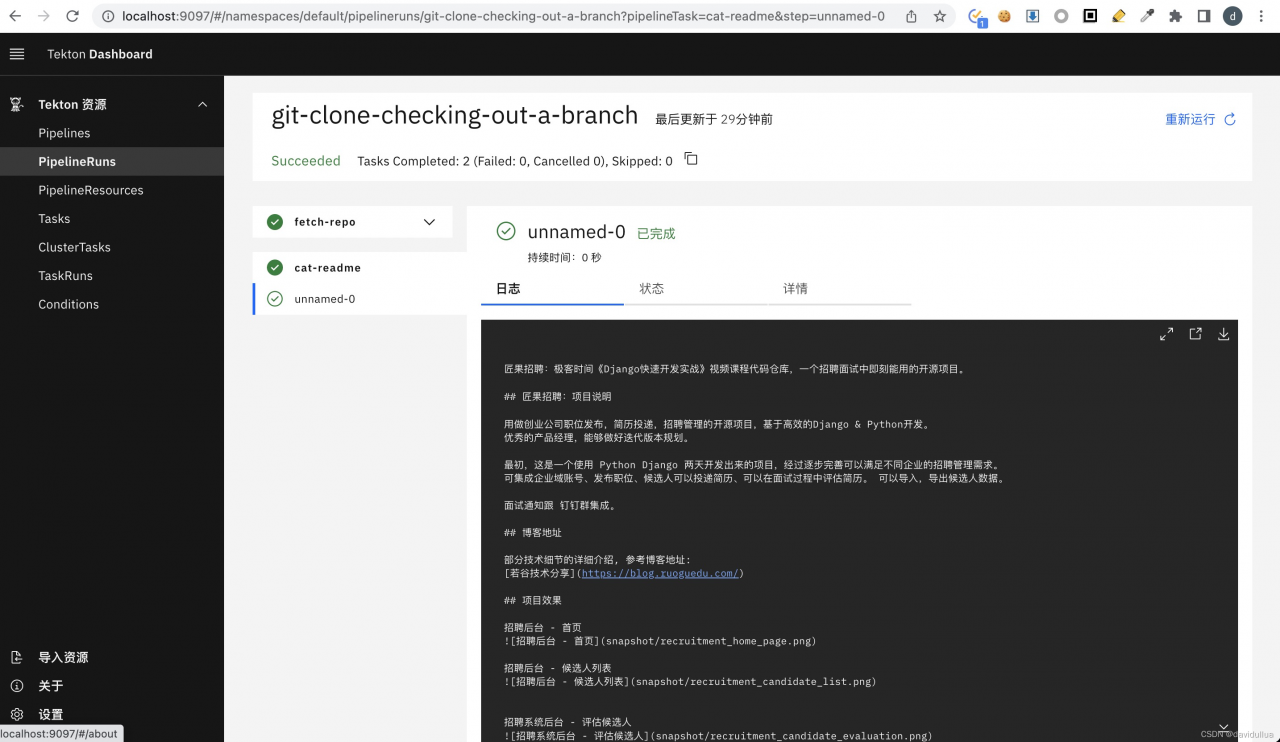
部署完,在 dashboard 上面检查 PipelineRun, 能看到执行的结果, http://localhost:9097
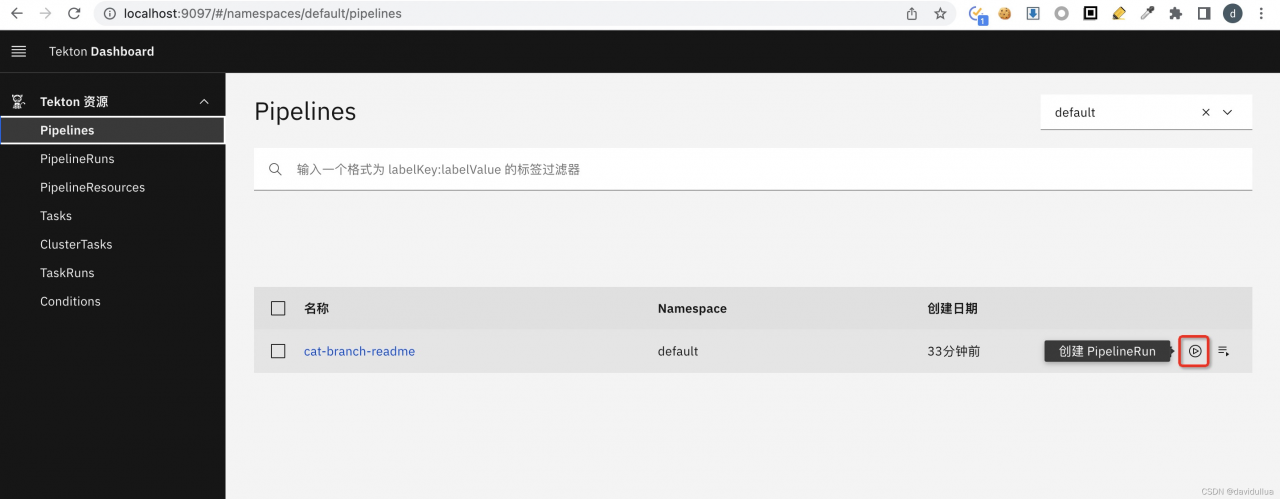
后面也可以继续通过 tekton dashboard 来执行一个 Pipeline。
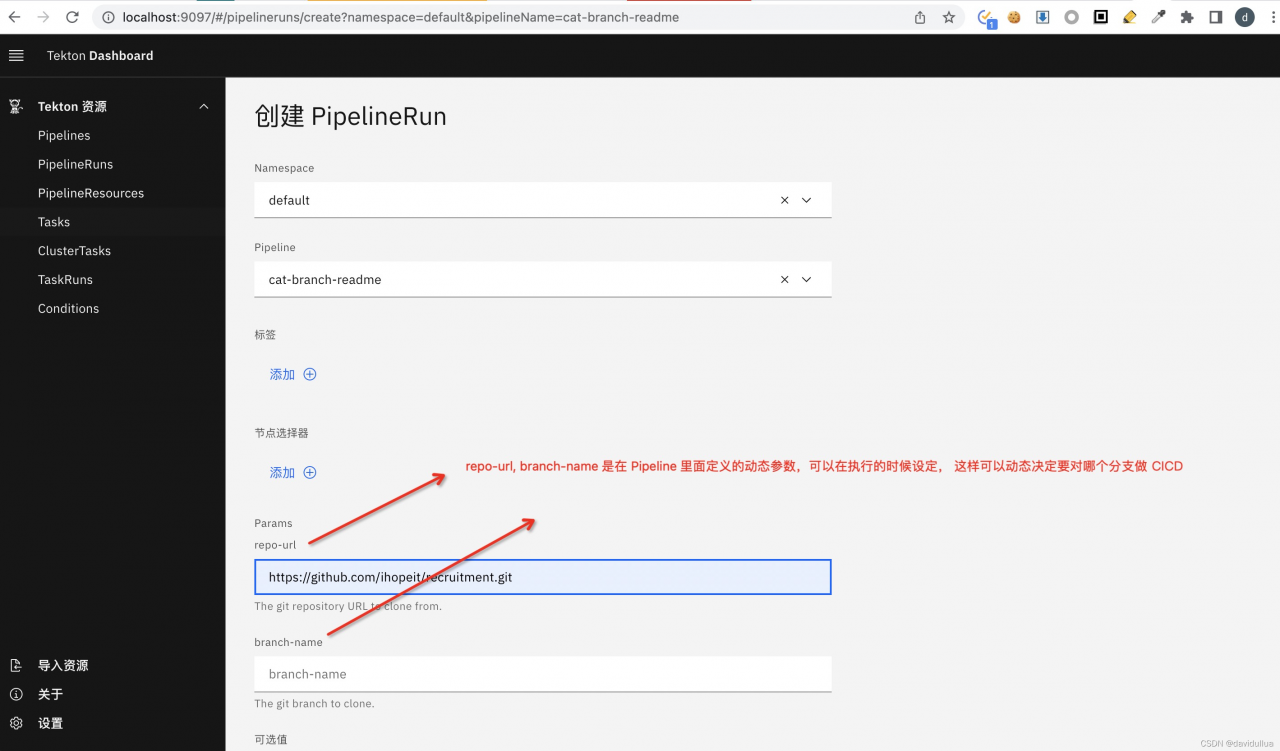
你可以选择在 Pipelines 页面 或者 PipelineRuns 页面触发执行,如果 Pipeline 有参数,界面上面可以指定参数,比如在Pipelines 列表页, pipeline 右侧点击执行图标,来手工创建一个 PipelineRun:
创建 PipelineRun 的时候,可以设定动态的参数,如下:
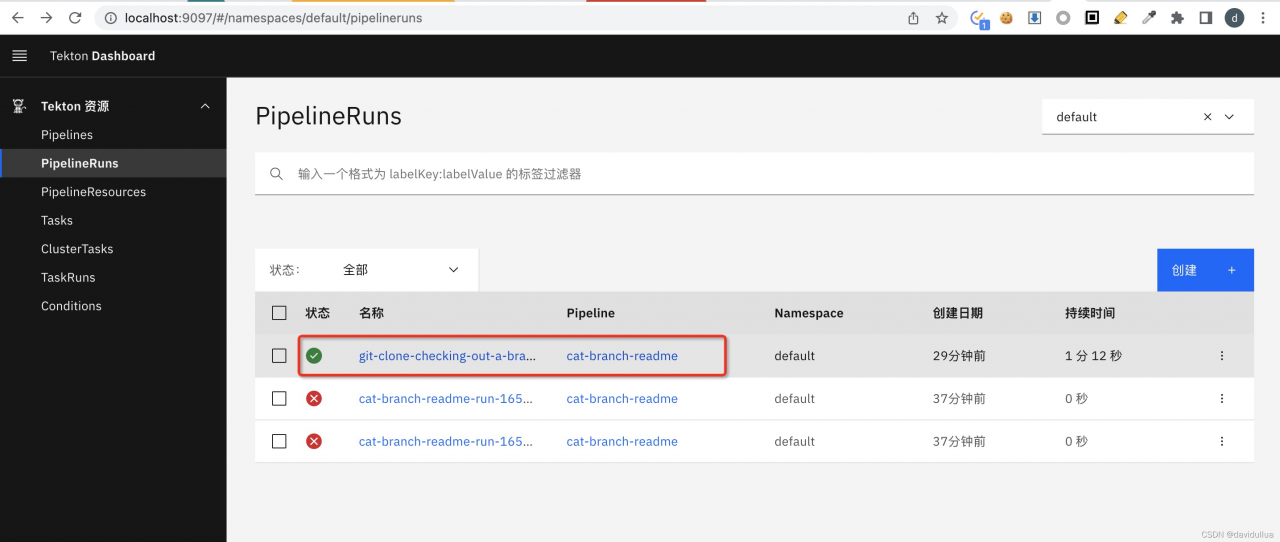
这是运行成功和失败的 PipelineRun 记录:
这是运行成功的日志:
五、执行前面任务的常见问题
问题一, 在控制台,能看到 Back-off pulling image 的错误:
container: step-clone name: clone waiting: message: 'Back-off pulling image "gcr.io/tekton-releases/github.com/tektoncd/pipeline/cmd/git-init:v0.29.0"' reason: ImagePullBackOff
这是因为在 git-clone.yaml 里面有用到 gcr.io 的镜像。
重新下载 git-clone.yaml, 然后更改里面的镜像文件的仓库路径,然后再部署 git-clone 的 task :
kubetcl delete -f https://raw.githubusercontent.com/tektoncd/catalog/main/task/git-clone/0.6/git-clone.yaml
wget https://raw.githubusercontent.com/tektoncd/catalog/main/task/git-clone/0.6/git-clone.yaml
vim git-clone.yaml
编辑里面的 gcr.io,比如做如下的替换 (你可以直接用 下面这个 docker.io 里面的镜像):
gcr.io/tekton-releases/github.com/tektoncd/pipeline/cmd/git-init:v0.29.0
→ ihopeit/tekton-git-init:v0.29.0
如果要自己通过代理把镜像 pull 下来,push 到自己的仓库,可以这么干(先要在本地启动 docker 服务,或者你可以使用 podman ):
docker pull gcr.io/tekton-releases/github.com/tektoncd/pipeline/cmd/git-init:v0.29.0
docker tag gcr.io/tekton-releases/github.com/tektoncd/pipeline/cmd/git-init:v0.29.0 xxxx/tekton-git-init:v0.29.0
docker push xxxx/tekton-git-init:v0.29.0
kubectl delete -f git-clone-and-cat-readme.yaml
kubectl apply -f git-clone-and-cat-readme.yaml
问题二,it contains Tasks that don't exist
如果前面第1步没有执行,在 k8s/tekton 中缺少 git-clone 这个 task 的定义。 会执行失败, 从 tekton 的日志或者 dashboard 上能看到报错信息如下:
Pipeline default/cat-branch-readme can't be Run; it contains Tasks that don't exist: Couldn't retrieve Task "git-clone": tasks.tekton.dev "git-clone" not found