说明
本示例只是简单仅是入门级的示例,详细使用后续会持续更新
测试版本:
- springcloud :Hoxton.SR8
- springcloud alibaba: 2.2.3.RELEASE
- springboot : 2.3.2.RELEASE
- rockectMQ: V4.4.0
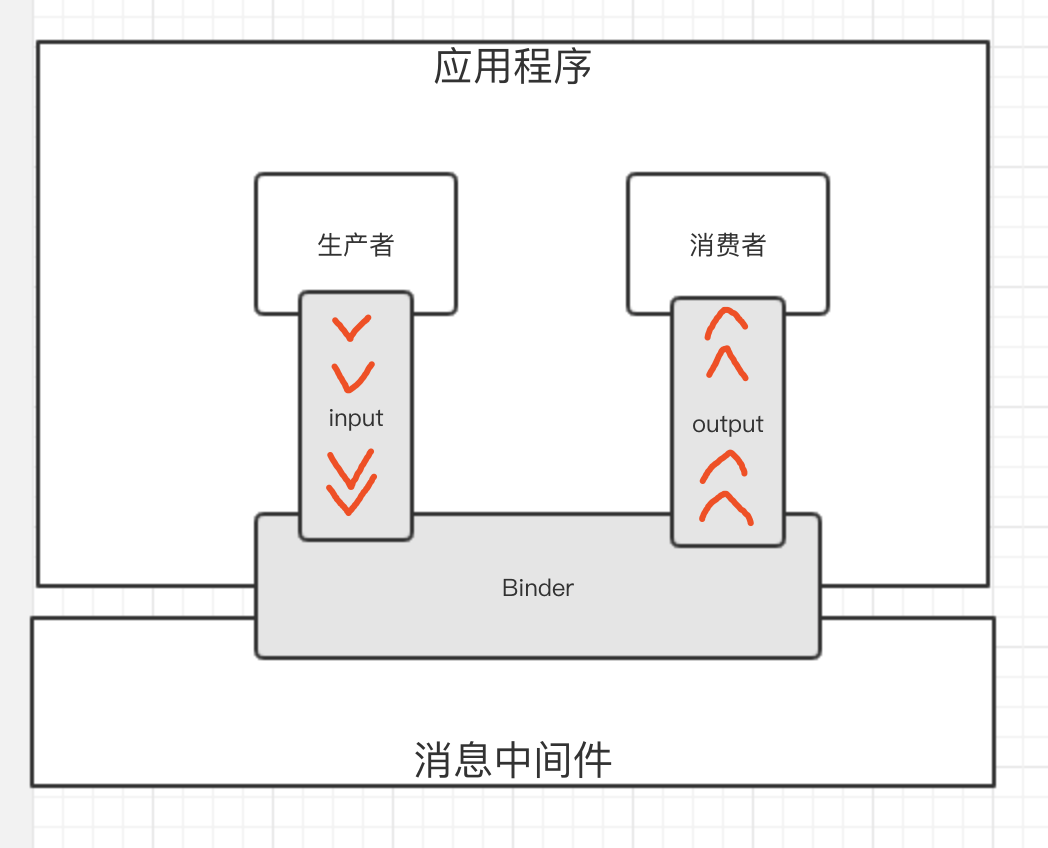
Springcloud Stream交互示意图
搭建 Demo示例
生产者
maven依赖
<dependency>
  <groupId>com.alibaba.cloud</groupId>
  <artifactId>spring-cloud-starter-stream-rocketmq</artifactId>
</dependency>
配置文件
spring:
  cloud:
    # Spring Cloud Stream 配置项,对应 BindingServiceProperties 类
    stream:
      # Binding 配置项,对应 BindingProperties Map
      bindings:
        demo01-output:
          destination: DEMO-TOPIC-01 # 目的地。这里使用 RocketMQ Topic
          content-type: application/json # 内容格式。这里使用 JSON
      # Spring Cloud Stream RocketMQ 配置项
      rocketmq:
        # RocketMQ Binder 配置项,对应 RocketMQBinderConfigurationProperties 类
        binder:
          name-server: localhost:9876 # RocketMQ Namesrv 地址
        # RocketMQ 自定义 Binding 配置项,对应 RocketMQBindingProperties Map
        bindings:
          demo01-output:
            # RocketMQ Producer 配置项,对应 RocketMQProducerProperties 类
            producer:
              group: icspgroup # 生产者分组
代码
创建source
import org.springframework.cloud.stream.annotation.Output;
import org.springframework.messaging.MessageChannel;

/**
 * @author Rain
 * ceate time 2022/5/18 16:31
 **/
public interface MySource {

    @Output("demo01-output")
    MessageChannel demo01Output();
}
说明:
- @Output内的名字要和我们配置文件中的 spring.cloud.stream.bindings 配置项对应上
- 返回参数为MessageChannel(具体实现见下一章节)
- MySource是一个接口,不需要手动实现,全部交给 Spring Cloud Stream 的 BindableProxyFactory 来解决。BindableProxyFactory 会通过动态代理,自动实现 MySource 接口。 而 @Output 注解的方法的返回值,BindableProxyFactory 会扫描带有 @Output 注解的方法,自动进行创建。
创建消息发送接口
import org.springframework.messaging.Message;
import org.springframework.messaging.MessageChannel;

/**
 * @author Rain
 * ceate time 2022/5/18 16:32
 **/
public interface MyMessageChannel extends MessageChannel {

    long INDEFINITE_TIMEOUT = -1;

    default boolean send(Message<?> message) {
        return send(message, INDEFINITE_TIMEOUT);
    }

    boolean send(Message<?> message, long timeout);

}
注意:
- 需继承MessageChannel,也可使用 @FunctionalInterface 自定义接口
自定义消息对象
import lombok.Data;

/**
 * @author Rain
 * ceate time 2022/5/18 16:35
 **/
@Data
public class Demo01Message {

    /**
     * 编号
     */
    private Integer id;


}
创建测试服务模拟消息发送
import java.util.Random;
import org.springframework.beans.factory.annotation.Autowired;
import org.springframework.messaging.Message;
import org.springframework.messaging.support.MessageBuilder;
import org.springframework.web.bind.annotation.GetMapping;
import org.springframework.web.bind.annotation.RequestMapping;
import org.springframework.web.bind.annotation.RestController;

/**
 * @author Rain
 * ceate time 2022/5/18 16:30
 **/
@RestController
@RequestMapping("/demo01")
public class MQDemo01Controller {

    @Autowired
    private MySource mySource; // <X>

    @GetMapping("/send")
    public boolean send() {
        // <1> 创建 Message
        Demo01Message message = new Demo01Message();
        message.setId(new Random().nextInt());
        // <2> 创建 Spring Message 对象
        Message<Demo01Message> springMessage = MessageBuilder.withPayload(message)
                .build();
        // <3> 发送消息
        return mySource.demo01Output().send(springMessage);
    }

}
配置启动类
import org.springframework.boot.SpringApplication;
import org.springframework.boot.autoconfigure.SpringBootApplication;
import org.springframework.cloud.client.discovery.EnableDiscoveryClient;
import org.springframework.cloud.openfeign.EnableFeignClients;
import org.springframework.cloud.stream.annotation.EnableBinding;
import com.cennavi.ps.admin.mq.MySource;

/**
 * 程序启动主类.
 *
 * @author Rain
 * time 2021/10/9 10:32
 **/
@SpringBootApplication
@EnableDiscoveryClient
@EnableFeignClients
@EnableBinding(value = {MySource.class})
public class AdminMain {

    public static void main(String[] args) {

        SpringApplication.run(AdminMain.class, args);

    }
}
在主启动类配置 @EnableBinding 注解
测试
请求 http://ip:port/demo01
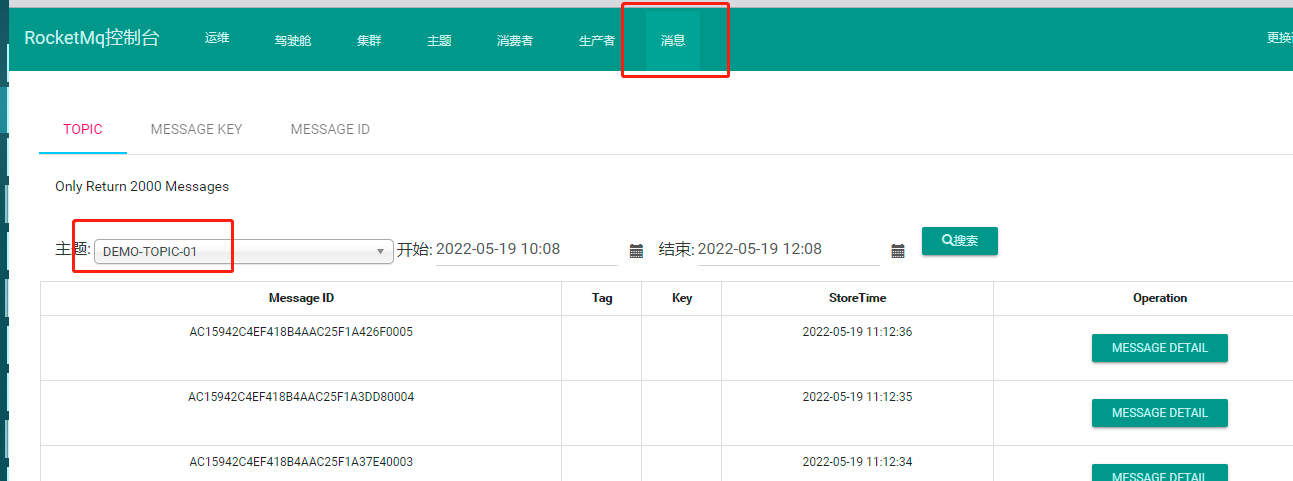
观察控制台,在控制台页面可以看到对应的消息记录表示可以正常向中MQ中写入消息:
消费者
说明:
RocketMQ数据消费支持push和pull两种模式(具体优缺点可自行查阅),Springcloud Alibaba 集成RocketMQ默认采用push模式(目前暂未发现有配置消息获取类型的参数),具体可详见源码中类:RocketMQListenerBindingContainer

maven依赖
<dependency>
  <groupId>com.alibaba.cloud</groupId>
  <artifactId>spring-cloud-starter-stream-rocketmq</artifactId>
</dependency>
配置文件
spring:
  cloud:
    # Spring Cloud Stream 配置项,对应 BindingServiceProperties 类
    stream:
      # Binding 配置项,对应 BindingProperties Map
      bindings:
        demo01-input:
          destination: DEMO-TOPIC-01 # 目的地。这里使用 RocketMQ Topic
          content-type: application/json # 内容格式。这里使用 JSON
          group: demo01-consumer-group-DEMO-TOPIC-01 # 消费者分组
      # Spring Cloud Stream RocketMQ 配置项
      rocketmq:
        # RocketMQ Binder 配置项,对应 RocketMQBinderConfigurationProperties 类
        binder:
          name-server: localhost:9876 # RocketMQ Namesrv 地址
        # RocketMQ 自定义 Binding 配置项,对应 RocketMQBindingProperties Map
        bindings:
          demo01-input:
            # RocketMQ Consumer 配置项,对应 RocketMQConsumerProperties 类
            consumer:
              enabled: true # 是否开启消费,默认为 true
              broadcasting: false # 是否使用广播消费,false: 使用集群消费(默认),true:广播消费模式
              orderly: true # 是否顺序消费,默认为 false 并发消费。
代码
创建slink
import org.springframework.cloud.stream.annotation.Input;
import org.springframework.messaging.SubscribableChannel;

/**
 * @author Rain
 * ceate time 2022/5/18 16:57
 **/
public interface MySink {

    String DEMO01_INPUT = "demo01-input";

    @Input(DEMO01_INPUT)
    SubscribableChannel demo01Input();
}
说明
- @Input 注解,声明了一个名字为 demo01-input 的 Input Binding。注意,这个名字要和我们配置文件中的 spring.cloud.stream.bindings 配置项对应上。
- @Input 注解的方法的返回结果为 SubscribableChannel 类型 (具体创建详见下一章节)
- MySlink不需要手动实现,交给 Spring Cloud Stream 的 BindableProxyFactory 解决。BindableProxyFactory 会通过动态代理,自动实现 MySink 接口。 而 @Input 注解的方法的返回值,BindableProxyFactory 会扫描带有 @Input 注解的方法,自动进行创建。
创建消息接收接口
import org.springframework.messaging.MessageHandler;
import org.springframework.messaging.SubscribableChannel;

/**
 * @author Rain
 * ceate time 2022/5/18 16:58
 **/
public interface MySubscribableChannel extends SubscribableChannel {

    boolean subscribe(MessageHandler handler);// 订阅

    boolean unsubscribe(MessageHandler handler);// 取消订阅

}
自定义消息对象
import lombok.Data;

/**
 * @author Rain
 * ceate time 2022/5/18 17:02
 **/
@Data
public class Demo01Message {

    /**
     * 编号
     */
    private Integer id;

}
创建监听
import org.slf4j.Logger;
import org.slf4j.LoggerFactory;
import org.springframework.cloud.stream.annotation.StreamListener;
import org.springframework.messaging.handler.annotation.Payload;
import org.springframework.stereotype.Component;

/**
 * @author Rain
 * ceate time 2022/5/18 16:59
 **/
@Component
public class Demo01Consumer {

    private Logger logger = LoggerFactory.getLogger(getClass());

    @StreamListener(MySink.DEMO01_INPUT)
    public void onMessage(@Payload Demo01Message message) {
        logger.info("[onMessage][线程编号:{} 消息内容:{}]", Thread.currentThread().getId(), message);
    }

}
配置启动类
import org.springframework.boot.SpringApplication;
import org.springframework.boot.autoconfigure.SpringBootApplication;
import org.springframework.cloud.client.discovery.EnableDiscoveryClient;
import org.springframework.cloud.openfeign.EnableFeignClients;
import org.springframework.cloud.stream.annotation.EnableBinding;
import com.cennavi.ps.log.mq.MySink;

/**
 * @author Rain
 * ceate time 2022/5/11 15:00
 **/
@EnableDiscoveryClient
@EnableFeignClients
@SpringBootApplication
@EnableBinding(MySink.class)
public class LogMain {

    public static void main(String[] args) {

        SpringApplication.run(LogMain.class, args);

    }
}
在主启动类配置 @EnableBinding 注解
测试
- 利用生产者向MQ发送消息
- 在消费者端消费指定topic的数据,会有如下日志代表消费成功

版权声明:本文为liuchunlin1原创文章,遵循CC 4.0 BY-SA版权协议,转载请附上原文出处链接和本声明。