编写一个简单的鼠标打飞碟(Hit UFO)游戏
游戏内容要求:
- 游戏有 n 个 round,每个 round 都包括10 次 trial;
- 每个 trial 的飞碟的色彩、大小、发射位置、速度、角度、同时出现的个数都可能不同。它们由该 round 的 ruler 控制;
- 每个 trial 的飞碟有随机性,总体难度随 round 上升;
- 鼠标点中得分,得分规则按色彩、大小、速度不同计算,规则可自由设定。
游戏的要求:
- 使用带缓存的工厂模式管理不同飞碟的生产与回收,该工厂必须是场景单实例的!具体实现见参考资源 Singleton 模板类
- 近可能使用前面 MVC 结构实现人机交互与游戏模型分离
参考上次动作分离版魔鬼与牧师的MVC结构对动作进行管理,保留SSDirector,SSAction和SSActionManager等类,重复的代码略过不表。
游戏规则
玩家点击飞出的飞碟即可得分,而让飞碟飞出画面会降低血量。随着分数积累可以到达不同关卡,级别越高的关卡难度越大。玩家的初始血量为10,血量降为0时游戏结束。
Singleton
本次作业的要求包括飞碟工厂场景单实例,具体实现需要定义Singleton模板类。运用模板,可以为每个MonoBehaviour子类创建一个对象的实例。代码如下所示:
public class Singleton<T> : MonoBehaviour where T: MonoBehaviour {
    protected static T instance;

    public static T Instance {
        get {
            if(instance == null) {
                instance = (T)FindObjectOfType(typeof(T));
                if(instance == null)
                    Debug.LogError("An instance of " + typeof(T) + " is needed in the scene, but there is none.");
            }
            return instance;
        }
    }
}
由此,场景单实例的使用就很简单了,只需要将MonoBehaviour子类对象挂载在任何一个游戏对象上即可。之后,在任意位置使用代码Singleton<YourMonoType>.Instance获得该对象。
UserGUI
此类用来实现游戏的界面,根据游戏规则,击中不同种类的飞碟会有不同的得分,所以需要显示总分数。
而且,需要显示出关卡等级,并设计一个简易的血条来展示剩余血量更能够增加游戏性。
其中的关键性代码如下:
        if (isStart) {
            if (Input.GetButtonDown("Fire1")) act.hit(Input.mousePosition);
            GUI.Label(new Rect(10, 5, 200, 50), "SCORE", textStyle);
            GUI.Label(new Rect(10, 50, 200, 50), "LEVEL", textStyle);
            GUI.Label(new Rect(Screen.width - 380, 5, 50, 50), "BLOOD", textStyle);
            GUI.Label(new Rect(200, 5, 200, 50), act.getScore().ToString(), scoreStyle);
            GUI.Label(new Rect(200, 50, 200, 50), act.getLevel().ToString(), scoreStyle);
            for (int i = 0; i < blood; i++)
                GUI.Label(new Rect(Screen.width - 220 + 20 * i, 5, 50, 50), "#", bStyle);
            if (blood == 0) {
                GUI.Label(new Rect(Screen.width / 2 - 130, Screen.height / 2 - 120, 100, 100), "Game Over", style);
                if (GUI.Button(new Rect(Screen.width / 2 - 40, Screen.height / 2 - 30, 100, 50), "REPLAY")) {
                    blood = 10;
                    act.restart();
                    return;
                }
                act.gameOver();
            }
        }
        else {
            GUI.Label(new Rect(Screen.width / 2 - 100, Screen.height / 2 - 120, 100, 100), "Hit UFO", style);
            if (GUI.Button(new Rect(Screen.width / 2 - 40, Screen.height / 2 - 30, 100, 50), "START")) {
                isStart = true;
                act.begin();
            }
        }
isStart用来判断游戏是否开始,用action来进行游戏进度的调节,包括游戏开始、重新开始、结束、设计动作等。
得到的得分栏和血条效果如下:

IUserAction
public interface IUserAction {
    void restart();
    void hit(Vector3 pos);
    void gameOver();
    int getScore();
    int getLevel();
    void begin();
}
IUserAction用来调整游戏的进度,协同计分器类与玩家的操作进行交互,为每一次成功的射击加上相应的分数,并在血量为空时重新开始游戏。具体的实现在FirstController中,代码如下:
    public void hit(Vector3 pos) {
        bool isHit = false;
        RaycastHit[] hits;
        Ray ray = Camera.main.ScreenPointToRay(pos);
        hits = Physics.RaycastAll(ray);
        for (int i = 0; i < hits.Length; i++) {
            RaycastHit temp = hits[i];
            if (temp.collider.gameObject.GetComponent<DiskData>() != null) {
                for (int j = 0; j < notHit.Count; j++)
                    if (temp.collider.gameObject.GetInstanceID() == notHit[j].gameObject.GetInstanceID())
                        isHit = true;
                if (!isHit) return;
                notHit.Remove(temp.collider.gameObject);
                record.Record(temp.collider.gameObject);
                temp.collider.gameObject.transform.GetChild(0).GetComponent<ParticleSystem>().Play();
                StartCoroutine(WaitingParticle(0.08f, temp, factory, temp.collider.gameObject));
                break;
            }
        }
    }

    public int getScore() {
        return record.score;
    }

    public int getLevel() {
        return level;
    }

    public void restart() {
        record.score = 0;
        level = 1;
        speed = 2f;
        isOver = false;
        isPlay = false;
    }

    public void gameOver() {
        isOver = true;
    }

    public void begin() {
        isStart = true;
    }
DiskFactory
飞碟工厂用来制造发送飞碟。
        switch (level) {
            case 1: num = Random.Range(0, s1); break;
            case 2: num = Random.Range(0, s2); break;
            case 3: num = Random.Range(0, s3); break;
        }
首先根据不同的级别生成随机数。在更高的关卡,可以生成低级关卡的飞碟,所以随机数的区间从0开始。
        if (num <= s1) type = "disk1";
        else if (num <= s2 && num > s1) type = "disk2";
        else type = "disk3";
然后根据不同的随机数对应生成飞碟的类型。
        if (disk == null) {
            if (type == "disk1") {
                disk = Instantiate(Resources.Load<GameObject>("Prefabs/disk1"), new Vector3(0, Y, 0), Quaternion.identity);
                disk.GetComponent<DiskData>().score = 10;
            }
            else if (type == "disk2") {
                disk = Instantiate(Resources.Load<GameObject>("Prefabs/disk2"), new Vector3(0, Y, 0), Quaternion.identity);
                disk.GetComponent<DiskData>().score = 20;
            }
            else if (type == "disk3") {
                disk = Instantiate(Resources.Load<GameObject>("Prefabs/disk3"), new Vector3(0, Y, 0), Quaternion.identity);
                disk.GetComponent<DiskData>().score = 30;
            }
然后根据飞碟的类型实例化,并且对不同类型的飞碟赋予不同的分数。
    public void freeDisk(GameObject disk) {
        for (int i = 0; i < close.Count; i++)
            if (disk.GetInstanceID() == close[i].gameObject.GetInstanceID()) {
                close[i].gameObject.SetActive(false);
                open.Add(close[i]);
                close.Remove(close[i]);
                break;
            }
    }
最后需要回收飞碟,因为飞出游戏画面的飞碟不再被需要。
FirstController
此类用来控制整个游戏的状态。
    private int level = 1;
    private float speed = 2f;
    private bool isPlay = false, isOver = false, isStart = false;
以上是游戏中用到的表示状态的变量。isPlay用来表示游戏中的状态,isOver用来表示游戏结束的状态,isStart则是游戏开始的状态。
    void Update () {
        if(isStart) {
            if (isOver) CancelInvoke("LoadResources");
            if (!isPlay) {
                InvokeRepeating("LoadResources", 1f, speed);
                isPlay = true;
            }
            createDisk();
            if (level == 1 && record.score >= 30) {
                level++;
                speed = speed - 0.6f;
                CancelInvoke("LoadResources");
                isPlay = false;
            }
            else if (level == 2 && record.score >= 100) {
                level++;
                speed = speed - 0.5f;
                CancelInvoke("LoadResources");
                isPlay = false;
            }
        }
    }
Update函数如上,当获取的分数大于30时,就进入关卡2;分数大于100时就进入关卡3.
CancelInvoke定义如下:
public void CancelInvoke();
Description
Cancels all Invoke calls on this MonoBehaviour.
public void CancelInvoke(string methodName);
Description
Cancels all Invoke calls with name
methodNameon this behaviour.
        for (int i = 0; i < notHit.Count; i++)
            if (notHit[i].transform.position.y < -10 && notHit[i].gameObject.activeSelf == true) {
                factory.freeDisk(notHit[i]);
                notHit.Remove(notHit[i]);
                GUI.bloodReduce();
            }
当飞碟飞出画面时,就及时销毁并按照游戏规则减掉血量。
    public void bloodReduce() {
        if (blood > 0) blood--;
    }
当调用bloodReduce函数,就对血量blood执行减一即可。
ScoreRecorder
public class ScoreRecorder : MonoBehaviour {
    public int score;

    void Start () {
        score = 0;
    }

    public void Record(GameObject disk) {
        score += disk.GetComponent<DiskData>().score;
    }

    public void Reset() {
        score = 0;
    }
}
记分器类的逻辑比较简单。初始状态分数变量score为0,此后每次击中飞碟则累加上此飞碟对应的分数,重新开始游戏则重置score为0。
游戏实现


游戏视频戳这里
编写一个简单的自定义 Component (选做)
用自定义组件定义几种飞碟,做成预制
- 参考官方脚本手册 https://docs.unity3d.com/ScriptReference/Editor.html
- 实现自定义组件,编辑并赋予飞碟一些属性

创造三个关卡中对应的飞碟类型如上,做成预制。
创建DiskData类,存储飞碟的一些基本属性。
public class DiskData : MonoBehaviour {
    public int score;
    public Vector3 direction;
    public Vector3 scale = new Vector3(1, 1, 1);
}
将DiskData.cs挂载在飞碟的预制上,结果如下:
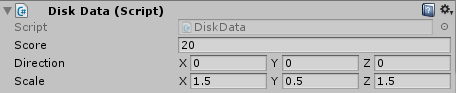
在此可以编辑修改飞碟的一些属性。
        if (disk == null) {
            if (type == "disk1") {
                disk = Instantiate(Resources.Load<GameObject>("Prefabs/disk1"), new Vector3(0, Y, 0), Quaternion.identity);
                disk.GetComponent<DiskData>().score = 10;
            }
            else if (type == "disk2") {
                disk = Instantiate(Resources.Load<GameObject>("Prefabs/disk2"), new Vector3(0, Y, 0), Quaternion.identity);
                disk.GetComponent<DiskData>().score = 20;
            }
            else if (type == "disk3") {
                disk = Instantiate(Resources.Load<GameObject>("Prefabs/disk3"), new Vector3(0, Y, 0), Quaternion.identity);
                disk.GetComponent<DiskData>().score = 30;
            }
            float X = Random.Range(-1f, -1f) < 0 ? -1 : 1;
            disk.GetComponent<DiskData>().direction = new Vector3(X, Y, 0);
            disk.transform.localScale = disk.GetComponent<DiskData>().scale;
        }
在飞碟工厂里,每当实例化一个飞碟预制,即通过GetComponent来根据飞碟的类型修改相关属性。
GetComponent定义如下:
public T GetComponent();
Description
GetComponent is the primary way of accessing other components. From javascript the type of a script is always the name of the script as seen in the project view. You can access both builtin components or scripts with this function.
通过GetComponent,可以即时地编辑组件的属性。
temp.collider.gameObject.transform.GetChild(0).GetComponent<ParticleSystem>().Play();在FirstController中,也可以用它来完成爆炸效果。