文章目录
1. 前言
InputManagerService为书写方便,下文皆简称为IMS。
IMS在前面的文章有一笔带过,这篇文章重点来学习一下这个系统服务,也是对自己学习过程的一个记录,下文时序图由visio工具所绘制。(主要还是因为想了解特殊键值的处理过程,以方便理解键值定制原理,哈哈哈哈~)
2. 服务的启动
说到IMS,这里还是从服务的启动开始讲起,依然是老生常谈的模式,它是由SystemServer在开机的时候给拉起来的:
/frameworks/base/services/java/com/android/server/SystemServer.java
 inputManager = new InputManagerService(context, wmHandler);  //1
 ServiceManager.addService(Context.INPUT_SERVICE, inputManager);
 inputManager.setWindowManagerCallbacks(wm.getInputMonitor()); //2
 inputManager.start();  //3
3. 特殊按键的处理
特殊键值这里指的是遥控器的按键,通常做系统开发可能都会知道,遥控器的键值信号数据,会通过信号接收器,通过底层一层一层映射到上层framwork进行处理。
代码位置:framworks/base/policy/src/com/android/internal/policy/impl/PhoneWindowManager.java
键值入队之前处理,处理函数:interceptKeyBeforeQueueing
键值分发之前处理,处理函数:interceptKeyBeforeDispatching
interceptKeyBeforeQueueing函数已处理了绝大多数的键值事件,而interceptKeyBeforeDispatching函数主要处理HOME,菜单,搜索等这几个键值。
下面将会从IMS一步步调用到这两个函数分别进行说明。
3.1 interceptKeyBeforeQueueing
上面代码我已截取到关键部分,首先来看注释1处代码,然后我就跳转到InputManagerService类的构造函数中:
/frameworks/base/services/java/com/android/server/input/InputManagerService.java
    public InputManagerService(Context context, Handler handler) {
        this.mContext = context;
        this.mHandler = new InputManagerHandler(handler.getLooper());

        mUseDevInputEventForAudioJack =
                context.getResources().getBoolean(R.bool.config_useDevInputEventForAudioJack);
        Slog.i(TAG, "Initializing input manager, mUseDevInputEventForAudioJack="
                + mUseDevInputEventForAudioJack);
        mPtr = nativeInit(this, mContext, mHandler.getLooper().getQueue()); //4
    }
然后直接看关键点,注释4处的代码,可想而知是调用了本地nativeInit函数:
    private static native int nativeInit(InputManagerService service,
            Context context, MessageQueue messageQueue);
我找到它的实现所在:
frameworks/base/services/jni/com_android_server_input_InputManagerService.cpp
static jint nativeInit(JNIEnv* env, jclass clazz,
        jobject serviceObj, jobject contextObj, jobject messageQueueObj) {
    sp<MessageQueue> messageQueue = android_os_MessageQueue_getMessageQueue(env, messageQueueObj);
    if (messageQueue == NULL) {
        jniThrowRuntimeException(env, "MessageQueue is not initialized.");
        return 0;
    }

    NativeInputManager* im = new NativeInputManager(contextObj, serviceObj,
            messageQueue->getLooper());  //5
    im->incStrong(0);
    return reinterpret_cast<jint>(im);
}
找到这个函数是根据jni知识,不懂的话可以后面去补一下这部分知识,这里直接看上面函数实现注释5处代码,可以看到它实例化了一个NativeInputManager对象,那我先去找找这个类的构造实现:
NativeInputManager::NativeInputManager(jobject contextObj,
        jobject serviceObj, const sp<Looper>& looper) :
        mLooper(looper) {
    JNIEnv* env = jniEnv();

    mContextObj = env->NewGlobalRef(contextObj);
    mServiceObj = env->NewGlobalRef(serviceObj);

    {
        AutoMutex _l(mLock);
        mLocked.systemUiVisibility = ASYSTEM_UI_VISIBILITY_STATUS_BAR_VISIBLE;
        mLocked.pointerSpeed = 0;
        mLocked.pointerGesturesEnabled = true;
        mLocked.showTouches = false;
    }

    sp<EventHub> eventHub = new EventHub();  //6
    mInputManager = new InputManager(eventHub, this, this);  //7
}
在上面的函数中有两点需要注意的,其中注释6处是实例化了一个EventHub对象,这个后面会讲到它的作用,那我们继续往下看注释7中InputManager这个类的构造函数实现:
frameworks/base/services/input/InputManager.cpp
InputManager::InputManager(
        const sp<EventHubInterface>& eventHub,
        const sp<InputReaderPolicyInterface>& readerPolicy,
        const sp<InputDispatcherPolicyInterface>& dispatcherPolicy) {
    mDispatcher = new InputDispatcher(dispatcherPolicy);   //8
    mReader = new InputReader(eventHub, readerPolicy, mDispatcher);  //9
    initialize();  //10
}
这里先看注释10处的函数实现代码:
void InputManager::initialize() {
    mReaderThread = new InputReaderThread(mReader);   //11
    mDispatcherThread = new InputDispatcherThread(mDispatcher);  //12
}
这里回到注释3处看调用的start函数实现代码:
    public void start() {
        Slog.i(TAG, "Starting input manager");
        nativeStart(mPtr);

        // Add ourself to the Watchdog monitors.
        Watchdog.getInstance().addMonitor(this);

        registerPointerSpeedSettingObserver();
        registerShowTouchesSettingObserver();

        mContext.registerReceiver(new BroadcastReceiver() {
            @Override
            public void onReceive(Context context, Intent intent) {
                updatePointerSpeedFromSettings();
                updateShowTouchesFromSettings();
            }
        }, new IntentFilter(Intent.ACTION_USER_SWITCHED), null, mHandler);

        updatePointerSpeedFromSettings();
        updateShowTouchesFromSettings();
    }
上面代码的关键处其实就是调用到nativeStart函数,这个
static void nativeStart(JNIEnv* env, jclass clazz, jint ptr) {
    NativeInputManager* im = reinterpret_cast<NativeInputManager*>(ptr);

    status_t result = im->getInputManager()->start();
    if (result) {
        jniThrowRuntimeException(env, "Input manager could not be started.");
    }
}
可以看到这里InputManagerService保存的mPtr传下来的变量强制转成NativeInputManager,调用调用器getInputManager函数,也就是其InputManager的start函数
status_t InputManager::start() {
    status_t result = mDispatcherThread->run("InputDispatcher", PRIORITY_URGENT_DISPLAY);
    if (result) {
        ALOGE("Could not start InputDispatcher thread due to error %d.", result);
        return result;
    }

    result = mReaderThread->run("InputReader", PRIORITY_URGENT_DISPLAY);
    if (result) {
        ALOGE("Could not start InputReader thread due to error %d.", result);

        mDispatcherThread->requestExit();
        return result;
    }

    return OK;
}
这里可以看到,注释11,12的两个线程实际是在这里被启动了。先来看注释11处的代码,由于调用了线程的run方法,则最终会调用到下面的函数:
bool InputReaderThread::threadLoop() {
    mReader->loopOnce();
    return true;
}
再然后就是loopOnce函数的实现:
void InputReader::loopOnce() {
    int32_t oldGeneration;
    int32_t timeoutMillis;
    bool inputDevicesChanged = false;
    Vector<InputDeviceInfo> inputDevices;
    { // acquire lock
        AutoMutex _l(mLock);

        oldGeneration = mGeneration;
        timeoutMillis = -1;

        uint32_t changes = mConfigurationChangesToRefresh;
        if (changes) {
            mConfigurationChangesToRefresh = 0;
            timeoutMillis = 0;
            refreshConfigurationLocked(changes);
        } else if (mNextTimeout != LLONG_MAX) {
            nsecs_t now = systemTime(SYSTEM_TIME_MONOTONIC);
            timeoutMillis = toMillisecondTimeoutDelay(now, mNextTimeout);
        }
    } // release lock

    size_t count = mEventHub->getEvents(timeoutMillis, mEventBuffer, EVENT_BUFFER_SIZE);  //12

    { // acquire lock
        AutoMutex _l(mLock);
        mReaderIsAliveCondition.broadcast();

        if (count) {
            processEventsLocked(mEventBuffer, count);  //13
        }

        if (mNextTimeout != LLONG_MAX) {
            nsecs_t now = systemTime(SYSTEM_TIME_MONOTONIC);
            if (now >= mNextTimeout) {
#if DEBUG_RAW_EVENTS
                ALOGD("Timeout expired, latency=%0.3fms", (now - mNextTimeout) * 0.000001f);
#endif
                mNextTimeout = LLONG_MAX;
                timeoutExpiredLocked(now);
            }
        }

        if (oldGeneration != mGeneration) {
            inputDevicesChanged = true;
            getInputDevicesLocked(inputDevices);
        }
    } // release lock

    // Send out a message that the describes the changed input devices.
    if (inputDevicesChanged) {
        mPolicy->notifyInputDevicesChanged(inputDevices);
    }

    mQueuedListener->flush();   //14
}
注释12处代码就是从EventHub监控并读取/dev/input下的数据,初步封装成rawEventData给注释13处的函数处理,并在注释14处函数开始分发键值。
这里直接先看注释14处的代码:
void QueuedInputListener::flush() {
    size_t count = mArgsQueue.size();
    for (size_t i = 0; i < count; i++) {
        NotifyArgs* args = mArgsQueue[i];
        args->notify(mInnerListener);  //15
        delete args;
    }
    mArgsQueue.clear();
}
关键代码为注释15,最终调用的是NotifyKeyArgs的notify函数:
void NotifyKeyArgs::notify(const sp<InputListenerInterface>& listener) const {
    listener->notifyKey(this);
}
而这个listener,是新建QueuedInputListener的时候传进来的
InputReader::InputReader(const sp<EventHubInterface>& eventHub,
        const sp<InputReaderPolicyInterface>& policy,
        const sp<InputListenerInterface>& listener) :
        mContext(this), mEventHub(eventHub), mPolicy(policy),
        mGlobalMetaState(0), mGeneration(1),
        mDisableVirtualKeysTimeout(LLONG_MIN), mNextTimeout(LLONG_MAX),
        mConfigurationChangesToRefresh(0) {
    mQueuedListener = new QueuedInputListener(listener);

    { // acquire lock
        AutoMutex _l(mLock);

        refreshConfigurationLocked(0);
        updateGlobalMetaStateLocked();
    } // release lock
}
listener是InputReader里面传过来的,并且我们知道InputReader是在InputManager中创建的
我们看下InputManager的构造函数,发现传进来的是InputDispatcher
InputManager::InputManager(
        const sp<EventHubInterface>& eventHub,
        const sp<InputReaderPolicyInterface>& readerPolicy,
        const sp<InputDispatcherPolicyInterface>& dispatcherPolicy) {
    mDispatcher = new InputDispatcher(dispatcherPolicy);
    mReader = new InputReader(eventHub, readerPolicy, mDispatcher);
    initialize();
}
所以最后这个listener是InputDispatcher,因此最后就是调用的InputDispatcher的notifyKey函数。
这个listener实际上就是InputDispatcher,故:
void InputDispatcher::notifyKey(const NotifyKeyArgs* args) {
#if DEBUG_INBOUND_EVENT_DETAILS
    ALOGD("notifyKey - eventTime=%lld, deviceId=%d, source=0x%x, policyFlags=0x%x, action=0x%x, "
            "flags=0x%x, keyCode=0x%x, scanCode=0x%x, metaState=0x%x, downTime=%lld",
            args->eventTime, args->deviceId, args->source, args->policyFlags,
            args->action, args->flags, args->keyCode, args->scanCode,
            args->metaState, args->downTime);
#endif
    if (!validateKeyEvent(args->action)) {
        return;
    }

    uint32_t policyFlags = args->policyFlags;
    int32_t flags = args->flags;
    int32_t metaState = args->metaState;
    if ((policyFlags & POLICY_FLAG_VIRTUAL) || (flags & AKEY_EVENT_FLAG_VIRTUAL_HARD_KEY)) {
        policyFlags |= POLICY_FLAG_VIRTUAL;
        flags |= AKEY_EVENT_FLAG_VIRTUAL_HARD_KEY;
    }
    if (policyFlags & POLICY_FLAG_ALT) {
        metaState |= AMETA_ALT_ON | AMETA_ALT_LEFT_ON;
    }
    if (policyFlags & POLICY_FLAG_ALT_GR) {
        metaState |= AMETA_ALT_ON | AMETA_ALT_RIGHT_ON;
    }
    if (policyFlags & POLICY_FLAG_SHIFT) {
        metaState |= AMETA_SHIFT_ON | AMETA_SHIFT_LEFT_ON;
    }
    if (policyFlags & POLICY_FLAG_CAPS_LOCK) {
        metaState |= AMETA_CAPS_LOCK_ON;
    }
    if (policyFlags & POLICY_FLAG_FUNCTION) {
        metaState |= AMETA_FUNCTION_ON;
    }

    policyFlags |= POLICY_FLAG_TRUSTED;

    KeyEvent event;
    event.initialize(args->deviceId, args->source, args->action,
            flags, args->keyCode, args->scanCode, metaState, 0,
            args->downTime, args->eventTime);

    mPolicy->interceptKeyBeforeQueueing(&event, /*byref*/ policyFlags); //16

    if (policyFlags & POLICY_FLAG_WOKE_HERE) {
        flags |= AKEY_EVENT_FLAG_WOKE_HERE;
    }

    bool needWake;
    { // acquire lock
        mLock.lock();

        if (shouldSendKeyToInputFilterLocked(args)) {
            mLock.unlock();

            policyFlags |= POLICY_FLAG_FILTERED;
            if (!mPolicy->filterInputEvent(&event, policyFlags)) {
                return; // event was consumed by the filter
            }

            mLock.lock();
        }

        int32_t repeatCount = 0;
        KeyEntry* newEntry = new KeyEntry(args->eventTime,
                args->deviceId, args->source, policyFlags,
                args->action, flags, args->keyCode, args->scanCode,
                metaState, repeatCount, args->downTime);

        needWake = enqueueInboundEventLocked(newEntry);
        mLock.unlock();
    } // release lock

    if (needWake) {
        mLooper->wake();
    }
}
上面到注释16处mPolicy实际上是NativeInputManager对象,所以最终通过下面的interceptKeyBeforeQueueing函数实现,实现反射调用到java层的interceptKeyBeforeQueueing函数进行键值处理的操作:
void NativeInputManager::interceptKeyBeforeQueueing(const KeyEvent* keyEvent,
        uint32_t& policyFlags) {
    if ((policyFlags & POLICY_FLAG_TRUSTED)) {
        nsecs_t when = keyEvent->getEventTime();
        bool isScreenOn = this->isScreenOn();
        bool isScreenBright = this->isScreenBright();

        JNIEnv* env = jniEnv();
        jobject keyEventObj = android_view_KeyEvent_fromNative(env, keyEvent);
        jint wmActions;
        if (keyEventObj) {
            wmActions = env->CallIntMethod(mServiceObj,
                    gServiceClassInfo.interceptKeyBeforeQueueing,
                    keyEventObj, policyFlags, isScreenOn);
            if (checkAndClearExceptionFromCallback(env, "interceptKeyBeforeQueueing")) {
                wmActions = 0;
            }
            android_view_KeyEvent_recycle(env, keyEventObj);
            env->DeleteLocalRef(keyEventObj);
        } else {
            ALOGE("Failed to obtain key event object for interceptKeyBeforeQueueing.");
            wmActions = 0;
        }

        if (!(policyFlags & POLICY_FLAG_INJECTED)) {
            if (!isScreenOn) {
                policyFlags |= POLICY_FLAG_WOKE_HERE;
            }

            if (!isScreenBright) {
                policyFlags |= POLICY_FLAG_BRIGHT_HERE;
            }
        }

        handleInterceptActions(wmActions, when, /*byref*/ policyFlags);
    } else {
        policyFlags |= POLICY_FLAG_PASS_TO_USER;
    }
}
3.2 interceptKeyBeforeDispatching
我们再回到注释12处代码,来分析启动java处interceptKeyBeforeDispatching函数的过程。
同理会走到InputDispatcherThread的threadLoop:
bool InputDispatcherThread::threadLoop() {
    mDispatcher->dispatchOnce();
    return true;
}
下一步则跳转到InputDispatcher类的dispatchOnce函数:
void InputDispatcher::dispatchOnce() {
    nsecs_t nextWakeupTime = LONG_LONG_MAX;
    {
        AutoMutex _l(mLock);
        //唤醒等待线程,monitor()用于监控dispatcher是否发生死锁
        mDispatcherIsAliveCondition.broadcast();
        if (!haveCommandsLocked()) {
            //当mCommandQueue不为空时处理
            dispatchOnceInnerLocked(&nextWakeupTime);
        }
        if (runCommandsLockedInterruptible()) {
            nextWakeupTime = LONG_LONG_MIN;
        }
    }
    nsecs_t currentTime = now();
    int timeoutMillis = toMillisecondTimeoutDelay(currentTime, nextWakeupTime);
    //进入epoll_wait
    mLooper->pollOnce(timeoutMillis);
}
当线程被唤醒的时候,并且mCommandQueue不为空的情况下执行dispatchOnceInnerLocked函数
void InputDispatcher::dispatchOnceInnerLocked(nsecs_t* nextWakeupTime) {
    nsecs_t currentTime = now();
    if (!mPolicy->isKeyRepeatEnabled()) {
        resetKeyRepeatLocked();
    }
    if (mDispatchFrozen) {
#if DEBUG_FOCUS
        ALOGD("Dispatch frozen.  Waiting some more.");
#endif
        return;
    }

    // Optimize latency of app switches.
    // Essentially we start a short timeout when an app switch key (HOME / ENDCALL) has
    // been pressed.  When it expires, we preempt dispatch and drop all other pending events.
    bool isAppSwitchDue = mAppSwitchDueTime <= currentTime;
    if (mAppSwitchDueTime < *nextWakeupTime) {
        *nextWakeupTime = mAppSwitchDueTime;
    }

    // Ready to start a new event.
    // If we don't already have a pending event, go grab one.
    if (! mPendingEvent) {
        if (mInboundQueue.isEmpty()) {
            if (isAppSwitchDue) {
                // The inbound queue is empty so the app switch key we were waiting
                // for will never arrive.  Stop waiting for it.
                resetPendingAppSwitchLocked(false);
                isAppSwitchDue = false;
            }

            // Synthesize a key repeat if appropriate.
            if (mKeyRepeatState.lastKeyEntry) {
                if (currentTime >= mKeyRepeatState.nextRepeatTime) {
                    mPendingEvent = synthesizeKeyRepeatLocked(currentTime);
                } else {
                    if (mKeyRepeatState.nextRepeatTime < *nextWakeupTime) {
                        *nextWakeupTime = mKeyRepeatState.nextRepeatTime;
                    }
                }
            }

            // Nothing to do if there is no pending event.
            if (!mPendingEvent) {
                return;
            }
        } else {
            // Inbound queue has at least one entry.
            mPendingEvent = mInboundQueue.dequeueAtHead();
            traceInboundQueueLengthLocked();
        }

        // Poke user activity for this event.
        if (mPendingEvent->policyFlags & POLICY_FLAG_PASS_TO_USER) {
            pokeUserActivityLocked(mPendingEvent);
        }

        // Get ready to dispatch the event.
        resetANRTimeoutsLocked();
    }

    // Now we have an event to dispatch.
    // All events are eventually dequeued and processed this way, even if we intend to drop them.
    ALOG_ASSERT(mPendingEvent != NULL);
    bool done = false;
    DropReason dropReason = DROP_REASON_NOT_DROPPED;
    if (!(mPendingEvent->policyFlags & POLICY_FLAG_PASS_TO_USER)) {
        dropReason = DROP_REASON_POLICY;
    } else if (!mDispatchEnabled) {
        dropReason = DROP_REASON_DISABLED;
    }

    if (mNextUnblockedEvent == mPendingEvent) {
        mNextUnblockedEvent = NULL;
    }

    switch (mPendingEvent->type) {
    case EventEntry::TYPE_CONFIGURATION_CHANGED: {
        ConfigurationChangedEntry* typedEntry =
                static_cast<ConfigurationChangedEntry*>(mPendingEvent);
        done = dispatchConfigurationChangedLocked(currentTime, typedEntry);
        dropReason = DROP_REASON_NOT_DROPPED; // configuration changes are never dropped
        break;
    }

    case EventEntry::TYPE_DEVICE_RESET: {
        DeviceResetEntry* typedEntry =
                static_cast<DeviceResetEntry*>(mPendingEvent);
        done = dispatchDeviceResetLocked(currentTime, typedEntry);
        dropReason = DROP_REASON_NOT_DROPPED; // device resets are never dropped
        break;
    }

    case EventEntry::TYPE_KEY: {
        KeyEntry* typedEntry = static_cast<KeyEntry*>(mPendingEvent);
        if (isAppSwitchDue) {
            if (isAppSwitchKeyEventLocked(typedEntry)) {
                resetPendingAppSwitchLocked(true);
                isAppSwitchDue = false;
            } else if (dropReason == DROP_REASON_NOT_DROPPED) {
                dropReason = DROP_REASON_APP_SWITCH;
            }
        }
        if (dropReason == DROP_REASON_NOT_DROPPED
                && isStaleEventLocked(currentTime, typedEntry)) {
            dropReason = DROP_REASON_STALE;
        }
        if (dropReason == DROP_REASON_NOT_DROPPED && mNextUnblockedEvent) {
            dropReason = DROP_REASON_BLOCKED;
        }
        done = dispatchKeyLocked(currentTime, typedEntry, &dropReason, nextWakeupTime);
        break;
    }

    case EventEntry::TYPE_MOTION: {
        MotionEntry* typedEntry = static_cast<MotionEntry*>(mPendingEvent);
        if (dropReason == DROP_REASON_NOT_DROPPED && isAppSwitchDue) {
            dropReason = DROP_REASON_APP_SWITCH;
        }
        if (dropReason == DROP_REASON_NOT_DROPPED
                && isStaleEventLocked(currentTime, typedEntry)) {
            dropReason = DROP_REASON_STALE;
        }
        if (dropReason == DROP_REASON_NOT_DROPPED && mNextUnblockedEvent) {
            dropReason = DROP_REASON_BLOCKED;
        }
        done = dispatchMotionLocked(currentTime, typedEntry,
                &dropReason, nextWakeupTime);
        break;
    }

    default:
        ALOG_ASSERT(false);
        break;
    }

    if (done) {
        if (dropReason != DROP_REASON_NOT_DROPPED) {
            dropInboundEventLocked(mPendingEvent, dropReason);
        }

        releasePendingEventLocked();
        *nextWakeupTime = LONG_LONG_MIN;  // force next poll to wake up immediately
    }
}
由于这里分析的是特殊键值的处理过程,故上面会走switch的EventEntry::TYPE_KEY分支,并最终会调用到dispatchKeyLocked
bool InputDispatcher::dispatchKeyLocked(nsecs_t currentTime, KeyEntry* entry,
        DropReason* dropReason, nsecs_t* nextWakeupTime) {
			......
            CommandEntry* commandEntry = postCommandLocked(
                    & InputDispatcher::doInterceptKeyBeforeDispatchingLockedInterruptible);
            ......
}
上面代码已经大量删减,直接看下面:
void InputDispatcher::doInterceptKeyBeforeDispatchingLockedInterruptible(
        CommandEntry* commandEntry) {
    KeyEntry* entry = commandEntry->keyEntry;

    KeyEvent event;
    initializeKeyEvent(&event, entry);

    mLock.unlock();

    nsecs_t delay = mPolicy->interceptKeyBeforeDispatching(commandEntry->inputWindowHandle,
            &event, entry->policyFlags);

    mLock.lock();

    if (delay < 0) {
        entry->interceptKeyResult = KeyEntry::INTERCEPT_KEY_RESULT_SKIP;
    } else if (!delay) {
        entry->interceptKeyResult = KeyEntry::INTERCEPT_KEY_RESULT_CONTINUE;
    } else {
        entry->interceptKeyResult = KeyEntry::INTERCEPT_KEY_RESULT_TRY_AGAIN_LATER;
        entry->interceptKeyWakeupTime = now() + delay;
    }
    entry->release();
}
然后又是相同套路,即调用了NativeInputManager类的interceptKeyBeforeDispatching函数,具体实现如下:
nsecs_t NativeInputManager::interceptKeyBeforeDispatching(
        const sp<InputWindowHandle>& inputWindowHandle,
        const KeyEvent* keyEvent, uint32_t policyFlags) {
    nsecs_t result = 0;
    if (policyFlags & POLICY_FLAG_TRUSTED) {
        JNIEnv* env = jniEnv();

        // Note: inputWindowHandle may be null.
        jobject inputWindowHandleObj = getInputWindowHandleObjLocalRef(env, inputWindowHandle);
        jobject keyEventObj = android_view_KeyEvent_fromNative(env, keyEvent);
        if (keyEventObj) {
            jlong delayMillis = env->CallLongMethod(mServiceObj,
                    gServiceClassInfo.interceptKeyBeforeDispatching,
                    inputWindowHandleObj, keyEventObj, policyFlags);
            bool error = checkAndClearExceptionFromCallback(env, "interceptKeyBeforeDispatching");
            android_view_KeyEvent_recycle(env, keyEventObj);
            env->DeleteLocalRef(keyEventObj);
            if (!error) {
                if (delayMillis < 0) {
                    result = -1;
                } else if (delayMillis > 0) {
                    result = milliseconds_to_nanoseconds(delayMillis);
                }
            }
        } else {
            ALOGE("Failed to obtain key event object for interceptKeyBeforeDispatching.");
        }
        env->DeleteLocalRef(inputWindowHandleObj);
    }
    return result;
}
通过上面的一些函数跳转,最终通过反射调用到java处的interceptKeyBeforeDispatching函数。
4. 普通按键的处理
普通按键这里指的是点击屏幕时候的普通按钮产生的事件,这里直接从屏幕点击事件传递上面dispatchOnceInnerLocked函数中,EventEntry::TYPE_MOTION switch分支进行说明:
void InputDispatcher::dispatchOnceInnerLocked(nsecs_t* nextWakeupTime) {
     case EventEntry::TYPE_MOTION: {
        MotionEntry* typedEntry = static_cast<MotionEntry*>(mPendingEvent);
        ...
        done = dispatchMotionLocked(currentTime, typedEntry,
                &dropReason, nextWakeupTime);
        break;
    }
}
可以看到实际处理触摸事件的是dispatchMotionLocked函数:
bool InputDispatcher::dispatchMotionLocked(
        nsecs_t currentTime, MotionEntry* entry, DropReason* dropReason, nsecs_t* nextWakeupTime) {
    ...
    Vector<InputTarget> inputTargets;

    bool conflictingPointerActions = false;
    int32_t injectionResult;
    if (isPointerEvent) {
        //关键点1: 找到目标Window
        injectionResult = findTouchedWindowTargetsLocked(currentTime,
                entry, inputTargets, nextWakeupTime, &conflictingPointerActions);
    } else {
        // Non touch event.  (eg. trackball)
        injectionResult = findFocusedWindowTargetsLocked(currentTime,
                entry, inputTargets, nextWakeupTime);
    }
    ...
    //关键点2: 消息派发到目标窗口中
    dispatchEventLocked(currentTime, entry, inputTargets);  //20
    return true;
}
触摸事件会首先通过findTouchedWindowTargetsLocked()函数找到目标Window,进而通过dispatchEventLocked()将消息发送到目标窗口。
/frameworks/native/services/inputflinger/InputDispatcher.cpp
int32_t InputDispatcher::findTouchedWindowTargetsLocked(nsecs_t currentTime,
        const MotionEntry* entry, Vector<InputTarget>& inputTargets, nsecs_t* nextWakeupTime,
        bool* outConflictingPointerActions) {
    enum InjectionPermission {
        INJECTION_PERMISSION_UNKNOWN,
        INJECTION_PERMISSION_GRANTED,
        INJECTION_PERMISSION_DENIED
    };

    nsecs_t startTime = now();

    ......

    // Ensure all touched foreground windows are ready for new input.
    for (size_t i = 0; i < mTempTouchState.windows.size(); i++) {
        const TouchedWindow& touchedWindow = mTempTouchState.windows[i];
        if (touchedWindow.targetFlags & InputTarget::FLAG_FOREGROUND) {
            // Check whether the window is ready for more input.
            String8 reason = checkWindowReadyForMoreInputLocked(currentTime,
                    touchedWindow.windowHandle, entry, "touched");
            if (!reason.isEmpty()) {
                injectionResult = handleTargetsNotReadyLocked(currentTime, entry,
                        NULL, touchedWindow.windowHandle, nextWakeupTime, reason.string());
                goto Unresponsive;
            }
        }
    }
    ......
    for (size_t i = 0; i < mTempTouchState.windows.size(); i++) {
        const TouchedWindow& touchedWindow = mTempTouchState.windows.itemAt(i);
        addWindowTargetLocked(touchedWindow.windowHandle, touchedWindow.targetFlags,
                touchedWindow.pointerIds, inputTargets);
    }

    ......
    return injectionResult;
}
获取能够处理这个事件的forceground window,如果这个window不能够继续处理事件,就是说这个window的主线程被某些耗时操作占据,我们继续看handleTargetsNotReadyLocked这个方法。
int32_t InputDispatcher::handleTargetsNotReadyLocked(nsecs_t currentTime,
    const EventEntry* entry,
    const sp<InputApplicationHandle>& applicationHandle,
    const sp<InputWindowHandle>& windowHandle,
    nsecs_t* nextWakeupTime, const char* reason) {
    if (applicationHandle == NULL && windowHandle == NULL) {
        if (mInputTargetWaitCause != INPUT_TARGET_WAIT_CAUSE_SYSTEM_NOT_READY) {
            mInputTargetWaitCause = INPUT_TARGET_WAIT_CAUSE_SYSTEM_NOT_READY;
            mInputTargetWaitStartTime = currentTime; //当前时间
            mInputTargetWaitTimeoutTime = LONG_LONG_MAX;
            mInputTargetWaitTimeoutExpired = false;
            mInputTargetWaitApplicationHandle.clear();
        }
    } else {
        if (mInputTargetWaitCause != INPUT_TARGET_WAIT_CAUSE_APPLICATION_NOT_READY) {
            nsecs_t timeout;
            if (windowHandle != NULL) {
                timeout = windowHandle->getDispatchingTimeout(DEFAULT_INPUT_DISPATCHING_TIMEOUT);
            } else if (applicationHandle != NULL) {
                timeout = applicationHandle->getDispatchingTimeout(DEFAULT_INPUT_DISPATCHING_TIMEOUT);
            } else {
                timeout = DEFAULT_INPUT_DISPATCHING_TIMEOUT; // 5s
            }

            mInputTargetWaitCause = INPUT_TARGET_WAIT_CAUSE_APPLICATION_NOT_READY;
            mInputTargetWaitStartTime = currentTime; //当前时间
            mInputTargetWaitTimeoutTime = currentTime + timeout;
            mInputTargetWaitTimeoutExpired = false;
            mInputTargetWaitApplicationHandle.clear();

            if (windowHandle != NULL) {
                mInputTargetWaitApplicationHandle = windowHandle->inputApplicationHandle;
            }
            if (mInputTargetWaitApplicationHandle == NULL && applicationHandle != NULL) {
                mInputTargetWaitApplicationHandle = applicationHandle;
            }
        }
    }

    if (mInputTargetWaitTimeoutExpired) {
        return INPUT_EVENT_INJECTION_TIMED_OUT; //等待超时已过期,则直接返回
    }

    //当超时5s则进入ANR流程
    if (currentTime >= mInputTargetWaitTimeoutTime) {
        onANRLocked(currentTime, applicationHandle, windowHandle,
                entry->eventTime, mInputTargetWaitStartTime, reason);

        *nextWakeupTime = LONG_LONG_MIN; //强制立刻执行轮询来执行ANR策略
        return INPUT_EVENT_INJECTION_PENDING;
    } else {
        if (mInputTargetWaitTimeoutTime < *nextWakeupTime) {
            *nextWakeupTime = mInputTargetWaitTimeoutTime; //当触发超时则强制执行轮询
        }
        return INPUT_EVENT_INJECTION_PENDING;
    }
}
findTouchedWindowTargetsLocked,如果没有发生ANR,则addWindowTargetLocked()将该事件添加到inputTargets。
void InputDispatcher::addWindowTargetLocked(const sp<InputWindowHandle>& windowHandle,
        int32_t targetFlags, BitSet32 pointerIds, Vector<InputTarget>& inputTargets) {
    inputTargets.push();

    const InputWindowInfo* windowInfo = windowHandle->getInfo();
    InputTarget& target = inputTargets.editTop();
    target.inputChannel = windowInfo->inputChannel;
    target.flags = targetFlags;
    target.xOffset = - windowInfo->frameLeft;
    target.yOffset = - windowInfo->frameTop;
    target.scaleFactor = windowInfo->scaleFactor;
    target.pointerIds = pointerIds;
}
将当前聚焦窗口mFocusedWindowHandle的inputChannel传递到inputTargets。
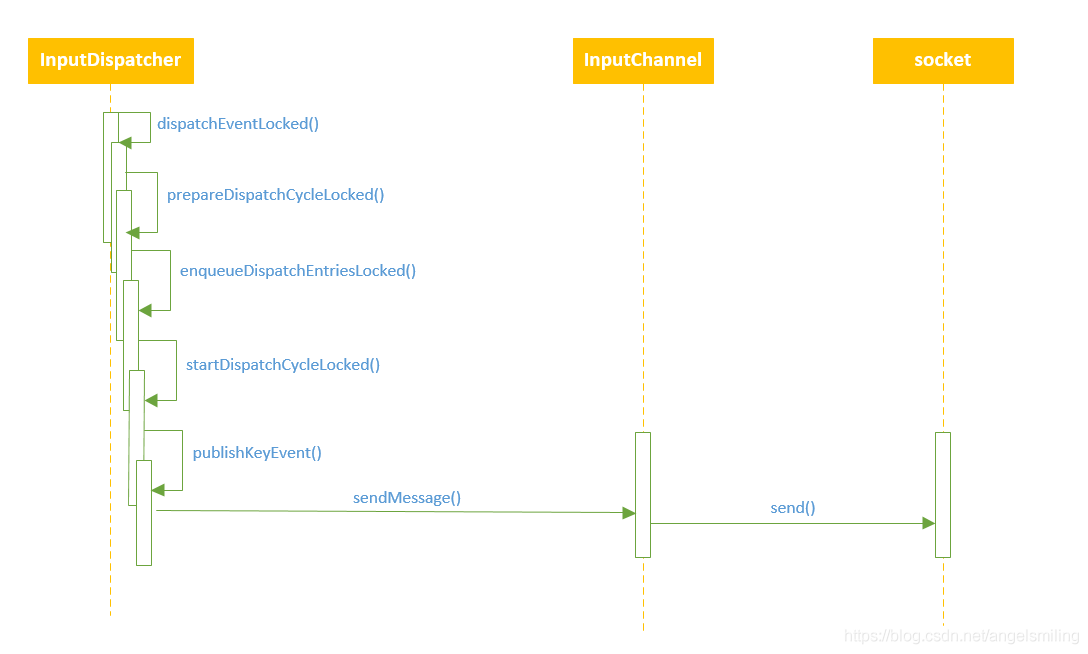
回到注释20处的代码,看消息在目标窗口的传递过程:
void InputDispatcher::dispatchEventLocked(nsecs_t currentTime,
        EventEntry* eventEntry, const Vector<InputTarget>& inputTargets) {
    //向mCommandQueue队列添加doPokeUserActivityLockedInterruptible命令
    pokeUserActivityLocked(eventEntry);

    for (size_t i = 0; i < inputTargets.size(); i++) {
        const InputTarget& inputTarget = inputTargets.itemAt(i);
        //
        ssize_t connectionIndex = getConnectionIndexLocked(inputTarget.inputChannel);
        if (connectionIndex >= 0) {
            sp<Connection> connection = mConnectionsByFd.valueAt(connectionIndex);
            //找到目标连接
            prepareDispatchCycleLocked(currentTime, connection, eventEntry, &inputTarget);
        }
    }
}
代码逐层往下看会发现最后会调用到InputChannel的sendMessage函数,最会通过socket发送到APP端(Socket怎么来的接下来会分析)
这个Socket是怎么来的呢?或者说两端通信的一对Socket是怎么来的呢?其实还是要牵扯到WindowManagerService,在APP端向WMS请求添加窗口的时候,会伴随着Input通道的创建,窗口的添加一定会调用ViewRootImpl的setView函数:
/frameworks/native/services/inputflinger/ViewRootImpl.cpp
public void setView(View view, WindowManager.LayoutParams attrs, View panelParentView) {
                ...
                requestLayout();
                if ((mWindowAttributes.inputFeatures
                        & WindowManager.LayoutParams.INPUT_FEATURE_NO_INPUT_CHANNEL) == 0) {
                    //创建InputChannel容器
                    mInputChannel = new InputChannel();
                }
                try {
                    mOrigWindowType = mWindowAttributes.type;
                    mAttachInfo.mRecomputeGlobalAttributes = true;
                    collectViewAttributes();
                    //添加窗口,并请求开辟Socket Input通信通道
                    res = mWindowSession.addToDisplay(mWindow, mSeq, mWindowAttributes,
                            getHostVisibility(), mDisplay.getDisplayId(),
                            mAttachInfo.mContentInsets, mAttachInfo.mStableInsets,
                            mAttachInfo.mOutsets, mInputChannel);
                } ...
                //监听,开启Input信道
                if (mInputChannel != null) {
                    if (mInputQueueCallback != null) {
                        mInputQueue = new InputQueue();
                        mInputQueueCallback.onInputQueueCreated(mInputQueue);
                    }
                    mInputEventReceiver = new WindowInputEventReceiver(mInputChannel,
                            Looper.myLooper());
                }
在IWindowSession.aidl定义中 InputChannel是out类型,也就是说需要服务端进行填充,那么接着看服务端WMS如何填充的呢?
public int addWindow(Session session, IWindow client, int seq,
        WindowManager.LayoutParams attrs, int viewVisibility, int displayId,
        Rect outContentInsets, Rect outStableInsets, Rect outOutsets,
        InputChannel outInputChannel) {
          ...
        if (outInputChannel != null && (attrs.inputFeatures
                & WindowManager.LayoutParams.INPUT_FEATURE_NO_INPUT_CHANNEL) == 0) {
            String name = win.makeInputChannelName();
            <!--关键点1创建通信信道 -->
            InputChannel[] inputChannels = InputChannel.openInputChannelPair(name);
            <!--本地用-->
            win.setInputChannel(inputChannels[0]);
            <!--APP端用-->
            inputChannels[1].transferTo(outInputChannel);
            <!--注册信道与窗口-->
            mInputManager.registerInputChannel(win.mInputChannel, win.mInputWindowHandle);
        }
WMS首先创建socketPair作为全双工通道,并分别填充到Client与Server的InputChannel中去;之后让InputManager将Input通信信道与当前的窗口ID绑定,这样就能知道哪个窗口用哪个信道通信了;最后通过Binder将outInputChannel回传到APP端,下面是socketPair的创建代码:
status_t InputChannel::openInputChannelPair(const String8& name,
        sp<InputChannel>& outServerChannel, sp<InputChannel>& outClientChannel) {
    int sockets[2];
    if (socketpair(AF_UNIX, SOCK_SEQPACKET, 0, sockets)) {
        status_t result = -errno;
        ...
        return result;
    }

    int bufferSize = SOCKET_BUFFER_SIZE;
    setsockopt(sockets[0], SOL_SOCKET, SO_SNDBUF, &bufferSize, sizeof(bufferSize));
    setsockopt(sockets[0], SOL_SOCKET, SO_RCVBUF, &bufferSize, sizeof(bufferSize));
    setsockopt(sockets[1], SOL_SOCKET, SO_SNDBUF, &bufferSize, sizeof(bufferSize));
    setsockopt(sockets[1], SOL_SOCKET, SO_RCVBUF, &bufferSize, sizeof(bufferSize));
    <!--填充到server inputchannel-->
    String8 serverChannelName = name;
    serverChannelName.append(" (server)");
    outServerChannel = new InputChannel(serverChannelName, sockets[0]);
     <!--填充到client inputchannel-->
    String8 clientChannelName = name;
    clientChannelName.append(" (client)");
    outClientChannel = new InputChannel(clientChannelName, sockets[1]);
    return OK;
}
这里socketPair的创建与访问其实是还是借助文件描述符,WMS需要借助Binder通信向APP端回传文件描述符fd,这部分只是可以参考Binder知识,主要是在内核层面实现两个进程fd的转换,窗口添加成功后,socketpair被创建,被传递到了APP端,但是信道并未完全建立,因为还需要一个主动的监听,毕竟消息到来是需要通知的,先看一下信道模型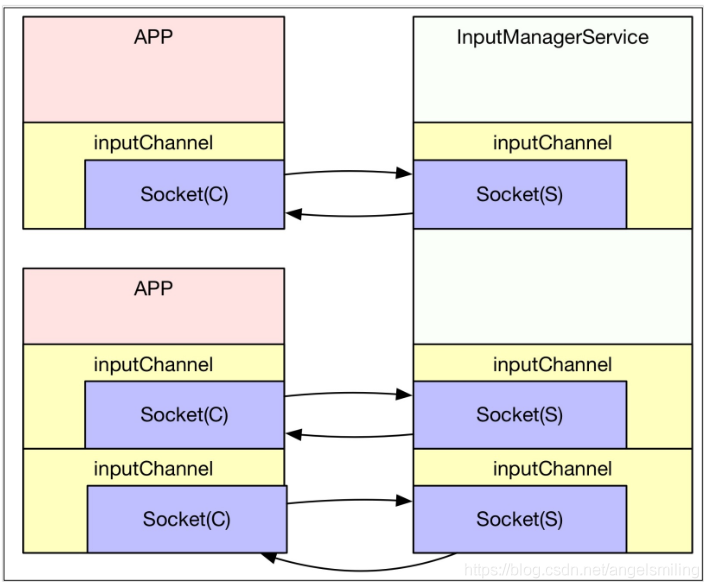
APP端的监听消息的手段是:将socket添加到Looper线程的epoll数组中去,一有消息到来Looper线程就会被唤醒,并获取事件内容,从代码上来看,通信信道的打开是伴随WindowInputEventReceiver的创建来完成的。
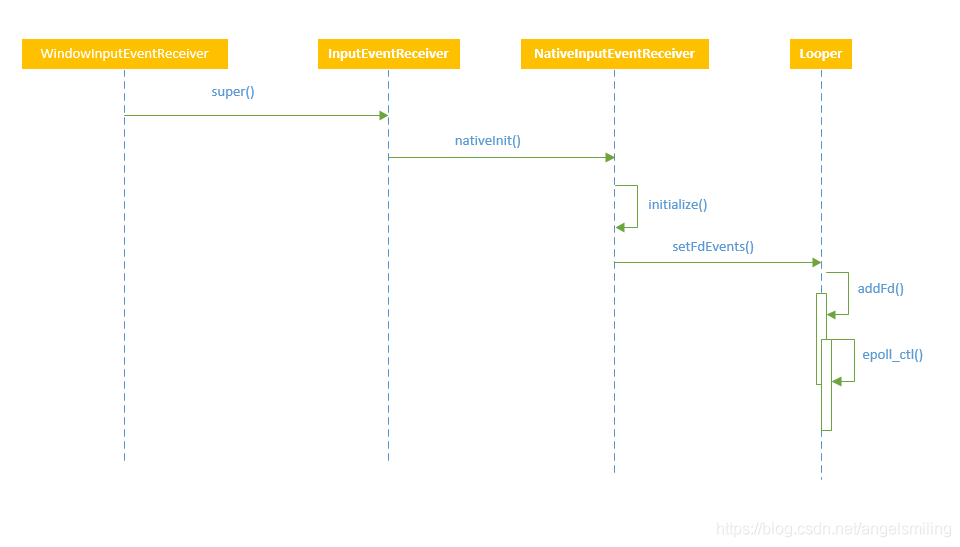
信息到来,Looper根据fd找到对应的监听器:NativeInputEventReceiver,并调用handleEvent处理对应事件
int NativeInputEventReceiver::handleEvent(int receiveFd, int events, void* data) {
   ...
    if (events & ALOOPER_EVENT_INPUT) {
        JNIEnv* env = AndroidRuntime::getJNIEnv();
        status_t status = consumeEvents(env, false /*consumeBatches*/, -1, NULL);
        mMessageQueue->raiseAndClearException(env, "handleReceiveCallback");
        return status == OK || status == NO_MEMORY ? 1 : 0;
    }
  ...
之后会进一步读取事件,并封装成Java层对象,传递给Java层,进行相应的回调处理:
status_t NativeInputEventReceiver::consumeEvents(JNIEnv* env,
        bool consumeBatches, nsecs_t frameTime, bool* outConsumedBatch) {
        ...
    for (;;) {
        uint32_t seq;
        InputEvent* inputEvent;
        <!--获取事件-->
        status_t status = mInputConsumer.consume(&mInputEventFactory,
                consumeBatches, frameTime, &seq, &inputEvent);
        ...
        <!--处理touch事件-->
      case AINPUT_EVENT_TYPE_MOTION: {
        MotionEvent* motionEvent = static_cast<MotionEvent*>(inputEvent);
        if ((motionEvent->getAction() & AMOTION_EVENT_ACTION_MOVE) && outConsumedBatch) {
            *outConsumedBatch = true;
        }
        inputEventObj = android_view_MotionEvent_obtainAsCopy(env, motionEvent);
        break;
        }
        <!--回调处理函数-->
       if (inputEventObj) {
                    env->CallVoidMethod(receiverObj.get(),
                            gInputEventReceiverClassInfo.dispatchInputEvent, seq, inputEventObj);
                    env->DeleteLocalRef(inputEventObj);
                }
所以最后就是触摸事件被封装成了inputEvent,并通过InputEventReceiver的dispatchInputEvent(WindowInputEventReceiver)进行处理,这里就返回到我们常见的Java世界了。
/frameworks/base/core/java/android/view/ViewRootImpl.java
 final class WindowInputEventReceiver extends InputEventReceiver {
        public WindowInputEventReceiver(InputChannel inputChannel, Looper looper){
            super(inputChannel, looper);
        }

        @Override
        public void onInputEvent(InputEvent event) {
         enqueueInputEvent(event, this, 0, true);
        }
   ...
  }
  void enqueueInputEvent(InputEvent event,
            InputEventReceiver receiver, int flags, boolean processImmediately) {
       ...
        if (processImmediately) {
            doProcessInputEvents();
        }
        ...
  }
  void doProcessInputEvents() {
      ...
      deliverInputEvent(q);
      ...
  }
  private void deliverInputEvent(QueuedInputEvent q) {
        ...
        InputStage stage;
        if (q.shouldSendToSynthesizer()) {
            stage = mSyntheticInputStage;
        } else {
            stage = q.shouldSkipIme() ? mFirstPostImeInputStage : mFirstInputStage;
        }

        if (stage != null) {
            stage.deliver(q);
        }
        ...
   }
   final class ViewPostImeInputStage extends InputStage {
        ...
        @Override
        protected int onProcess(QueuedInputEvent q) {
            if (q.mEvent instanceof KeyEvent) {
                return processKeyEvent(q);
            } else {
                // If delivering a new non-key event, make sure the window is
                // now allowed to start updating.
                handleDispatchWindowAnimationStopped();
                final int source = q.mEvent.getSource();
                if ((source & InputDevice.SOURCE_CLASS_POINTER) != 0) {
                    return processPointerEvent(q);
                }
                ...
            }
        }
        ...
        private int processPointerEvent(QueuedInputEvent q) {
            ...
            boolean handled = mView.dispatchPointerEvent(event);
            ...
        }
    }
processPointerEvent()方法通过调用mView的dispatchPointerEvent()方法来做进一步的操作,变量mView是一个DecorView类型的对象,它的父类View来实现这个方法,这个调用最终就会进入它的父类View的dispatchPointerEvent()方法中。
/frameworks/base/core/java/android/view/View.java
public final boolean dispatchPointerEvent(MotionEvent event) {
        if (event.isTouchEvent()) {
            return dispatchTouchEvent(event);
        } else {
            return dispatchGenericMotionEvent(event);
        }
}
整个过程参考网图如下,我就不画了,比较形象生动:
5. 总结
上面所述还不够完善,可以通读几遍,仅仅为一个理解思路。