IOC 操作Bean管理(概念)
1.什么是Bean管理
Bean管理指的是两个操作:
(1)Spring 创建对象
(2)Spring 注入属性
2.Bean管理操作的两种方式
(1)基于xml配置文件方式实现
(2)基于注解方式实现
IOC 操作Bean管理(基于xml方式)
1.基于xml方式创建对象
spring创建对象的时候,默认执行对象中的无参数构造方法,创建对象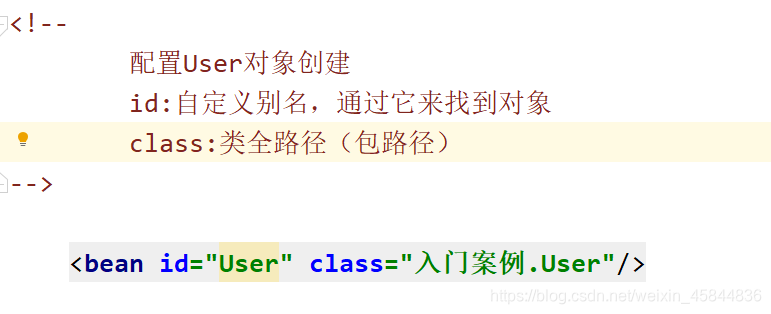
2.基于xml方式注入属性
(1)DI:依赖注入,就是注入属性
~第二种注入方式:使用 有参数构造进行注入
3.第一种注入方式:使用set方法进行注入
(1)创建类,定义属性和对应set方法
/**
 * 使用set方法进行注入属性
 */
public class Book {
    /**
     * 书名
     */
    private String name;
    /**
     * 作者
     */
    private String author;


    public void setName (String name) {
        this.name = name;
    }

    public void setAuthor (String author) {
        this.author = author;
    }

    @Override
    public String toString () {
        return "Book{" +
                "name='" + name + '\'' +
                ", author='" + author + '\'' +
                '}';
    }
}
(2)配置xml文件
    <!-- set方法完成属性注入-->
    <bean id="Book" class="IOC容器.Bean管理操作.基于xml方式.Book">
<!--        使用property完成属性注入
        !! 对象中对应属性必须要有set方法 否则注入失败
-->
        <property name="name" value="龙族"/>
        <property name="author" value="江南"/>
    </bean>
4.第二种注入方式:使用有参数构造进行注入
(1)创建类,定义属性,创建属性对应的有参数构造方法
/**
 * 第二种注入方式 使用有参数构造方法
 */
public class Order {

    private String name;
    private String address;

    public Order (String name, String address) {
        this.name = name;
        this.address = address;
    }
}
(2)配置xml文件
    <!-- 有参数构造 完成属性注入-->
    <bean id="Order" class="IOC容器.Bean管理操作.基于xml方式.Order">
        <constructor-arg name="name" value="订单名称"/>
        <constructor-arg name="address" value="下单地址"/>
    </bean>
5.p名称空间注入(简化基于xml配置方式)
(1)第一步 添加p名称空间在配置文件中
<beans xmlns="http://www.springframework.org/schema/beans"
       xmlns:p="http://www.springframework.org/schema/p"
       xmlns:xsi="http://www.w3.org/2001/XMLSchema-instance"
       xsi:schemaLocation="http://www.springframework.org/schema/beans http://www.springframework.org/schema/beans/spring-beans.xsd">
(2)第二步 进行属性注入,在bean标签中进行操作
    <!--使用p标签简化xml配置-->
    <bean id="Book1" class="IOC容器.Bean管理操作.基于xml方式.Book" p:name="龙族" p:author="江南">

    </bean>
IOC操作Bean管理(xml注入其他类型属性)
1.字面量
(1)null值
           <property name="author">
           <null></null>
           </property>
(2)属性值中包含特殊符号
<property name="author">
                <![<![CDATA[
                    <<江南>>
                ]]>
            </property>
2.注入属性 – 外部bean
(1)创建两个类,Service类和dao类,将dao作为对象注入到UserService中
public interface UserDao {
     void add();
}
public class UserDaoImp implements UserDao {
    public void add () {
        System.out.println("userDao add---------");
    }
}
public class UserService {
    /**
     * 创建UserDao对象,生成set方法
     */
    private UserDao userDao;

    public void setUserDao (UserDao userDao) {
        this.userDao = userDao;
    }

    public UserDao getUserDao () {
        return userDao;
    }
}
(2)xml配置
<!--    创建UserService 和dao 对象-->
    <bean id="UserService" class="IOC容器.Bean管理操作.基于xml方式.外部bean.service.UserService">
        <!--
            注入userDao 对象
            ref:创建UserDao 对象bean的id值
        -->
        <property name="userDao" ref="UserDaoImp"/>
    </bean>
    <bean id="UserDaoImp" class="IOC容器.Bean管理操作.基于xml方式.外部bean.dao.UserDaoImp"></bean>
3.内部bean和级联赋值
(1)创建一个部门类Dept 和员工类 表示一多的关系
/**
 * 部门类
 */
public class Dept {
    /**
     * 部门名称
     */
    private String dname;

    public void setDname (String dname) {
        this.dname = dname;
    }
}
/**
 * 员工类
 */
public class Emp {
    private String ename;
    /**
     * 员工属于某个部门,将部门对象注入进来
     */
    private Dept dept;

    public void setEname (String ename) {
        this.ename = ename;
    }

    public void setDept (Dept dept) {
        this.dept = dept;
    }
}
(2)配置xml
    <!--内部Bean的写法 -->
    <bean id="Emp" class="IOC容器.Bean管理操作.基于xml方式.内部Bean.Emp">
        <property name="ename" value="员工名称"/>
        <property name="dept">
            <bean id="Dept" class="IOC容器.Bean管理操作.基于xml方式.内部Bean.Dept">
                <property name="dname" value="部门名称"/>
            </bean>
        </property>
    </bean>
级联赋值的写法
	 <bean id="Emp" class="IOC容器.Bean管理操作.基于xml方式.内部Bean.Emp">
	        <property name="ename" value="员工名称"/>
	        <!--级联赋值-->
	        <property name="dept" ref="Dept"/>
	        <!--这种写法 需要在Emp 生成dept对象的get 方法 获取到Dept类 才能对dept中的属性进行赋值-->
	        <property name="dept.dname" value="部门名称"/>
	 </bean>
	<bean id="Dept" class="IOC容器.Bean管理操作.基于xml方式.内部Bean.Dept"/>
IOC操作Bean管理(xml注入集合属性)
1.注入数组类型的属性
2.注入List类型的属性
3.注入Map类型的属性
4.注入Set类型的属性
5.在集合里设置对象类型值
public class Type {
    private String name;

    public void setName (String name) {
        this.name = name;
    }
}
/**
 * 注入集合类型属性
 */
public class CollectionType {
    /**
     * 数组类型
     */
    private String[] strings;
    /**
     * List类型
     */
    private List<String> list;
    /**
     * Map类型
     */
    private Map<String,String> maps;
    /**
     * Set类型
     */
    private Set<String> set;
    /**
     * 对象list
     */
    private List<Type> typeList;
    public void setStrings (String[] strings) {
        this.strings = strings;
    }

    public void setList (List< String > list) {
        this.list = list;
    }

    public void setMaps (Map< String, String > maps) {
        this.maps = maps;
    }

    public void setSet (Set< String > set) {
        this.set = set;
    }

    public void setTypeList (List< Type > typeList) {
        this.typeList = typeList;
    }

    @Override
    public String toString () {
        return "CollectionType{" +
                "strings=" + Arrays.toString(strings) +
                ", list=" + list +
                ", maps=" + maps +
                ", set=" + set +
                ", typeList=" + typeList +
                '}';
    }
}
配置xml
        <!--集合类型属性注入-->
    <bean id="CollectionType" class="IOC容器.Bean管理操作.基于xml方式.注入集合类型属性.CollectionType">

        <!--数组类型属性的注入-->
        <property name="strings">
            <array>
                <value>Java课程</value>
                <value>数据库课程</value>
            </array>
        </property>
        <!--List类型属性的注入-->
        <property name="list">
            <list>
                <value>List对象1</value>
                <value>List对象2</value>
            </list>
        </property>
        <!--Map类型属性的注入-->
        <property name="maps">
            <map>
                <entry key="key1" value="值1"></entry>
                <entry key="key2" value="值2"></entry>
                <entry key="key3" value="值3"></entry>
            </map>
        </property>
        <!--Set类型属性的注入-->
        <property name="set">
            <set>
                <value>set值1</value>
                <value>set值2</value>
            </set>
        </property>
        <!--对象List类型属性的注入-->
        <property name="typeList">
            <list>
                <ref bean="Type1"></ref>
                <ref bean="Type2"></ref>
                <ref bean="Type3"></ref>
            </list>
        </property>
    </bean>

    <!--创建多个Type对象-->
    <bean id="Type1" class="IOC容器.Bean管理操作.基于xml方式.注入集合类型属性.Type">
        <property name="name" value="name1"/>
    </bean>
    <bean id="Type2" class="IOC容器.Bean管理操作.基于xml方式.注入集合类型属性.Type">
        <property name="name" value="name2"/>
    </bean>
    <bean id="Type3" class="IOC容器.Bean管理操作.基于xml方式.注入集合类型属性.Type">
        <property name="name" value="name3"/>
    </bean>
6.将集合抽取出来
(1)在Spring配置文件中引入名称空间util
<?xml version="1.0" encoding="UTF-8"?>
<beans xmlns="http://www.springframework.org/schema/beans"
       xmlns:xsi="http://www.w3.org/2001/XMLSchema-instance"
       xmlns:util="http://www.springframework.org/schema/util"
       xsi:schemaLocation="http://www.springframework.org/schema/beans http://www.springframework.org/schema/beans/spring-beans.xsd
                           http://www.springframework.org/schema/util http://www.springframework.org/schema/util/spring-util.xsd">
(2)使用util对象
<!--    使用util 提取集合属性-->
    <util:list id="strings">
        <value>Java课程</value>
        <value>数据库课程</value>
    </util:list>

    <util:list id="list">
        <value>List对象1</value>
        <value>List对象2</value>
    </util:list>
    <util:map id="maps">
        <entry key="key1" value="值1"></entry>
        <entry key="key2" value="值2"></entry>
        <entry key="key3" value="值3"></entry>
    </util:map>
    <util:set id="set">
        <value>set值1</value>
        <value>set值2</value>
    </util:set>
    <util:list id="typeList">
        <ref bean="Type1"></ref>
        <ref bean="Type2"></ref>
        <ref bean="Type3"></ref>
    </util:list>

    <!--使用util 名称空间 集合类型属性注入-->
    <bean id="CollectionTypeUtil" class="IOC容器.Bean管理操作.基于xml方式.注入集合类型属性.CollectionType">

        <!--数组类型属性的注入-->
        <property name="strings" ref="strings"/>
        <!--List类型属性的注入-->
        <property name="list" ref="list"/>
        <!--Map类型属性的注入-->
        <property name="maps" ref="maps"/>
        <!--Set类型属性的注入-->
        <property name="set" ref="set"/>

        <!--对象List类型属性的注入-->
        <property name="typeList" ref="typeList"/>

    </bean>
IOC操作Bean管理(FactoryBean)
1、Spring中有两种类型bean,一种是普通的bean,一种是工厂bean
2.普通bean:在spring配置文件中定义的bean 类型就是返回的类型
3.工厂bean:在配置文件中定义的类型可以和返回的类型不一样
(1)第一步,创建一个类,让这个类成为工厂bean,实现接口FactoryBean
(2) 第二步,实现FactoryBean中的方法,在方法中定义返回的bean类型
public class MyBean implements FactoryBean<Type> {
    /**
     * 定义返回bean
     * @return
     * @throws Exception
     */
    public Type getObject () throws Exception {
        Type type = new Type();
        return type;
    }

    public Class< ? > getObjectType () {
        return null;
    }

    /**
     * 是否是一个单例
     * @return
     */
    public boolean isSingleton () {
        return false;
    }
}
IOC操作Bean管理(bean作用域)
1.在Spring里面,设置创建bean的实例是单实例还是多实例
2.在Spring里面,默认bean是单实例
3.如何设置单实例还是多实例?
通过设置scope值
(1)singleton :默认值,表示单实例对象
(2) prototype: 表示多实例对象
    <bean id="Type1" class="IOC容器.Bean管理操作.基于xml方式.注入集合类型属性.Type" scope="prototype">
        <property name="name" value="name1"/>
    </bean>
		(3) singleton 和prototype的区别:
				(1)singleton 是单实例,prototype是多实例
				(2)scope设置为singleton时,**加载spring的配置文件的时候就会创建单实例对象**
						 scope设置为prototype时,**不是在加载spring配置文件的时候创建对象,而是在调用getBean方法的时候**
IOC操作Bean管理(bean生命周期)
1.生命周期(概念)
(1)从对象创建到对象销毁的过程
2.bean生命周期
(1)通过构造器创建bean实例(默认是无参构造)
(2)为bean属性设置值和对其他bean的引用(调用类中的set方法)
(3) 将bean实例传递bean后置处理器 调用postProcessBeforeInitialization()
(4) 调用bean中初始化的方法(需要进行配置)
(5) 将bean实例传递bean后置处理器 调用postProcessAfterInitialization()
(6)获取到对象
(7)当容器关闭的时候,调用bean的销毁的方法(需要进行配置销毁的方法)
/**
 * Bean的生命周期
 */
public class Bean {
    private String beanName;

    public void setBeanName (String beanName) {
        this.beanName = beanName;
    }

    /**
     * 定义一个方法,bean初始化的时候调用
     */
    public void initialization(){
        System.out.println("bean的初始化执行的方法");
    }

    /**
     * 定义一个方法,当容器关闭时,调用bean的销毁方法
     */
    public void destroy(){
        System.out.println("bean销毁执行的方法");
    }
}
    <bean id="Bean" class="IOC容器.Bean管理操作.基于xml方式.bean生命周期.Bean"
          init-method="initialization" destroy-method="destroy">
        <property name="beanName" value="beanName"/>
    </bean>
配置一个bean后置处理器
先定义一个类实现BeanPostProcessor 重写其中的postProcessBeforeInitialization方法 和postProcessAfterInitialization方法
/**
 * 实现BeanPostProcessor接口 重写其中的方法,自定义bean的处理器
 */
public class MyBeanPost implements BeanPostProcessor {
    /**
     * bean初始化之前执行这个方法
     */
    @Nullable
    public Object postProcessBeforeInitialization(Object bean, String beanName) throws BeansException {
        System.out.println("在初始化之前执行的方法");
        return bean;
    }
    /**
     * bean初始化之后执行这个方法
     */
    @Nullable
    public Object postProcessAfterInitialization(Object bean, String beanName) throws BeansException {
        System.out.println("在初始化之后执行的方法");
        return bean;

    }
}
配置xml
    <!--配置后置处理器-->
    <bean id="MyBeanPost" class="IOC容器.Bean管理操作.基于xml方式.bean的后置处理器.MyBeanPost"/>
IOC操作Bean管理(xml自动装配)
1、什么是自动装配
(1)根据自动装配规则(属性名称或者属性类型),Spring自动将匹配的属性值进行注入
2 、演示自动装配的过程 (使用autowire)
先创建两个类Emp 和Dept 在Emp中注入Dept
public class Emp {
    private Dept dept;

    public void setDept (Dept dept) {
        this.dept = dept;
    }

    @Override
    public String toString () {
        return "Emp{" +
                "dept=" + dept +
                '}';
    }
}
public class Dept {
    @Override
    public String toString () {
        return "Dept{}";
    }
}
进行xml的配置,实现自动装配
    <!--
        实现自动装配
        bean中标签autowire,配置自动装配
        autowire属性有两个值    (1)byName 根据属性名称注入
                               (2)byType 根据属性类型注入
     -->
    <bean id="Emp" class="IOC容器.Bean管理操作.基于xml方式.自动装配.Emp" autowire="byName"></bean>
    <bean id="dept" class="IOC容器.Bean管理操作.基于xml方式.自动装配.Dept"></bean>
IOC 操作Bean管理(外部属性文件)
1、引入外部属性文件进行配置数据库
(1)创建外部属性文件,properties格式文件,存放数据库的信息
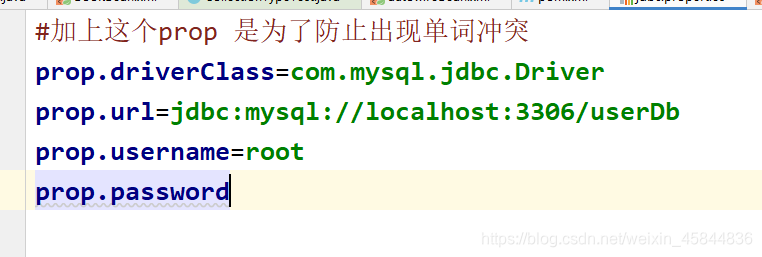
	(2)把外部properties属性文件引入到Spring配置文件中
				~ xml中 引入context名称空间
<?xml version="1.0" encoding="UTF-8"?>
<beans xmlns="http://www.springframework.org/schema/beans"
       xmlns:xsi="http://www.w3.org/2001/XMLSchema-instance"
       xmlns:context="http://www.springframework.org/schema/context"
       xsi:schemaLocation="http://www.springframework.org/schema/beans http://www.springframework.org/schema/beans/spring-beans.xsd
                           http://www.springframework.org/schema/context http://www.springframework.org/schema/context/spring-context.xsd">
~引入外部属性文件
<!--外部属性文件的引入-->
    <context:property-placeholder location="classpath:jdbc.properties"/>
~配置数据库
<!--配置数据库连接池-->
    <bean id="dataSource" class="com.alibaba.druid.pool.DruidDataSource">
        <property name="driverClassName" value="${prop.driverClass}"></property>
        <property name="url" value="${prop.url}"></property>
        <property name="username" value="${prop.username}"></property>
        <property name="password" value="${prop.password}"></property>
    </bean>