相信各位在公司写API文档数量应该不少,当然如果你还处在自己一个人开发前后台的年代,当我没说,如今为了前后台更好的对接,还是为了以后交接方便,都有要求写API文档。常用的工具有诸如小幺鸡、showdoc等,不过都需要人工进行编辑,大大影响了效率,或者是无法在线测试,接口更改后又得重新修改接口文档。
Swagger也就是为了解决这个问题,当然也不能说Swagger就一定是完美的,当然也有缺点,最明显的就是代码移入性比较强。其他的不多说,想要了解Swagger的,可以去Swagger官网,可以直接使用Swagger editor编写接口文档,当然我们这里讲解的是SpringBoot整合Swagger2,直接生成接口文档的方式。
一、pom导包
<dependency>
			<groupId>com.spring4all</groupId>
			<artifactId>spring-boot-starter-swagger</artifactId>
			<version>1.5.1.RELEASE</version>
</dependency>
二、swagger配置编写,application.yml
swagger:
  # 是否启用swagger,默认:true
  enabled: true
  # 标题
  title: swagger-demo API 管理
  # 描述
  description: 这里是 swagger-demo API 管理的描述信息
  # 版本
  version: 0.0.1-SNAPSHOT
  # 许可证
  license: MIT License
  contact:
      # 维护人
      name: heaven
      # 维护人URL
      url: http://heavenzhang.com
      # 维护人URL
      email: 441339905@qq.com
  # swagger扫描的基础包,默认:全扫描
  base-package: com.heaven
  # 需要处理的基础URL规则,默认:/**
  base-path: /**
  # 需要排除的URL规则,默认:空
  exclude-path: /error
三、Restfull API接口
package com.heaven.springbootdemoswagger.controller;

import com.google.common.collect.Lists;
import com.xiaoleilu.hutool.util.StrUtil;
import com.heaven.springbootdemoswagger.model.User;
import io.swagger.annotations.Api;
import io.swagger.annotations.ApiOperation;
import io.swagger.annotations.ApiParam;
import org.springframework.web.bind.annotation.*;
import springfox.documentation.annotations.ApiIgnore;

import javax.validation.Valid;
import java.util.List;

@Api(tags = "用户管理")
@RestController
@RequestMapping("/user")
public class UserController {

	@ApiOperation("新增用户")
	@PostMapping({"", "/"})
	public User insert(@RequestBody @Valid User user) {
		return user;
	}

	@ApiIgnore
	@DeleteMapping("/{id}")
	public String deleteById(@PathVariable Long id) {
		return "已删除用户 --> " + id;
	}

	@ApiOperation("修改用户详情")
	@PutMapping("/{id}")
	public User update(@PathVariable Long id, @RequestBody @Valid User user) {
		user.setId(id);
		return user;
	}

	@ApiOperation("用户详情")
	@GetMapping("/{id}")
	public User findById(@PathVariable Long id) {
		return new User(id, "heaven" + id, 21, StrUtil.format("heaven{}@163.com", id), StrUtil.fill("186", id.toString().charAt(0), 11, false));
	}

	@ApiOperation("用户列表")
	@GetMapping({"", "/"})
	public List<User> index(@ApiParam("第几页") @RequestParam(defaultValue = "1") Integer pageNum, @ApiParam("每页的条目数") @RequestParam(defaultValue = "20") Integer pageSize) {
		List<User> users = Lists.newArrayList();
		users.add(new User(0L, "heaven0", 18, "heaven0@163.com", "18600000000"));
		users.add(new User(1L, "heaven1", 19, "heaven1@163.com", "18611111111"));
		return users;
	}

}
四、启动类加@EnableSwagger2Doc注解
package com.heaven.springbootdemoswagger;

import com.spring4all.swagger.EnableSwagger2Doc;
import org.springframework.boot.SpringApplication;
import org.springframework.boot.autoconfigure.SpringBootApplication;

@SpringBootApplication
@EnableSwagger2Doc // 启用 Swagger
public class SpringBootDemoSwaggerApplication {

	public static void main(String[] args) {
		SpringApplication.run(SpringBootDemoSwaggerApplication.class, args);
	}
}
五、启动SpringBoot项目,访问 http://localhost:8080/swagger-ui.html
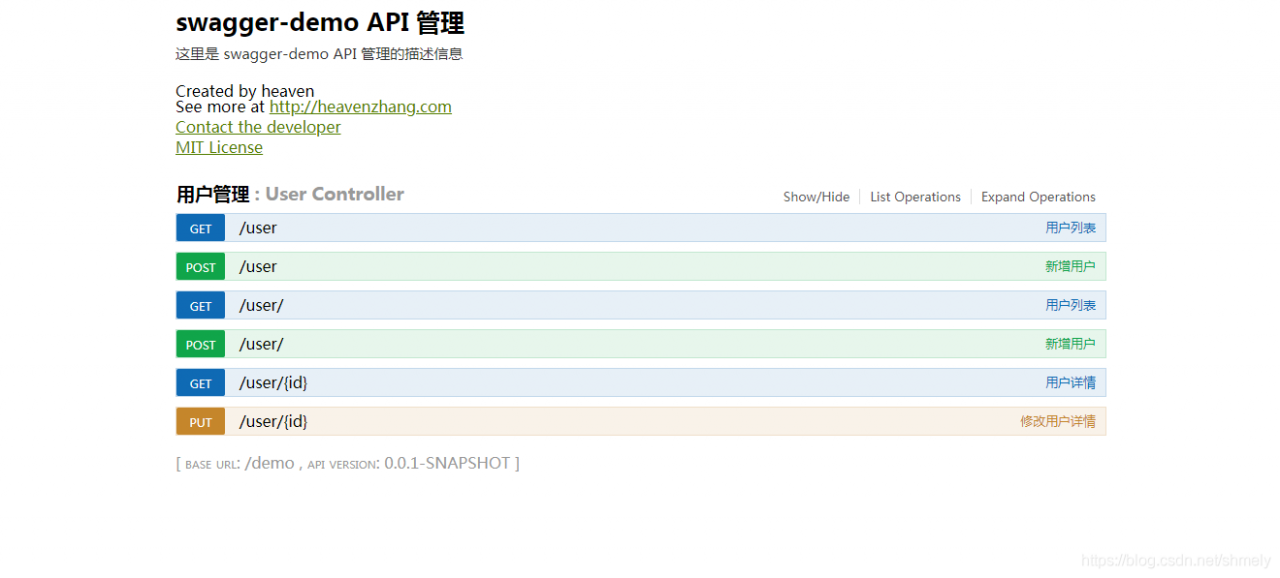
具体里面的内容以及接口测试,应该一看就懂了。这里就不一一截图了。
六、Swagger注解
swagger通过注解表明该接口会生成文档,包括接口名、请求方法、参数、返回信息的等等。
@Api:修饰整个类,描述Controller的作用
@ApiOperation:描述一个类的一个方法,或者说一个接口
@ApiParam:单个参数描述
@ApiModel:用对象来接收参数
@ApiProperty:用对象接收参数时,描述对象的一个字段
@ApiResponse:HTTP响应其中1个描述
@ApiResponses:HTTP响应整体描述
@ApiIgnore:使用该注解忽略这个API
@ApiError :发生错误返回的信息
@ApiImplicitParam:一个请求参数
@ApiImplicitParams:多个请求参数