一、准备
1、Ubuntu需要准备
安装gdb、make、gcc、g++
2、window需要准备
安装vscode、openssh(window自带)
3、可以先在powershell中利用openssh进行远程连接测试,输入:
ssh username@ip地址
例如:
ssh root@192.168.204.1
连接成功说明Ubuntu和windows环境没有问题,然后配置vscode。
二、配置vscode
1、安装插件
2、vscode中的左栏出现远程资源管理器,点击SSH Targets建立。
添加配置文件config.
该文件的内容为:
Host ubuntu18
  HostName ip地址
  PreferredAuthentications password
  Port 24
  User username
如果想加入其他远程可以直接在该文件后面加。
3、设置路径
在扩展设置中进行设置。
(1)加入远程控制openssh的绝对路径
(2)加入.ssh/config的绝对路径
至此可以在自己远程资源管理下进行远程连接了。
三、配置调试文件
新建项目之后再该项目下面进行配置。
1、新建文件Makefile
内容如下:
# C++ compiler options
CC	= g++
#CFLAGS	= -g -O2
RELEASE	= release.elf
DEBUG	= debug.elf
LIBS =
INC	=

# Source files
SRCS = main.cpp

# Make everything
all:	$(RELEASE) $(DEBUG)

# Make the application
$(RELEASE): $(OBJS)
	$(CC) -o $(RELEASE) $(SRCS) $(LIBS)

$(DEBUG): $(OBJS)
	$(CC) -o $(DEBUG) $(SRCS) $(LIBS) -ggdb3

#
# Clean all object files...
#
clean:
	$(RM) $(DEBUG) $(RELEASE)
2、新建文件.vscode/tasks.json
内容如下:
{
	"version": "2.0.0",
	"tasks": [
			{
					"label": "make",
					"command": "make",
					"type": "process",
					"args": [],
					"problemMatcher": "$msCompile"
			}
	]
}
3、新建文件.vscode/launch.json
内容如下:
{
// Use IntelliSense to learn about possible attributes.
// Hover to view descriptions of existing attributes.
// For more information, visit: https://go.microsoft.com/fwlink/?linkid=830387
“version”: “0.2.0”,
“configurations”: [
{
“name”: “(gdb) Launch”,
“type”: “cppdbg”,
“request”: “launch”,
“program”: “w o r k s p a c e F o l d e r / d e b u g . e l f " , " a r g s " : [ ] , " s t o p A t E n t r y " : f a l s e , " c w d " : " {workspaceFolder}/debug.elf", "args": [], "stopAtEntry": false, "cwd": "workspaceFolder/debug.elf","args":[],"stopAtEntry":false,"cwd":"{workspaceFolder}”,
“environment”: [],
“externalConsole”: false,
“MIMode”: “gdb”,
“logging”: {
“moduleLoad”: true,
“engineLogging”: true,
“trace”: true
},
“setupCommands”: [
{
“description”: “Enable pretty-printing for gdb”,
“text”: “-enable-pretty-printing”,
“ignoreFailures”: true
}
],
“preLaunchTask”: “make”,
“miDebuggerPath”: “/usr/bin/gdb”
}
]
}
然后可以调试了,调试界面如下,按F5: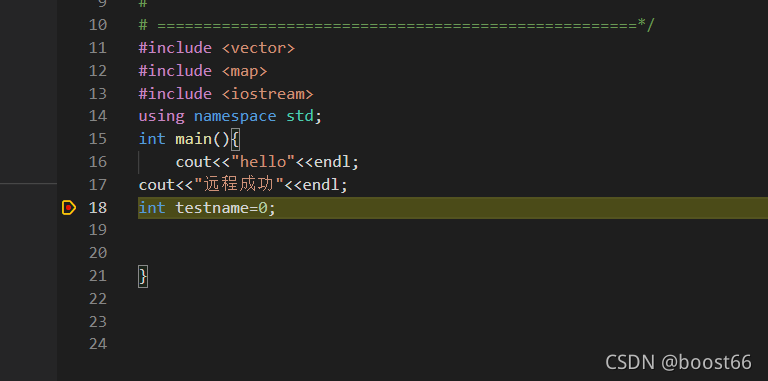
四、实现代码自动补全
1、打包linux下的库文件,,在/usr/include
sudo zip -r include.zip include
2、将该文件复制到window下面找一个地方。
我的路径为:
D:\install path\VScode\linux_include
3、vscode设置里面配置文件,输入setting 点击进入setting.json文件。
添加以下内容:
//远程控制linux实现自动补全
    "[cpp]": {
        "editor.quickSuggestions": true
    },
    "[c]": {
        "editor.quickSuggestions": true
    },
    "C_Cpp.default.includePath": [
        "D:/install path/VScode/linux_include",
        "D:/install path/VScode/linux_include/x86_64-linux-gnu/**",
        "${workspaceFolder}/**",
    ]
重启vscode即可实现。
参考:https://www.cnblogs.com/DragonStart/p/12966851.html