接收方:
@Service("receiveService")
public class ReceiveServiceImpl implements ReceiveService {
    @RabbitListener(bindings = {@QueueBinding(value = @Queue("topic01"),
    key = {"aa"},exchange = @Exchange(name = "topicExchange",type = "topic"))})
    public void topicReceive01(String message){
        System.out.println("topic接收到的消息:  "+message+" key: aa");
    }
    @RabbitListener(bindings = {@QueueBinding(value = @Queue("topic02"),
    key = {"aa.*"},exchange = @Exchange(name = "topicExchange",type = "topic"))})
    public void topicReceive02(String message){
        System.out.println("topic接收到的消息:  "+message+" key: aa.*");
    }
    @RabbitListener(bindings = {@QueueBinding(value = @Queue("topic03"),
    key = {"aa.#"},exchange = @Exchange(name = "topicExchange",type = "topic"))})
    public void topicReceive03(String message){
        System.out.println("topic接收到的消息:  "+message+" key: aa.#");
    }
}
为了防止消息的丢失,所以需要先启动消息的接收方。由于用到的是注解开发所以这里没有使用到配置类
发送方:
@Service("sendService")
public class TestServiceImpl implements TestService {
    /**注入AMQP模板类
     * 利用这个对象来发送和接收消息
     * */
    @Resource
    private AmqpTemplate amqpTemplate;
    @Override
    public void sendTopicMessage(String Message) {
        amqpTemplate.convertAndSend("topicExchange","aa.bb",Message);
    }
}
主函数入口类
@SpringBootApplication
public class BootSendApplication {

    public static void main(String[] args) {
        SpringApplication application = new SpringApplication(BootSendApplication.class);
        ConfigurableApplicationContext context = application.run(args);
        TestService service = context.getBean(TestService.class);
        service.sendTopicMessage("topic类型交换机的测试消息");
    }
}
为了保证目标交换机必须存在,所以需要使用到配置类
@Configuration
public class RabbiMQConfig {
    /**配置Topic交换机
     * */
    @Bean
    public TopicExchange topicExchange(){
        return new TopicExchange("topicExchange");
    }
}
发送方RoutdingKey为aa的运行结果
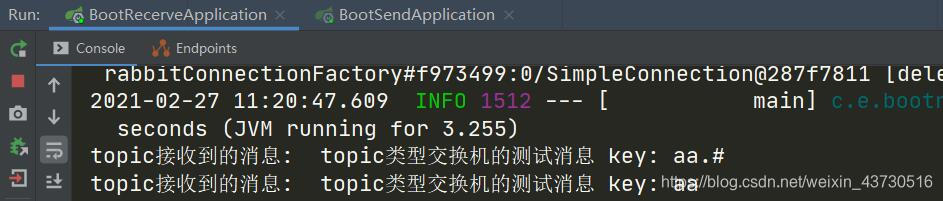
发送方RoutdingKey为aa.bb的运行结果

与RabbitMQ交换机的基本原理得出的结果相符
版权声明:本文为weixin_43730516原创文章,遵循CC 4.0 BY-SA版权协议,转载请附上原文出处链接和本声明。