上一篇使用了thymeleaf的方式整合soringboot进行前端取值,这篇主要对thymeleaf的语法进行学习。
1. thymeleaf变量获取语法
thymeleaf的语法基本上和el表达式是一样的,但比el更复杂功能更多。
举例:
1.1 创建一个user和role类:
package cn.tx.sboot.model;

public class User {
    private String name;
    private int age;
    private Role role;

    public User(String name, int age) {
        this.name = name;
        this.age = age;
    }

    public String getName() {
        return name;
    }

    public void setName(String name) {
        this.name = name;
    }

    ...	//省略
}
package cn.tx.sboot.model;

public class Role {
    private String roleName;

    public Role(String roleName) {
        this.roleName = roleName;
    }

    public String getRoleName() {
        return roleName;
    }

    public void setRoleName(String roleName) {
        this.roleName = roleName;
    }
}
1.2 添加一个方法:
@GetMapping("test")
    public String test(Model model){
        User user = new User("小明",20);
        user.setRole(new Role("学生"));
        model.addAttribute("user",user);
        return "hello";
1.3 前端添加属性获取值:
<p th:text="${'姓名:'+user.name + '年龄'+user.age + '角色:'+user.role.roleName}"></p>
1.4 测试: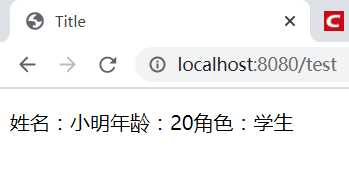
成功。
2. thymeleaf变量中常用的对象
这里列举几个比较常用的对象:
方法里传一个对象:
model.addAttribute("now",new Date());
model.addAttribute("name","hello world");
model.addAttribute("strarr",new String[]{"aa","bb","cc"});
model.addAttribute("strs","aa-bb-cc");
前端取值
<p th:text="${#dates.format(date,'yyyy-MM-dd')}"></p>
<p th:text="${#strings.substring(name,3,5)}"></p>
<p th:text="${#strings.arrayJoin(strarr,'-')}"></p>
<p th:text="${#strings.listSplit(strs,'-')}"></p>
效果: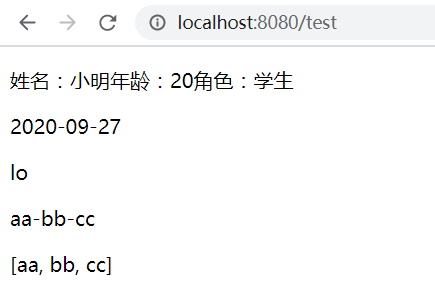
3. 变量选择表达式
变量表达式不仅可以写成${…},而且还可以写成*{…}。
session.setAttribute("user",user);
<div th:object="${session.user}">
    <p>Name: <span th:text="*{name}"></span>.</p>
    <p>Surname: <span th:text="*{age}"></span>.</p>
</div>

<div>
    <p>Name: <span th:text="${session.user.name}"></span>.</p>
    <p>Surname: <span th:text="${session.user.age}"></span>.</p>
</div>

<div th:object="${session.user}">
    <p>Name: <span th:text="*{name}"></span>.</p>
    <p>Surname: <span th:text="${session.user.lastName}"></span>.</p>
</div>
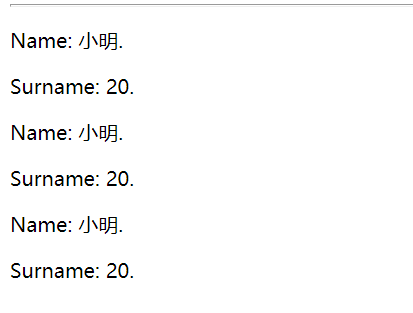
3种效果是一样的。
4. URL地址解析
4.1 先建一个thymeleafUrl.html,然后创建一个配置类:
package cn.tx.sboot.config;

import org.springframework.context.annotation.Configuration;
import org.springframework.web.servlet.config.annotation.ViewControllerRegistry;
import org.springframework.web.servlet.config.annotation.WebMvcConfigurer;
@Configuration
public class WebConfig implements WebMvcConfigurer {
    @Override
    public void addViewControllers(ViewControllerRegistry registry) {
        registry.addViewController("thyme").setViewName("thymeleafUrl");
    }
}
在HTML文件添加官网的实例:
<!-- Will produce 'http://localhost:8080/gtvg/order/details?orderId=3' (plus rewriting) -->
<a href="details.html"
   th:href="@{http://localhost:8080/gtvg/order/details(orderId=${1})}">view1</a>

<!-- Will produce '/gtvg/order/details?orderId=3' (plus rewriting) -->
<a href="details.html" th:href="@{/order/details(orderId=${1})}">view2</a>

<!-- Will produce '/gtvg/order/3/details' (plus rewriting) -->
<a href="details.html" th:href="@{/order/{orderId}/details(orderId=${1})}">view3</a>
因为和我的文件的路径有点差别,所以在配置文件中设置一下:
server:
  servlet:
    context-path: /gtvg
设置好后,访问一下:


基本一样的。
还有其他一些字符串的拼接和条件的表达式,这里就不再演示了。
5. 迭代
在前端需要以集合的方式显示要用到迭代,th:each。
5.1 添加list方法:
@GetMapping("list")
    public String list(Model model, HttpSession session){
        List<User> users = new ArrayList<>();
        for (int i = 0;i<10;i++){
            users.add(new User("小明"+i,20+i));
        }
        model.addAttribute("users",users);
        return "list";
    }
5.2 创建list.html:
<!DOCTYPE html>
<html lang="en" xmlns:th="http://www.thymeleaf.org">
<head>
    <meta charset="UTF-8">
    <title>Title</title>
</head>
<body>
<h1>Product list</h1>

<table>
    <tr>
        <th>name</th>
        <th>age</th>
    </tr>
    <tr th:each="user : ${users}">
        <td th:text="${user.name}"></td>
        <td th:text="${user.age}"></td>
    </tr>
</table>

<p>
    <a href="../home.html" th:href="@{/}">Return to home</a>
</p>
</body>
</html>
5.3 测试
访问一下:
遍历出来了,很简单。
6. IF
@GetMapping("condition")
    public String condition(Model model, HttpSession session){
        List<User> users = new ArrayList<>();
        for (int i = 0;i<10;i++){
            User user = new User("小明"+i,20+i);
            if (i % 3 == 0){
                user.setRole(new Role("优秀学生"));
            }
            users.add(user);
        }
        model.addAttribute("users",users);
        return "condition";
    }
<!DOCTYPE html>
<html lang="en" xmlns:th="http://www.thymeleaf.org">
<head>
    <meta charset="UTF-8">
    <title>Title</title>
</head>
<body>
<h1>Product list</h1>

<table>
    <tr>
        <th>name</th>
        <th>age</th>
        <th>role</th>
    </tr>
    <tr th:each="user : ${users}">
        <td th:text="${user.name}"></td>
        <td th:text="${user.age}"></td>
        <td>
            <span th:text="${user.role == null?'无':user.role.roleName}"></span>
            <a
                th:href="@{/user/roleDetail}"
                th:if="${user.role != null}">view</a>	//判断角色是否为空,为空不显示链接,非空则显示,另外unless是if的对立面,相当于else
        </td>
    </tr>
</table>
</body>
</html>
效果: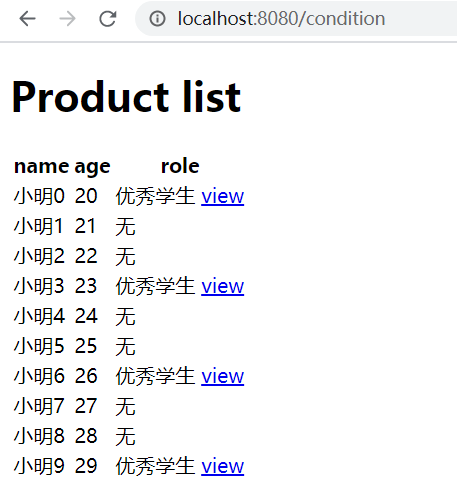
7. switch
<div th:switch="${user.role}">
  <p th:case="'admin'">管理员</p>
  <p th:case="#{roles.user}">用户</p>
  <p th:case="*">User is some other thing</p>	//都不满足选中的就是*
</div>
标题8. replace
在页面中我们想引入其他HTML中的div片段,或者想要将公共部分抽取出来(也称分页),就可以用th:replace进行引入
1、抽取公共片段
<div th:fragment="copy">
© 2011 The Good Thymes Virtual Grocery
</div>
2、引入公共片段
<div th:insert="~{footer :: copy}"></div>
~{templatename::selector}:模板名::选择器
~{templatename::fragmentname}:模板名::片段名
3、默认效果:
insert的公共片段在div标签中
如果使用th:insert等属性进行引入,可以不用写~{}:
行内写法可以加上:[[~{}]];[(~{})];
三种引入公共片段的th属性:
th:insert:将公共片段整个插入到声明引入的元素中
th:replace:将声明引入的元素替换为公共片段
th:include:将被引入的片段的内容包含进这个标签中
<footer th:fragment="copy">
© 2011 The Good Thymes Virtual Grocery
</footer>
引入方式:
<div th:insert="footer :: copy"></div>
<div th:replace="footer :: copy"></div>
<div th:include="footer :: copy"></div>
效果:
<div>
<footer>
© 2011 The Good Thymes Virtual Grocery
</footer>
</div>
<footer>
© 2011 The Good Thymes Virtual Grocery
</footer>
<div>
© 2011 The Good Thymes Virtual Grocery
</div>
还有关于thymeleaf的其他一些属性操作,这里就不记录了。
关于thymeleaf的语法就暂时学习到这里了。
版权声明:本文为weixin_46482482原创文章,遵循CC 4.0 BY-SA版权协议,转载请附上原文出处链接和本声明。