Android刘海屏适配及view被摄像头遮挡动态改变位置
目前市面上的刘海屏、水滴屏、挖孔屏越来越多,作为移动开发者来说,这并不是一件好事,越来越多异形屏的出现意味着我们需要投入大量的经历在屏幕适配上,本文总结了当下主流手机的屏幕适配方式(华为、vivo、oppo、小米)以及判断view是否被摄像头遮挡,去动态改变view的位置。
一. Android P及以上
谷歌官方从Android P开始给开发者提供了刘海屏相关的API,可以通过直接调用API来进行刘海屏的适配处理。通过DisplayCutout类可以获得安全区域的范围以及刘海区域(官方的叫法是缺口)的信息,只有API Level在28及以上才可以调用。
1. 判断是否是异形屏
    /**
     * Android P异形屏判断
     *
     * @param activity activity
     * @return 是否是异形屏
     */
    public static boolean isSpecialScreen(Activity activity) {
        if (Build.VERSION.SDK_INT >= Build.VERSION_CODES.P) {
            final View decorView = activity.getWindow().getDecorView();
            if (decorView != null) {
                WindowInsets windowInsets = decorView.getRootWindowInsets();
                if (windowInsets != null) {
                    DisplayCutout cutoutDisp = windowInsets.getDisplayCutout();
                    if(cutoutDisp != null) {
                        displayCutout = cutoutDisp;
                        return true;
                    }
                }
            }
        }
        return false;
    }
2. 获取异形屏的刘海高度
    /**
     * 9.0以上手机,获取异形屏的刘海高度
     *
     * @return 获取异形屏的刘海高度
     */
    @RequiresApi(28)
    private static int getNotchHeightFromP() {
        int notchHeight = 0;
        if (SwanApp.get() == null || SwanApp.get().getActivity() == null) {
            return notchHeight;
        }
        try {
            View view = SwanApp.get().getActivity().getWindow().getDecorView();
            WindowInsets windowInsets = view.getRootWindowInsets();
            if (windowInsets == null) {
                return notchHeight;
            }
            DisplayCutout displayCutout = windowInsets.getDisplayCutout();
            if (displayCutout == null) {
                return notchHeight;
            }
            notchHeight = displayCutout.getSafeInsetTop();
            if (DEBUG) {
                Log.d(TAG, "刘海屏高度:" + notchHeight);
            }
        } catch (Exception e) {
            if (DEBUG) {
                Log.w(TAG, e);
            }
        }
        return notchHeight;
    }
二. Android P以下
对于Android P以下的手机,我们可以通过各个厂商提供的适配方案来进行适配。
1. 华为适配方案
    /**
     * 判断华为是否有刘海屏
     *
     * @param context Context
     * @return hasNotch 是否有刘海屏
     */
    private static boolean hasNotchAtHuawei(@NonNull Context context) {
        boolean ret = false;
        try {
            ClassLoader classLoader = context.getClassLoader();
            Class HwNotchSizeUtil = classLoader.loadClass("com.huawei.android.util.HwNotchSizeUtil");
            Method get = HwNotchSizeUtil.getMethod("hasNotchInScreen");
            ret = (boolean) get.invoke(HwNotchSizeUtil);
        } catch (Exception e) {
            if (DEBUG) {
                e.printStackTrace();
            }
        }
        return ret;
    }
2. VIVO适配方案
    /**
     * 判断VIVO是否有刘海屏
     * <p>
     * 0x00000020表示是否有凹槽;
     * 0x00000008表示是否有圆角。
     *
     * @param context Context
     * @return hasNotch 是否有刘海屏
     */
    private static boolean hasNotchAtVivo(@NonNull Context context) {
        boolean ret = false;
        try {
            ClassLoader classLoader = context.getClassLoader();
            Class FtFeature = classLoader.loadClass("android.util.FtFeature");
            Method method = FtFeature.getMethod("isFeatureSupport", int.class);
            ret = (boolean) method.invoke(FtFeature, VIVO_NOTCH);
        } catch (Exception e) {
            if (DEBUG) {
                e.printStackTrace();
            }
        }
        return ret;
    }
3. 小米适配方案
    /**
     * 判断MIUI是否有刘海屏
     *
     * @param context Context
     * @return 是否有刘海屏
     */
    private static boolean hasNotchAtMiui(@NonNull Context context) {
        boolean ret = false;
        try {
            ClassLoader classLoader = context.getClassLoader();
            Class SystemProperties = classLoader.loadClass("android.os.SystemProperties");
            Method getInt = SystemProperties.getMethod("getInt", String.class, int.class);
            ret = (Integer) getInt.invoke(SystemProperties, "ro.miui.notch", 0) == 1;
        } catch (Exception e) {
            if (DEBUG) {
                e.printStackTrace();
            }
        }
        return ret;
    }
4. OPPO适配方案
    /**
     * 判断OPPO是否有刘海屏
     *
     * @param context Context
     * @return 是否有刘海屏
     */
    private static boolean hasNotchAtOPPO(@NonNull Context context) {
        return context.getPackageManager().hasSystemFeature("com.oppo.feature.screen.heteromorphism");
    }
三. 设置异形屏的显示模式
Android 还允许我们控制是否在刘海区域内显示内容。窗口布局属性 layoutInDisplayCutoutMode 控制您的内容如何呈现在刘海区域中。您可以将 layoutInDisplayCutoutMode 设为以下某个值:
LAYOUT_IN_DISPLAY_CUTOUT_MODE_DEFAULT - 这是默认行为,在竖屏模式下,内容会呈现到刘海区域中;但在横屏模式下,内容会显示黑边。
LAYOUT_IN_DISPLAY_CUTOUT_MODE_SHORT_EDGES - 在竖屏模式和横屏模式下,内容都会呈现到刘海区域中。
LAYOUT_IN_DISPLAY_CUTOUT_MODE_NEVER - 内容从不呈现到刘海区域中。
    /**
     * 设置异形屏的显示模式
     *
     *@param activity Activity
     *@param int mode(三种模式)
     */
    public static void setWindowLayoutInDisplayCutoutMode(Activity activity,int mode) {
        if (Build.VERSION.SDK_INT >= Build.VERSION_CODES.P) {
            WindowManager.LayoutParams lp = activity.getWindow().getAttributes();
            lp.layoutInDisplayCutoutMode = mode;
            activity.getWindow().setAttributes(lp);
        }
    }
四. 判断view是否被摄像头遮挡
刘海屏的摄像头可能在左边、中间、右边,我们可以通过displayCutout.getBoundingRects()获取所有缺口的集合,然后根据缺口的位置判断view是否被遮挡。
    /**
     *
     * 判断view是否被摄像头遮挡
     */
    public static boolean isViewCovered(Activity activity,View view) {
        //判断是否是异形屏(里面包含Android P以上及以下异形屏的判断)
        if (isSpecialshapedScreen(activity) && isAndroidP(activity)) {
            List<Rect> rects = displayCutout.getBoundingRects();
            int rectLfet = rects.get(0).left;
            int rectRight = rects.get(0).right;
            int rectTop = rects.get(0).top;
            int rectBottom = rects.get(0).bottom;
            int[] location = new  int[2] ;
            view.getLocationOnScreen(location); //获取在整个屏幕内的绝对坐标,含statusBar
            int width = view.getWidth();
            int height = view.getHeight();
            int left = location[0];
            int right = location[0] + width;
            int top = location[1];
            int bottom = location[1] + height;
            if (((bottom <= rectBottom && bottom > rectTop) || (top < rectBottom && top >= rectTop))
                    && ((right > rectLfet && right <= rectRight)
                    || (left >= rectLfet && right <= rectRight)
                    || (left >= rectLfet && left < rectRight)
                    || (left < rectLfet && right > rectRight))) {
                return true;
            } else if (((left >= rectLfet && left < rectRight) || (right > rectLfet && right <= rectRight))
                    && ((bottom > rectTop && bottom <=rectBottom)
                    || (top >= rectTop && bottom <= rectBottom)
                    || (top >= rectTop && top < rectBottom)
                    || (top < rectTop && bottom > rectBottom))) {
                return true;
            } else if (left <= rectLfet && right >= rectRight && top <= rectTop && bottom >= rectBottom) {
                return true;
            }
        }
        return false;
    }
分析:
left 、top、right、bottom分别代表view在屏幕中的左上右下距离。
rectLeft、rectTop、rectRight、rectBottom分别代表刘海屏在屏幕中的左上右下距离。
1.以view的上边或下边为边界,上边或下边在刘海屏的上下之间,view被遮挡的情况有四种。
2.以view的左边或右边为边界,左边或右边在刘海屏的左右之间,view被遮挡的情况有四种。
3.刘海屏被view包围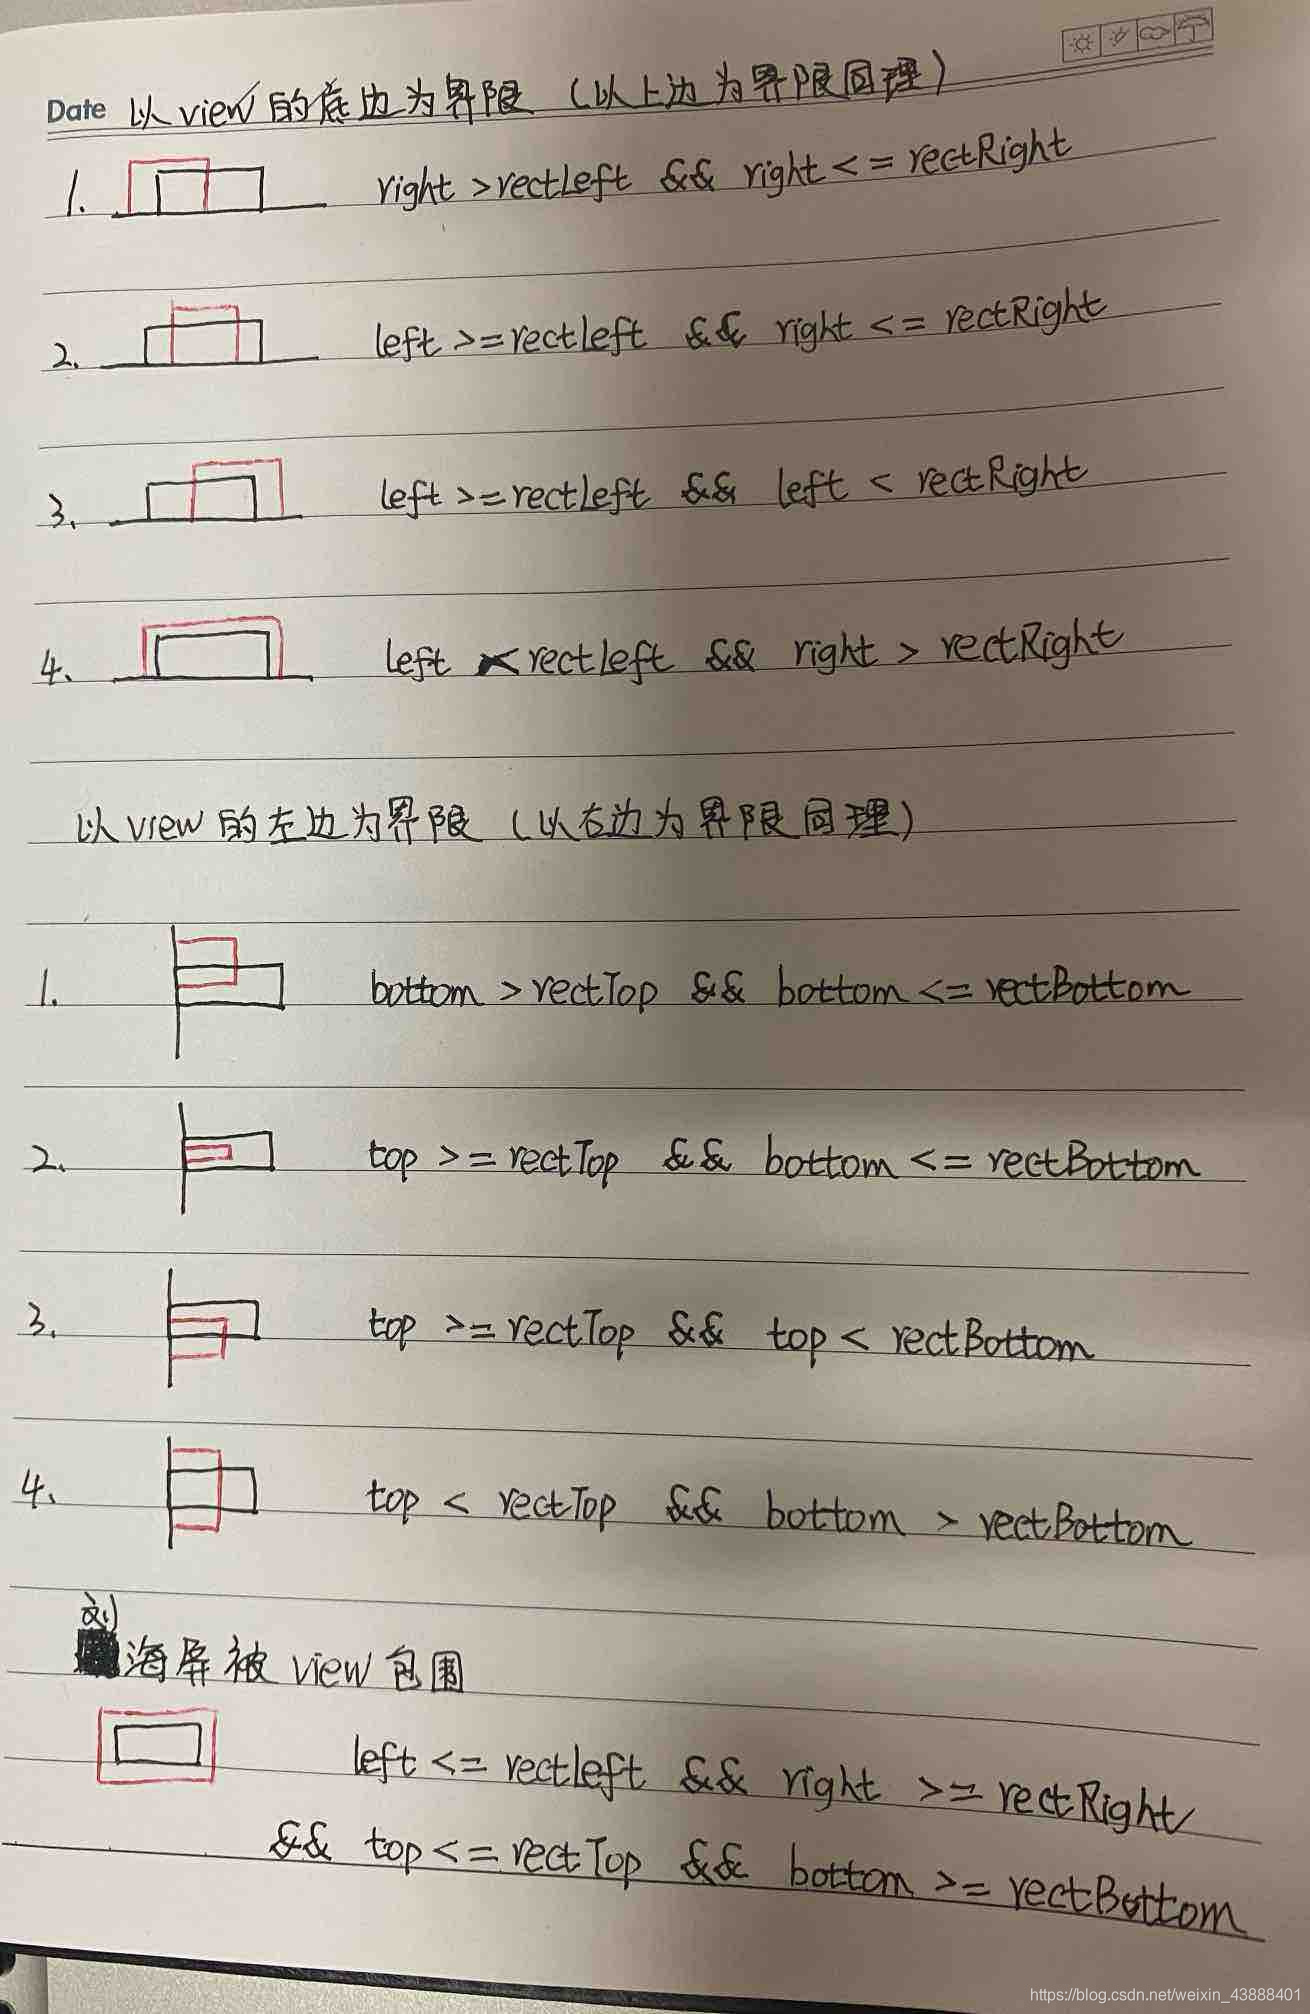
五. 动态改变view的位置
当我们判断view被刘海屏遮挡后,就可以改变view的位置,根据需求移动到刘海屏下方或其他。可以通过设置layoutParams,要想获取到view在屏幕中的位置,需要等view绘制完成,所以使用view.post
    /**
     *伪代码
     */
    view.post(new Runnable() {
            @Override
            public void run() {
                if (isViewCovered(activity,view) ) {
                    List<Rect> rects = cutoutDisp.getBoundingRects();
                    int rectBottom = rects.get(0).bottom;
                    FrameLayout.LayoutParams layoutParams = (FrameLayout.LayoutParams) view.getLayoutParams();
                    layoutParams.topMargin = mMenu.getTop() + rectBottom;
                    mMenu.setLayoutParams(layoutParams);
                }
            }
        });