目录
一.axios使用
1.json-Server服务搭建
json-Server可以快速搭建http服务,首先用命令行安装
npm install -g json-server然后创建一个db.json文件
{
  "posts": [
    {
      "id": 1,
      "title": "json-server",
      "author": "typicode"
    },
    {
      "id": 2,
      "title": "尚硅谷大厂学院上线啦",
      "author": "小编"
    }
  ],
  "comments": [
    {
      "id": 1,
      "body": "some comment",
      "postId": 1
    },
    {
      "body": "喜大普奔",
      "postId": 2,
      "id": 2
    }
  ],
  "profile": {
    "name": "typicode"
  }
}
最后在db.json文件所在文件夹目录下启动服务
json-server --watch db.json2.axios的介绍与页面配置
2.1. axios 是什么 ?
1. 前端最流行的 ajax 请求库
2. react/vue 官方都推荐使用 axios 发 ajax 请求
2.2. axios 特点
1. 基于 xhr + promise 的异步 ajax 请求库
2. 浏览器端 /node 端都可以使用
3. 支持请求/响应拦截器
4. 支持请求取消
5. 请求 / 响应数据转换
6. 批量发送多个请求
2.3. axios 安装
1. npm install axios
2. bower install axios
3. yarn install axios
这里使用CND的方式直接引入: <script src="https://cdn.bootcdn.net/ajax/libs/axios/0.21.1/axios.min.js"></script>
<!DOCTYPE html>
<html lang="en">
<head>
    <meta charset="UTF-8">
    <meta name="viewport" content="width=device-width, initial-scale=1.0">
    <title>axios配置</title>
    <script src="https://cdn.bootcdn.net/ajax/libs/axios/0.21.1/axios.min.js"></script>
</head>
<body>
    <script>
        console.log(axios);
    </script>
</body>
</html>
3.axios的基本使用
<!doctype html>
<html lang="en">
<head>
    <meta charset="UTF-8">
    <meta name="viewport" content="width=device-width, user-scalable=no, initial-scale=1.0, maximum-scale=1.0, minimum-scale=1.0">
    <meta http-equiv="X-UA-Compatible" content="ie=edge">
    <title>axios基本使用</title>
    <link crossorigin="anonymous" href="https://cdn.bootcss.com/twitter-bootstrap/3.3.7/css/bootstrap.min.css" rel="stylesheet">
    <script src="https://cdn.bootcdn.net/ajax/libs/axios/0.21.1/axios.min.js"></script>
</head>
<body>
    <div class="container">
        <h2 class="page-header">基本使用</h2>
        <button class="btn btn-primary"> 发送GET请求 </button>
        <button class="btn btn-warning" > 发送POST请求 </button>
        <button class="btn btn-success"> 发送 PUT 请求 </button>
        <button class="btn btn-danger"> 发送 DELETE 请求 </button>
    </div>
    <script>
        //获取按钮
        const btns = document.querySelectorAll('button');

        //第一个
        btns[0].onclick = function(){
            //发送 AJAX 请求
            axios({
                //请求类型
                method: 'GET',
                //URL
                url: 'http://localhost:3000/posts/2',
            }).then(response => {
                console.log(response);
            });
        }

        //添加一篇新的文章
        btns[1].onclick = function(){
            //发送 AJAX 请求
            axios({
                //请求类型
                method: 'POST',
                //URL
                url: 'http://localhost:3000/posts',
                //设置请求体
                data: {
                    title: "今天天气不错, 还挺风和日丽的",
                    author: "张三"
                }
            }).then(response => {
                console.log(response);
            });
        }

        //更新数据
        btns[2].onclick = function(){
            //发送 AJAX 请求
            axios({
                //请求类型
                method: 'PUT',
                //URL
                url: 'http://localhost:3000/posts/3',
                //设置请求体
                data: {
                    title: "今天天气不错, 还挺风和日丽的",
                    author: "李四"
                }
            }).then(response => {
                console.log(response);
            });
        }

        //删除数据
        btns[3].onclick = function(){
            //发送 AJAX 请求
            axios({
                //请求类型
                method: 'delete',
                //URL
                url: 'http://localhost:3000/posts/3',
            }).then(response => {
                console.log(response);
            });
        }

    </script>
</body>

</html>
4.axios其他方式发送请求
axios 常用语法
axios(config): 通用 / 最本质的发任意类型请求的方式
axios(url[, config]): 可以只指定 url 发 get 请求
axios.request(config): 等同于 axios(config)
axios.get(url[, config]): 发 get 请求
axios.delete(url[, config]): 发 delete 请求
axios.post(url[, data, config]): 发 post 请求
axios.put(url[, data, config]): 发 put 请求
axios.defaults.xxx: 请求的默认全局配置
axios.interceptors.request.use(): 添加请求拦截器
axios.interceptors.response.use(): 添加响应拦截器
axios.create([config]): 创建一个新的 axios( 它没有下面的功能 )
axios.Cancel(): 用于创建取消请求的错误对象
axios.CancelToken(): 用于创建取消请求的 token 对象
axios.isCancel(): 是否是一个取消请求的错误
axios.all(promises): 用于批量执行多个异步请求
axios.spread(): 用来指定接收所有成功数据的回调函数的方法

<!doctype html>
<html lang="en">
<head>
    <meta charset="UTF-8">
    <meta name="viewport" content="width=device-width, user-scalable=no, initial-scale=1.0, maximum-scale=1.0, minimum-scale=1.0">
    <meta http-equiv="X-UA-Compatible" content="ie=edge">
    <title>axios其他使用</title>
    <link crossorigin="anonymous" href="https://cdn.bootcss.com/twitter-bootstrap/3.3.7/css/bootstrap.min.css" rel="stylesheet">
    <script src="https://cdn.bootcdn.net/ajax/libs/axios/0.21.1/axios.min.js"></script>
</head>
<body>
    <div class="container">
        <h2 class="page-header">其他使用</h2>
        <button class="btn btn-primary"> 发送GET请求 </button>
        <button class="btn btn-warning" > 发送POST请求 </button>
        <button class="btn btn-success"> 发送 PUT 请求 </button>
        <button class="btn btn-danger"> 发送 DELETE 请求 </button>
    </div>
    <script>
        //获取按钮
        const btns = document.querySelectorAll('button');

        //发送 GET 请求
        btns[0].onclick = function(){
            // axios()
            axios.request({
                method:'GET',
                url: 'http://localhost:3000/comments'
            }).then(response => {
                console.log(response);
            })
        }

        //发送 POST 请求
        btns[1].onclick = function(){
            // axios()
            axios.post(
                'http://localhost:3000/comments',
                {
                    "body": "喜大普奔",
                    "postId": 2
                }).then(response => {
                    console.log(response);
                })
        }


    </script>
</body>

</html>
5.axios请求响应结果的结构

config:配置对象,里面包含请求类型、请求URL、请求体等
data:响应体的结果
headers:响应头信息
request:原生的Ajax请求对象
status:响应状态码
statusText:响应状态字符串
6.axios配置对象详细说明
这些是用于发出请求的可用配置选项。只有url是必需的。GET如果method未指定,请求将默认为。
{
// `url` 是将用于请求url的服务器
URL : '/user' ,
// `method` 是发出请求时要使用的请求方法
method : 'get' , // 默认
// `baseURL` 将被添加到 `url` 之前,除非 `url` 是绝对的。
// 为 axios 实例设置 `baseURL` 以将相对 URL
// 传递给该实例的方法会很方便。
baseURL : 'https://some-domain.com/api/' ,
// `transformRequest` 允许在将请求数据发送到服务器之前对其进行更改
// 这仅适用于请求方法 'PUT'、'POST'、'PATCH' 和 'DELETE'
// 数组中的最后一个函数必须返回字符串或 Buffer、ArrayBuffer 的实例,
// FormData 或 Stream
// 您可以修改 headers 对象。
transformRequest : [ function ( data , headers ) {
// 做任何你想做的转换数据
return data;
} ] ,
// `transformResponse` 允许在将响应数据传递给 then/catch之前更改响应数据
transformResponse : [ function ( data ) {
// 做任何你想做的事情来转换数据
return data;
} ] ,
// `headers` 是要发送的自定义头
headers : { 'X-Requested-With' : 'XMLHttpRequest' } ,
// `params` 是与请求一起发送的 URL 参数
// 必须是普通对象或 URLSearchParams 对象
params : {
ID : 12345
} ,
// `paramsSerializer` 是一个可选函数,负责序列化 `params`
// (eg https://www.npmjs.com/package/qs, http://api.jquery.com/jquery.param/)
paramsSerializer: function (params) {
return Qs.stringify(params, {arrayFormat: 'brackets'})
},
// `data` 是要作为请求体发送的数据
// 仅适用于请求方法 'PUT'、'POST'、'DELETE 和 'PATCH'
// 当没有设置 `transformRequest` 时,必须是以下类型之一:
// - 字符串、普通对象、ArrayBuffer、ArrayBufferView、URLSearchParams
// - 仅限浏览器:FormData、File、Blob
// - 仅限节点:流、缓冲区
data:{
firstName : 'Fred'
} ,
// 将数据发送到正文的替代语法
// 方法 post
// 仅发送值,而不发送键
data:'Country=Brasil&City=Belo Horizonte' ,
// `timeout` 指定请求超时前的毫秒数。
// 如果请求时间超过 `timeout`,请求将被中止。
timeout : 1000 , // 默认为 `0`(无超时)
// `withCredentials` 指示是否应该使用凭据进行跨站点访问控制请求
withCredentials : false , // 默认
// `adapter` 允许自定义处理请求,这使得测试更容易。
// 返回一个承诺并提供一个有效的响应(参见 lib/adapters/README.md)。
adapter: function (config) {
/* ... */
},
// `auth` 表示应该使用 HTTP 基本身份验证,并提供凭据。
// 这将设置一个 `Authorization` 标头,覆盖您使用 `headers` 设置的任何现有的
// `Authorization` 自定义标头。
// 请注意,通过此参数只能配置 HTTP Basic auth。
// 对于 Bearer 令牌等,请改用 `Authorization` 自定义标头。
auth: {
username: 'janedoe',
password: 's00pers3cret'
},
// `responseType` 表示服务器将响应的数据类型
// 选项有:'arraybuffer'、'document'、'json'、'text'、'stream'
// 仅限浏览器:'blob'
responseType : 'json' , // 默认
// `responseEncoding` 表示用于解码响应的编码(仅限 Node.js)
// 注意:忽略 `responseType` 的 'stream' 或客户端请求
responseEncoding : 'utf8' , // 默认
// `xsrfCookieName` 是用作 xsrf 令牌值的 cookie 的名称
xsrfCookieName : 'XSRF-TOKEN' , // 默认
// `xsrfHeaderName` 是带有 xsrf 令牌值的 http 头的名称
xsrfHeaderName : 'X-XSRF-TOKEN' , // 默认
// `onUploadProgress` 允许处理上传的进度事件
// 仅浏览器
onUploadProgress : function ( progressEvent ) {
// 对本地进度事件做任何你想做的事情
} ,
// `onDownloadProgress` 允许处理下载的进度事件
// 仅浏览器
onDownloadProgress : function ( progressEvent ) {
// 对本地进度事件做任何你想做的事情
} ,
// `maxContentLength` 定义了 node.js 中允许的 http 响应内容的最大大小
maxContentLength : 2000 ,
// `maxBodyLength`(仅限节点选项)定义允许的 http 请求内容的最大大小(以字节为单位)
maxBodyLength : 2000 ,
// `validateStatus` 定义是否解决或拒绝给定HTTP 响应状态代码的承诺。
// 如果 `validateStatus` 返回 `true`(或设置为 `null` 或 `undefined`),
//promise 将被解析;否则,promise 将被拒绝。
validateStatus : function ( status ) {
return status >= 200 && status < 300 ; // 默认
} ,
// `maxRedirects` 定义了在 node.js 中重定向的最大数量。
// 如果设置为 0,则不会进行重定向。
maxRedirects : 21 , // 默认
// `beforeRedirect` 定义了一个将在重定向之前调用的函数。
// 使用它来调整重定向时的请求选项,
// 检查最新的响应标头,
// 或通过抛出错误取消请求
// 如果 maxRedirects 设置为 0,则不使用 `beforeRedirect`。
beforeRedirect: (options, { headers }) => {
if (options.hostname === "example.com") {
options.auth = "user:password";
}
};
// `socketPath` 定义了一个在 node.js 中使用的 UNIX Socket。
// 例如 '/var/run/docker.sock' 向 docker 守护进程发送请求。
// 只能指定 `socketPath` 或 `proxy`。
// 如果两者都指定,则使用 `socketPath`。
socketPath: null , // 默认
// `httpAgent` 和 `httpsAgent` 定义了在 node.js 中分别执行 http 和
// https 请求时要使用的自定义代理。这允许添加默认情况下未启用的选项,例如 `keepAlive`。
httpAgent: new http.Agent({ keepAlive: true }),
httpsAgent: new https.Agent({ keepAlive: true }),
// `proxy` 定义代理服务器的主机名、端口和协议。
// 您还可以使用常规的 `http_proxy` 和
// `https_proxy` 环境变量来定义您的代理。如果您正在使用环境变量进行代理配置,
// 您还可以将 `no_proxy` 环境变量定义为不应被代理的域的逗号分隔列表。
// 使用 `false` 禁用代理,忽略环境变量。
// `auth` 表示应该使用 HTTP Basic auth 连接到代理,并且提供凭据。
// 这将设置一个 `Proxy-Authorization` 标头,覆盖您使用 `headers` 设置的任何现有的
//`Proxy-Authorization` 自定义标头。
// 如果代理服务器使用 HTTPS,那么您必须将协议设置为 `https`。
proxy: {
protocol: 'https',
host: '127.0.0.1',
port: 9000,
auth: {
username: 'mikeymike',
password: 'rapunz3l'
}
},
// `cancelToken` 指定可用于取消请求的取消令牌
//(有关详细信息,请参阅下面的取消部分)
cancelToken : new CancelToken ( function ( cancel ) {
} ) ,
// 使用 AbortController信号取消 Axios 请求的另一种方法
signal: new AbortController().signal,
// `decompress` 指示是否应该自动解压缩响应正文。如果设置为 `true`
// 还将从所有解压缩响应的响应对象中删除 'content-encoding' 标头
// - 仅限节点(XHR 无法关闭解压缩)
decompress : true // 默认
// `insecureHTTPParser` 布尔值。
// 指示在何处使用接受无效 HTTP 标头的不安全 HTTP 解析器。
// 这可能允许与不符合标准的 HTTP 实现的互操作性。
// 应该避免使用不安全的解析器。
// 见选项 https://nodejs.org/dist/latest-v12.x/
// docs/api/http.html#http_http_request_url_options_callback
// 另见 https://nodejs.org/en/blog/vulnerability/february-2020 -security-
// releases/#strict-http-header-parsing-none
insecureHTTPParser: undefined // 默认
// 向后兼容的过渡选项,可能会在较新版本中删除
transitional: {
// 静默 JSON 解析模式
// `true` - 如果解析失败,则忽略 JSON 解析错误并将 response.data 设置为 null(旧行为)
// `false` - 如果 JSON 解析失败则抛出 SyntaxError (注意:responseType 必须设置为 'json')
silentJSONParsing : true , // 当前 Axios 版本的默认值
// 尝试将响应字符串解析为 JSON,即使 `responseType` 不是 'json'
forcedJSONParsing: true,
// 在请求超时时抛出 ETIMEDOUT 错误而不是通用 ECONNABORTED
clarifyTimeoutError: false,
}
}7.axios的默认配置
<!doctype html>
<html lang="en">
<head>
    <meta charset="UTF-8">
    <meta name="viewport" content="width=device-width, user-scalable=no, initial-scale=1.0, maximum-scale=1.0, minimum-scale=1.0">
    <meta http-equiv="X-UA-Compatible" content="ie=edge">
    <title>axios基本使用</title>
    <link crossorigin="anonymous" href="https://cdn.bootcss.com/twitter-bootstrap/3.3.7/css/bootstrap.min.css" rel="stylesheet">
    <script src="https://cdn.bootcdn.net/ajax/libs/axios/0.21.1/axios.min.js"></script>
</head>
<body>
    <div class="container">
        <h2 class="page-header">基本使用</h2>
        <button class="btn btn-primary"> 发送GET请求 </button>
        <button class="btn btn-warning" > 发送POST请求 </button>
        <button class="btn btn-success"> 发送 PUT 请求 </button>
        <button class="btn btn-danger"> 发送 DELETE 请求 </button>
    </div>
    <script>
        //获取按钮
        const btns = document.querySelectorAll('button');
        //默认配置
        axios.defaults.method = 'GET';//设置默认的请求类型为 GET
        axios.defaults.baseURL = 'http://localhost:3000';//设置基础 URL
        axios.defaults.params = {id:100};
        axios.defaults.timeout = 3000;//

        btns[0].onclick = function(){
            axios({
                url: '/posts'
            }).then(response => {
                console.log(response);
            })
        }

    </script>
</body>

</html>
8.axios创建实例发送请求
axios.create(config)
1. 根据指定配置创建一个新的 axios, 也就是每个新 axios 都有自己的配置
2. 新 axios 只是没有取消请求和批量发请求的方法 , 其它所有语法都是一致的
3. 为什么要设计这个语法 ?
(1) 需求 : 项目中有部分接口需要的配置与另一部分接口需要的配置不太一
样 , 如何处理
(2) 解决 : 创建 2 个新 axios, 每个都有自己特有的配置 , 分别应用到不同要
求的接口请求中
<!doctype html>
<html lang="en">
<head>
    <meta charset="UTF-8">
    <meta name="viewport" content="width=device-width, user-scalable=no, initial-scale=1.0, maximum-scale=1.0, minimum-scale=1.0">
    <meta http-equiv="X-UA-Compatible" content="ie=edge">
    <title>axios实例对象对象</title>
    <link crossorigin="anonymous" href="https://cdn.bootcss.com/twitter-bootstrap/3.3.7/css/bootstrap.min.css" rel="stylesheet">
    <script src="https://cdn.bootcdn.net/ajax/libs/axios/0.21.1/axios.min.js"></script>
</head>
<body>
    <div class="container">
        <h2 class="page-header">基本使用</h2>
        <button class="btn btn-primary"> 发送GET请求 </button>
        <button class="btn btn-warning" > 发送POST请求 </button>
        <br>
    </div>
    <script>
        //获取按钮
        const btns = document.querySelectorAll('button');

        //创建实例对象  /getJoke
        const duanzi = axios.create({
            baseURL: 'https://api.apiopen.top',
            timeout: 2000
        });

        const onather = axios.create({
            baseURL: 'https://b.com',
            timeout: 2000
        });
        //这里  duanzi 与 axios 对象的功能几近是一样的
        // duanzi({
        //     url: '/getJoke',
        // }).then(response => {
        //     console.log(response);
        // });

        duanzi.get('/getJoke').then(response => {
            console.log(response.data)
        })
    </script>
</body>

</html>
9.axios拦截器
拦截器函数 /ajax 请求 / 请求的回调函数的调用顺序
1. 说明 : 调用 axios() 并不是立即发送 ajax 请求 , 而是需要经历一个较长的流程
2. 流程 : 请求拦截器 2 => 请求拦截器 1 => 发 ajax 请求 => 响应拦截器 1 => 响
应拦截器 2 => 请求的回调;请求拦截器后进先出,响应拦截器先进先出。
3. 注意 : 此流程是通过 promise 串连起来的 , 请求拦截器传递的是 config, 响应
拦截器传递的是 response
<!DOCTYPE html>
<html lang="en">
<head>
    <meta charset="UTF-8">
    <meta name="viewport" content="width=device-width, initial-scale=1.0">
    <title>拦截器</title>
    <script src="https://cdn.bootcdn.net/ajax/libs/axios/0.21.1/axios.min.js"></script>
</head>
<body>
    <script>
        // Promise
        // 设置请求拦截器  config 配置对象
        axios.interceptors.request.use(function (config) {
            console.log('请求拦截器 成功 - 1号');
            //修改 config 中的参数
            config.params = {a:100};

            return config;
        }, function (error) {
            console.log('请求拦截器 失败 - 1号');
            return Promise.reject(error);
        });

        axios.interceptors.request.use(function (config) {
            console.log('请求拦截器 成功 - 2号');
            //修改 config 中的参数
            config.timeout = 2000;
            return config;
        }, function (error) {
            console.log('请求拦截器 失败 - 2号');
            return Promise.reject(error);
        });

        // 设置响应拦截器
        axios.interceptors.response.use(function (response) {
            console.log('响应拦截器 成功 1号');
            return response.data;
            // return response;
        }, function (error) {
            console.log('响应拦截器 失败 1号')
            return Promise.reject(error);
        });

        axios.interceptors.response.use(function (response) {
            console.log('响应拦截器 成功 2号')
            return response;
        }, function (error) {
            console.log('响应拦截器 失败 2号')
            return Promise.reject(error);
        });

        //发送请求
        axios({
            method: 'GET',
            url: 'http://localhost:3000/posts'
        }).then(response => {
            console.log('自定义回调处理成功的结果');
            console.log(response);
        });
    </script>
</body>
</html>
10.axios取消请求
1. 基本流程
配置 cancelToken 对象
缓存用于取消请求的 cancel 函数
在后面特定时机调用 cancel 函数取消请求
在错误回调中判断如果 error 是 cancel, 做相应处理
2. 实现功能
点击按钮 , 取消某个正在请求中的请求
在请求一个接口前 , 取消前面一个未完成的请求
<!DOCTYPE html>
<html lang="en">
<head>
    <meta charset="UTF-8">
    <meta name="viewport" content="width=device-width, initial-scale=1.0">
    <title>取消请求</title>
    <link crossorigin='anonymous' href="https://cdn.bootcss.com/twitter-bootstrap/3.3.7/css/bootstrap.min.css" rel="stylesheet">
    <script src="https://cdn.bootcdn.net/ajax/libs/axios/0.21.1/axios.min.js"></script>
</head>
<body>
    <div class="container">
        <h2 class="page-header">axios取消请求</h2>
        <button class="btn btn-primary"> 发送请求 </button>
        <button class="btn btn-warning" > 取消请求 </button>
    </div>
    <script>
        //获取按钮
        const btns = document.querySelectorAll('button');
        //2.声明全局变量
        let cancel = null;
        //发送请求
        btns[0].onclick = function(){
            //检测上一次的请求是否已经完成
            if(cancel !== null){
                //取消上一次的请求
                cancel();
            }
            axios({
                method: 'GET',
                url: 'http://localhost:3000/posts',
                //1. 添加配置对象的属性`cancelToken` 指定可用于取消请求的取消令牌
                cancelToken: new axios.CancelToken(function(c){
                    //3. 将 c 的值赋值给 cancel
                    cancel = c;
                })
            }).then(response => {
                console.log(response);
                //将 cancel 的值初始化
                cancel = null;
            })
        }

        //绑定第二个事件取消请求
        btns[1].onclick = function(){
            cancel();
        }
    </script>
</body>
</html>
因为服务器在本地,没等取消请求就回来了,所以将服务器端做个延时响应
json-server --watch db.json -d 2000
二.axios源码分析
11.axios文件结构说明
├── /dist/ # 项目输出目录 ├── /lib/ # 项目源码目录 │ ├── /adapters/ # 定义请求的适配器 xhr 、 http │ │ ├── http.js # 实现 http 适配器 ( 包装 http 包 ) │ │ └── xhr.js # 实现 xhr 适配器 ( 包装 xhr 对象 ) │ ├── /cancel/ # 定义取消功能 │ ├── /core/ # 一些核心功能 │ │ ├── Axios.js # axios 的核心主类 │ │ ├── dispatchRequest.js # 用来调用 http 请求适配器方法发送请求的函数 │ │ ├── InterceptorManager.js # 拦截器的管理器 │ │ └── settle.js # 根据 http 响应状态,改变 Promise 的状态 │ ├── /helpers/ # 一些辅助方法 │ ├── axios.js # 对外暴露接口 │ ├── defaults.js # axios 的默认配置 │ └── utils.js # 公用工具 ├── package.json # 项目信息 ├── index.d.ts # 配置 TypeScript 的声明文件 └── index.js # 入口文件 |

12.axios的创建过程详解
源码:
index.js
module.exports = require('./lib/axios');axios.js
'use strict';
// axios 入口文件
//引入工具
var utils = require('./utils');
//引入绑定函数  创建函数
var bind = require('./helpers/bind');// 创建函数的
//引入 Axios 主文件
var Axios = require('./core/Axios');
// 引入合并配置的函数
var mergeConfig = require('./core/mergeConfig');
// 导入默认配置
var defaults = require('./defaults');

/**
 * Create an instance of Axios
 * 创建一个 Axios 的实例对象
 * @param {Object} defaultConfig The default config for the instance
 * @return {Axios} A new instance of Axios
 */
function createInstance(defaultConfig) {
    //创建一个实例对象 context 可以调用 get  post put delete request
    var context = new Axios(defaultConfig);// context 不能当函数使用
    // 将 request 方法的 this 指向 context 并返回新函数  instance 可以用作函数使用, 且返回的是一个 promise 对象
    var instance = bind(Axios.prototype.request, context);// instance 与 Axios.prototype.request 代码一致
    // instance({method:'get'});  instance.get() .post()
    // Copy axios.prototype to instance
    // 将 Axios.prototype 和实例对象的方法都添加到 instance 函数身上
    utils.extend(instance, Axios.prototype, context);// instance.get instance.post ...
    // instance()  instance.get()
    // 将实例对象的方法和属性扩展到 instance 函数身上
    utils.extend(instance, context);

    return instance;
}
// axios.interceptors

// Create the default instance to be exported
// 通过配置创建 axios 函数
var axios = createInstance(defaults);

// Expose Axios class to allow class inheritance
// axios 添加 Axios 属性, 属性值为构造函数对象  axios.CancelToken = CancelToken    new axios.Axios();
axios.Axios = Axios;

// Factory for creating new instances
// 工厂函数  用来返回创建实例对象的函数
axios.create = function create(instanceConfig) {
    return createInstance(mergeConfig(axios.defaults, instanceConfig));
};

// Expose Cancel & CancelToken
axios.Cancel = require('./cancel/Cancel');
axios.CancelToken = require('./cancel/CancelToken');
axios.isCancel = require('./cancel/isCancel');

// Expose all/spread
axios.all = function all(promises) {
    return Promise.all(promises);
};
axios.spread = require('./helpers/spread');

module.exports = axios;

//简单实现全局暴露 axios
window.axios = axios;

// Allow use of default import syntax in TypeScript
module.exports.default = axios;
Axios.js
'use strict';
//Axios 构造函数文件

//引入工具
var utils = require('./../utils');
//引入构建 URL 工具
var buildURL = require('../helpers/buildURL');
//引入拦截器管理构造函数
var InterceptorManager = require('./InterceptorManager');
//引入发送请求的函数
var dispatchRequest = require('./dispatchRequest');
//获取合并配置的函数
var mergeConfig = require('./mergeConfig');

/**
 * Create a new instance of Axios
 * 创建 Axios 构造函数
 * @param {Object} instanceConfig The default config for the instance
 */
function Axios(instanceConfig) {
    //实例对象上的 defaults 属性为配置对象
    this.defaults = instanceConfig;
    //实例对象上有 interceptors 属性用来设置请求和响应拦截器
    this.interceptors = {
        request: new InterceptorManager(),
        response: new InterceptorManager()
    };
}

/**
 * Dispatch a request
 * 发送请求的方法.  原型上配置, 则实例对象就可以调用 request 方法发送请求
 * @param {Object} config The config specific for this request (merged with this.defaults)
 */
Axios.prototype.request = function request(config) {
    /*eslint no-param-reassign:0*/
    // Allow for axios('example/url'[, config]) a la fetch API
    /**
     * axios('http://www.baidu.com', {header:{}})
     */
    if (typeof config === 'string') {
        config = arguments[1] || {};
        config.url = arguments[0];
    } else {
        config = config || {};
    }
    //将默认配置与用户调用时传入的配置进行合并
    config = mergeConfig(this.defaults, config);

    // Set config.method
    // 设定请求方法
    if (config.method) {
        config.method = config.method.toLowerCase();
    } else if (this.defaults.method) {
        config.method = this.defaults.method.toLowerCase();
    } else {
        config.method = 'get';
    }

    // Hook up interceptors middleware
    // 创建拦截器中间件  第一个参数用来发送请求, 第二个为 undefined 用来补位
    var chain = [dispatchRequest, undefined];
    // 创建一个成功的 promise 且成功的值为合并后的请求配置
    var promise = Promise.resolve(config);//  promise 成功的Promise
    // 遍历实例对象的请求拦截器,
    this.interceptors.request.forEach(function unshiftRequestInterceptors(interceptor) {
        //将请求拦截器压入数组的最前面
        chain.unshift(interceptor.fulfilled, interceptor.rejected);
    });

    this.interceptors.response.forEach(function pushResponseInterceptors(interceptor) {
        //将相应拦截器压入数组的最尾部
        chain.push(interceptor.fulfilled, interceptor.rejected);
    });

    //如果链条长度不为 0
    while (chain.length) {
        //依次取出 chain 的回调函数, 并执行
        promise = promise.then(chain.shift(), chain.shift());
    }

    return promise;
};

Axios.prototype.getUri = function getUri(config) {
    config = mergeConfig(this.defaults, config);
    return buildURL(config.url, config.params, config.paramsSerializer).replace(/^\?/, '');
};

// Provide aliases for supported request methods  axios.get  axios.post axios.put
utils.forEach(['delete', 'get', 'head', 'options'], function forEachMethodNoData(method) {
    /*eslint func-names:0*/
    Axios.prototype[method] = function (url, config) {
        return this.request(utils.merge(config || {}, {
            method: method,
            url: url
        }));
    };
});

utils.forEach(['post', 'put', 'patch'], function forEachMethodWithData(method) {
    /*eslint func-names:0*/
    Axios.prototype[method] = function (url, data, config) {
        return this.request(utils.merge(config || {}, {
            method: method,
            url: url,
            data: data
        }));
    };
});

module.exports = Axios;
13.模拟实现axios对象的创建过程
<!DOCTYPE html>
<html lang="en">
<head>
    <meta charset="UTF-8">
    <meta name="viewport" content="width=device-width, initial-scale=1.0">
    <title> axios 的由来</title>
    <!-- <script src="./node_modules/axios/dist/mine-axios.js"></script> -->
</head>
<body>
    <script>
        // console.log(axios);
        // axios();
        // axios.get();
        // axios.post();

        //构造函数
        function Axios(config){
            //初始化
            this.defaults = config;//为了创建 default 默认属性
            this.intercepters = {
                request: {},
                response: {}
            }
        }
        //原型添加相关的方法
        Axios.prototype.request = function(config){
            console.log('发送 AJAX 请求 请求的类型为 '+ config.method);
        }
        Axios.prototype.get = function(config){
            return this.request({method: 'GET'});
        }
        Axios.prototype.post = function(config){
            return this.request({method: 'POST'});
        }

        //声明函数
        function createInstance(config){
            //实例化一个对象
            let context = new Axios(config);// context.get()  context.post()  但是不能当做函数使用 context() X
            //创建请求函数
            let instance = Axios.prototype.request.bind(context);// instance 是一个函数 并且可以 instance({})  此时 instance 不能 instance.get X
            //将 Axios.prototype 对象中的方法添加到instance函数对象中
            Object.keys(Axios.prototype).forEach(key => {
                instance[key] = Axios.prototype[key].bind(context);// this.default  this.interceptors
            });
            //为 instance 函数对象添加属性 default 与 interceptors
            Object.keys(context).forEach(key => {
                instance[key] = context[key];
            });
            return instance;
        }

        let axios = createInstance();
        //发送请求
        // axios({method:'POST'});
        axios.get({});
        axios.post({});


    </script>
</body>
</html>
14.axios发送请求过程详解
axios运行的整体流程?
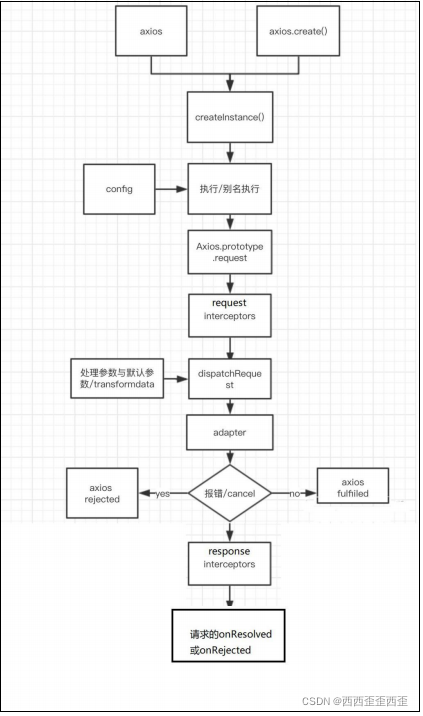
1. 整体流程 :
request(config) ==> dispatchRequest(config) ==> xhrAdapter(config)
2. request(config):
将请求拦截器 / dispatchRequest() / 响应拦截器 通过 promise 链串连起来 ,
返回 promise
3. dispatchRequest(config):
转换请求数据 ===> 调用 xhrAdapter() 发请求 ===> 请求返回后转换响应数
据 . 返回 promise
4. xhrAdapter(config):
创建 XHR 对象 , 根据 config 进行相应设置 , 发送特定请求 , 并接收响应数据 ,
返回 promise
15.模拟实现axios发送请求
<!DOCTYPE html>
<html lang="en">
<head>
    <meta charset="UTF-8">
    <meta name="viewport" content="width=device-width, initial-scale=1.0">
    <title>请求发送过程</title>
    <!-- <script src="./node_modules/axios/dist/mine-axios.js"></script> -->
</head>
<body>
    <script>
        // axios 发送请求   axios  Axios.prototype.request  bind
        //1. 声明构造函数
        function Axios(config){
            this.config = config;
        }
        Axios.prototype.request = function(config){
            //发送请求
            //创建一个 promise 对象
            let promise = Promise.resolve(config);
            //声明一个数组
            let chains = [dispatchRequest, undefined];// undefined 占位
            //调用 then 方法指定回调
            let result = promise.then(chains[0], chains[1]);
            //返回 promise 的结果
            return result;
        }

        //2. dispatchRequest 函数
        function dispatchRequest(config){
            //调用适配器发送请求
            return xhrAdapter(config).then(response => {
                //响应的结果进行转换处理
                //....
                return response;
            }, error => {
                throw error;
            });
        }

        //3. adapter 适配器
        function xhrAdapter(config){
            console.log('xhrAdapter 函数执行');
            return new Promise((resolve, reject) => {
                //发送 AJAX 请求
                let xhr = new XMLHttpRequest();
                //初始化
                xhr.open(config.method, config.url);
                //发送
                xhr.send();
                //绑定事件
                xhr.onreadystatechange = function(){
                    if(xhr.readyState === 4){
                        //判断成功的条件
                        if(xhr.status >= 200 && xhr.status < 300){
                            //成功的状态
                            resolve({
                                //配置对象
                                config: config,
                                //响应体
                                data: xhr.response,
                                //响应头
                                headers: xhr.getAllResponseHeaders(), //字符串  parseHeaders
                                // xhr 请求对象
                                request: xhr,
                                //响应状态码
                                status: xhr.status,
                                //响应状态字符串
                                statusText: xhr.statusText
                            });
                        }else{
                            //失败的状态
                            reject(new Error('请求失败 失败的状态码为' + xhr.status));
                        }
                    }
                }
            });
        }


        //4. 创建 axios 函数
        let axios = Axios.prototype.request.bind(null);
        axios({
            method:'GET',
            url:'http://localhost:3000/posts'
        }).then(response => {
            console.log(response);
        });
    </script>
</body>
</html>
16.axios拦截器工作原理
axios的请求/响应拦截器是什么?

1. 请求拦截器 :
在真正发送请求前执行的回调函数
可以对请求进行检查或配置进行特定处理
成功的回调函数 , 传递的默认是 config( 也必须是 )
失败的回调函数 , 传递的默认是 error
2. 响应拦截器
在请求得到响应后执行的回调函数
可以对响应数据进行特定处理
成功的回调函数 , 传递的默认是 response
失败的回调函数 , 传递的默认是 error
axios 的请求 / 响应数据转换器是什么 ?
1. 请求转换器 : 对请求头和请求体数据进行特定处理的函数
if (utils.isObject(data)) {
setContentTypeIfUnset(headers, 'application/json;charset=utf-8');
return JSON.stringify(data);
}
2. 响应转换器 : 将响应体 json 字符串解析为 js 对象或数组的函数
response.data = JSON.parse(response.data)
response 的整体结构
{
data,
status,
statusText,
headers,
config,
request
}
error 的整体结构
{
message,
response,
request,
}
17.模拟实现axios拦截器功能
<!DOCTYPE html>
<html lang="en">
<head>
    <meta charset="UTF-8">
    <meta name="viewport" content="width=device-width, initial-scale=1.0">
    <title>拦截器</title>
    <!-- <script src="./node_modules/axios/dist/mine-axios.js"></script> -->
</head>
<body>
    <script>
        //构造函数
        function Axios(config){
            this.config = config;
            this.interceptors = {
                request: new InterceptorManager(),
                response: new InterceptorManager(),
            }
        }
        //发送请求  难点与重点
        Axios.prototype.request = function(config){
            //创建一个 promise 对象
            let promise = Promise.resolve(config);
            //创建一个数组
            const chains = [dispatchRequest, undefined];
            //处理拦截器
            //请求拦截器 将请求拦截器的回调 压入到 chains 的前面  request.handles = []
            this.interceptors.request.handlers.forEach(item => {
                chains.unshift(item.fulfilled, item.rejected);
            });
            //响应拦截器
            this.interceptors.response.handlers.forEach(item => {
                chains.push(item.fulfilled, item.rejected);
            });

            // console.log(chains);
            //遍历
            while(chains.length > 0){
                promise = promise.then(chains.shift(), chains.shift());
            }

            return promise;
        }

        //发送请求
        function dispatchRequest(config){
            //返回一个promise 队形
            return new Promise((resolve, reject) => {
                resolve({
                    status: 200,
                    statusText: 'OK'
                });
            });
        }

        //创建实例
        let context = new Axios({});
        //创建axios函数
        let axios = Axios.prototype.request.bind(context);
        //将 context 属性 config interceptors 添加至 axios 函数对象身上
        Object.keys(context).forEach(key => {
            axios[key] = context[key];
        });

        //拦截器管理器构造函数
        function InterceptorManager(){
            this.handlers = [];
        }
        InterceptorManager.prototype.use = function(fulfilled, rejected){
            this.handlers.push({
                fulfilled,
                rejected
            })
        }


        //以下为功能测试代码
        // 设置请求拦截器  config 配置对象
        axios.interceptors.request.use(function one(config) {
            console.log('请求拦截器 成功 - 1号');
            return config;
        }, function one(error) {
            console.log('请求拦截器 失败 - 1号');
            return Promise.reject(error);
        });

        axios.interceptors.request.use(function two(config) {
            console.log('请求拦截器 成功 - 2号');
            return config;
        }, function two(error) {
            console.log('请求拦截器 失败 - 2号');
            return Promise.reject(error);
        });

        // 设置响应拦截器
        axios.interceptors.response.use(function (response) {
            console.log('响应拦截器 成功 1号');
            return response;
        }, function (error) {
            console.log('响应拦截器 失败 1号')
            return Promise.reject(error);
        });

        axios.interceptors.response.use(function (response) {
            console.log('响应拦截器 成功 2号')
            return response;
        }, function (error) {
            console.log('响应拦截器 失败 2号')
            return Promise.reject(error);
        });


        //发送请求
        axios({
            method: 'GET',
            url: 'http://localhost:3000/posts'
        }).then(response => {
            console.log(response);
        });
    </script>
</body>
</html>
18.axios取消请求工作原理
如何取消未完成的请求 ?
1. 当配置了 cancelToken 对象时 , 保存 cancel 函数
(1) 创建一个用于将来中断请求的 cancelPromise
(2) 并定义了一个用于取消请求的 cancel 函数
(3) 将 cancel 函数传递出来
2. 调用 cancel() 取消请求
(1) 执行 cacel 函数 , 传入错误信息 message
(2) 内部会让 cancelPromise 变为成功 , 且成功的值为一个 Cancel 对象
(3) 在 cancelPromise 的成功回调中中断请求 , 并让发请求的 proimse 失败 ,
失败的 reason 为 Cancel 对象
19.模拟实现axios取消请求功能
<!DOCTYPE html>
<html lang="en">
<head>
    <meta charset="UTF-8">
    <meta name="viewport" content="width=device-width, initial-scale=1.0">
    <title>取消请求</title>
    <link crossorigin='anonymous' href="https://cdn.bootcss.com/twitter-bootstrap/3.3.7/css/bootstrap.min.css" rel="stylesheet">
    <!-- <script src="./node_modules/axios/dist/mine-axios.js"></script> -->
</head>
<body>
    <div class="container">
        <h2 class="page-header">axios取消请求</h2>
        <button class="btn btn-primary"> 发送请求 </button>
        <button class="btn btn-warning"> 取消请求 </button>
    </div>
    <script>
        //构造函数
        function Axios(config){
            this.config = config;
        }
        //原型 request 方法
        Axios.prototype.request = function(config){
            return dispatchRequest(config);
        }
        //dispatchRequest 函数
        function dispatchRequest(config){
            return xhrAdapter(config);
        }
        //xhrAdapter
        function xhrAdapter(config){
            //发送 AJAX 请求
            return new Promise((resolve, reject) => {
                //实例化对象
                const xhr = new XMLHttpRequest();
                //初始化
                xhr.open(config.method, config.url);
                //发送
                xhr.send();
                //处理结果
                xhr.onreadystatechange = function(){
                    if(xhr.readyState === 4){
                        //判断结果
                        if(xhr.status >= 200 && xhr.status < 300){
                            //设置为成功的状态
                            resolve({
                                status: xhr.status,
                                statusText: xhr.statusText
                            });
                        }else{
                            reject(new Error('请求失败'));
                        }
                    }
                }
                //关于取消请求的处理
                if(config.cancelToken){
                    //对 cancelToken 对象身上的 promise 对象指定成功的回调
                    config.cancelToken.promise.then(value => {
                        xhr.abort();
                        //将整体结果设置为失败
                        reject(new Error('请求已经被取消'))
                    });
                }
            })
        }

        //创建 axios 函数
        const context = new Axios({});
        const axios = Axios.prototype.request.bind(context);

        //CancelToken 构造函数
        function CancelToken(executor){
            //声明一个变量
            var resolvePromise;
            //为实例对象添加属性
            this.promise = new Promise((resolve) => {
                //将 resolve 赋值给 resolvePromise
                resolvePromise = resolve
            });
            //调用 executor 函数
            executor(function(){
                //执行 resolvePromise 函数
                resolvePromise();
            });
        }

        //获取按钮 以上为模拟实现的代码
        const btns = document.querySelectorAll('button');
        //2.声明全局变量
        let cancel = null;
        //发送请求
        btns[0].onclick = function(){
            //检测上一次的请求是否已经完成
            if(cancel !== null){
                //取消上一次的请求
                cancel();
            }

            //创建 cancelToken 的值
            let cancelToken = new CancelToken(function(c){
                cancel = c;
            });

            axios({
                method: 'GET',
                url: 'http://localhost:3000/posts',
                //1. 添加配置对象的属性
                cancelToken: cancelToken
            }).then(response => {
                console.log(response);
                //将 cancel 的值初始化
                cancel = null;
            })
        }

        //绑定第二个事件取消请求
        btns[1].onclick = function(){
            cancel();
        }
    </script>
</body>
</html>
20.axios源码分析总结
axios 与 Axios 的关系 ?
1. 从语法上来说 : axios 不是 Axios 的实例
2. 从功能上来说 : axios 是 Axios 的实例
3. axios 是 Axios.prototype.request 函数 bind() 返回的函数
4. axios 作为对象有 Axios 原型对象上的所有方法 , 有 Axios 对象上所有属性
instance 与 axios 的区别 ?
1. 相同 :
(1) 都是一个能发任意请求的函数 : request(config)
(2) 都有发特定请求的各种方法 : get()/post()/put()/delete()
(3) 都有默认配置和拦截器的属性 : defaults/interceptors
2. 不同 :
(1) 默认配置很可能不一样
(2) instance 没有 axios 后面添加的一些方法 : create()/CancelToken()/all()
axios运行的整体流程?
1. 整体流程 :
request(config) ==> dispatchRequest(config) ==> xhrAdapter(config)
2. request(config):
将请求拦截器 / dispatchRequest() / 响应拦截器 通过 promise 链串连起来 ,
返回 promise
3. dispatchRequest(config):
转换请求数据 ===> 调用 xhrAdapter() 发请求 ===> 请求返回后转换响应数
据 . 返回 promise
4. xhrAdapter(config):
创建 XHR 对象 , 根据 config 进行相应设置 , 发送特定请求 , 并接收响应数据 ,
返回 promise
axios的请求/响应拦截器是什么?
1. 请求拦截器 :
在真正发送请求前执行的回调函数
可以对请求进行检查或配置进行特定处理
成功的回调函数 , 传递的默认是 config( 也必须是 )
失败的回调函数 , 传递的默认是 error
2. 响应拦截器
在请求得到响应后执行的回调函数
可以对响应数据进行特定处理
成功的回调函数 , 传递的默认是 response
失败的回调函数 , 传递的默认是 error
axios 的请求 / 响应数据转换器是什么 ?
1. 请求转换器 : 对请求头和请求体数据进行特定处理的函数
if (utils.isObject(data)) {
setContentTypeIfUnset(headers, 'application/json;charset=utf-8');
return JSON.stringify(data);
}
2. 响应转换器 : 将响应体 json 字符串解析为 js 对象或数组的函数
response.data = JSON.parse(response.data)
response 的整体结构
{
data,
status,
statusText,
headers,
config,
request
}
error 的整体结构
{
message,
response,
request,
}
如何取消未完成的请求 ?
1. 当配置了 cancelToken 对象时 , 保存 cancel 函数
(1) 创建一个用于将来中断请求的 cancelPromise
(2) 并定义了一个用于取消请求的 cancel 函数
(3) 将 cancel 函数传递出来
2. 调用 cancel() 取消请求
(1) 执行 cacel 函数 , 传入错误信息 message
(2) 内部会让 cancelPromise 变为成功 , 且成功的值为一个 Cancel 对象
(3) 在 cancelPromise 的成功回调中中断请求 , 并让发请求的 proimse 失败 ,
失败的 reason 为 Cancel 对象
版权声明:本文为weixin_58214412原创文章,遵循CC 4.0 BY-SA版权协议,转载请附上原文出处链接和本声明。