文章目录
3.在application.properties中进行配置
注:如果有小伙伴不需要使用redis或者暂时用不到redis,下面我对代码需要修改的地方已经进行了说明,进行改正即可。
1.开启服务:POP3/SMTP服务
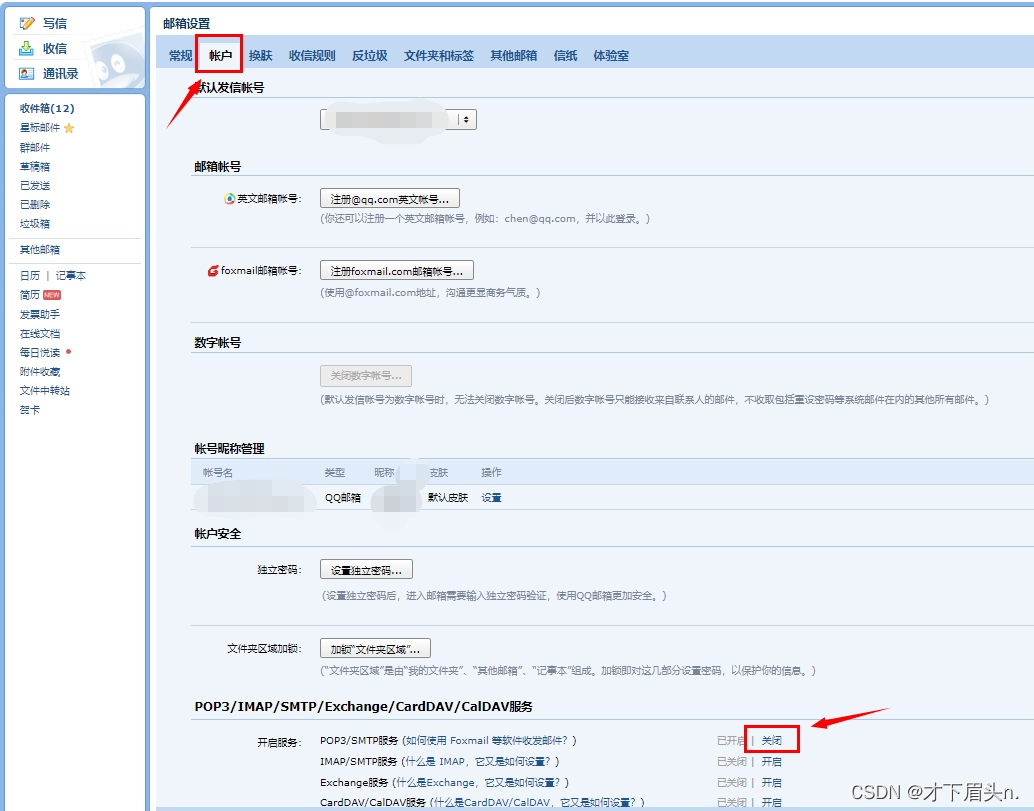
获取授权码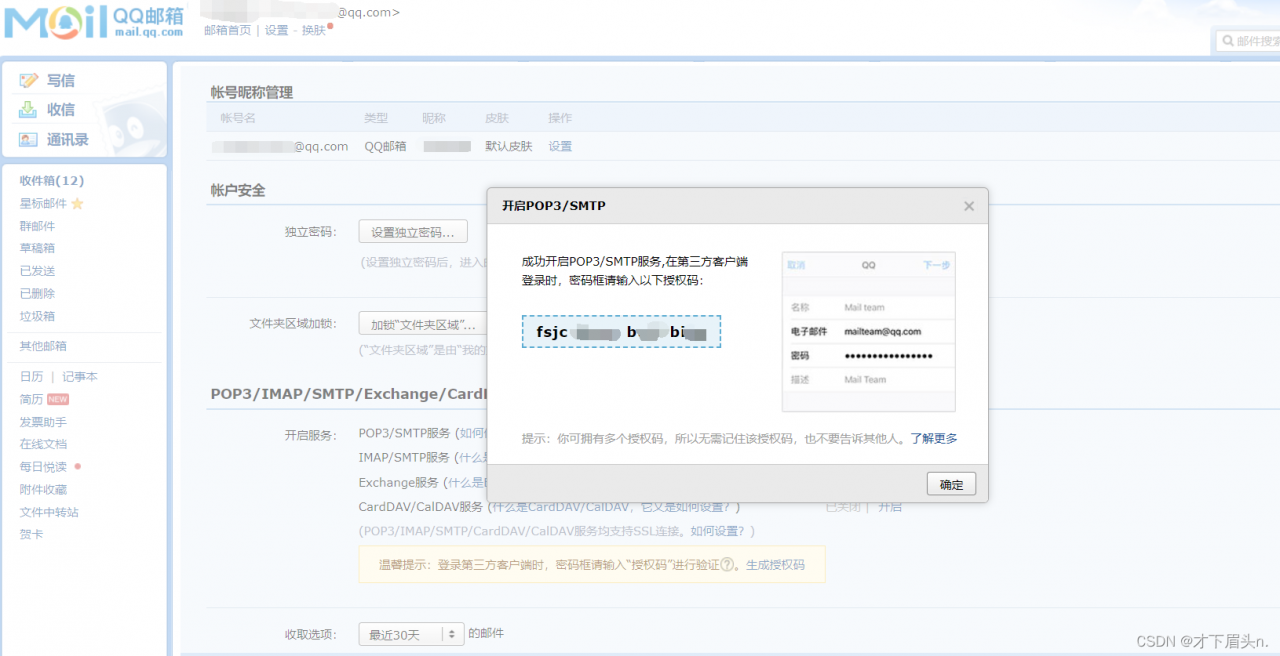
2.添加maven依赖
<!--邮箱依赖-->
<dependency>
     <groupId>org.springframework.boot</groupId>
     <artifactId>spring-boot-starter-mail</artifactId>
</dependency>
3.在application.properties中进行配置
username为发件者邮箱
password为刚刚获得的授权码
host为 SMTP 服务器地址,可以不用更改
#邮箱发件人及授权码信息
spring.mail.default-encoding=UTF-8
spring.mail.username=18*******221@qq.com
spring.mail.password=fxc**********ed
spring.mail.host=smtp.qq.com


#下面是redis的配置,如果用不到可以不用配置,这里只是用作缓存
spring.redis.host=192.1**.1*.251
spring.redis.port=6379
spring.redis.database= 0
#redis配置密码则添加,没有则无需配置
spring.redis.password=aA6dD4
spring.redis.timeout=1800000
4.Service层
MsmService
package com.xxx.msm.service;

public interface MsmService {
    boolean sendMail(String code,String emailReceiver);
}
实现类:MsmServiceImpl
package com.xxx.msm.service.impl;

import com.xxx.msm.service.MsmService;
import org.springframework.beans.factory.annotation.Autowired;
import org.springframework.beans.factory.annotation.Value;
import org.springframework.mail.MailException;
import org.springframework.mail.SimpleMailMessage;
import org.springframework.mail.javamail.JavaMailSender;
import org.springframework.stereotype.Service;

@Service
public class MsmServiceImpl implements MsmService {
    @Autowired
    private JavaMailSender javaMailSender;

    //读取配置文件中username的值并赋值给form
    @Value("${spring.mail.username}")
    private String from;

    public boolean sendMail(String code,String emailReceiver){
        SimpleMailMessage message = new SimpleMailMessage();
        // 设置邮件发送者
        message.setFrom(from);
        // 设置邮件接收者
        message.setTo(emailReceiver);
        // 设置邮件的主题
        message.setSubject("登录验证码");
        // 设置邮件的正文

        String text = "您的验证码为:" + code + ",5分钟内有效,请勿泄露给他人。";
        message.setText(text);
        // 发送邮件
        try {
            javaMailSender.send(message);
            return true;
        } catch (MailException e) {
            e.printStackTrace();
        }
        return false;
    }
}
5.Controller层
MsmController
package com.xxx.msm.controller;

import com.xxx.msm.service.MsmService;
import com.xxx.msm.utils.RandomUtil;
import coom.xxx.commonutils.Result;
import org.springframework.beans.factory.annotation.Autowired;
import org.springframework.data.redis.core.RedisTemplate;
import org.springframework.util.StringUtils;
import org.springframework.web.bind.annotation.*;
import java.util.concurrent.TimeUnit;

@RestController
@RequestMapping("edumsm")
@CrossOrigin
public class MsmController {
    @Autowired
    private MsmService msmService;

    //*不用redis可以删去该自动装配
    @Autowired
    private RedisTemplate<String,String> redisTemplate;

    @RequestMapping("sendEmail/{emailReceiver}")
    public Result sendSimpleMail(@PathVariable("emailReceiver") String emailReceiver) {
        //从Redis中获取code
        String code = redisTemplate.opsForValue().get(emailReceiver);
        if (!StringUtils.isEmpty(code)){
            return Result.ok();
        }
        code= RandomUtil.getSixBitRandom();
        // 构建一个邮件对象
        Boolean mail = msmService.sendMail(code, emailReceiver);
        if (mail){
            //设置有效时间,这里是5分钟,*不用redis可以删去该行
            redisTemplate.opsForValue().set(emailReceiver,code,5, TimeUnit.MINUTES);
            return Result.ok();
        }
        return Result.error().message("邮件发送失败");
    }

}
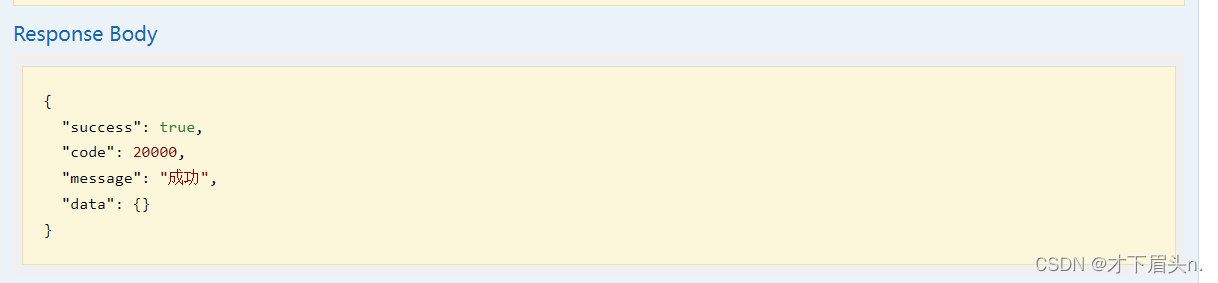
以上的Result为结果集
代码如下
package coom.xxx.commonutils;

import lombok.AllArgsConstructor;
import lombok.Data;
import lombok.NoArgsConstructor;

import java.util.HashMap;
import java.util.Map;
@Data
public class Result {
    private Boolean success;
    private Integer code;
    private String message;
    private Map<String,Object> data=new HashMap<>();


    //成功静态方法
    public static Result ok() {
        Result r = new Result();
        r.setSuccess(true);
        r.setCode(ResultCode.SUCCESS);
        r.setMessage("成功");
        return r;
    }

    private Result() {
    }

    //失败静态方法
    public static Result error() {
        Result r = new Result();
        r.setSuccess(false);
        r.setCode(ResultCode.ERROR);
        r.setMessage("失败");
        return r;
    }

    public Result success(Boolean success) {
        this.setSuccess(success);
        return this;
    }

    public Result message(String message) {
        this.setMessage(message);
        return this;
    }

    public Result code(Integer code) {
        this.setCode(code);
        return this;
    }

    public Result data(String key, Object value) {
        this.data.put(key, value);
        return this;
    }

    public Result data(Map<String, Object> map) {
        this.setData(map);
        return this;
    }
}
6.测试结果
成功收到邮件

redis中存储成功

版权声明:本文为qq_53686534原创文章,遵循CC 4.0 BY-SA版权协议,转载请附上原文出处链接和本声明。