mmdetection
GitHub地址:「链接」
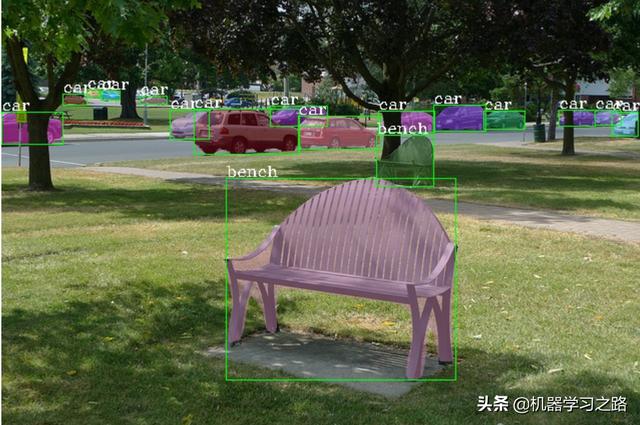
mmdetection是商汤和香港中文大学基于pytorch开源的一个深度学习目标检测工具,包括了RPN、Fast R-CNN、Faster R-CNN、Mask R-CNN、SSD、RetinaNet以及Cascade R-CNN等,还包括了各种提取特征的主干网络ResNet、ResNext、SENet、VGG、HRNet,还有包括了其它的特征如DCN、Group Normalization、Soft-NMS、Generalized Attention等,mmdetection已经成为目标检测竞赛的必备工具。
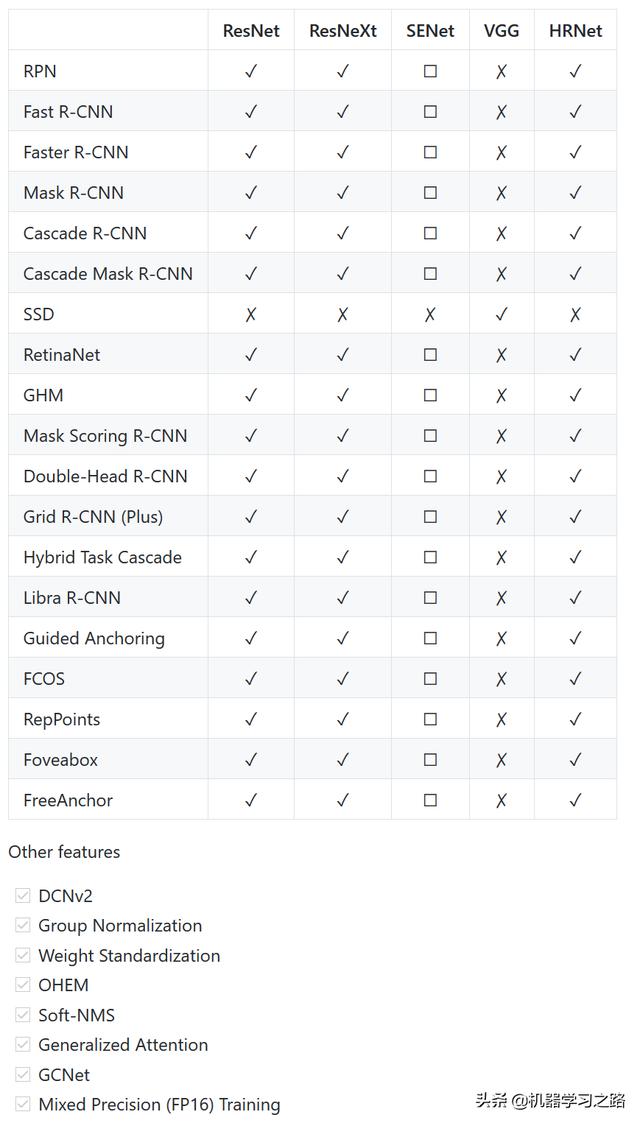
网络
模型下载
模型下载地址:「链接」
mmdetection提供了很多的预训练模型,模型是基于COCO_2017_train训练的,在COCO_2017_val上测试的,通过8 NVIDIA Tesla V100 GPU训练的,训练时每个batch size为16(每块显卡2张图片)。默认下载地址使用的是AWS的镜像,速度可能比较慢,大家可以改为阿里云镜像,将下载链接中的https://s3.ap-northeast-2.amazonaws.com/open-mmlab改为https://open-mmlab.oss-cn-beijing.aliyuncs.com,经过测试部分模型下载不支持阿里云镜像。
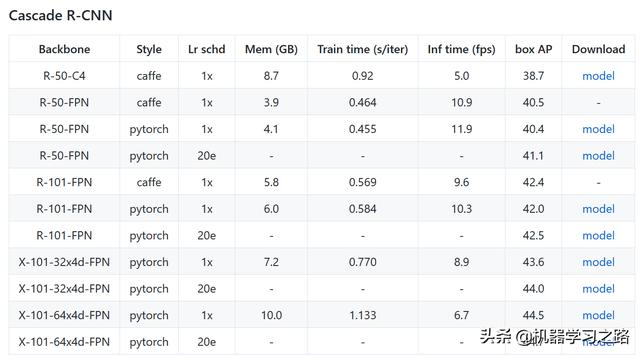
Cascade R-CNN模型
环境要求
- Linux
- Python3.5+
- Pytorch1.1+
- CUDA9.0+
- NCCL 2
- GCC(G++)4.9+
- mmcv
安装
mmdetection安装需要先安装anaconda,具体安装步骤我这里就不重复的
- 创建conda虚拟环境
conda create -n open-mmlab python=3.7 -yconda activate open-mmlab- 安装pytorch
conda install pytorch torchvision -c pytorch上面安装命令默认安装的是最新的pytorch,安装的时候需要先看自己cuda的版本,通过nvcc -V可以查看也可以直接通过cat /usr/local/cuda/version.txt查看,如果是cuda9.0请用下面的命令安装
conda install pytorch==1.1.0 torchvision==0.3.0 cudatoolkit=9.0 -c pytorch- 下载mmdetection项目
git clone https://github.com/open-mmlab/mmdetection.gitcd mmdetection- 安装mmcv
pip install mmcvpython setup.py develop # or "pip install -v -e ."在安装mmcv时如果发现卡主半天都没有反应,可能是pip源导致的,这时候可以安装下面的方法来解决
#step1 找到你环境的安装目录 pip --version使用预训练模型进行测试
这里需要先根据之前提供的模型下载地址先下载预训练模型
from mmdet.apis import init_detector, inference_detector, show_resultimport mmcvconfig_file = 'configs/faster_rcnn_r50_fpn_1x.py'checkpoint_file = 'checkpoints/faster_rcnn_r50_fpn_1x_20181010-3d1b3351.pth'# build the model from a config file and a checkpoint filemodel = init_detector(config_file, checkpoint_file, device='cuda:0')# test a single image and show the resultsimg = 'test.jpg' # or img = mmcv.imread(img), which will only load it onceresult = inference_detector(model, img)# visualize the results in a new windowshow_result(img, result, model.CLASSES)# or save the visualization results to image filesshow_result(img, result, model.CLASSES, out_file='result.jpg')# test a video and show the resultsvideo = mmcv.VideoReader('video.mp4')for frame in video: result = inference_detector(model, frame) show_result(frame, result, model.CLASSES, wait_time=1)训练自己的模型
- 标记数据
如果我们想要在自己的数据集上训练一个目标检测模型,我们需要先标记数据可以使用labelme或labelImg工具进行标记
- 数据格式
利用mmdetection/mmdet/datasets/custom.py类来加载数据,数据格式如下,我们需要将所有的图片和对应的标签文件最终合成一个下面这样数据格式的文件,可以自己写一个脚本来进行转换
Annotation format: [ { 'filename': 'a.jpg', 'width': 1280, 'height': 720, 'ann': { 'bboxes': (n, 4), 'labels': (n, ), 'bboxes_ignore': (k, 4), (optional field) 'labels_ignore': (k, 4) (optional field) } }, ... ]- 配置文件设置
根据自己选择的模型在mmdetection/configs/目录下找到对应的配置文件,可以根据自己的需要去修改一些参数和网络的结构,这里有几个参数是必须要注意一下dataset_type,根据自己选择的数据格式进行修改,如果你使用的datasets文件是custom.py,就需要改为dataset_type = 'CustomDataset',就是对应文件里面dataset的类名
data_root:为数据存放的目录
ann_file:就是上面合成数据文件的路径
img_prefix:图片存放的路径
checkpoint_config = dict(interval=1):保存模型间隔的epoch,为1表示每次epoch之后都保存模型
total_epochs:迭代总的epoch次数
work_dir:模型的保存目录
load_from:预训练模型的目录,epoch从0开始训练
resume_from:重新训练模型的目录,根据保存模型时的epoch开始训练
- 训练模型
单个GPU训练
python tools/train.py ${CONFIG_FILE}多GPU训练
./tools/dist_train.sh ${CONFIG_FILE} ${GPU_NUM} [optional arguments]可选参数:
- --validate:每多少次epoch,在验证集上评估一下结果,默认是1
- --work_dir:模型的保存目录
- --resume_from ${CHECKPOINT_FILE}:预训练或重新开始训练模型的路径