目录
LVS用于多服务器的负载均衡
haproxy支持七层负载均衡,拥有一个功能出色监控页面,实时了解系统当前状态
nginx也是七层负载均衡器,可自动剔除工作不正常的后端服务器
keepalived可防止单点故障,增强可用性
通过这些组件可以搭建出一个小型高并发高可用的web框架
1.环境部署
1)两台LVS、两台HAproxy、四台web
188、187、186、185(web1/2/3/4)
184、189(HAproxy1/2)
191、190(lvs1/2)
2)全部关闭防火墙,selinux
2.在web1搭建ansible安装服务
1)yum install -y epel-release

2)yum install -y ansible
3)做ssh-key免密

4)做域名解析
vim /etc/hosts
192.168.171.188 web1
192.168.171.187 web2
192.168.171.186 web3
192.168.171.185 web4

5)去掉(yes/no)询问
vim /etc/ssh/ssh_config
StrictHostKeyChecking no
systemctl restart sshd --重启进程

6)定义主机清单
vim /etc/ansible/hosts
web[1:4] ansible_ssh_user='root' ansible_ssh_pass='111123'

7)后续我们优化网站,使它不再单调
3.搭建网页
1)
ansible webserver -m shell -a 'yum install -y nginx &systemctl start nginx ' -o

2)每台web服务器都执行
rm -rf /usr/share/nginx/html/*
echo web1 > /usr/share/nginx/html/index.html
4.部署HAproxy
>配置HAproxy1对应web1,web2
1)
yum install -y epel-release haproxy
2)
vim /etc/haproxy/haproxy.cfg
global
log 127.0.0.1 local3 info
maxconn 4096
user nobody
group nobody
daemon
nbproc 1
pidfile /run/haproxy.pid
defaults
log global
mode http
maxconn 2048
retries 3
option redispatch
contimeout 5000
clitimeout 50000
srvtimeout 50000
option abortonclose
stats uri /admin?status
stats realm Private lands
stats auth admin:password
stats hide-version
frontend http-in
bind 0.0.0.0:80
mode http
log global
option httplog
option httpclose
acl html url_reg -i \.html$
use_backend html-server if html
default_backend html-server
backend html-server
mode http
balance roundrobin
option httpchk GET /index.html
cookie SERVERID insert indirect nocache
server html-A web1:80 weight 1 cookie 3 check inter 2000 rise 2 fall 5
server html-B web2:80 weight 1 cookie 4 check inter 2000 rise 2 fall 5这里的配置分成五部分
1>global:设置全局配置参数
2>default:默认配置参数
3>frontend:接收请求的前端虚拟节点
4>backend:后端服务器集群配置,真实服务器
5>Listen:frontend和backend结合体
3)
vim /etc/hosts
192.168.171.184 haproxy1
192.168.171.188 web1
192.168.171.187 web2
4)
scp /etc/hosts 192.168.171.189:/etc/hosts
在192.168.171.189上修改vim /etc/hosts
192.168.171.189 haproxy2
192.168.171.186 web3
192.168.171.185 web45)
scp /etc/haproxy/haproxy.cfg 192.168.171.189:/etc/haproxy/haproxy.cfg
在192.168.171.189上修改vim /etc/haproxy/haproxy.cfg
server html-A web3:80 weight 1 cookie 3 check inter 2000 rise 2 fall 5
server html-B web4:80 weight 1 cookie 4 check inter 2000 rise 2 fall 56)
cp /etc/sysconfig/network-scripts/ifcfg-lo /etc/sysconfig/network-scripts/ifcfg-lo:0 --备份一份7)
vim /etc/sysconfig/network-scripts/ifcfg-lo:0 --配置虚拟地址
DEVICE=lo:0
IPADDR=192.168.171.199
NETMASK=255.255.255.255
ONBOOT=yes
# If you're having problems with gated making 127.0.0.0/8 a martian,
# you can change this to something else (255.255.255.255, for example)8)
vim /etc/rc.local --配置路由
/sbin/route add -host 192.168.171.199 dev lo:09)
vim /etc/sysctl.conf --配置ARP
net.ipv4.conf.all.arp_ignore = 1
net.ipv4.conf.all.arp_announce = 2
net.ipv4.conf.default.arp_ignore = 1
net.ipv4.conf.default.arp_announce = 2
net.ipv4.conf.lo.arp_ignore = 1
net.ipv4.conf.lo.arp_announce = 2
10)reboot
>HAproxy2对应web3,web4
1)
yum install -y epel-release haproxy

2)
cp /etc/sysconfig/network-scripts/ifcfg-lo /etc/sysconfig/network-scripts/ifcfg-lo:0           --备份一份
3)--配置虚拟地址
vim /etc/sysconfig/network-scripts/ifcfg-lo:0
DEVICE=lo:0
IPADDR=192.168.171.199
NETMASK=255.255.255.255
ONBOOT=yes
# If you're having problems with gated making 127.0.0.0/8 a martian,
# you can change this to something else (255.255.255.255, for example)4) --配置路由
vim /etc/rc.local
/sbin/route add -host 192.168.171.199 dev lo:05) --配置ARP
vim /etc/sysctl.conf
net.ipv4.conf.all.arp_ignore = 1
net.ipv4.conf.all.arp_announce = 2
net.ipv4.conf.default.arp_ignore = 1
net.ipv4.conf.default.arp_announce = 2
net.ipv4.conf.lo.arp_ignore = 1
net.ipv4.conf.lo.arp_announce = 26)reboot
5.部署LVS
两台lvs部署一样操作,LVS1做master结点,LVS2做BACKUP结点
LVS1
1)
yum install -y keepalived

2)
vim /etc/keepalived/keepalived.conf
! Configuration File for keepalived
global_defs {
   router_id 1
}
vrrp_instance VI_1 {
    state MASTER
    interface ens33 #注意网卡
    virtual_router_id 51
    priority 100 #MASTER要比BACKUP值要大
    advert_int 1
    authentication {
        auth_type PASS
        auth_pass 1111
    }
    virtual_ipaddress {
        192.168.171.199/24 dev ens33
    }
}

virtual_server 192.168.171.199 80 {
    delay_loop 6
    lb_algo rr
    lb_kind DR
    protocol TCP
    real_server 192.168.171.184 80 {
        weight 1
        TCP_CHECK {
            connect_timeout 3
        }
    }

    real_server 192.168.171.189 80 {
        weight 1
        TCP_CHECK {
            connect_timeout 3
        }
    }
}
3)
systemctl restart keepalived.service
4)
vim /etc/hosts
192.168.171.190 lvs1
192.168.171.191 lvs2
5)
scp /etc/hosts 192.168.171.190:/etc/hosts
6)
scp /etc/keepalived/keepalived.conf 192.168.171.190:/etc/keepalived/keepalived.conf
修改192.168.171.190上的配置文件etc/keepalived/keepalived.conf
priority 99
state BACKUP
systemctl restart keepalived.serviceLVS2
1)
yum install -y keepalived
2)
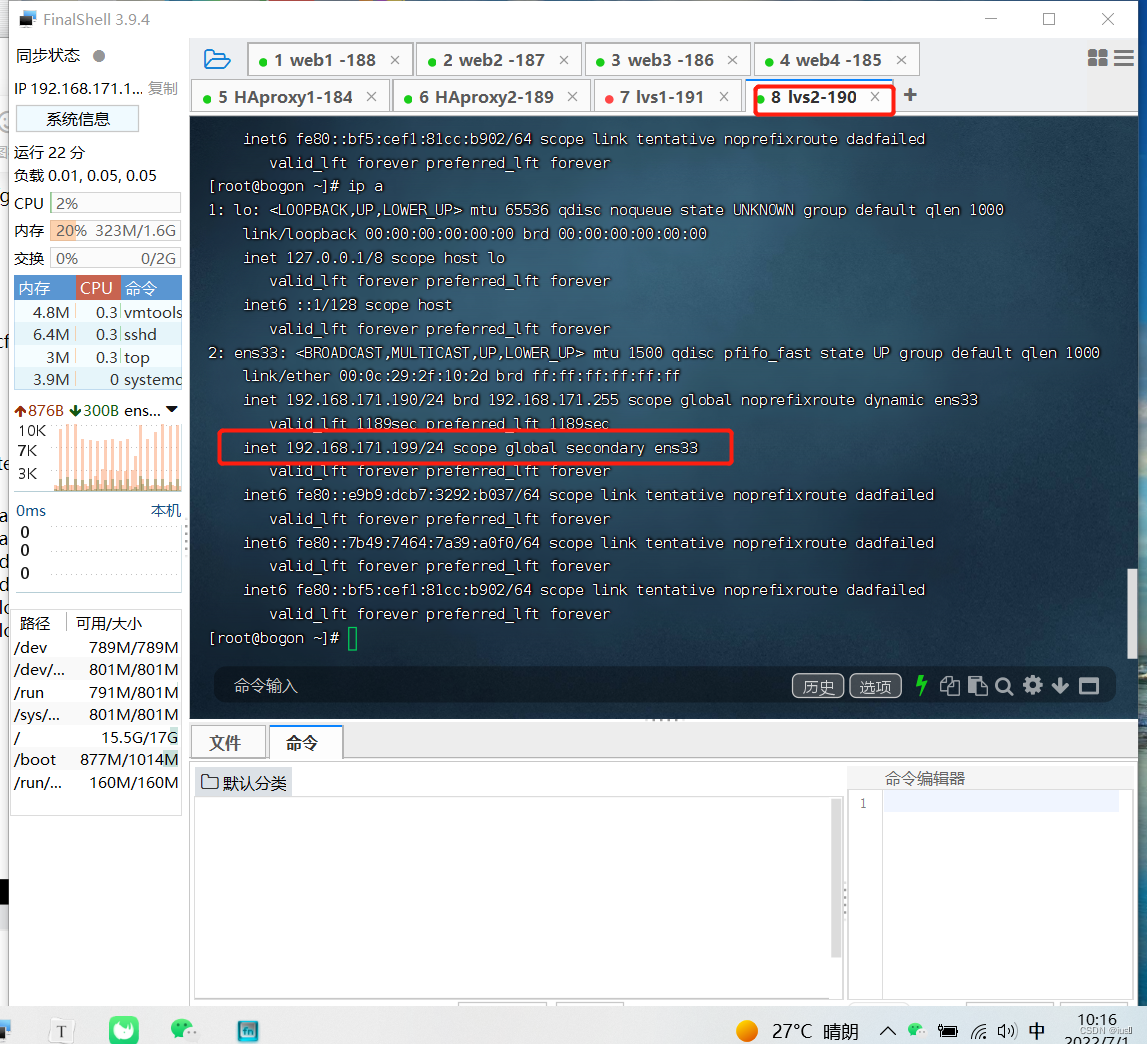
LVS2与lvs1部署类似,只修改了几个参数1>访问192.168.171.199会发现,看到了web1(188)页面的内容 2>此时我们断开web1这台服务器 3>继续访问199会发现,我们看到了web2(187)的页面 4>断开LVS1(191)服务器我们发现,LVS2(190)这台服务器继承了lvs1的虚拟的ip(199)访问199页面还可以正常访问,从而实现了保证业务不间断服务,把故障对业务影响降为最小
后续我们还可对部署进行各种优化比如:
1.停掉HAproxy服务,在haproxy上安装nginx搭建动静分离部署
2.安装zabbix对代理服务器实时监控tcp连接数量
3.安装ELK对日志分析,新增一台centos7安装kibana将日志输出在页面进行观察
4.逐步优化网页建造LNMP动态网页
版权声明:本文为yshisu原创文章,遵循CC 4.0 BY-SA版权协议,转载请附上原文出处链接和本声明。