2022/4/25日报
Slave节点未运行解决

进入current目录查看ID
Namenode:/usr/local/hadoop/tmp/dfs/name/current
Datanode:/usr/local/hadoop/tmp/dfs/data/current
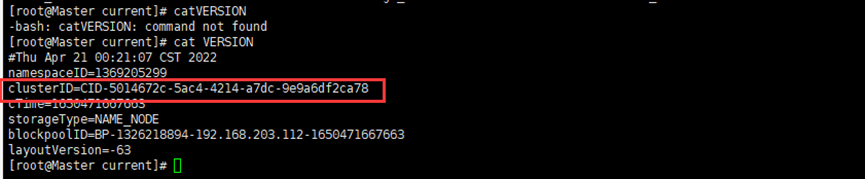

问题原因:hadoop集群clusterID不一致( namenode格式化过多次)
在第一次格式化dfs后,启动并使用了hadoop,后来又重新执行了格式化命令(hdfs namenode -format),这时NameNode的clusterID会重新生成,而DataNode的clusterID 保持不变。每次namenode format会重新创建一个namenodeId,而data目录包含了上次format时的id,namenode format清空了NameNode下的数据,但是没有清空datanode下的数据,导致启动时失败,所要做的就是每次fotmat前,清空data下的所有目录。

解决办法:删掉namenode和各datanode节点的current目录,再重新格式化,命令:hdfs namenode -format
2022/4/26日报
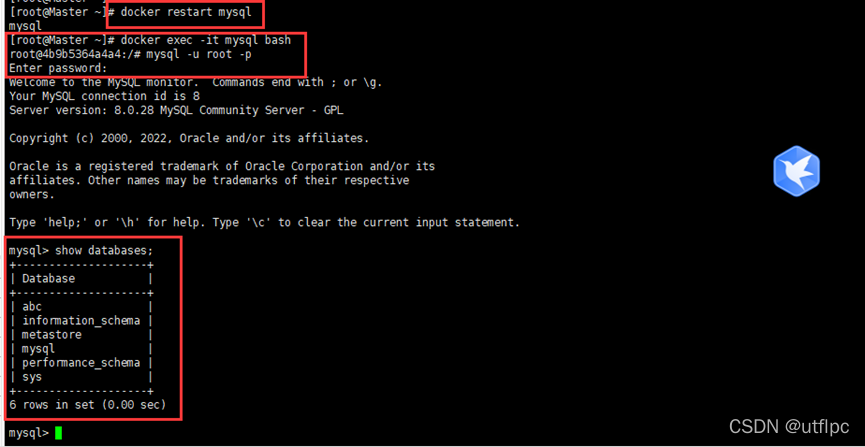
docker启动MySQL
启动doker
systemctl start docker
启动mysql
docker restart mysql
进入MySQL的文件夹
docker exec -it mysql bash
使用用户名和密码登录MySQL
mysql -u root -P
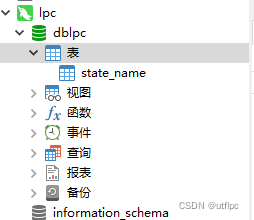
创建表
CREATE TABLE `dblpc`.`state_name` (`state` varchar(20)) ENGINE=InnoDB DEFAULT CHARSET=utf8;
CREATE TABLE `dblpc`.`state_name` (`state` varchar(20)) ENGINE=InnoDB DEFAULT CHARSET=utf8;
CREATE TABLE `dblab`.`user_action` (`id` varchar(50),`uid` varchar(50),`item_id` varchar(50),`behavior_type` varchar(10),`item_category` varchar(50), `visit_date` DATE,`province` varchar(20)) ENGINE=InnoDB DEFAULT CHARSET=utf8;
提示:语句中的引号是反引号`,不是单引号’
2022/4/27日报
Hive上处理数据
user_table.txt存在于到分布式文件系统HDFS的“/bigdatacase/dataset”目录下
dfs dfs -put /usr/local/dataset/user_table.txt /bigdatacase/dataset

这里我们要在数据库dblab中创建一个外部表bigdata_user,它包含字段(id, uid, item_id,
behavior_type, item_category, date, province),请在hive命令提示符下输入如下命令:
CREATE EXTERNAL TABLE dblab.bigdata_user(id INT,uid STRING,item_id STRING,behavior_type INT,item_category STRING,visit_date DATE,province STRING) COMMENT 'Welcome to xmu dblab!' ROW FORMAT DELIMITED FIELDS TERMINATED BY '\t' STORED AS TEXTFILE LOCATION '/bigdatacase/dataset';
在“hive>”命令提示符状态下执行下面命令:
hive> use dblab; //使用dblab数据库
hive> show tables; //显示数据库中所有表。
hive> show create table bigdata_user; //查看bigdata_user表的各种属性;
结果如下
OK
CREATE EXTERNAL TABLE `bigdata_user`(
  `id` int,
  `uid` string,
  `item_id` string,
  `behavior_type` int,
  `item_category` string,
  `visit_date` date,
  `province` string)
COMMENT 'Welcome to xmu dblab!'
ROW FORMAT SERDE
  'org.apache.hadoop.hive.serde2.lazy.LazySimpleSerDe'
WITH SERDEPROPERTIES (
  'field.delim'='\t',
  'serialization.format'='\t')
STORED AS INPUTFORMAT
  'org.apache.hadoop.mapred.TextInputFormat'
OUTPUTFORMAT
  'org.apache.hadoop.hive.ql.io.HiveIgnoreKeyTextOutputFormat'
LOCATION
  'hdfs://localhost:9000/bigdatacase/dataset'
TBLPROPERTIES (
  'numFiles'='1',
  'totalSize'='15590786',
  'transient_lastDdlTime'='1480217306')
Time taken: 0.715 seconds, Fetched: 24 row(s)
简单查询分析
hive> select behavior_type from bigdata_user limit 10;//查看前10位用户对商品的行为
如果要查出每位用户购买商品时的多种信息,输出语句格式为 select 列1,列2,….,列n from 表名;
比如我们现在查询前20位用户购买商品时的时间和商品的种类
hive> select visit_date,item_category from bigdata_user limit 20;
有时我们在表中查询可以利用嵌套语句,如果列名太复杂可以设置该列的别名,以简化我们操作的难度
hive> select e.bh, e.it from (select behavior_type as bh, item_category as it from bigdata_user) as e limit 20;
2022/4/27日报
使用Sqoop将数据从Hive导入MySQL
启动Hadoop集群、MySQL服务
systemctl start docker  #启动doker
docker restart mysql  #启动mysql
cd /usr/local/hadoop-2.8.5/sbin
./start-dfs.sh # 启动 HDFS
./start-yarn.sh # 启动 YARN
启动进入Hive
cd /usr/local/hive
./bin/hive   //启动Hive
创建临时表user_action
hive> create table dblab.user_action(id STRING,uid STRING, item_id STRING, behavior_type STRING, item_category STRING, visit_date DATE, province STRING) COMMENT 'Welcome to XMU dblab! ' ROW FORMAT DELIMITED FIELDS TERMINATED BY '\t' STORED AS TEXTFILE;
这个命令执行完以后,Hive会自动在HDFS文件系统中创建对应的数据文件“/user/hive/warehouse/dblab.db/user_action”。
我们可以新建一个终端,执行命令查看一下,确认这个数据文件在HDFS中确实被创建了,请在新建的终端中执行下面命令:
cd /usr/local/hadoop
./bin/hdfs dfs -ls /user/hive/warehouse/dblab.db/user_action
将bigdata_user表中的数据插入到user_action
INSERT OVERWRITE TABLE dblab.user_action select * from dblab.bigdata_user;
执行命令查询上面的插入命令是否成功执行:
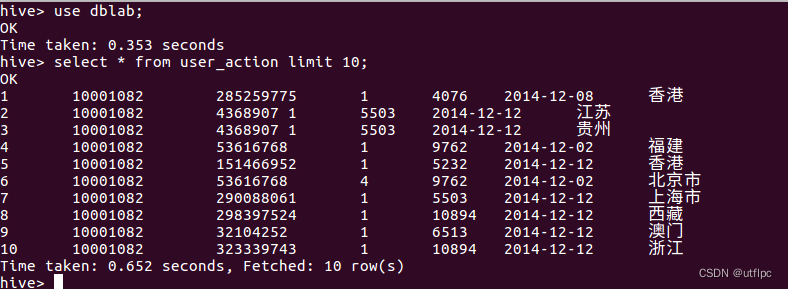
hive>select * from user_action limit 10;
导入数据
cd /usr/local/sqoop
./bin/sqoop export --connect jdbc:mysql://localhost:3306/dblab --username root --password hadoop --table user_action --export-dir '/user/hive/warehouse/dblab.db/user_action' --fields-terminated-by '\t'; #导入命令
查看MySQL中user_action表数据
2022/4/29日报
HBase安装
HBase的版本一定要和之前已经安装的Hadoop的版本保持兼容,不能随便选择版本。HBase1.1.2和Hadoop2.7.1(或Hadoop2.6.0或Hadoop2.7.3)兼容,而HBase2.2.2和Hadoop3.1.3兼容。
HBase1.1.2安装
sudo tar -zxf ~/下载/hbase-1.1.2-bin.tar.gz -C /usr/local
sudo mv /usr/local/hbase-1.1.2 /usr/local/hbase
配置环境变量
将hbase下的bin目录添加到path中,这样,启动hbase就无需到/usr/local/hbase目录下,大大的方便了hbase的使用。教程下面的部分还是切换到了/usr/local/hbase目录操作,有助于初学者理解运行过程,熟练之后可以不必切换。
编辑~/.bashrc文件
vi ~/.bashrc
export PATH=$PATH:/usr/local/hbase/bin
source ~/.bashrc
添加HBase权限
cd /usr/local
sudo chown -R hadoop ./hbase       #将hbase下的所有文件的所有者改为hadoop,hadoop是当前用户的用户名。
2022/5/1日报
编写程序实现对输入文件的排序
现在有多个输入文件,每个文件中的每行内容均为一个整数。要求读取所有文件中的整数,进行升序排序后,输出到一个新的文件中,输出的数据格式为每行两个整数,第一个数字为第二个整数的排序位次,第二个整数为原待排列的整数。下面是输入文件和输出文件的一个样例供参考。
输入文件1的样例如下:
33
37
12
40
输入文件2的样例如下:
4
16
39
5
输入文件2的样例如下:
1
45
25
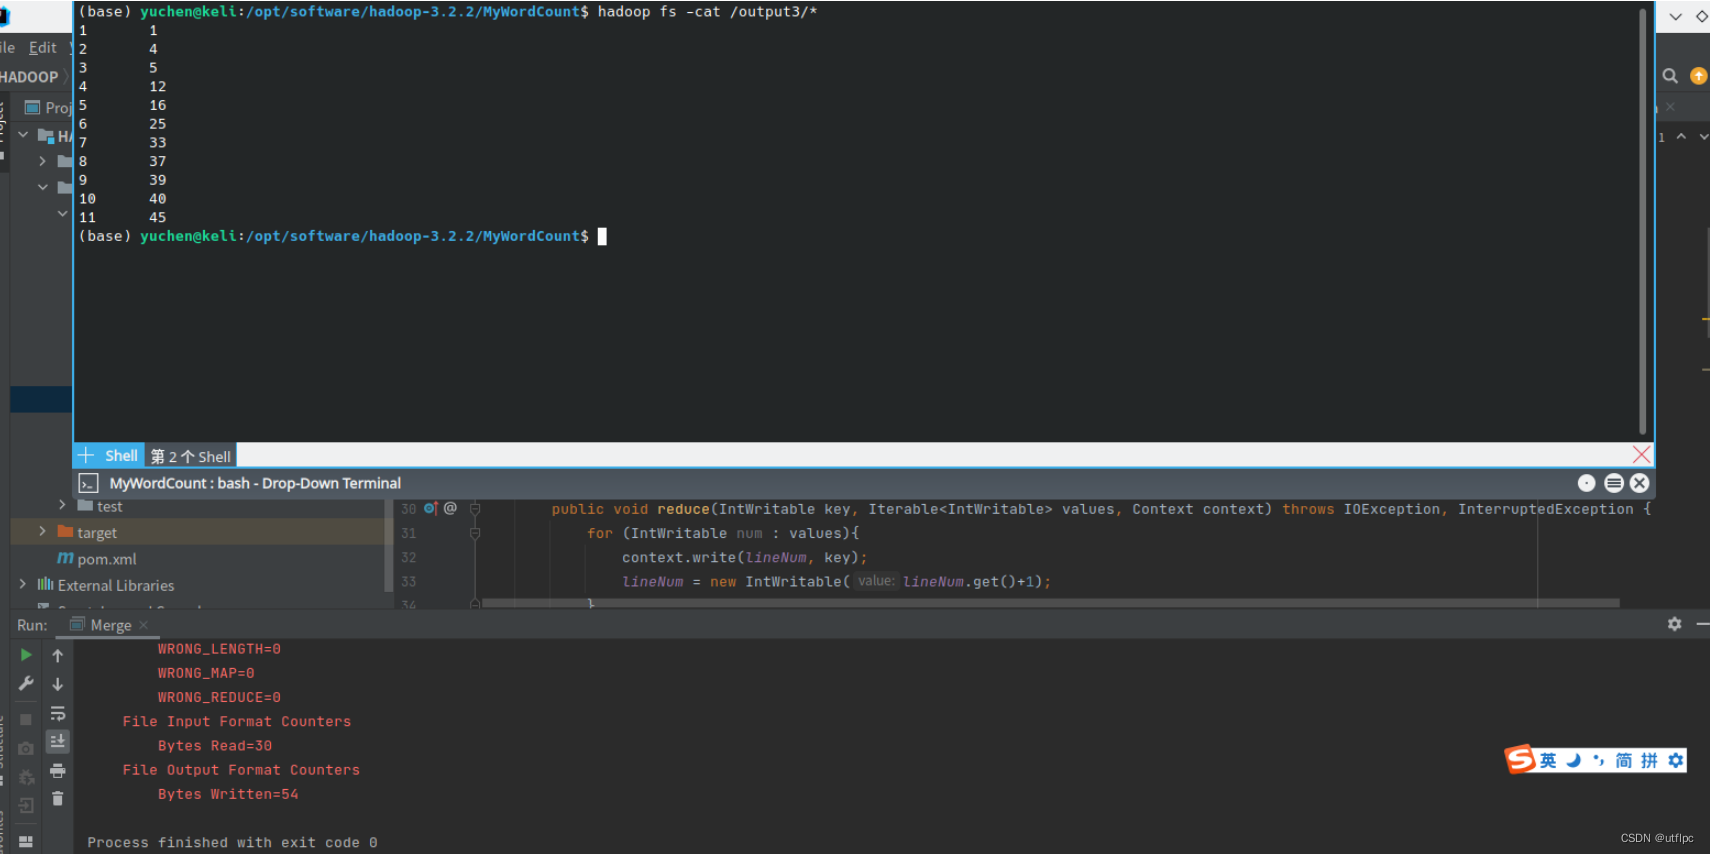
根据输入文件1、2和3得到的输出文件如下:
1 1
2 4
3 5
4 12
5 16
6 25
7 33
8 37
9 39
10 40
11 45
import org.apache.hadoop.conf.Configuration;
import org.apache.hadoop.fs.FSDataInputStream;
import org.apache.hadoop.fs.FileSystem;
import org.apache.hadoop.fs.Path;
import org.apache.hadoop.io.IntWritable;
import org.apache.hadoop.io.Text;
import org.apache.hadoop.mapreduce.Job;
import org.apache.hadoop.mapreduce.Mapper;
import org.apache.hadoop.mapreduce.Partitioner;
import org.apache.hadoop.mapreduce.Reducer;
import org.apache.hadoop.mapreduce.lib.input.FileInputFormat;
import org.apache.hadoop.mapreduce.lib.output.FileOutputFormat;
import java.io.BufferedReader;
import java.io.IOException;
import java.io.InputStreamReader;
public class Merge {
    public static class TokenizerMapper extends Mapper<Object, Text, IntWritable, IntWritable>
    {
        public static IntWritable data = new IntWritable();
        public void map(Object key, Text value, Context context) throws IOException, InterruptedException{
            String line = value.toString();
            data.set(Integer.parseInt(line));
            context.write(data, new IntWritable(1));
        }
    }
    public static class Reduce extends Reducer<Object, IntWritable, IntWritable, IntWritable> {
        private static IntWritable lineNum = new IntWritable(1);
        public void reduce(IntWritable key, Iterable<IntWritable> values, Context context)throws IOException, InterruptedException {
            for (IntWritable num : values){
                context.write(lineNum, key);
                lineNum = new IntWritable(lineNum.get()+1);
            }
        }
    }
    //自定义Partition函数,此函数根据输入数据的最大值和MapReduce框架中Partition的数量获取将输入数据按照大小分块的边界,然后根据输入数值和边界的关系返回对应的PartitionID
    public static class Partition extends Partitioner<IntWritable, IntWritable> {
        public int getPartition(IntWritable key, IntWritable value, int num) {
            int maxNumber = 65223;
            int bound = maxNumber/num +1;
            int keyNumber = key.get();
            for (int i = 0; i < num; i++){
                if (keyNumber < bound * i && keyNumber >= bound * (i-1))
                    return i - 1;
            }
            return -1;
        }
    }
    public static void main(String[] args) throws Exception {
        Configuration conf = new Configuration();
        conf.set("fs.hdfs.impl", "org.apache.hadoop.hdfs.DistributedFileSystem");
        FileSystem fs = FileSystem.get(conf);
        Job job = Job.getInstance(conf, "merge and duplicate removal");
        job.setJarByClass(Merge.class);
        job.setMapperClass(TokenizerMapper.class);
        job.setReducerClass(Reduce.class);
        job.setPartitionerClass(Partition.class);
        job.setOutputKeyClass(IntWritable.class);
        job.setOutputValueClass(IntWritable.class);
        FileInputFormat.addInputPath(job, new Path("hdfs://localhost:9000/input3/file1"));
        FileInputFormat.addInputPath(job, new Path("hdfs://localhost:9000/input3/file2"));
        FileInputFormat.addInputPath(job, new Path("hdfs://localhost:9000/input3/file3"));
        FileOutputFormat.setOutputPath(job, new Path("hdfs://localhost:9000/output3"));
        System.exit(job.waitForCompletion(true)?0:1);
    }
}