基本环境
- 开发板:hikey960 (4G+32G版本)
- 代码:aosp,Android R(master分支)
- 开发环境:64bit ubuntu 16.04
演示场景
Android 8.0 或更高版本的设备必须使用 HIDL 语言编写 HAL1。HIDL HAL类型分为Binderized HALs(绑定式HAL)和Passthrough HALs(直通式HAL);拜读 AOSP对两种HAL的规定,总结:除了android.hardware.graphics.mapper@1.0 和 android.hardware.renderscript@1.0 两个被强制规定采用直通式HAL外,其它的HAL采用绑定式HAL必然不会有 VTS 问题,绑定式HAL是google aosp主推方式;故本文仅介绍使用纯绑定式 HAL实现以下场景:
通过APP控制,最终在HAL中通过文件操作函数open()、close()、write()访问LED的设备节点,控制LED的亮灭。
本文涉及到的关键源码我已释放到github上面:https://github.com/LuciferZhu/android_drviver_demo,使用方法如下。
$ cd aosp/
$ git clone git@github.com:LuciferZhu/android_drviver_demo.git
$ mv android_drviver_demo my_demo
一、 HIDL 代码
已发布的 HIDL 软件包的根目录为 hardware/interfaces 或 vendor/vendorName(例如,对于 Pixel 设备,根目录为 vendor/google),但为了熟悉HIDL软件包从零到一的流程,我们把demo代码部署在全新的根目录my_demo/interfaces/上面,执行命令:
$ croot                                       # 这个命令在对源码进行source和lunch后才有
$ mkdir -p my_demo/interfaces/led/1.0/default
$ touch my_demo/interfaces/led/1.0/ILed.hal
上面创建的ILed.hal是HAL接口描述文件,要在其中定义开放给上层的接口,内容如下。其中参数的数据类型的表示需参考HIDL基元与C++的数据类型对应关系表。
package my_demo.hardware.led@1.0;   /* 整个HAL的软件包名称,包名前缀“my_demo.hardware”由后面要定义的my_demo/interfaces/Android.bp决定 */

interface ILed {
   control(uint32_t enable) generates (int32_t retval);   /* 调用接口会返回一个 int32_t 型数*/
};
二、纯 Binder 化 HAL
① 使用aosp提供的hidl-gen工具,通过ILed.hal生成HAL的必要文件。
$ touch my_demo/interfaces/led/1.0/hidl-generate.sh
$ make hidl-gen -j6                   # 手动生成 hidl-gen 工具,编译aosp时并没有默认生成
脚本hidl-generate.sh内容如下所示。
#!/bin/bash
set -e

if [ ! -d $ANDROID_BUILD_TOP/my_demo/interfaces ] ; then
 echo "Where is my_demo/interfaces?";
 exit 1;
fi

if [ ! -d $ANDROID_BUILD_TOP/system/libhidl/transport ] ; then
 echo "Where is system/libhidl/transport?";
 exit 1;
fi

PACKAGE=my_demo.hardware.led@1.0
LOC=$ANDROID_BUILD_TOP/my_demo/interfaces/led/1.0/default/
options="-rmy_demo.hardware:my_demo/interfaces \
       -randroid.hidl:system/libhidl/transport"

#make hidl-gen -j6

hidl-gen -o $LOC -Lc++-impl $options $PACKAGE

hidl-gen -o $LOC -Landroidbp-impl $options $PACKAGE

echo done!
如下所示执行脚本hidl-generate.sh并查看my_demo/interfaces/led目录的结构;可见my_demo/interfaces/led/1.0/default/下新生成了三个文件。
$ chmod +x my_demo/interfaces/led/1.0/hidl-generate.sh
$ ./my_demo/interfaces/led/1.0/hidl-generate.sh
$ tree my_demo/interfaces/led/
my_demo/interfaces/led/
└── 1.0
    ├── default
    │   ├── Android.bp
    │   ├── Led.cpp
    │   └── Led.h
    ├── hidl-generate.sh
    └── ILed.hal

2 directories, 5 files
② 借助system/tools/hidl/update-makefiles-helper.sh中的do_makefiles_update函数生成HAL的必要make-files,具体操作如下:
$ touch my_demo/interfaces/update-makefiles.sh
$ chmod +x my_demo/interfaces/update-makefiles.sh
编辑my_demo/interfaces/update-makefiles.sh内容如下所示。其中第14行指定了以目录my_demo/interfaces为软件包my_demo.hardware根目录,进行更新或生成该软件包下子包的makefiles文件。
#!/bin/bash
# Script to update Android make-files for HAL and VTS modules.

set -e

if [ -z "$ANDROID_BUILD_TOP" ]; then
    echo "Missing ANDROID_BUILD_TOP env variable. Run 'lunch' first."
    exit 1
fi

source $ANDROID_BUILD_TOP/system/tools/hidl/update-makefiles-helper.sh

do_makefiles_update \
  "my_demo.hardware:my_demo/interfaces" \
  "android.hidl:system/libhidl/transport"
函数do_makefiles_update要求在Android源码根目录执行脚本update-makefiles.sh,执行该脚本如下所示。可知新生成了my_demo/interfaces/led/1.0/Android.bp,它将会控制编译生成HIDL接口my_demo.hardware.led@1.0,该软件包还会导出一些必要的中间件,具体参考《Google aosp > 设计 > 架构 > HIDL(C++) > 软件包 > 生成的文件》。
$ ./my_demo/interfaces/update-makefiles.sh
Updating makefiles for my_demo.hardware in /home/lucifer/samba_share/android_code/hikey960/aosp/my_demo/interfaces.
Updating my_demo.hardware.led@1.0
$ tree my_demo/interfaces/
my_demo/interfaces/
├── led
│   └── 1.0
│       ├── Android.bp
│       ├── default
│       │   ├── Android.bp
│       │   ├── Led.cpp
│       │   └── Led.h
│       ├── hidl-generate.sh
│       └── ILed.hal
└── update-makefiles.sh

3 directories, 7 files
③ 指定目录my_demo/interfaces作为HIDL软件包my_demo.hardware的根目录。具体操作如下:
$ touch my_demo/interfaces/Android.bp
编辑my_demo/interfaces/Android.bp内容如下:
hidl_package_root {
    name: "my_demo.hardware",
    path: "my_demo/interfaces",
}
④ 实现控制LED的纯绑定式hal代码。如下图所示my_demo/interfaces/led/1.0/default/Led.cpp是前面通过aosp自带工具hidl-gen生成的HAL核心代码。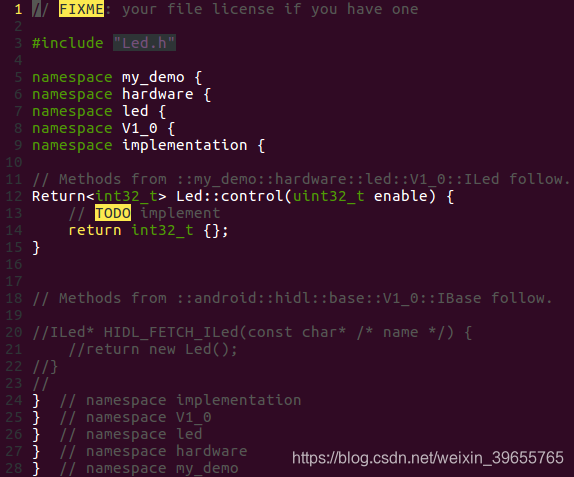
我们在这个基础框架上填充我们的实现代码后如下所示。
// FIXME: your file license if you have one

#define LOG_TAG "my_demo.hardware.led@1.0-impl"
#include <log/log.h>

#include <stdio.h>
#include <string.h>
#include <stdlib.h>
#include <sys/types.h>
#include <sys/stat.h>
#include <fcntl.h>
#include <unistd.h>
#include <errno.h>

#include "Led.h"

namespace my_demo {
namespace hardware {
namespace led {
namespace V1_0 {
namespace implementation {

static const char THE_DEVICE[] = "/sys/devices/platform/leds/leds/user_led3/brightness";

// Methods from ::my_demo::hardware::led::V1_0::ILed follow.
Led::Led() {
    ALOGD("%s() ++++++++", __func__);
}

Led::~Led() {
    ALOGD("%s() ++++++++", __func__);
}

Return<int32_t> Led::control(uint32_t enable) {
    char ctrl_str[4];
    int ret = 0;
    ALOGD("%s() ++++++++ enable=%d", __func__, enable);

    int fd = open(THE_DEVICE, O_RDWR);
    if (fd < 0) {
        ALOGE("open: %s", strerror(errno));
        ret = -1;
        goto err_open;
    }

    memset(ctrl_str, '\0', sizeof(ctrl_str));
    if (enable)
        strcpy(ctrl_str, "255");
    else
        strcpy(ctrl_str, "0");

    ALOGD("ctrl_str='%s'", ctrl_str);
    ret = write(fd, ctrl_str, strlen(ctrl_str)+1);
    if (ret < 0) {
        ALOGE("write: %s", strerror(errno));
        ret = -1;
        goto err_write;
    }

    close(fd);
    return 0;
err_write:
    close(fd);
err_open:
    return int32_t {ret};
}
// Methods from ::android::hidl::base::V1_0::IBase follow.

}  // namespace implementation
}  // namespace V1_0
}  // namespace led
}  // namespace hardware
}  // namespace my_demo
上面可看到我添加了Led结构体的构造函数Led::Led()和析构函数Led::~Led(),因此还要修改my_demo/interfaces/led/1.0/default/Led.h成如下所示,其中第25、26行是新添加的函数声明。
// FIXME: your file license if you have one

#pragma once

#include <my_demo/hardware/led/1.0/ILed.h>
#include <hidl/MQDescriptor.h>
#include <hidl/Status.h>

namespace my_demo {
namespace hardware {
namespace led {
namespace V1_0 {
namespace implementation {

using ::android::hardware::hidl_array;
using ::android::hardware::hidl_memory;
using ::android::hardware::hidl_string;
using ::android::hardware::hidl_vec;
using ::android::hardware::Return;
using ::android::hardware::Void;
using ::android::sp;

struct Led : public ILed {
    // Methods from ::my_demo::hardware::led::V1_0::ILed follow.
    Led();
    ~Led();
    Return<int32_t> control(uint32_t enable) override;
    // Methods from ::android::hidl::base::V1_0::IBase follow.
};

}  // namespace implementation
}  // namespace V1_0
}  // namespace led
}  // namespace hardware
}  // namespace my_demo
三、HAL 纯绑定式服务器
对于纯绑定式HAL,HAL的调用者将会通过HwBinder RPC通信进行间接调用HAL接口,所以我们要构建一个守护进程用于处理这些HwBinder通信请求。
① 创建并编写服务器代码my_demo/interfaces/led/1.0/default/service.cpp内容如下所示。第16行调用configureRpcThreadpool()设置当前进程用于hwbinder通信的最大线程数;第20行的registerAsService()方法是Led结构体继承于自动生成的my_demo/hardware/led/1.0/ILed.h中的ILed结构体,它会向 hwservicemanager注册HAL接口实现;第29行执行joinRpcThreadpool()会将当前的通信加入HwBinder的线程池进行循环。
#define LOG_TAG "my_demo.hardware.led@1.0-service"
#include <log/log.h>
#include <hidl/HidlSupport.h>
#include <hidl/HidlTransportSupport.h>
#include <my_demo/hardware/led/1.0/ILed.h>
#include "Led.h"

using my_demo::hardware::led::V1_0::implementation::Led;
using android::sp;
using android::status_t;

int main(int /* argc */, char* /* argv */ []) {
    // This function must be called before you join to ensure the proper
    // number of threads are created. The threadpool will never exceed
    // size one because of this call.
    ::android::hardware::configureRpcThreadpool(1 /*threads*/, true /*willJoin*/);

    ALOGD("prepare for my_demo.hardware.led@1.0-service");
    sp<ILed> led = new Led();
    const status_t status = led->registerAsService();
    if (status != ::android::OK) {
        ALOGE("Can't register service of Led");
        return 1; // or handle error
    }

    // Adds this thread to the threadpool, resulting in one total
    // thread in the threadpool. We could also do other things, but
    // would have to specify 'false' to willJoin in configureRpcThreadpool.
    ::android::hardware::joinRpcThreadpool();
    return 1; // joinRpcThreadpool should never return
}
② 创建并编辑my_demo/interfaces/led/1.0/default/my_demo.hardware.led@1.0-service.rc,用于实现开机自启动上述守护进程。
service my_demo.led-1-0 /vendor/bin/hw/my_demo.hardware.led@1.0-service
    class hal
    user system
    group system
③ 前面hidl-gen自动生成的my_demo/interfaces/led/1.0/default/Android.bp只适用于直通式HAL,需要修改成如下所示才适用于纯绑定式HAL服务器。将控制生成并部署到机器的/vendor/bin/hw/my_demo.hardware.led@1.0-service和/vendor/etc/init/my_demo.hardware.led@1.0-service.rc。
cc_binary {
    // FIXME: this should only be -impl for a passthrough hal.
    // In most cases, to convert this to a binderized implementation, you should:
    // - change '-impl' to '-service' here and make it a cc_binary instead of a
    //   cc_library_shared.
    // - add a *.rc file for this module.
    // - delete HIDL_FETCH_I* functions.
    // - call configureRpcThreadpool and registerAsService on the instance.
    // You may also want to append '-impl/-service' with a specific identifier like
    // '-vendor' or '-<hardware identifier>' etc to distinguish it.
    name: "my_demo.hardware.led@1.0-service",
    relative_install_path: "hw",
    defaults: ["hidl_defaults"],
    vendor: true,
    init_rc: ["my_demo.hardware.led@1.0-service.rc"],
    srcs: [
        "Led.cpp",
        "service.cpp",
    ],
    shared_libs: [
        "libhidlbase",
        "libhidltransport",
        "libutils",
        "liblog",
        "my_demo.hardware.led@1.0",
    ],
}
四、C++实现 HAL 客户端
① 创建文件my_demo/jni/ledHidl_jni/ledNative.cpp并填充如下代码。我们在 JNI 代码中实现HAL客户端,当要使用HAL接口时,需要调用静态函数ILed::getService();来获取第三章注册到hwservicemanager的服务器实例,通过智能指针如hidlService->control(1)的形式调用服务器中的接口。
- 代码第3、4、5、8和31行是hidl hal客户端必须包含的代码样式。
#define LOG_TAG "ledNative.cpp"
#include <log/log.h>
#include <hidl/HidlSupport.h>
#include <hidl/Status.h>
#include <my_demo/hardware/led/1.0/ILed.h>
#include "jni.h"

using my_demo::hardware::led::V1_0::ILed;
using android::sp;
using android::status_t;

static const char *classPathName = "com/example/lowlevel/LedNative";

jint openLed(JNIEnv* /*env*/, jobject /*thiz*/)
{
    ALOGD("------%s", __FUNCTION__);
    return 0;
}

jint closeLed(JNIEnv* /*env*/, jobject /*thiz*/)
{
    ALOGD("------%s", __FUNCTION__);
    return 0;
}


jint ledOn(JNIEnv* /*env*/, jobject /*thiz*/)
{
    jint ret;
    ALOGD("------%s", __FUNCTION__);
    sp<ILed> hidlService = ILed::getService();
    if (hidlService == nullptr) {
        ALOGE("can't not get ILed service");
        return -1;
    }

    ret = hidlService->control(1);
    if(ret < 0) {
        ALOGE("hidlService->control(1) failed");
        return -1;
    }
    return 0;
}

jint ledOff(JNIEnv* /*env*/, jobject /*thiz*/)
{
    jint ret;
    ALOGD("------%s", __FUNCTION__);
    sp<ILed> hidlService = ILed::getService();
    if (hidlService == nullptr) {
        ALOGE("can't not get ILed service");
        return -1;
   }

    ret = hidlService->control(0);
    if(ret < 0) {
        ALOGE("hidlService->control(0) failed");
        return -1;
    }
    return 0;
}

static JNINativeMethod ledMethod[] = {
  {"openDev", "()I", (void*)openLed},
  {"closeDev", "()I", (void*)closeLed},
  {"devOn", "()I", (void*)ledOn},
  {"devOff", "()I", (void*)ledOff},
};

jint JNI_OnLoad(JavaVM* vm, void* /*reserved*/)
{
    jint ret;
    JNIEnv* env = NULL;
    ALOGD("------%s", __FUNCTION__);
    ret = vm->GetEnv((void**)&env, JNI_VERSION_1_4);
    if (ret != 0) {
        ALOGE("vm->GetEnv error, ret = %d", ret);
        return -1;
    }

    jclass cls = env->FindClass(classPathName);
    if (cls == NULL) {
        ALOGE("Native registration unable to find class '%s'", classPathName);
        return JNI_FALSE;
    }

    ret = env->RegisterNatives(cls, ledMethod, sizeof(ledMethod)/sizeof(ledMethod[0]));
    if (ret < 0) {
        ALOGE("RegisterNatives failed for '%s'", classPathName);
        return JNI_FALSE;
    }

    return JNI_VERSION_1_4;
}
② 创建文件 my_demo/jni/ledHidl_jni/Android.bp 并填充如下代码。其中第9、10行的libhidlbase 和 my_demo.hardware.led@1.0 是HAL客户端模块必须连接的动态库样式。
cc_library_shared {
    name: "libled_jni",
    // All of the source files that we will compile.
    srcs: ["ledNative.cpp"],
    // All of the shared libraries we link against.
    shared_libs: [
        "liblog",
        "libutils",
        "libhidlbase",
        "my_demo.hardware.led@1.0",
    ],
    // No static libraries.
    static_libs: [],
    cflags: [
        "-Wall",
        "-Werror",
    ],
}
五、JAVA实现用户界面APP
我们在第四章中已经实现JNI代码,在app中只需要常规调用JNI接口即可间接控制LED。
① 使用Android studio创建工程LedControl,创建native接口映射类LedControl/app/src/main/java/com/example/lowlevel/LedNative.java内容如下。
package com.example.lowlevel;

public class LedNative {
    static {
        System.loadLibrary("led_jni");
    }
    public native int openDev();
    public native int closeDev();
    public native int devOn();
    public native int devOff();
}
② 创建主程序LedControl/app/src/main/java/com/example/ledcontrol/MainActivity.java代码如下:
package com.example.ledcontrol;

import android.support.v7.app.AppCompatActivity;
import android.os.Bundle;
import android.util.Log;
import android.view.View;
import android.widget.Button;

import com.example.lowlevel.LedNative;

public class MainActivity extends AppCompatActivity {
    private final String TAG = "LedControl";
    private Button btn_led = null;
    LedNative ledNative = null;

    @Override
    protected void onCreate(Bundle savedInstanceState) {
        super.onCreate(savedInstanceState);
        setContentView(R.layout.activity_main);
        initView();
        ledNative = new LedNative();
        ledNative.openDev();
    }

    public void initView() {
        btn_led = (Button) findViewById(R.id.btn_led);
    }

    public void onClickLed(View v) {

        if (btn_led.getText().equals("开灯") ) {
            Log.d(TAG, "turn on led");
            btn_led.setText("关灯");
            ledNative.devOn();

        } else {
            Log.d(TAG, "turn off led");
            btn_led.setText("开灯");
            ledNative.devOff();

        }
    }

    @Override
    protected void onDestroy() {
        super.onDestroy();
        ledNative.closeDev();
    }
}
③ 创建app布局文件LedControl/app/src/main/res/layout/activity_main.xml,界面较为简单,只有一个用来控制LED亮灭的按钮。
<?xml version="1.0" encoding="utf-8"?>
<android.support.constraint.ConstraintLayout xmlns:android="http://schemas.android.com/apk/res/android"
    xmlns:app="http://schemas.android.com/apk/res-auto"
    xmlns:tools="http://schemas.android.com/tools"
    android:layout_width="match_parent"
    android:layout_height="match_parent"
    tools:context=".MainActivity">

    <Button
        android:id="@+id/btn_led"
        android:layout_width="wrap_content"
        android:layout_height="wrap_content"
        android:text="开灯"
        android:textSize="@android:dimen/app_icon_size"
        app:layout_constraintBottom_toBottomOf="parent"
        app:layout_constraintEnd_toEndOf="parent"
        app:layout_constraintStart_toStartOf="parent"
        app:layout_constraintTop_toTopOf="parent"
        android:onClick="onClickLed"/>

</android.support.constraint.ConstraintLayout>
④ 将整个LedControl AS工程代码拷贝到目录aosp/my_demo/jni/ledHidl_jni/app中,参考《android studio项目嵌入到Android系统源码》或者我的github源码的修改提交commit c45c72caf,对app代码进行修改,方可在集成在aosp代码中。
其中新增的模块编译控制文件my_demo/jni/ledHidl_jni/app/LedControl/Android.bp如下所示。第三行certificate: "platform",指定该APP为platform_app,使得可在下一章中赋予访问HIDL接口的权限。
android_app {
    name: "LedControl",
    certificate: "platform",
    //product_specific: true,
    srcs: ["app/src/main/java/**/*.java"],

    resource_dirs: ["app/src/main/res"],
    manifest: "app/src/main/AndroidManifest.xml",

    jni_libs: ["libled_jni"],
    static_libs: [
        "androidx-constraintlayout_constraintlayout",
        "androidx-constraintlayout_constraintlayout-solver",
    ],

    optimize: {
        enabled: false,
    },
    sdk_version: "current",
    dex_preopt: {
        enabled: false,
    },
}
六、系统配置
HIDL源码和用于测试工具代码前面已经完成,还需要做些板级项目配置以及selinux配置,方可把测试程序正常运行起来。
① 把HIDL接口、服务器可执行程序、led jni库、app添加到板级项目配置的PRODUCT_PACKAGES中,这些模块才真正被编进安卓镜像。配置文件device/linaro/hikey/hikey960/device-hikey960.mk加入如下内容:
PRODUCT_PACKAGES += \
        my_demo.hardware.led@1.0-service \
        my_demo.hardware.led@1.0.so \
        libled_jni \
        LedControl
② 在第二章的HAL接口实现中,我们使用sysfs中设备拓扑的led设备属性文件/sys/devices/platform/leds/leds/user_led3/brightness,进行led的亮灭控制,默认情况下只有root用户才有权限访问改属性文件,所以我们要在on post-fs阶段设置该设备属性文件的访问权限。修改文件device/linaro/hikey/hikey960/init.hikey960.rc加入chmod 0666 /sys/devices/platform/leds/leds/user_led3/brightness如下图所示。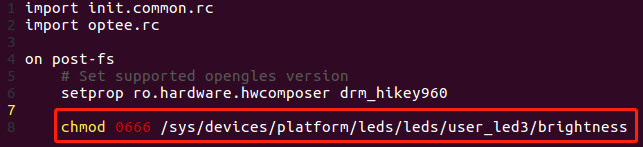
③ 在文件 device/linaro/hikey/manifest.xml 中添加如下代码用以声明我们提供的 HAL 实例。更多细节参考《aosp.设计.测试.供应商测试套件(VTS).测试框架.HAL可测试性检查.确定支持哪些 HAL》
    <hal format="hidl">
        <name>my_demo.hardware.led</name>
        <transport>hwbinder</transport>
        <version>1.0</version>
        <interface>
            <name>ILed</name>
            <instance>default</instance>
        </interface>
    </hal>
④ 配置selinux。
修改或创建device/linaro/hikey/sepolicy/attributes文件附加如下代码:
attribute hal_led;
attribute hal_led_client;
attribute hal_led_server;
创建编辑device/linaro/hikey/sepolicy/hal_led_default.te。新建了一个hal_led_default类型的域,目的是用于后面标识HAL服务器/vendor/bin/hw/my_demo.hardware.led@1.0-service。
第18行至22行,是赋予HAL服务器访问设备属性文件/sys/devices/platform/leds/leds/user_led3/brightness的规则,该设备属性文件的上下文名字默认在system/sepolicy/prebuilts/api/29.0/private/genfs_contexts被定义成genfscon sysfs /class/leds u:object_r:sysfs_leds:s0;所以第18行至22行应根据实际HAL接口所访问的资源来编写。
type hal_led_default, domain, mlstrustedsubject;
type hal_led_default_exec, exec_type, vendor_file_type, file_type;

init_daemon_domain(hal_led_default)
hal_server_domain(hal_led_default, hal_led)

# HwBinder IPC from client to server, and callbacks
binder_call(hal_led_client, hal_led_server)
binder_call(hal_led_server, hal_led_client)

add_hwservice(hal_led_server, hal_led_hwservice)
allow hal_led_client hal_led_hwservice:hwservice_manager find;

##########################################################
# allow HAL module to open/read/write/ioctl
# /sys/devices/platform/leds (/sys/class/leds)
##########################################################
allow hal_led sysfs_leds:lnk_file read;
allow hal_led sysfs_leds:file rw_file_perms;
allow hal_led sysfs_leds:dir r_dir_perms;

allow hal_led_default sysfs:file rw_file_perms;
在device/linaro/hikey/sepolicy/file_contexts添加如下内容,用于声明守护进程/vendor/bin/hw/my_demo.hardware.led@1.0-service为前面新定义的hal_led_default_exec type,从而这个进程属于hal_led_default的安全上下文。
/vendor/bin/hw/my_demo\.hardware\.led@1\.0-service u:object_r:hal_led_default_exec:s0
修改或创建device/linaro/hikey/sepolicy/hwservice.te文件附加如下代码。新定义了一个名为hal_led_hwservice的type,用于后面声明my_demo.hardware.led::ILed的安全上下文。
type hal_led_hwservice, hwservice_manager_type;
修改或创建device/linaro/hikey/sepolicy/hwservice_contexts文件附加如下代码。
my_demo.hardware.led::ILed u:object_r:hal_led_hwservice:s0
修改或创建device/linaro/hikey/sepolicy/platform_app.te文件附加如下代码。在第五章中我们给用户界面app签名成platform_app,它虽然通过JNI来获取HIDL服务和接口,但这时JNI跟app在同样的安全上下文。在JNI中我们通过ILed::getService()来获取第三章注册到hwservicemanager的服务器实例,最后通过hwbinder进行实际HAL接口的调用,所以需要赋予相应的权限才可顺利执行。
allow platform_app hal_led_hwservice:hwservice_manager { find };
allow platform_app hal_led_default:binder { call };
修改device/linaro/hikey/sepolicy/system_server.te文件附加如下代码:
hal_client_domain(system_server, hal_led)
七、测试和总结
用户界面APP如下所示,其已作为platform_app内置于系统。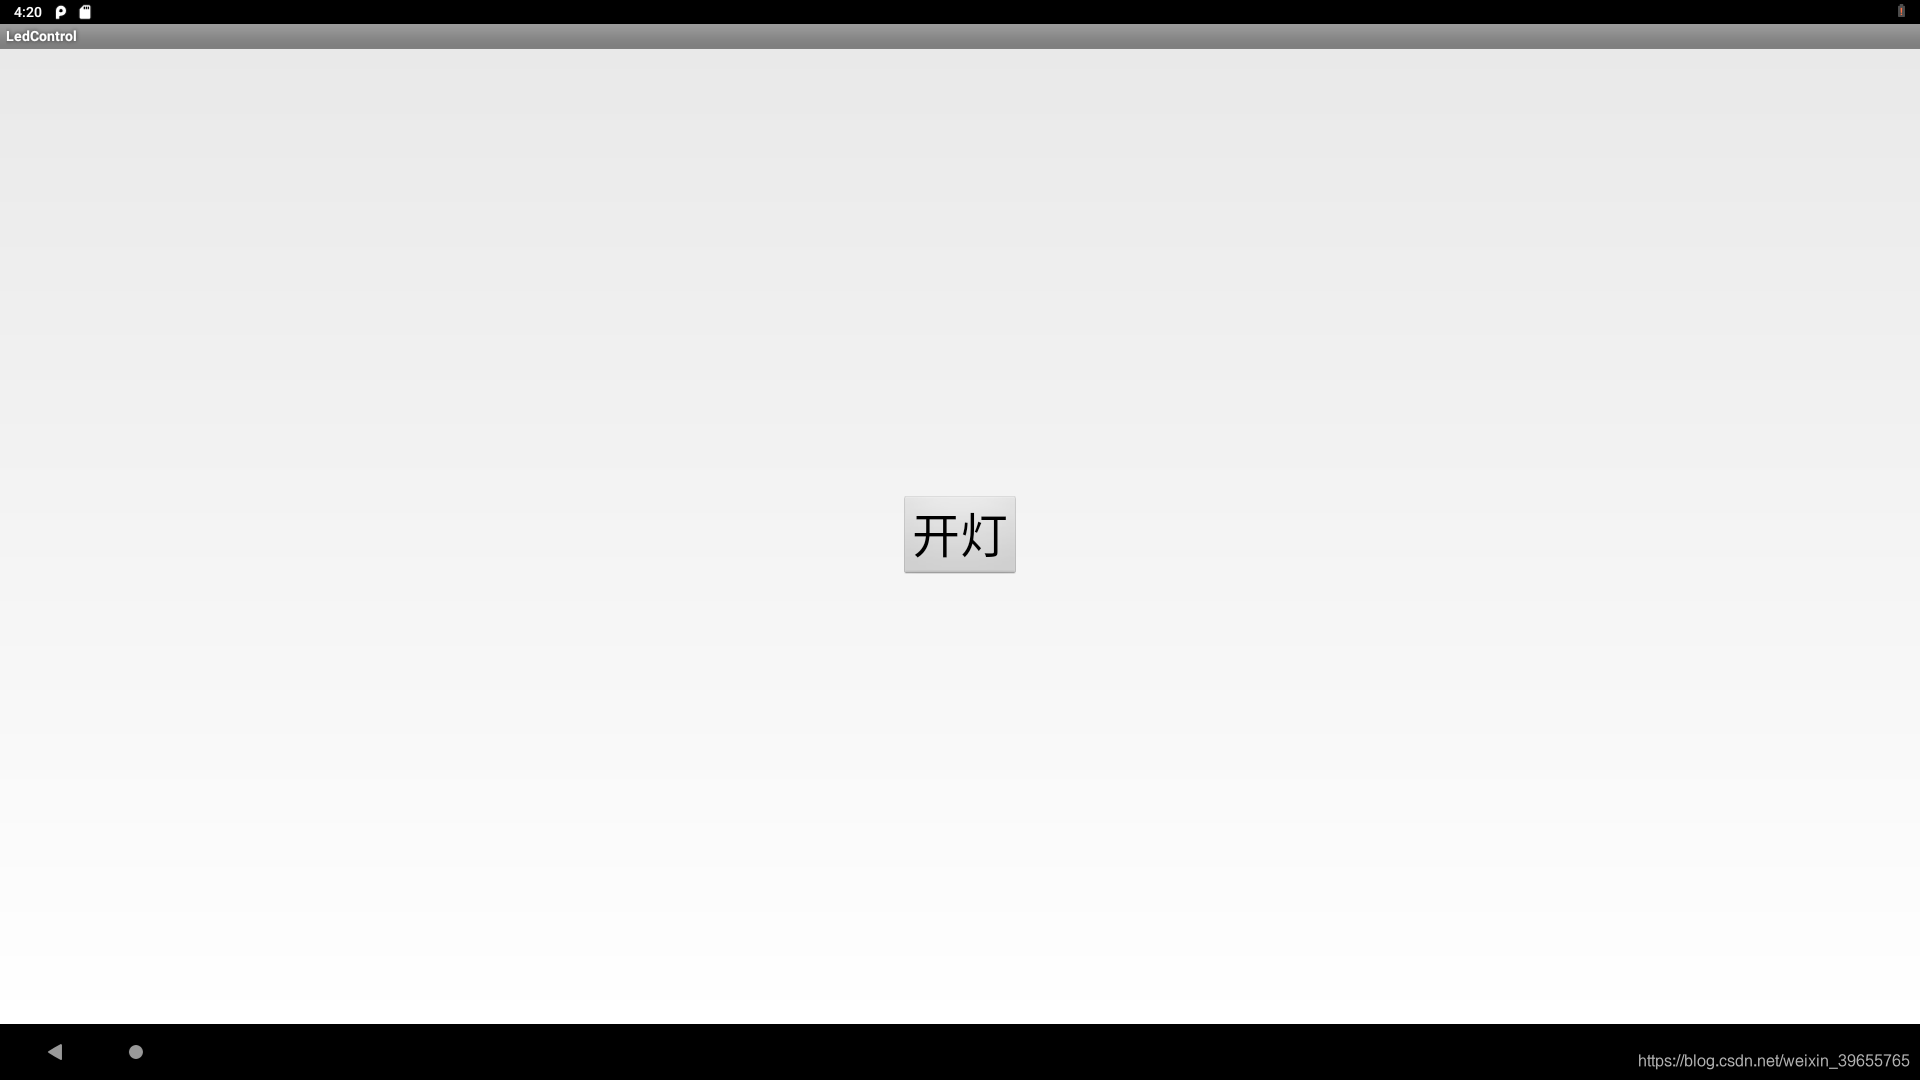
点击按钮开灯后,硬件呈现效果如下图所示。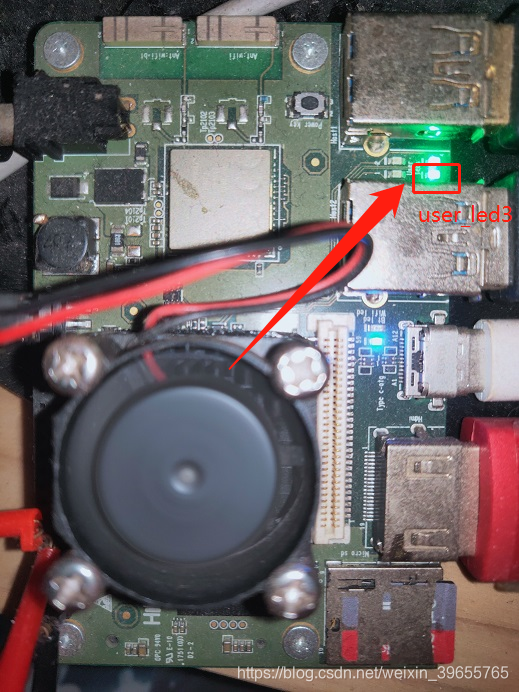
本文通过C++实现了HIDL HAL的客户端,另外还可以通过JAVA实现客户端,可以越过实现JNI的步骤,具体参考我的下一篇文章《android HIDL HAL控制LED demo(二)之JAVA作客户端》。