初探脚手架
必要性
便于多人协作,不必从零开始搭建初始项目,提升前端研发效能。
什么是脚手架
脚手架本质是一个操作系统的客户端,它通过命令执行,举个?:
vue create my-project
这条命令由3个部分组成
- 主命令:vue
- command:create
- command 的 params:my-project
它表示创建一个 vue 项目,该项目的名称为my-project,较为简属于较为简单的脚手架命令,但实际场景往往更加复杂,比如:
当前目录已经有文件了,我们需要覆盖当前目录下的文件,强制进行安装vue项目,此时我们就可以输入:
vue create my-project --force
这里的--force叫做option,用来辅助脚手架确认在特定场景下用户的选择。还有一种场景:
通过vue create创建项目时。会自动执行npm install帮用户安装依赖,如果我们希望使用淘宝源来安装,可以输入命令
vue create my-project --force -r https://registry.npm.taobao.org
这里的-r也叫做options,他与--force不同的是它使用-,并且使用简写,这里的-r也可以替换成--registry,通过下面命令就可以看到vue-create支持的所有options:
vue create --help
-r https://registry.npm.taobao.org后面的https://registry.npm.taobao.org成为option的param,其实--force可以理解为:--force true,简写为:--force或-f
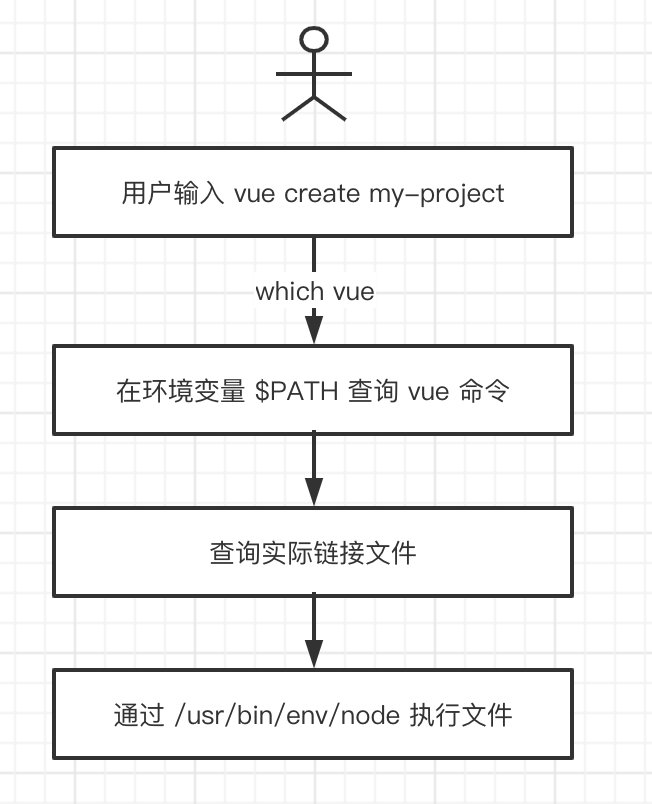
脚手架执行原理
- 在终端输入
vue create my-project - 在终端解析出
vue命令 - 终端在环境变量中找到
vue命令 - 终端根据
vue命令链接到实际文件vue.js - 终端利用
node执行vue.js vue.js解析commond/optionsvue.js执行command- 执行完毕,退出执行
如何开发一个脚手架
以 vue-cli 为例
- 开发 npm 项目,该项目中应该包含一个
bin/vue.js文件,并将这个项目发布到npm - 将
npm项目安装到node的lib/node_modules - 将
node的bin目录下配置vue软链接指向lib/node_modules/@vue/cli/bin/vue.js,这样在执行vue命令的时候就可以找到vue.js进行执行
问题
为什么全局安装
@vue/cli后会添加的命令为vue?packages.json中bin进行的配置
npm install -g @vue/cli
全局安装
@vue/cli时发生了什么1、下载到指定lib/node_modules目录下
2、配置bin的软链接
为什么
vue指向一个js文件,我们却可以直接通过vue命令去执行它呢?1、在环境变量中找到命令是否呗注册
2、vue.js中第一行#!/usr/bin/env node,我们调用这个文件的时候直接到环境变量当中找node命令然后通过node命令执行,等价于node vue.js
为什么说脚手架本质是操作系统的客户端?它和我们自啊PC上安装的应用/软件有什么区别?
因为node是操作系统的客户端,区别是没有gui,node是通过命令行方式,传入参数执行
如何为
node脚手架命令创建别名相当于为现有的vue 这个命令在添加个别名:新建软连接指向他就好了。在node/bin下执行:ln -s /vue vue2即可使用vue2 指向vue。
描述脚手架命令执行的全过程
脚手架开发流程
创建
npm项目创建脚手架入口文件,最上方添加:
#!/usr/bin/env node配置
package.json,添加bin属性编写脚手架代码
将脚手架发布到
npm
使用流程
安装脚手架
npm install -g book-cli使用脚手架
book-cli
帮助文档
vue的帮助信息
// vue --help
Usage: vue <command> [options]

Options:
  -V, --version                              output the version number
  -h, --help                                 output usage information

Commands:
  create [options] <app-name>                create a new project powered by vue-cli-service
  add [options] <plugin> [pluginOptions]     install a plugin and invoke its generator in an already created project
  invoke [options] <plugin> [pluginOptions]  invoke the generator of a plugin in an already created project
  inspect [options] [paths...]               inspect the webpack config in a project with vue-cli-service
  serve [options] [entry]                    serve a .js or .vue file in development mode with zero config
  build [options] [entry]                    build a .js or .vue file in production mode with zero config
  ui [options]                               start and open the vue-cli ui
  init [options] <template> <app-name>       generate a project from a remote template (legacy API, requires @vue/cli-init)
  config [options] [value]                   inspect and modify the config
  outdated [options]                         (experimental) check for outdated vue cli service / plugins
  upgrade [options] [plugin-name]            (experimental) upgrade vue cli service / plugins
  migrate [options] [plugin-name]            (experimental) run migrator for an already-installed cli plugin
  info                                       print debugging information about your environment

  Run vue <command> --help for detailed usage of given command.
- Command help
- Usage
- Options
vue create的帮助信息
// vue create --help
Usage: create [options] <app-name>

create a new project powered by vue-cli-service

Options:
  -p, --preset <presetName>       Skip prompts and use saved or remote preset
  -d, --default                   Skip prompts and use default preset
  -i, --inlinePreset <json>       Skip prompts and use inline JSON string as preset
  -m, --packageManager <command>  Use specified npm client when installing dependencies
  -r, --registry <url>            Use specified npm registry when installing dependencies (only for npm)
  -g, --git [message]             Force git initialization with initial commit message
  -n, --no-git                    Skip git initialization
  -f, --force                     Overwrite target directory if it exists
  --merge                         Merge target directory if it exists
  -c, --clone                     Use git clone when fetching remote preset
  -x, --proxy <proxyUrl>          Use specified proxy when creating project
  -b, --bare                      Scaffold project without beginner instructions
  --skipGetStarted                Skip displaying "Get started" instructions
  -h, --help                      output usage information