目录
路线
想成为一个合格的云机器人工程师,需要对Linux和ROS系统有了解、适用,在这个工程基础上学习顺序为:SLAM十四讲-->深度强化学习-->迁移学习
Linux双系统的安装
教程
https://www.cnblogs.com/masbay/p/10745170.html
我的电脑是D UEFI新式bios+双硬盘(SSD固态硬盘+机械硬盘)
制作U盘:下载镜像( 阿里云的ubuntu镜像, amd64和i386的不同)如果cpu只支持32位就下载i386,否则都可以。amd64更兼容64位的。所以下然后制作好了通过F2(华硕笔记本)进入bios.
因为我的电脑有特殊独立显卡,所以还需要根据此处https://www.cnblogs.com/masbay/p/10718514.html修改(修改之后分辨率会变大 千万注意不要修改grub!因为加了nomodeset之后会使用集显运行图形界面,导致分辨率变低,并且更新nvidia的显卡驱动之后会出现循环登入问题,使用recovery的grub进入之后直接下nvidia显卡驱动(
sudo ubuntu-drivers autoinstall)
踩坑感谢:进入系统
1.更源(不然会很慢)
2.输入法:https://www.jianshu.com/p/ffbdf94c7306(需要重启才会出现chinese(pinyin))
ROS系统的初体验
https://blog.csdn.net/softimite_zifeng/article/details/78632211
下载失败地时候记得换hkp://keyserver.ubuntu.com:80的服务器
sudo rosdep init的时候可能会报错
asber@asber-X550VX:~$ sudo rosdep init
ERROR: cannot download default sources list from:
https://raw.githubusercontent.com/ros/rosdistro/master/rosdep/sources.list.d/20-default.list
Website may be down.
asber@asber-X550VX:~$ sudo -E rosdep init
ERROR: cannot download default sources list from:
https://raw.githubusercontent.com/ros/rosdistro/master/rosdep/sources.list.d/20-default.list
Website may be down.
https://blog.csdn.net/luvalluo/article/details/78745677 还是报错
我把源通过software&update改成在外国地源之后,好了
asber@asber-X550VX:~$ sudo c_rehash /etc/ssl/certs
Doing /etc/ssl/certs
WARNING: Skipping duplicate certificate ACCVRAIZ1.pem
WARNING: Skipping duplicate certificate ACCVRAIZ1.pem
asber@asber-X550VX:~$ sudo -E rosdep init
Wrote /etc/ros/rosdep/sources.list.d/20-default.list
Recommended: please run

	rosdep update
然后update
asber@asber-X550VX:~$ rosdep update
reading in sources list data from /etc/ros/rosdep/sources.list.d

ERROR: unable to process source [https://raw.githubusercontent.com/ros/rosdistro/master/rosdep/osx-homebrew.yaml]:
	<urlopen error timed out> (https://raw.githubusercontent.com/ros/rosdistro/master/rosdep/osx-homebrew.yaml)
ERROR: unable to process source [https://raw.githubusercontent.com/ros/rosdistro/master/rosdep/base.yaml]:
	<urlopen error timed out> (https://raw.githubusercontent.com/ros/rosdistro/master/rosdep/base.yaml)
Hit https://raw.githubusercontent.com/ros/rosdistro/master/rosdep/python.yaml
Hit https://raw.githubusercontent.com/ros/rosdistro/master/rosdep/ruby.yaml
Hit https://raw.githubusercontent.com/ros/rosdistro/master/releases/fuerte.yaml
Query rosdistro index https://raw.githubusercontent.com/ros/rosdistro/master/index-v4.yaml
Skip end-of-life distro "ardent"
Skip end-of-life distro "bouncy"
Add distro "crystal"
Add distro "dashing"
Add distro "eloquent"
Skip end-of-life distro "groovy"
Skip end-of-life distro "hydro"
Skip end-of-life distro "indigo"
Skip end-of-life distro "jade"
Add distro "kinetic"
Skip end-of-life distro "lunar"
Add distro "melodic"
Add distro "noetic"
updated cache in /home/asber/.ros/rosdep/sources.cache
ERROR: Not all sources were able to be updated.
[[[
ERROR: unable to process source [https://raw.githubusercontent.com/ros/rosdistro/master/rosdep/osx-homebrew.yaml]:
	<urlopen error timed out> (https://raw.githubusercontent.com/ros/rosdistro/master/rosdep/osx-homebrew.yaml)
ERROR: unable to process source [https://raw.githubusercontent.com/ros/rosdistro/master/rosdep/base.yaml]:
	<urlopen error timed out> (https://raw.githubusercontent.com/ros/rosdistro/master/rosdep/base.yaml)
]]]
估计是国外源的原因有一些报错,用阿里的源update了一下更是全部都是错,又回到美国地源弄了一下
好了,也没有之前地报错了
asber@asber-X550VX:~$ rosdep update
reading in sources list data from /etc/ros/rosdep/sources.list.d
Hit https://raw.githubusercontent.com/ros/rosdistro/master/rosdep/osx-homebrew.yaml
Hit https://raw.githubusercontent.com/ros/rosdistro/master/rosdep/base.yaml
Hit https://raw.githubusercontent.com/ros/rosdistro/master/rosdep/python.yaml
Hit https://raw.githubusercontent.com/ros/rosdistro/master/rosdep/ruby.yaml
Hit https://raw.githubusercontent.com/ros/rosdistro/master/releases/fuerte.yaml
Query rosdistro index https://raw.githubusercontent.com/ros/rosdistro/master/index-v4.yaml
Skip end-of-life distro "ardent"
Skip end-of-life distro "bouncy"
Add distro "crystal"
Add distro "dashing"
Add distro "eloquent"
Skip end-of-life distro "groovy"
Skip end-of-life distro "hydro"
Skip end-of-life distro "indigo"
Skip end-of-life distro "jade"
Add distro "kinetic"
Skip end-of-life distro "lunar"
Add distro "melodic"
Add distro "noetic"
updated cache in /home/asber/.ros/rosdep/sources.cache
骚的是后面还要安装building package的依赖,又要切到国内的源才可以下。
到最后真的可以出现小乌龟了,但是我的乌龟是死龟。不会动,不知道为什么。
ubuntu下的百度网盘加速和QQ VX
https://www.cnblogs.com/jiu0821/p/8489154.html
https://blog.csdn.net/weixin_37537818/article/details/88765529
https://blog.csdn.net/u011469138/article/details/82320761
发现貌似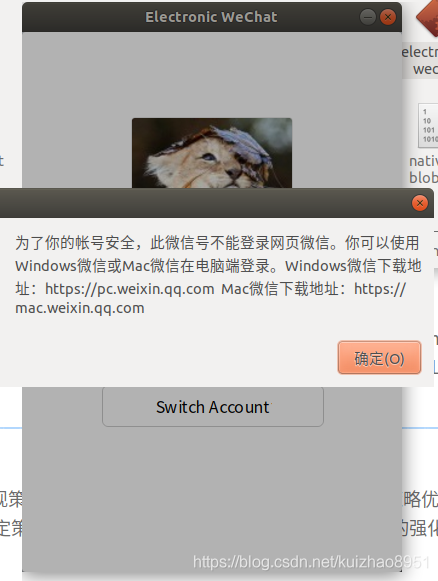 因为这个软件是通过网页登入的微信,webx被和谐了,所以现在linux没有方法上vx
OpenCV以及CUDA TENSORFLOW
安装之前有很多依赖,比如这里的:https://www.cnblogs.com/tsfh/p/8729578.html
cmake的时候发生这的问题,可以根据此处安装:https://www.jb51.net/article/149193.htm
-- Checking for module 'gstreamer-base-1.0' -- No package 'gstreamer-base-1.0' found -- Checking for module 'gstreamer-video-1.0' -- No package 'gstreamer-video-1.0' found -- Checking for module 'gstreamer-app-1.0'然后cmake就可以通过,按照这里按部就班:https://blog.csdn.net/qq_38660394/article/details/80581383
按照此处因为出现make时
[ 24%] Linking CXX static library ../../lib/libopencv_highgui_pch_dephelp.a [ 24%] Built target opencv_highgui_pch_dephelp [ 24%] Generating precomp.hpp.gch/opencv_highgui_Release.gch [ 24%] Built target pch_Generate_opencv_highgui [ 24%] Linking CXX shared library ../../lib/libopencv_highgui.so [ 24%] Built target opencv_highgui [ 25%] Built target opencv_ts [ 25%] Generating test_precomp.hpp.gch/opencv_test_core_Release.gch [ 25%] Built target pch_Generate_opencv_test_core [ 26%] Linking CXX executable ../../bin/opencv_test_core ../../lib/libopencv_core.so.3.2.0:对‘cblas_zgemm(CBLAS_ORDER, CBLAS_TRANSPOSE, CBLAS_TRANSPOSE, int, int, int, void const*, void const*, int, void const*, int, void const*, void*, int)’未定义的引用 ../../lib/libopencv_core.so.3.2.0:对‘cblas_dgemm(CBLAS_ORDER, CBLAS_TRANSPOSE, CBLAS_TRANSPOSE, int, int, int, double, double const*, int, double const*, int, double, double*, int)’未定义的引用 ../../lib/libopencv_core.so.3.2.0:对‘cblas_sgemm(CBLAS_ORDER, CBLAS_TRANSPOSE, CBLAS_TRANSPOSE, int, int, int, float, float const*, int, float const*, int, float, float*, int)’未定义的引用 ../../lib/libopencv_core.so.3.2.0:对‘cblas_cgemm(CBLAS_ORDER, CBLAS_TRANSPOSE, CBLAS_TRANSPOSE, int, int, int, void const*, void const*, int, void const*, int, void const*, void*, int)’未定义的引用 collect2: error: ld returned 1 exit status modules/core/CMakeFiles/opencv_test_core.dir/build.make:858: recipe for target 'bin/opencv_test_core' failed make[2]: *** [bin/opencv_test_core] Error 1 CMakeFiles/Makefile2:1225: recipe for target 'modules/core/CMakeFiles/opencv_test_core.dir/all' failed make[1]: *** [modules/core/CMakeFiles/opencv_test_core.dir/all] Error 2 Makefile:162: recipe for target 'all' failed make: *** [all] Error 2的失败,决定从新换个教程
其中,anaconda下载很慢,看这里https://blog.csdn.net/qq_37960007/article/details/90050456
anaconda的安装:https://blog.csdn.net/weixin_40593924/article/details/93530562
提示信息:
Welcome to Anaconda3 2019.03

In order to continue the installation process, please review the license
agreement.
Please, press ENTER to continue
>>>
===================================
Anaconda End User License Agreement
===================================

Copyright 2015, Anaconda, Inc.

All rights reserved under the 3-clause BSD License:

Redistribution and use in source and binary forms, with or without modification,
 are permitted provided that the following conditions are met:

  * Redistributions of source code must retain the above copyright notice, this
list of conditions and the following disclaimer.
  * Redistributions in binary form must reproduce the above copyright notice, th
is list of conditions and the following disclaimer in the documentation and/or o
ther materials provided with the distribution.
  * Neither the name of Anaconda, Inc. ("Anaconda, Inc.") nor the names of its c
ontributors may be used to endorse or promote products derived from this softwar
e without specific prior written permission.

THIS SOFTWARE IS PROVIDED BY THE COPYRIGHT HOLDERS AND CONTRIBUTORS "AS IS" AND
ANY EXPRESS OR IMPLIED WARRANTIES, INCLUDING, BUT NOT LIMITED TO, THE IMPLIED WA
RRANTIES OF MERCHANTABILITY AND FITNESS FOR A PARTICULAR PURPOSE ARE DISCLAIMED.
 IN NO EVENT SHALL ANACONDA, INC. BE LIABLE FOR ANY DIRECT, INDIRECT, INCIDENTAL

Do you accept the license terms? [yes|no]
[no] >>> yes

Anaconda3 will now be installed into this location:
/home/asber/anaconda3

  - Press ENTER to confirm the location
  - Press CTRL-C to abort the installation
  - Or specify a different location below

[/home/asber/anaconda3] >>>
PREFIX=/home/asber/anaconda3

installing: python-3.7.3-h0371630_0 ...
Python 3.7.3
installing: conda-env-2.6.0-1 ...
installing: blas-1.0-mkl ...
installing: ca-certificates-2019.1.23-0 ...
installing: intel-openmp-2019.3-199 ...
installing: libgcc-ng-8.2.0-hdf63c60_1 ...
installing: libgfortran-ng-7.3.0-hdf63c60_0 ...
……
installing: astropy-3.1.2-py37h7b6447c_0 ...
installing: statsmodels-0.9.0-py37h035aef0_0 ...
installing: seaborn-0.9.0-py37_0 ...
installing: anaconda-2019.03-py37_0 ...
installation finished.
Do you wish the installer to initialize Anaconda3
by running conda init? [yes|no]
[no] >>>
You have chosen to not have conda modify your shell scripts at all.
To activate conda's base environment in your current shell session:

eval "$(/home/asber/anaconda3/bin/conda shell.YOUR_SHELL_NAME hook)"

To install conda's shell functions for easier access, first activate, then:

conda init

If you'd prefer that conda's base environment not be activated on startup,
   set the auto_activate_base parameter to false:

conda config --set auto_activate_base false

Thank you for installing Anaconda3!

===========================================================================

Anaconda and JetBrains are working together to bring you Anaconda-powered
environments tightly integrated in the PyCharm IDE.

PyCharm for Anaconda is available at:
https://www.anaconda.com/pycharm
anaconda安装好了之后添加一下环境变量export PATH="/home/用户名/anaconda3/bin:$PATH"然后source ~/.bashrc 就可以了
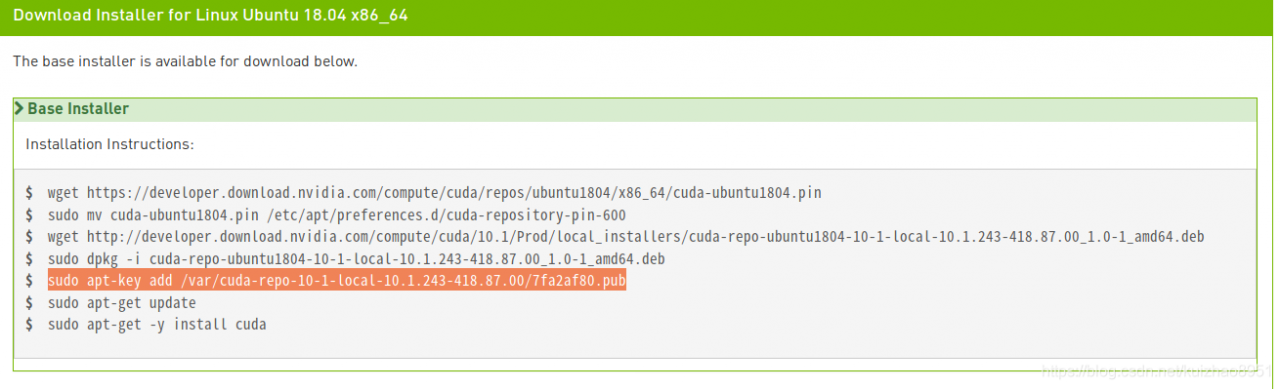
然后下载cuda,发现官方.run版本和.deb版本下好之后都会提示 段错误(核心已转储),然后.run的sudo sh之后就没有任何提示,.deb按照
官方的提示以及https://blog.csdn.net/u014754541/article/details/97108282此处的添加环境变量
最后测试不要按照上面说的测试,直接输入nvcc -V
asber@asber-X550VX:/bin$ nvcc -V
nvcc: NVIDIA (R) Cuda compiler driver
Copyright (c) 2005-2019 NVIDIA Corporation
Built on Sun_Jul_28_19:07:16_PDT_2019
Cuda compilation tools, release 10.1, V10.1.243
有类似这样的输出就OK了
按照这个教程虽然转好了cuda和gcc-5 g++-5以及anaconda。。。
但是发现编译opencv还是一样的报错,所以为感觉还是CMAKELIST。TXT那边没设置好
各种报错
然后发现自己下载了cuda1.1.243 可能需要改一些东西来避免编译opencv报错……
【只是在之后CMakeList.txt中需要注意
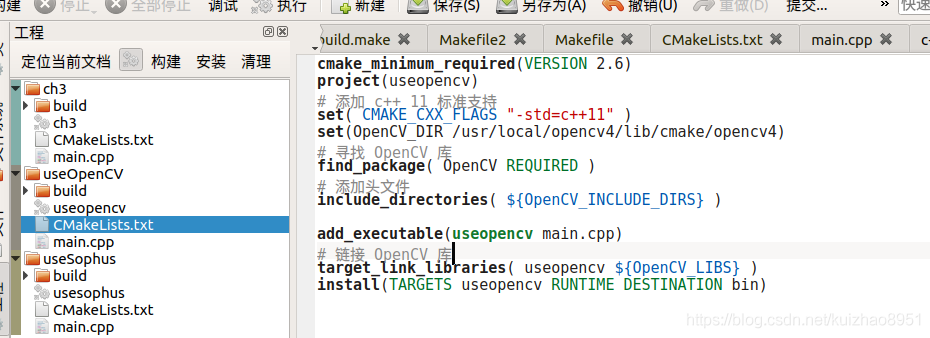
需要set(OpenCV_DIR /usr/local/opencv4/lib/cmake/opencv4)来让库找得到
cmake_minimum_required(VERSION 2.6)
project(useopencv)
# 添加 c++ 11 标准支持
set( CMAKE_CXX_FLAGS "-std=c++11" )
set(OpenCV_DIR /usr/local/opencv4/lib/cmake/opencv4)
# 寻找 OpenCV 库
find_package( OpenCV REQUIRED )
# 添加头文件
include_directories( ${OpenCV_INCLUDE_DIRS} )add_executable(useopencv main.cpp)
# 链接 OpenCV 库
target_link_libraries( useopencv ${OpenCV_LIBS} )
install(TARGETS useopencv RUNTIME DESTINATION bin)
】
但是上面折腾过程中,我发现显卡驱动不见了,
asber@asber-X550VX:~$ nvidia-smi
Failed to initialize NVML: Driver/library version mismatch
asber@asber-X550VX:~$ nvcc -V
Command 'nvcc' not found, but can be installed with:
sudo apt install nvidia-cuda-toolkit
asber@asber-X550VX:~$ cat /usr/local/cuda/version.txt
cat: /usr/local/cuda/version.txt: 没有那个文件或目录
asber@asber-X550VX:~$ cd /usr/local/
asber@asber-X550VX:/usr/local$ ls
etc games include lib man opencv4 sbin share src
asber@asber-X550VX:/usr/local$
cuda貌似也被删除了
现在 ros 和 cuda全丢了,重新安装