1. zabbix介绍
zabbix是一个基于WEB界面的提供分布式系统监视以及网络监视功能的企业级的开源解决方案。
zabbix能监视各种网络参数,保证服务器系统的安全运营;并提供灵活的通知机制以让系统管理员快速定位/解决存在的各种问题。
zabbix由2部分构成,zabbix server与可选组件zabbix agent。
zabbix server可以通过SNMP,zabbix agent,ping,端口监视等方法提供对远程服务器/网络状态的监视,数据收集等功能,它可以运行在Linux,Ubuntu,Solaris,HP-UX,AIX,Free BSD,Open BSD,OS X等平台上。
zabbix agent需要安装在被监视的目标服务器上,它主要完成对硬件信息或与操作系统有关的内存,CPU等信息的收集。
zabbix server可以单独监视远程服务器的服务状态;同时也可以与zabbix agent配合,可以轮询zabbix agent主动接收监视数据(agent方式),同时还可被动接收zabbix agent发送的数据(trapping方式)。
另外zabbix server还支持SNMP (v1,v2),可以与SNMP软件(例如:net-snmp)等配合使用。
Zabbix主要功能:
CPU负荷
内存使用
磁盘使用
网络状况
端口监视
日志监视
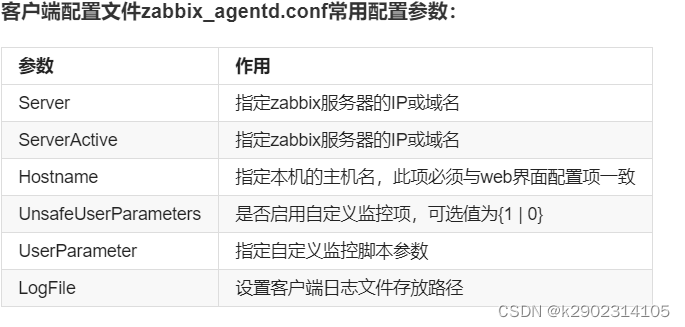
zabbix配置文件
zabbix配置文件有两种:
服务器端配置文件(/usr/local/etc/zabbix_server.conf)
客户端配置文件(/usr/local/etc/zabbix_agentd.conf)
zabbix代理配置文件(/usr/local/etc/zabbix_proxy.conf)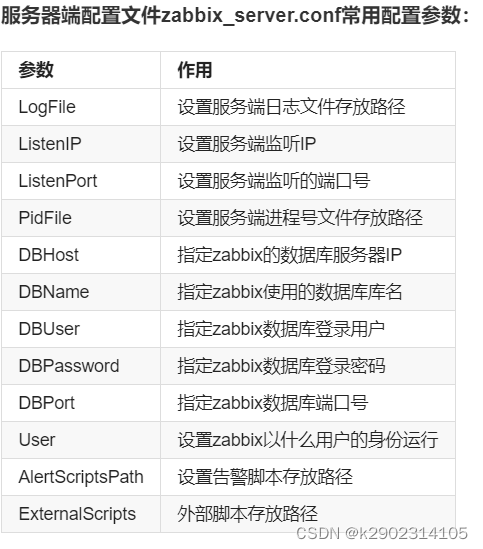
部署zabbix
环境说明:
下载地方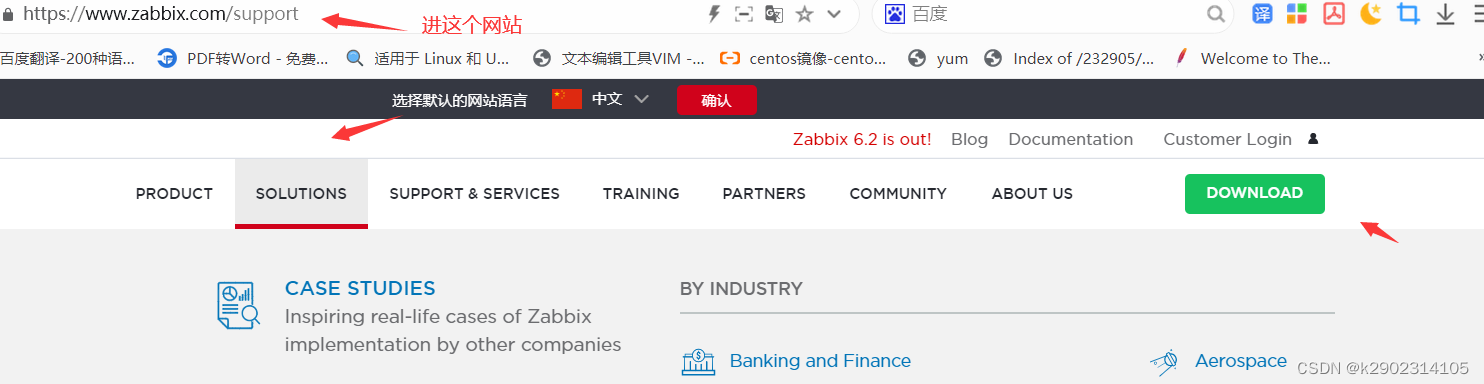


编译安装zabbix
[root@localhost ~]# useradd -r -M -s /sbin/nologin zabbix
[root@localhost ~]# mkdir -p /usr/lib/zabbix
[root@localhost ~]# chown -R zabbix.zabbix /usr/lib/zabbix/
[root@localhost ~]# chmod 770 /usr/lib/zabbix/
[root@localhost ~]# dnf -y install net-snmp-devel libevent-devel
[root@localhost ~]# tar -xf zabbix-5.0.25.tar.gz

[root@localhost ~]# getenforce
Disabled

[root@localhost ~]# systemctl status firewalld.service
● firewalld.service - firewalld - dynamic firewall daemon
   Loaded: loaded (/usr/lib/systemd/system/firewalld.service; disabled; vend>
   Active: inactive (dead)
     Docs: man:firewalld(1)

[root@localhost ~]# apachectl start
[root@localhost ~]# systemctl start mysqld
[root@localhost ~]# systemctl start php
[root@localhost ~]# ss -antl
State    Recv-Q    Send-Q       Local Address:Port       Peer Address:Port
LISTEN   0         128              127.0.0.1:9000            0.0.0.0:*
LISTEN   0         128                0.0.0.0:111             0.0.0.0:*
LISTEN   0         32           localhost.168.122.1:53              0.0.0.0:*
LISTEN   0         128                0.0.0.0:22              0.0.0.0:*
LISTEN   0         5                127.0.0.1:631             0.0.0.0:*
LISTEN   0         80                       *:3306                  *:*
LISTEN   0         128                   [::]:111                [::]:*
LISTEN   0         128                      *:80                    *:*
LISTEN   0         128                   [::]:22                 [::]:*
LISTEN   0         5                    [::1]:631                [::]:*
// 创建zabbix用户并授权
[root@localhost ~]# mysql
Welcome to the MySQL monitor.  Commands end with ; or \g.
Your MySQL connection id is 772
Server version: 5.7.37 MySQL Community Server (GPL)

mysql> create database zabbix character set utf8 collate utf8_bin;
Query OK, 1 row affected (0.00 sec)

mysql> create user 'zabbix'@'localhost' identified by 'zabbix123!';
Query OK, 0 rows affected (0.01 sec)

mysql> grant all privileges on zabbix.* to 'zabbix'@'localhost';
Query OK, 0 rows affected, 1 warning (0.00 sec)

mysql> flush privileges;
Query OK, 0 rows affected (0.01 sec)

mysql> quit
Bye

[root@localhost ~]# cd zabbix-5.0.25/
[root@localhost zabbix-5.0.25]# ls
aclocal.m4  compile       configure.ac  INSTALL      man      sass
AUTHORS     conf          COPYING       install-sh   misc     src
bin         config.guess  database      m4           missing  ui
build       config.sub    depcomp       Makefile.am  NEWS
ChangeLog   configure     include       Makefile.in  README
[root@localhost zabbix-5.0.25]# cd database/
[root@localhost database]# cd mysql/
[root@localhost mysql]# ls
//导入数据
data.sql  double.sql  images.sql  Makefile.am  Makefile.in  schema.sql
[root@localhost mysql]# mysql -uzabbix -pzabbix123! zabbix < schema.sql
mysql: [Warning] Using a password on the command line interface can be insecure.
[root@localhost mysql]# mysql -uzabbix -pzabbix123! zabbix < images.sql
mysql: [Warning] Using a password on the command line interface can be insecure.
[root@localhost mysql]# mysql -uzabbix -pzabbix123! zabbix < data.sql
mysql: [Warning] Using a password on the command line interface can be insecure.


data.sql  double.sql  images.sql  Makefile.am  Makefile.in  schema.sql
[root@localhost mysql]# pwd
/root/zabbix-5.0.25/database/mysql
[root@localhost ~]# cd zabbix-5.0.25/
[root@localhost zabbix-5.0.25] ./configure --enable-server --enable-agent --with-mysql  --with-net-snmp --with-libcurl --with-libxml2
[root@localhost zabbix-5.0.25] make install  //编译安装
测试是否开启服务端,客服端
[root@localhost ~]# cd /usr/local/etc/
[root@localhost etc]# ls
zabbix_agentd.conf    zabbix_server.conf
zabbix_agentd.conf.d  zabbix_server.conf.d
[root@localhost etc]# vim zabbix_server.conf
DBPassword=zabbix123!  //搜索Password 取消注释并在后面添加zabbix用户的密码
[root@localhost etc]# zabbix_server   // 服务端
[root@localhost etc]# zabbix_agentd   // 客户端


[root@localhost etc]# ss -antl
 State    Recv-Q   Send-Q       Local Address:Port        Peer Address:Port
LISTEN   0        128              127.0.0.1:9000             0.0.0.0:*
LISTEN   0        128                0.0.0.0:111              0.0.0.0:*
LISTEN   0        32           192.168.122.1:53               0.0.0.0:*
LISTEN   0        128                0.0.0.0:22               0.0.0.0:*
LISTEN   0        5                127.0.0.1:631              0.0.0.0:*
LISTEN   0        128                0.0.0.0:10050            0.0.0.0:*      //服务端
LISTEN   0        128                0.0.0.0:10051            0.0.0.0:*      //客户端
LISTEN   0        80                       *:3306                   *:*
LISTEN   0        128                   [::]:111                 [::]:*
LISTEN   0        128                      *:80                     *:*
LISTEN   0        128                   [::]:22                  [::]:*
zabbix服务端web界面安装与配置
zabbix web界面安装前配置
[root@localhost ~]# sed -ri 's/(post_max_size =).*/\1 16M/g' /etc/php.ini
[root@localhost ~]# sed -ri 's/(max_execution_time =).*/\1 300/g' /etc/php.ini
[root@localhost ~]# sed -ri 's/(max_input_time =).*/\1 300/g' /etc/php.ini
[root@localhost ~]# sed -i '/;date.timezone/a date.timezone = Asia/Shanghai' /etc/php.ini
[root@localhost ~]# service php-fpm restart
Gracefully shutting down php-fpm . done
Starting php-fpm  done
将软件的前端网页文件放到apache放网页文件的地方
[root@localhost ~]# cd /usr/local/apache/htdocs/
[root@localhost htdocs]# ls
index.html  test.com
[root@localhost htdocs]# rm -rf *
[root@localhost htdocs]# cp -a /root/zabbix-5.0.25/ui/* .
修改/etc/hosts文件,添加域名与IP的映射
在你的真机上的C:\Windows\System32\drivers\etc\hosts文件
www.test.com
0 就是默认3306端口,密码用前面在zabbix_server.conf文件设置的密码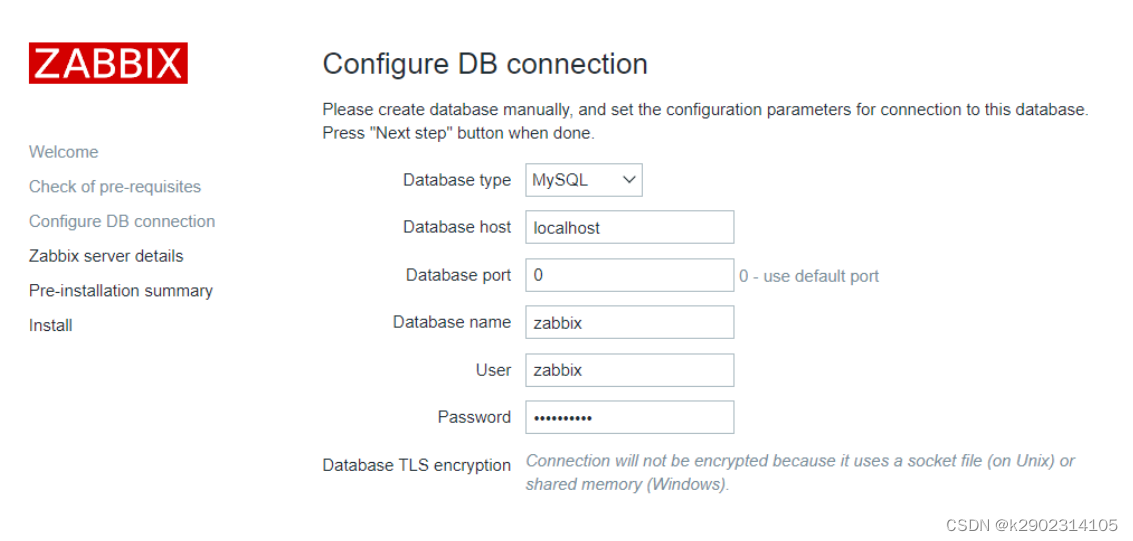
直接下一步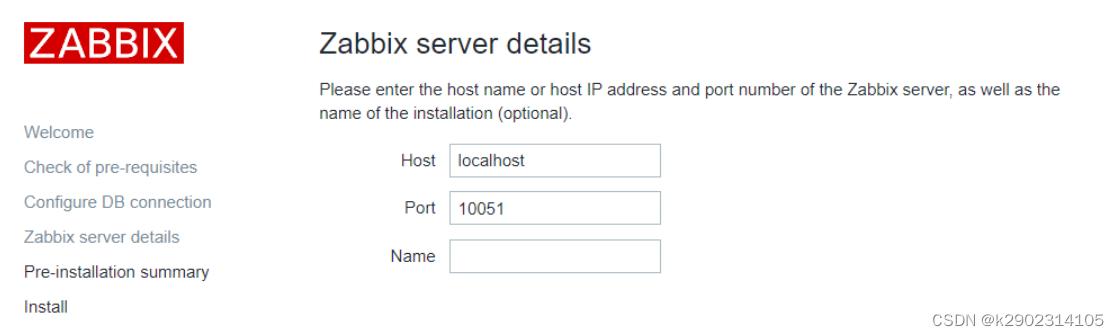

此处需要修改权限 让下一步的安装可以正常进行 安装完成后需要将权限改回来

[root@localhost ~]# cd /usr/local/apache/htdocs/
[root@localhost htdocs]# ll -d conf
drwxr-xr-x 3 qzl qzl 94 6月  27 03:41 conf
[root@localhost htdocs]# chmod 777 conf
[root@localhost htdocs]# ll -d conf
drwxrwxr-x 3 qzl qzl 117 7月   6 21:08 conf
默认用户Admin,,密码用前面在zabbix_server.conf文件设置的密码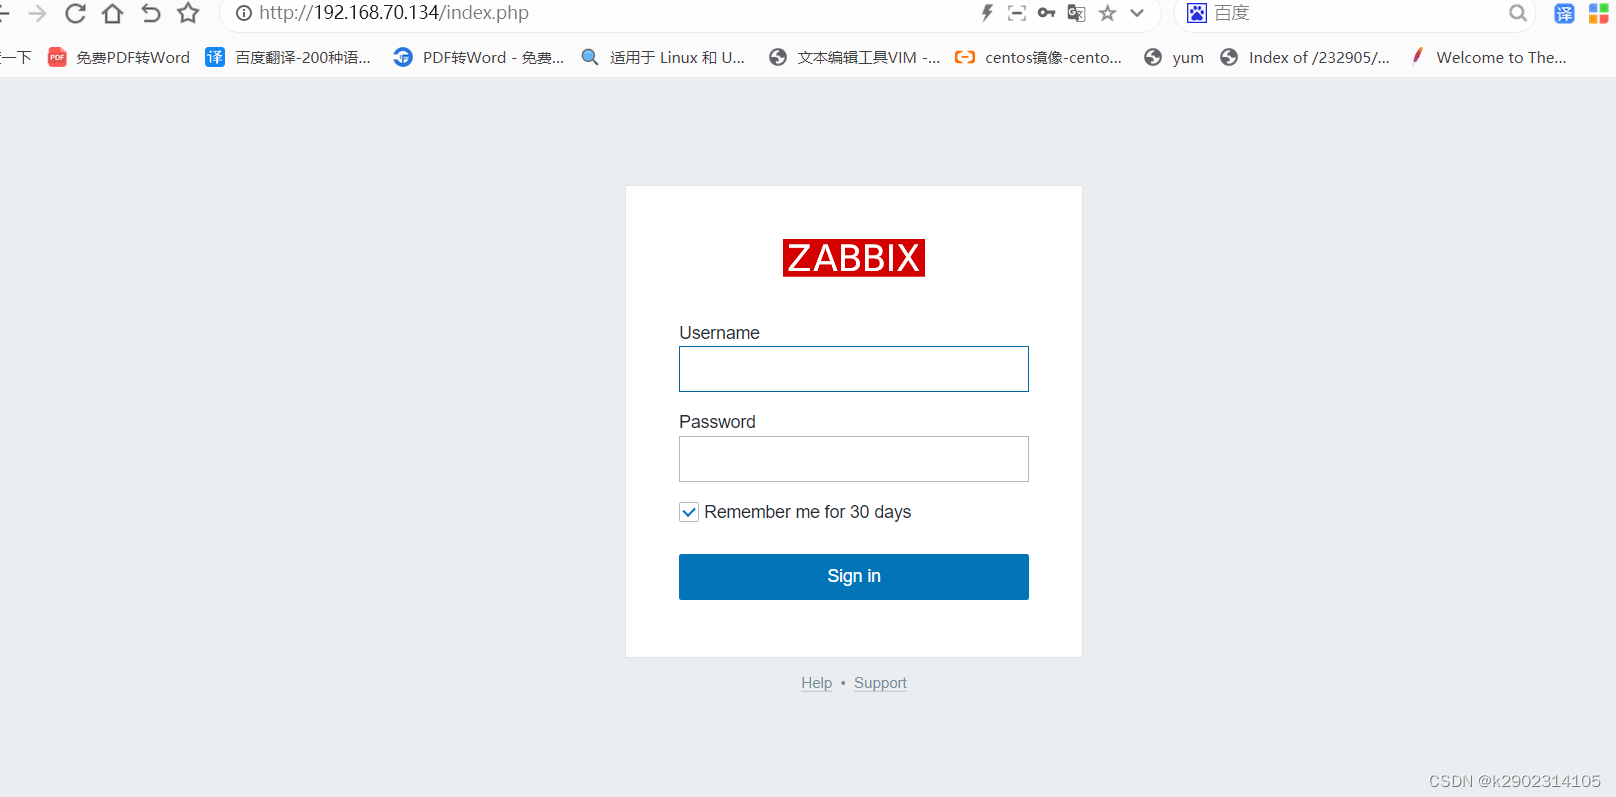
登录成功
权限改回
[root@localhost htdocs]# chmod 755 conf
[root@localhost htdocs]# ll -d conf
drwxr-xr-x 3 tom tom 117 7月   6 04:37 conf