- 使用voronoi做动态背景
- Unity shader graph:为UI组件编写自定义shader graph
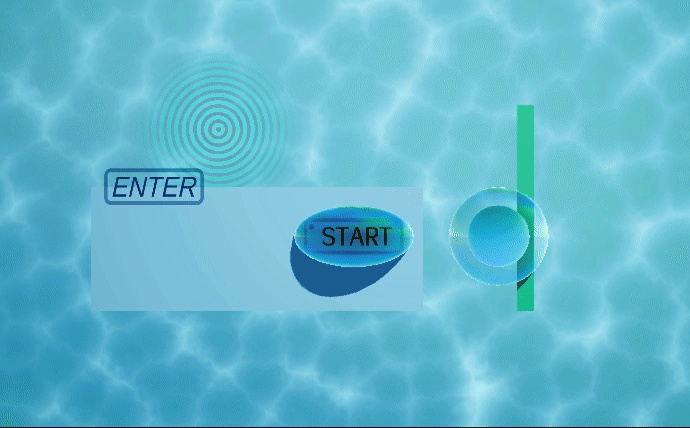
- 点击UI按钮,触发水波涟漪效果(使用脚本操作UI)
- 水面波光效果
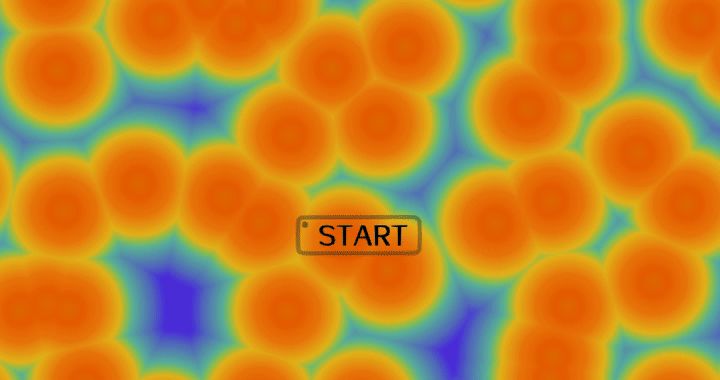
1. 使用voronoi做动态背景
如何把彩色渐变映射给灰度图?
答:直接把灰度图连给彩色渐变的UV输入即可
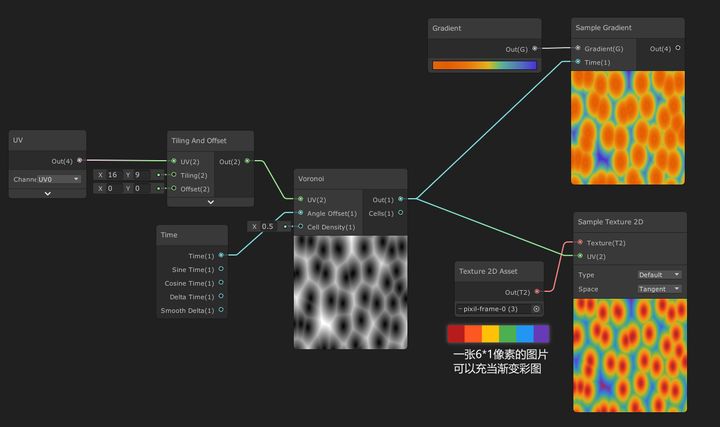
为什么像素图可以充当彩色渐变?
答:像素图经过图像插值(image interpolation),在Unity里自动呈现渐变效果。
没有Photoshop的话,强烈推荐一个在线绘制像素图的网站:https://www.pixilart.com
2. Unity shader graph:为UI组件编写自定义shader graph
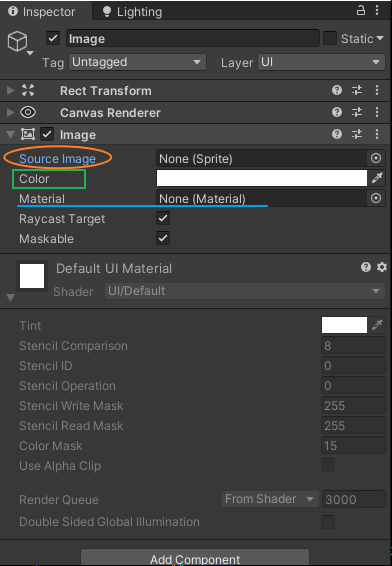
以Image 为例:Unity - Manual: Image (unity3d.com)
Image 组件下有2个属性:Source Image(即sprite)和Color。
这样做的好处是我们可以直接修改这两个参数,而不需要给每个Image都创建一个材质!
我们也可以使用自定义的材质球:
- Source Image(即sprite)对应材质球shader中的“_MainTex”
- Color对应Vertex Color,——sprite使用mesh的vertex color作为颜色
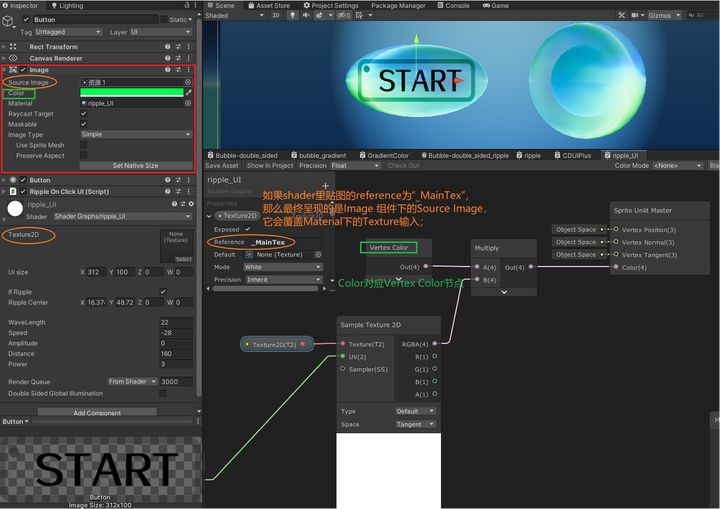
如果shader里贴图的reference为“_MainTex”,那么最终呈现的是Image 组件下的Source Image,它会覆盖Material下的Texture输入;
如果你不想使用Image 组件下的Source Image,你就是想让Material下的Texture输入生效,那么保持Source Image为空,并且shader里贴图的reference别叫“_MainTex”,叫其他啥名都OK。
3. 点击UI按钮触发水波涟漪效果(使用脚本操作UI)
Shader Graph主要参考这篇教程制作涟漪效果:
傲娇的露易丝:Unity2018 Shader Graph 学习笔记(八) 水波涟漪的实现45 赞同 · 18 评论文章正在上传…重新上传取消
在Update()里控制Amplitude逐渐归零,就可以模拟涟漪逐渐消失的效果:
using UnityEngine;
using UnityEngine.UI;

public Material ripple_mat;
float temp;

void Start()
    {
        ripple_mat = this.GetComponent<Image>().material;
    }
void Update()
    {
        if (temp < 0.02f)
        {
            ripple_mat.SetFloat("_Amplitude", 0);
        }
        else
        {
            ripple_mat.SetFloat("_Amplitude", Mathf.Lerp(temp, 0, 3.8f*Time.deltaTime));
            temp = ripple_mat.GetFloat("_Amplitude");
        }
    }
接下来要解决的问题是:鼠标点击UI按钮任一位置,并以此为中心触发涟漪
在shader graph里我添加了2个参数:
UIsize获取UI图片的尺寸(为了让涟漪是个正圆),RippleCenter决定涟漪的中心位置
假设UI图片的尺寸是312x100,那么RippleCenter.x的取值范围就是[0,312],RippleCenter.y的取值范围就是[0,100]
大致思路:
1. 监听按钮点击,获取鼠标在屏幕空间的坐标,即屏幕坐标,Input.mousePosition
2. 使用RectTransformUtility.ScreenPointToLocalPointInRectangle函数,把屏幕坐标转换为UI坐标。关于这个函数的解释:
絮酱酱:【Unity API 翻译】UGUI 屏幕坐标转UI坐标方法 – ScreenPointToLocalPointInRectangle()23 赞同 · 11 评论文章正在上传…重新上传取消
UI图片以正中心为原点,所以UI坐标的取值范围是:
[-width/2,+width/2],[-height/2,+height/2],并且与scale无关!
3. 显然UI坐标和我们需要的RippleCenter不在一个区间,需要转换一下。
完整的脚本:
using UnityEngine;
using UnityEngine.UI;

public class RippleOnClickUI : MonoBehaviour
{
    public bool enable_Ripple = false;
    public Material ripple_mat;
    public GameObject obj_UI;
    public float amp = 0.2f; //涟漪从这个振幅值开始衰减
    private float temp;//临时记录涟漪振幅的变量
    private Vector2 center;//shader graph里的变量"RippleCenter"
    private Vector2 uiSize;//UI的尺寸,同时也是shader graph里的变量"UIsize"

    void Start()
    {
        ripple_mat = this.GetComponent<Image>().material;

        obj_UI=this.transform.gameObject;//获取当前transform组件所在的gameObject
        obj_UI.GetComponent<Button>().onClick.AddListener(Click);

        uiSize = obj_UI.GetComponent<RectTransform>().sizeDelta;
        ripple_mat.SetVector("_UIsize", uiSize);
    }

    void Update()
    {
        if (temp < 0.02f)
        {
            ripple_mat.SetFloat("_Amplitude", 0);
        }
        else
        {
            ripple_mat.SetFloat("_Amplitude", Mathf.Lerp(temp, 0, 3.8f*Time.deltaTime));
            temp = ripple_mat.GetFloat("_Amplitude");
        }
    }

    public void Click()
    {
        if (enable_Ripple)
        {
            ripple_mat.SetFloat("_Amplitude", amp);
            temp = ripple_mat.GetFloat("_Amplitude");

            RectTransformUtility.ScreenPointToLocalPointInRectangle(
            obj_UI.GetComponent<RectTransform>(),//The RectTransform to find a point inside.
            Input.mousePosition,//Screen space position.
            Camera.main,//The camera associated with the screen space position.
            out Vector2 localPoint);//Point in local space of the rect transform.

            center.x = localPoint.x + uiSize.x / 2;
            center.y = localPoint.y + uiSize.y / 2;

            ripple_mat.SetVector("_Center", center);
        }
    }
}
4. 水面波光效果
教程:【シェーダーグラフメモ その50】Voronoiを利用した水面エフェクト - rn.log (hatenablog.com)
----------------------------------------------------------
上面截图里的文字都是图片,换成text就惨了,啊我没有想到过text不是image!而是等价于佷多张image,一个字符就是一张图片,并且他们来自同一张图集(atlas)!

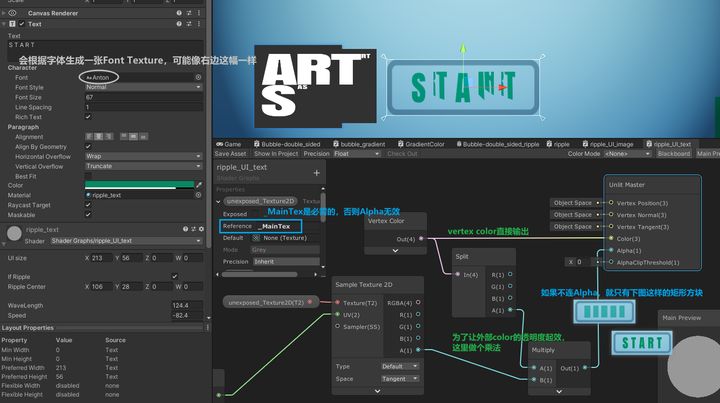
- text由一个个字符组成(character),如果不给Alpha或者shader里没有"_MainTex"的话,出来的就是一个个矩形方块,相当于一张张小图片
- 我猜啊,text组件根据字体和文本,背着我们生成了一张Font Texture(图集,atlas),上面排列着文本包含的字符形象(乱序),然后每个字符方块在这张临时的Font Texture上有自己对应的坐标,对应自己的字符形象
- 所以,给text做水波涟漪效果,相当于是在好几张小图片上做效果,这肯定不对啊……唉,我搞不定了……可能需要把text写成texture再当成image来处理吧……
同理,如果你的sprite来自于sprite atlas(图集),它将和text一样不能适用这个shader graph。切分sprite只是方便操作,实际渲染的时候其实只有一张图集。shader graph只获取贴图和UV数据,而无从得知单个被切分的sprite的信息。
参考: