1、创建动态Web项目命名ssm------next勾选自动生成web.xml------finnish创建完成
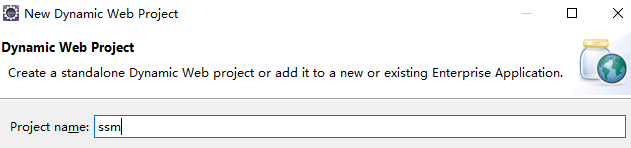
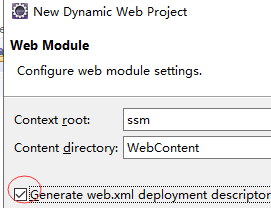
2、导入ssm等所依赖的jar包
3、创建log4j.properties日记记录文件(可有可无)
# Global logging configuration
log4j.rootLogger=INFO, stdout
# Console output...
log4j.appender.stdout=org.apache.log4j.ConsoleAppender
log4j.appender.stdout.layout=org.apache.log4j.PatternLayout
log4j.appender.stdout.layout.ConversionPattern=%5p [%t] - %m%n
4、创建与src同级的资源夹config文件,并在config目录下创建springmvc.xml
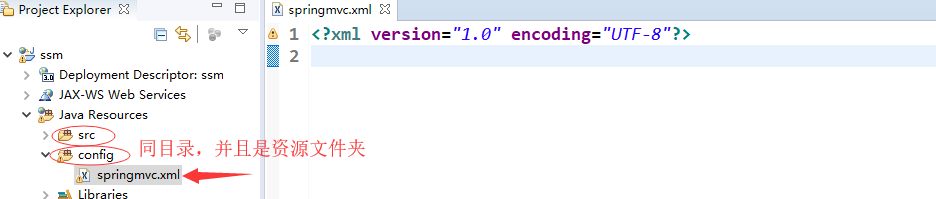
5、配置控制层springmvc.xml(掌握)
springmvc三大件指:控制器映射器、控制器适配器、视图解析器
- 配置controller扫描器,在src目录下创建扫描器扫描的controller层的包
- 配置注解驱动(相当于配置了控制器映射器+控制器适配器)
- 配置视图解析器
<?xml version="1.0" encoding="UTF-8"?>
<beans xmlns="http://www.springframework.org/schema/beans"
	xmlns:xsi="http://www.w3.org/2001/XMLSchema-instance" xmlns:p="http://www.springframework.org/schema/p"
	xmlns:context="http://www.springframework.org/schema/context"
	xmlns:mvc="http://www.springframework.org/schema/mvc"
	xsi:schemaLocation="http://www.springframework.org/schema/beans http://www.springframework.org/schema/beans/spring-beans-4.0.xsd
        http://www.springframework.org/schema/mvc http://www.springframework.org/schema/mvc/spring-mvc-4.0.xsd
        http://www.springframework.org/schema/context http://www.springframework.org/schema/context/spring-context-4.0.xsd">
        <!-- 配置Controller扫描器 -->
        <context:component-scan base-package="com.ssm.controller" />

        <!-- 配置注解驱动,相当于控制器映射器和控制器适配器的配置 -->
        <mvc:annotation-driven />

        <!-- 配置视图解析器 -->
        <bean class="org.springframework.web.servlet.view.InternalResourceViewResolver">
        	<property name="prefix" value="/WEB-INF/jsp/"></property>
        	<property name="suffix" value=".jsp"></property>
        </bean>

</beans>
6、业务层配置
在config下创建application-service.xml,并配置
- 配置service层扫描器
- 配置事务
- 配置切面
<beans xmlns="http://www.springframework.org/schema/beans"
	xmlns:context="http://www.springframework.org/schema/context"
	xmlns:p="http://www.springframework.org/schema/p"
	xmlns:aop="http://www.springframework.org/schema/aop"
	xmlns:tx="http://www.springframework.org/schema/tx"
	xmlns:xsi="http://www.w3.org/2001/XMLSchema-instance"
	xsi:schemaLocation="http://www.springframework.org/schema/beans http://www.springframework.org/schema/beans/spring-beans-4.2.xsd
	http://www.springframework.org/schema/context http://www.springframework.org/schema/context/spring-context-4.2.xsd
	http://www.springframework.org/schema/aop http://www.springframework.org/schema/aop/spring-aop-4.2.xsd http://www.springframework.org/schema/tx http://www.springframework.org/schema/tx/spring-tx-4.2.xsd
	http://www.springframework.org/schema/util http://www.springframework.org/schema/util/spring-util-4.2.xsd">

	<!-- 配置service层扫描器 -->
	<context:component-scan
		base-package="com.ssm.service" />

	<!-- 配置事务管理器 -->
	<bean id="transactionManager"
		class="org.springframework.jdbc.datasource.DataSourceTransactionManager">
		<!-- 数据源 -->
		<property name="dataSource" ref="dataSource" />
	</bean>
	<!-- 通知 -->
	<tx:advice id="txAdvice"
		transaction-manager="transactionManager">
		<tx:attributes>
			<!-- 传播行为 -->
			<tx:method name="save*" propagation="REQUIRED" />
			<tx:method name="insert*" propagation="REQUIRED" />
			<tx:method name="add*" propagation="REQUIRED" />
			<tx:method name="create*" propagation="REQUIRED" />
			<tx:method name="delete*" propagation="REQUIRED" />
			<tx:method name="update*" propagation="REQUIRED" />
			<tx:method name="find*" propagation="SUPPORTS"
				read-only="true" />
			<tx:method name="select*" propagation="SUPPORTS"
				read-only="true" />
			<tx:method name="get*" propagation="SUPPORTS"
				read-only="true" />
		</tx:attributes>
	</tx:advice>

	<!-- 配置切面 -->
	<aop:config>
		<aop:advisor advice-ref="txAdvice"
			pointcut="execution(* cn.e3mall.service..*.*(..))" />
	</aop:config>

</beans>
7、整合springmvc-spring层,配置web.xml(掌握)
- 加载spring容器
- 解决乱码(不是主要的,可以需要用到再配置)
- 配置前端控制器
<?xml version="1.0" encoding="UTF-8"?>
<web-app xmlns:xsi="http://www.w3.org/2001/XMLSchema-instance"
	xmlns="http://java.sun.com/xml/ns/javaee"
	xsi:schemaLocation="http://java.sun.com/xml/ns/javaee http://java.sun.com/xml/ns/javaee/web-app_3_0.xsd"
	id="WebApp_ID" version="3.0">
	<display-name>ssm</display-name>
	<welcome-file-list>
		<welcome-file>index.html</welcome-file>
		<welcome-file>index.htm</welcome-file>
		<welcome-file>index.jsp</welcome-file>
		<welcome-file>default.html</welcome-file>
		<welcome-file>default.htm</welcome-file>
		<welcome-file>default.jsp</welcome-file>
	</welcome-file-list>

	<!-- 启动spring容器 -->
	<listener>
		<listener-class>org.springframework.web.context.ContextLoaderListener</listener-class>
	</listener>
	<context-param>
		<param-name>contextConfigLocation</param-name>
		<param-value>classpath:application*.xml</param-value>
	</context-param>

	<!-- 解决post乱码 -->
	<filter>
		<filter-name>CharacterEncodingFilter</filter-name>
		<filter-class>org.springframework.web.filter.CharacterEncodingFilter</filter-class>
		<init-param>
			<param-name>encoding</param-name>
			<param-value>utf-8</param-value>
		</init-param>
	</filter>
	<filter-mapping>
		<filter-name>CharacterEncodingFilter</filter-name>
		<url-pattern>/*</url-pattern>
	</filter-mapping>


	<!-- 配置前端控制器 -->
	<servlet>
		<servlet-name>springmvc</servlet-name>
		<servlet-class>org.springframework.web.servlet.DispatcherServlet</servlet-class>
		<init-param>
			<param-name>contextConfigLocation</param-name>
			<param-value>classpath:springmvc.xml</param-value>
		</init-param>
		<load-on-startup>1</load-on-startup>
	</servlet>

	<servlet-mapping>
		<servlet-name>springmvc</servlet-name>
		<url-pattern>*.do</url-pattern>
	</servlet-mapping>

</web-app>
8、dao层,在config下创建SqlConfigMap.xml,并配置
<?xml version="1.0" encoding="UTF-8" ?>
<!DOCTYPE configuration
		PUBLIC "-//mybatis.org//DTD Config 3.0//EN"
		"http://mybatis.org/dtd/mybatis-3-config.dtd">
<configuration>

</configuration>
9、创建数据库配置文件db.properties,并配置
#数据库配置信息
jdbc.driver=com.mysql.jdbc.Driver
jdbc.url=jdbc:mysql://localhost:3306/test?characterEncoding=utf-8
jdbc.username=root
jdbc.password=root
10、整合mybaitis与spring,创建applicationContext-dao(掌握)
- 加载数据库配置文件db.properties
- 配置数据库连接池
- SqlSessionFactory交由spring管理,完美整合(重点)
- 映射文件配置
- 创建包,映射文件的dao层,即com.ssm.dao
<?xml version="1.0" encoding="UTF-8"?>
<beans xmlns="http://www.springframework.org/schema/beans"
	xmlns:context="http://www.springframework.org/schema/context"
	xmlns:p="http://www.springframework.org/schema/p"
	xmlns:aop="http://www.springframework.org/schema/aop"
	xmlns:tx="http://www.springframework.org/schema/tx"
	xmlns:xsi="http://www.w3.org/2001/XMLSchema-instance"
	xsi:schemaLocation="http://www.springframework.org/schema/beans http://www.springframework.org/schema/beans/spring-beans-4.2.xsd
	http://www.springframework.org/schema/context http://www.springframework.org/schema/context/spring-context-4.2.xsd
	http://www.springframework.org/schema/aop http://www.springframework.org/schema/aop/spring-aop-4.2.xsd http://www.springframework.org/schema/tx http://www.springframework.org/schema/tx/spring-tx-4.2.xsd
	http://www.springframework.org/schema/util http://www.springframework.org/schema/util/spring-util-4.2.xsd">
	<!-- 加载数据库配置文件 -->
	<context:property-placeholder
		location="classpath:db.properties" />

	<!-- 数据库连接池 -->
	<bean id="dataSource"
		class="com.alibaba.druid.pool.DruidDataSource" destroy-method="close">
		<property name="url" value="${jdbc.url}" />
		<property name="username" value="${jdbc.username}" />
		<property name="password" value="${jdbc.password}" />
		<property name="driverClassName" value="${jdbc.driver}" />
		<property name="maxActive" value="10" />
		<property name="minIdle" value="5" />
	</bean>

	<!-- SqlSessionFactory交由spring管理,完美整合 -->
	<bean id="sqlSessionFactory" class="org.mybatis.spring.SqlSessionFactoryBean">
		<!-- 数据库连接池 -->
		<property name="dataSource" ref="dataSource" />
		<!-- 加载mybatis的全局配置文件 -->
		<property name="configLocation" value="classpath:SqlMapConfig.xml" />
		<!-- 别名配置 -->
	</bean>

	<!-- 映射文件 -->
	<bean class="org.mybatis.spring.mapper.MapperScannerConfigurer">
		<property name="basePackage" value="com.ssm.dao" />
		<!-- 等到spring加载完成后再注入SqlSessionFactory属性,保证db.properties,dataSource在被加载了之后才注入sqlSessionFactory属性,保证不为空 -->
		<property name="sqlSessionFactoryBeanName" value="sqlSessionFactory" />
	</bean>

</beans>
11、创建一个pojo包,项目搭建成功
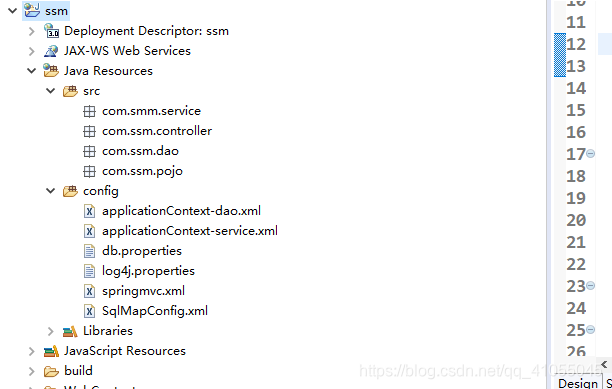
12、进入测试阶段,WEB-INF下创建jsp目录,在jsp下创建一个页面index.jsp
index.jsp
<%@ page language="java" contentType="text/html; charset=UTF-8"pageEncoding="UTF-8" %>
<%@ taglib uri="http://java.sun.com/jsp/jstl/core" prefix="c"%>
<!DOCTYPE html PUBLIC "-//W3C//DTD HTML 4.01 Transitional//EN" "http://www.w3.org/TR/html4/loose.dtd">
<html>
<head>
<meta http-equiv="Content-Type" content="text/html; charset=UTF-8">
<title>Insert title here</title>
</head>
<body>
<p>${name }</p>


</body>
</html>
13、在包com.ssm.dao下分别创建TestMapper.java、TestMapper.xml
TestMapper.java
package com.ssm.dao;

public interface TestMapper {
	/**
	 * 功能:测试返回一个name
	 * @return
	 */
	String testPage();

}
TestMapper.xml
<?xml version="1.0" encoding="UTF-8"?>
<!DOCTYPE mapper
    PUBLIC "-//mybatis.org//DTD Mapper 3.0//EN"
    "http://mybatis.org/dtd/mybatis-3-mapper.dtd">
<mapper namespace="com.ssm.dao.TestMapper">
    <select id="testPage" resultType="String">
        select name from student where id=1
    </select>
</mapper>
14、在包com.ssm.service下创建service层接口和实现类
接口 Testservice
package com.ssm.service;

/**
 * 功能:业务层接口
 * @author
 *
 */
public interface TestService {

	/**
	 * 功能:返回一个用户名
	 * @return
	 */
	String testPage();

}
实现类 TestServiceImpl
package com.ssm.service;

import org.springframework.beans.factory.annotation.Autowired;
import org.springframework.stereotype.Service;

import com.ssm.dao.TestMapper;

@Service
public class TestServiceImpl implements TestService {

	@Autowired
	private TestMapper testMapper;

	@Override
	public String testPage() {
		return testMapper.testPage();
	}

}
15、在包com.ssm.controller下创建 TestController.java
package com.ssm.controller;

import org.springframework.beans.factory.annotation.Autowired;
import org.springframework.stereotype.Controller;
import org.springframework.ui.Model;
import org.springframework.web.bind.annotation.RequestMapping;

import com.ssm.service.TestService;

/**
 * 功能:
 * 控制层
 * 测试,从数据库取出一条数据,响应到jsp页面
 * @author
 *
 */
@Controller
public class TestController {
	@Autowired
	private TestService testServiceImpl;

	@RequestMapping("index")
	public String testPage(Model model) {
		String name = testServiceImpl.testPage();
		System.out.println(name);
		model.addAttribute("name", name);
		return "index";
	}

}
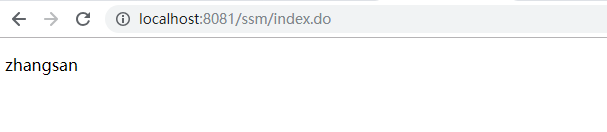
16、部署tomcat,运行,运行结果如下
版权声明:本文为qq_41055045原创文章,遵循CC 4.0 BY-SA版权协议,转载请附上原文出处链接和本声明。