本文设计技术点:spring cache, Lettuce, Spring Data Redis
开始之前,有个问题,知道什么是分布式部署吗,分布式部署都用在什么地方
现在的应用大都以微服务的方式进行分布式部署,因此如果仅仅使用本地缓存是满足不了需求的(Infinispan这样基于本地的内存实现的分布式缓存在这里暂不作讨论。。。)针对分布式场景下的缓存应用,我们急需要一个高可用的、快速的、中心化的、分布式的缓存产品。然后在众多此场景的实现产品中,Redis以它众多优秀的特性脱颖而出。
所以,本文集中讲的点都集中在了使用redis和spring data集成之后,所达到的最终分布式缓存的效果是怎样的。
介绍Spring Data Redis
spring构建了一个庞大的生态,Redis在缓存界这么广受欢迎,Spring Data工程中自然少不了它,它就是Spring Data Redis。
Spring Data Redis对Redis底层开发包(Jedis、Lettuce、JRedis、RJC)进行了高度封装。RedisTemplate封装提供了redis各种操作、异常处理及序列化,完全屏蔽里底层实现(使用者面向Spring Data编程即可,可完全不用关心底层到底使用的是Jedis or Lettuce)
Spring Data Redis这个Jar的依赖包如下:

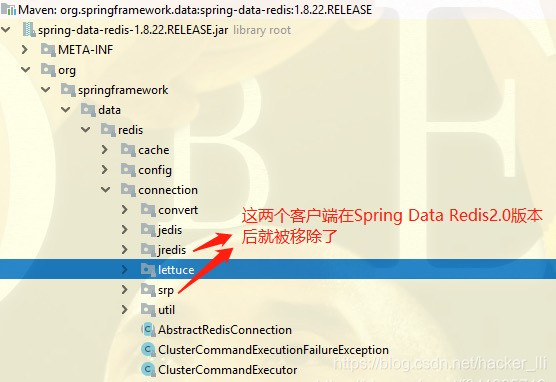
另外有个使用注意的地方就是:在Spring Data Redis的使用方面上,我们还需要重视版本的差异
Spring Data Redis1.x截图:
Spring Data Redis2.x截图:
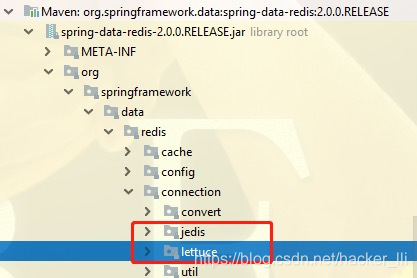
版本的差异从包结构上就能一目了然。具体到源码处,从RedisConnectionFactory接口的继承图也能看出差异:
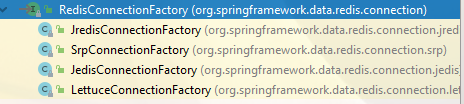

由图可知,从2.x版本开始,Spring就只为我们保留了jedis和lettuce。
lettuce是redis连接池未来的发展趋势,2.x开始已经推荐使用lettuce作为访问redis的client客户端。
不管用什么客户端,对使用者应该都是透明的,因为在开发过程中,没有极其特殊的情况,应该规定只允许使用`RedisTemplate`来操作Redis。
使用Jedis作为Client操作Redis示例
虽然说Jedis有多线程安全问题,并且它的性能也堪忧,大有被淘汰的趋势。但是,但是,但是毕竟它还仍旧还是当下的主流的Java访问Redis的客户端,所以也有必要把它的使用说一下,实验只是一个参考:
第一步:导包(我这里用的是2.x版本来做的测试):
<!-- 使用Spring Data Redis 操作Redis缓存 -->
<dependency>
    <groupId>org.springframework.data</groupId>
    <artifactId>spring-data-redis</artifactId>
    <version>2.1.9.RELEASE</version>
</dependency>
<!-- https://mvnrepository.com/artifact/redis.clients/jedis -->
<dependency>
    <groupId>redis.clients</groupId>
    <artifactId>jedis</artifactId>
    <version>2.10.2</version>
</dependency>
第二步:准备Config配置文件
//@EnableCaching // 因为此处我没准备CacheManager,暂时关闭缓存注解
@Configuration
public class CacheConfig extends CachingConfigurerSupport {

    @Bean
    public RedisConnectionFactory redisConnectionFactory() {
        RedisStandaloneConfiguration configuration = new RedisStandaloneConfiguration();
        // 2.0后的写法
        configuration.setHostName("10.102.132.150");
        //configuration.setPassword(RedisPassword.of("123456"));
        configuration.setPort(6379);
        configuration.setDatabase(0);


        JedisConnectionFactory factory = new JedisConnectionFactory(configuration);
        // Spring Data Redis1.x这么来设置  2.0后建议使用RedisStandaloneConfiguration来取代
        //factory.setHostName("10.102.132.150");
        //factory.setPassword("123456");
        //factory.setPort(6379);
        //factory.setDatabase(0);
        return factory;
    }

    @Bean
    public RedisTemplate<String, String> stringRedisTemplate() {
        RedisTemplate<String, String> redisTemplate = new StringRedisTemplate();
        redisTemplate.setConnectionFactory(redisConnectionFactory());
        return redisTemplate;
    }

}
运行单元测试:
@RunWith(SpringJUnit4ClassRunner.class)
@ContextConfiguration(classes = {RootConfig.class, CacheConfig.class})
public class TestSpringBean {

    @Autowired
    private RedisConnectionFactory redisConnectionFactory;
    @Autowired
    private RedisTemplate<String, String> redisTemplate;

    @Test
    public void test1() {
        System.out.println(redisConnectionFactory);
        System.out.println(redisConnectionFactory.getConnection());
        //System.out.println(redisConnectionFactory.getClusterConnection()); //InvalidDataAccessApiUsageException: Cluster is not configured!
        //System.out.println(redisConnectionFactory.getSentinelConnection()); // InvalidDataAccessResourceUsageException: No Sentinels configured

        System.out.println(redisTemplate);
        redisTemplate.opsForValue().set("name", "fsx");
        System.out.println(redisTemplate.opsForValue().get("name"));
    }
}
输出结果:
org.springframework.data.redis.connection.jedis.JedisConnectionFactory@238b521e
org.springframework.data.redis.connection.jedis.JedisConnection@1cefc4b3
org.springframework.data.redis.core.StringRedisTemplate@2b27cc70
fsx
并且Redis Server端也能查看到key为“name”的值:

由此可以证明缓存配置都能正常work了,能够使用RedisTempate操作Redis了。部分超简单的,只需要简单的两步即可达到目的~
关于Jedis或者说RedisTemplate的详细使用,显然也不是本文的重点,有兴趣的可自行研究,或者出门左拐~
使用Lettuce作为Client操作Redis示例
Lettuce作为新时代的Redis客户端,它势必成为将来的主流(其实现在也很主流了,比如SpringBoot2.0后默认就使用它作为Redis的Client访问)。
第一步:和上一个实验一样,导包(此处导入lettuce作为客户端)
<!-- 使用Spring Data Redis 操作Redis缓存 -->
<dependency>
    <groupId>org.springframework.data</groupId>
    <artifactId>spring-data-redis</artifactId>
    <version>2.1.9.RELEASE</version>
</dependency>
<!-- https://mvnrepository.com/artifact/io.lettuce/lettuce-core -->
<dependency>
    <groupId>io.lettuce</groupId>
    <artifactId>lettuce-core</artifactId>
    <version>5.1.7.RELEASE</version>
</dependency>
第二步:准备Config配置文件
//@EnableCaching
@Configuration
public class CacheConfig extends CachingConfigurerSupport {

    @Bean
    public RedisConnectionFactory redisConnectionFactory() {
        // RedisStandaloneConfiguration这个配置类是Spring Data Redis2.0后才有的~~~
        RedisStandaloneConfiguration configuration = new RedisStandaloneConfiguration();
        // 2.0后的写法
        configuration.setHostName("10.102.132.150");
        //configuration.setPassword(RedisPassword.of("123456"));
        configuration.setPort(6379);
        configuration.setDatabase(0);


        LettuceConnectionFactory factory = new LettuceConnectionFactory(configuration);
        // Spring Data Redis1.x这么来设置  2.0后建议使用RedisStandaloneConfiguration来取代
        //factory.setHostName("10.102.132.150");
        //factory.setPassword("123456");
        //factory.setPort(6379);
        //factory.setDatabase(0);
        return factory;
    }

    @Bean
    public RedisTemplate<String, String> stringRedisTemplate() {
        RedisTemplate<String, String> redisTemplate = new StringRedisTemplate();
        redisTemplate.setConnectionFactory(redisConnectionFactory());
        return redisTemplate;
    }

}
用上了Spring Data Redis2.0提供的RedisStandaloneConfiguration配置类后,配置步骤和Jedis的一毛一样
执行上面的单元测试之后得出的结果是:
org.springframework.data.redis.connection.lettuce.LettuceConnectionFactory@59942b48
14:35:00.798 [main] INFO  io.lettuce.core.EpollProvider - Starting without optional epoll library
14:35:00.800 [main] INFO  io.lettuce.core.KqueueProvider - Starting without optional kqueue library
org.springframework.data.redis.connection.lettuce.LettuceConnection@3cf7298d
org.springframework.data.redis.core.StringRedisTemplate@1ff55ff
fsx
从上面的测试输出结果看得出多输出了两句info日志,结果呢,都是ok的,能正常work。
说明:SpringBoot1.x最终依赖的是Spring Data Redis 1.8.xx,默认导入使用的是Jedis客户端,版本号为2.9.x(非最新的3.x,不兼容,慎用)
SpringBoot2.0开始,依赖的是Spring Data Redis 2.x/x,并且默认导入使用的是Lettuce客户端,版本号是从5.x.x开始
当然,不管是Boot1.x或者2.x,都是允许你手动切换的(只是完全没有必要而已)。
Redis和Spring Cache整合
Redis和Spring Cache整合,让能通过缓存注解优雅的操作Redis是本文的主菜。
因为Redis分布式缓存它是client/server模式,所以它的整合和前面整合Ehcache等还是有些不一样的地方的 。但在有了上篇文章做铺垫,加上上面介绍Spring Data Redis的使用之后,要集成它也是易如反掌之事。
RedisCacheManager
老规矩,整合前先看看Redis对CacheManager接口的实现RedisCacheManager:
// @since 2.0  这里面用到了2.0提供的 RedisCacheConfiguration和RedisCacheWriter等
public class RedisCacheManager extends AbstractTransactionSupportingCacheManager {
	// 这俩货都是不能为null的~~~
	private final RedisCacheWriter cacheWriter;
	// 这个配置类非常重要。能配置ttl、CacheKeyPrefix、ConversionService。。。。。。。。
	// 可以用链式操作进行构造~~~
	private final RedisCacheConfiguration defaultCacheConfig;


	private final Map<String, RedisCacheConfiguration> initialCacheConfiguration;、
	// allow create unconfigured caches
	private final boolean allowInFlightCacheCreation;

	// 请注意:这个构造函数是私有的
	private RedisCacheManager(RedisCacheWriter cacheWriter, RedisCacheConfiguration defaultCacheConfiguration, boolean allowInFlightCacheCreation) {

		Assert.notNull(cacheWriter, "CacheWriter must not be null!");
		Assert.notNull(defaultCacheConfiguration, "DefaultCacheConfiguration must not be null!");

		this.cacheWriter = cacheWriter;
		this.defaultCacheConfig = defaultCacheConfiguration;
		this.initialCacheConfiguration = new LinkedHashMap<>();
		this.allowInFlightCacheCreation = allowInFlightCacheCreation;
	}
	public RedisCacheManager(RedisCacheWriter cacheWriter, RedisCacheConfiguration defaultCacheConfiguration) {
		this(cacheWriter, defaultCacheConfiguration, true);
	}
	public RedisCacheManager(RedisCacheWriter cacheWriter, RedisCacheConfiguration defaultCacheConfiguration, String... initialCacheNames) {
		this(cacheWriter, defaultCacheConfiguration, true, initialCacheNames);
	}
	public RedisCacheManager(RedisCacheWriter cacheWriter, RedisCacheConfiguration defaultCacheConfiguration, boolean allowInFlightCacheCreation, String... initialCacheNames) {
		this(cacheWriter, defaultCacheConfiguration, allowInFlightCacheCreation);

		// 给每个Cache都放一个配置,默认都使用全局的defaultCacheConfiguration
		// 可见:它是支持给不同的Cache,给出不同的配置的(比如过期时间,,,。。。。。。)
		for (String cacheName : initialCacheNames) {
			this.initialCacheConfiguration.put(cacheName, defaultCacheConfiguration);
		}
	}
	// 这里也可以自己把initialCacheConfigurations这个Map传进来(完成完全个性化)
	public RedisCacheManager(RedisCacheWriter cacheWriter, RedisCacheConfiguration defaultCacheConfiguration, Map<String, RedisCacheConfiguration> initialCacheConfigurations) {

		this(cacheWriter, defaultCacheConfiguration, initialCacheConfigurations, true);
	}
	...


	// 根据RedisConnectionFactory 直接new一个RedisCacheManager出来,都采用默认的方案
	public static RedisCacheManager create(RedisConnectionFactory connectionFactory) {

		Assert.notNull(connectionFactory, "ConnectionFactory must not be null!");
		return new RedisCacheManager(new DefaultRedisCacheWriter(connectionFactory), RedisCacheConfiguration.defaultCacheConfig());
	}


	//builder默认来构造、设置更加详细的参数设置
	// 注意这个builder,既能够根据RedisConnectionFactory生成,也能个根据`RedisCacheWriter`直接生成
	public static RedisCacheManagerBuilder builder(RedisConnectionFactory connectionFactory) {

		Assert.notNull(connectionFactory, "ConnectionFactory must not be null!");

		return RedisCacheManagerBuilder.fromConnectionFactory(connectionFactory);
	}
	public static RedisCacheManagerBuilder builder(RedisCacheWriter cacheWriter) {

		Assert.notNull(cacheWriter, "CacheWriter must not be null!");

		return RedisCacheManagerBuilder.fromCacheWriter(cacheWriter);
	}


	// 实现抽象父类的抽象方法,把指定的缓存Cache都加载进来~
	// 若没有指定,这里木有啦~
	@Override
	protected Collection<RedisCache> loadCaches() {
		List<RedisCache> caches = new LinkedList<>();
		for (Map.Entry<String, RedisCacheConfiguration> entry : initialCacheConfiguration.entrySet()) {
			caches.add(createRedisCache(entry.getKey(), entry.getValue()));
		}
		return caches;
	}
	// 此处使用的是RedisCache,它其实里面依赖的是RedisCacheWriter(1.x版本传入的是RedisOperations,也就是RedisTemplate)
	protected RedisCache createRedisCache(String name, @Nullable RedisCacheConfiguration cacheConfig) {
		return new RedisCache(name, cacheWriter, cacheConfig != null ? cacheConfig : defaultCacheConfig);
	}

	// 简单的说,默认下RedisCache也是允许动态生成的~~~~
	// 显然,默认生成的(并非自己指定的),只能使用默认配置defaultCacheConfig了
	@Override
	protected RedisCache getMissingCache(String name) {
		return allowInFlightCacheCreation ? createRedisCache(name, defaultCacheConfig) : null;
	}

	public Map<String, RedisCacheConfiguration> getCacheConfigurations() {
	... // 获取到全部的Cache的配置(包括只传了CacheNames的情况)  它的key就是所有的cacheNames
	}

	// builder模式,详细代码省略~
	public static class RedisCacheManagerBuilder {
		...
		public RedisCacheManager build() {
			RedisCacheManager cm = new RedisCacheManager(cacheWriter, defaultCacheConfiguration, initialCaches, allowInFlightCacheCreation);
			// 是否允许事务:默认是false
			cm.setTransactionAware(enableTransactions);
			return cm;
		}
	}
}
这个实现看着还是非常简单的,因为它有2.0提供的两个新的类:RedisCacheWriter和RedisCacheConfiguration进行分而治之。
RedisCache
很显然,RedisCache是对Cache抽象的实现:
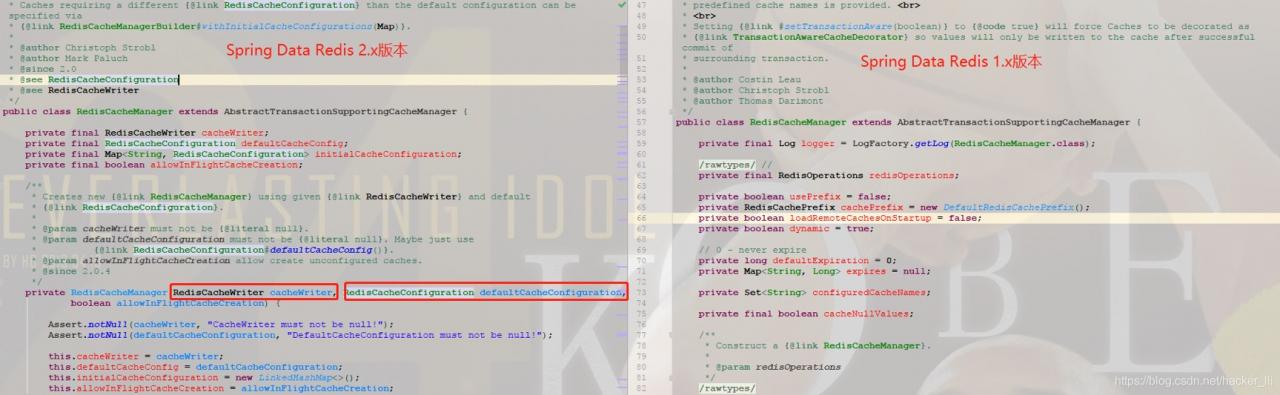
同样的,1.x版本和2.x版本的实行都不一样
// @since 2.0   请注意:这里也是以2.0版本的为准的
public class RedisCache extends AbstractValueAdaptingCache {

	private static final byte[] BINARY_NULL_VALUE = RedisSerializer.java().serialize(NullValue.INSTANCE);

	private final String name; // 缓存的名字
	private final RedisCacheWriter cacheWriter; //最终操作是委托给它的
	private final RedisCacheConfiguration cacheConfig; // cache的配置(因为每个Cache的配置可能不一样,即使来自于同一个CacheManager)
	private final ConversionService conversionService; // 数据转换

	// 唯一构造函数,并且还是protected 的。可见我们自己并不能操控它
	protected RedisCache(String name, RedisCacheWriter cacheWriter, RedisCacheConfiguration cacheConfig) {

		super(cacheConfig.getAllowCacheNullValues());

		Assert.notNull(name, "Name must not be null!");
		Assert.notNull(cacheWriter, "CacheWriter must not be null!");
		Assert.notNull(cacheConfig, "CacheConfig must not be null!");

		this.name = name;
		this.cacheWriter = cacheWriter;
		this.cacheConfig = cacheConfig;
		this.conversionService = cacheConfig.getConversionService();
	}

	@Override
	public String getName() {
		return name;
	}
	@Override
	public RedisCacheWriter getNativeCache() {
		return this.cacheWriter;
	}

	// cacheWriter会有网络访问请求~~~去访问服务器
	@Override
	protected Object lookup(Object key) {
		byte[] value = cacheWriter.get(name, createAndConvertCacheKey(key));
		if (value == null) {
			return null;
		}
		return deserializeCacheValue(value);
	}

	@Override
	@Nullable
	public ValueWrapper get(Object key) {
		Object value = lookup(key);
		return toValueWrapper(value);
	}

	// 请注意:这个方法因为它要保证同步性,所以使用了synchronized
	// 还记得我说过的sync=true这个属性吗,靠的就是它来保证的(当然在分布式情况下 不能百分百保证)
	@Override
	@SuppressWarnings("unchecked")
	public synchronized <T> T get(Object key, Callable<T> valueLoader) {
		ValueWrapper result = get(key);
		if (result != null) { // 缓存里有,就直接返回吧
			return (T) result.get();
		}

		// 缓存里没有,那就从valueLoader里拿值,拿到后马上put进去
		T value = valueFromLoader(key, valueLoader);
		put(key, value);
		return value;
	}


	@Override
	public void put(Object key, @Nullable Object value) {
		Object cacheValue = preProcessCacheValue(value);

		// 对null值的判断,看看是否允许存储它呢~~~
		if (!isAllowNullValues() && cacheValue == null) {
			throw new IllegalArgumentException(String.format("Cache '%s' does not allow 'null' values. Avoid storing null via '@Cacheable(unless=\"#result == null\")' or configure RedisCache to allow 'null' via RedisCacheConfiguration.", name));
		}
		cacheWriter.put(name, createAndConvertCacheKey(key), serializeCacheValue(cacheValue), cacheConfig.getTtl());
	}

	// @since 4.1
	@Override
	public ValueWrapper putIfAbsent(Object key, @Nullable Object value) {
	...
	}

	@Override
	public void evict(Object key) {
		cacheWriter.remove(name, createAndConvertCacheKey(key));
	}

	// 清空:在redis中慎用。因为它是传一个*去  进行全部删除的。
	@Override
	public void clear() {
		byte[] pattern = conversionService.convert(createCacheKey("*"), byte[].class);
		cacheWriter.clean(name, pattern);
	}

	public RedisCacheConfiguration getCacheConfiguration() {
		return cacheConfig;
	}
	// 序列化key、value   ByteUtils为redis包的工具类,Data Redis 1.7
	protected byte[] serializeCacheKey(String cacheKey) {
		return ByteUtils.getBytes(cacheConfig.getKeySerializationPair().write(cacheKey));
	}
	protected byte[] serializeCacheValue(Object value) {
		if (isAllowNullValues() && value instanceof NullValue) {
			return BINARY_NULL_VALUE;
		}
		return ByteUtils.getBytes(cacheConfig.getValueSerializationPair().write(value));
	}


	// 创建一个key,请注意这里prefixCacheKey() 前缀生效了~~~
	protected String createCacheKey(Object key) {

		String convertedKey = convertKey(key);

		if (!cacheConfig.usePrefix()) {
			return convertedKey;
		}

		return prefixCacheKey(convertedKey);
	}
	...
}
RedisCache它持有RedisCacheWriter的引用,所以的对Redis服务的操作都是委托给了它。同时它还持有RedisCacheConfiguration和ConversionService,证明即使是同一个CacheManager管理的缓存实例,配置都可能是不一样的,支持到了很强的个性化。
// @since 2.0
public interface RedisCacheWriter {
	// 两个静态方法用于创建一个 有锁/无锁的RedisCacheWriter
	// 它内部自己实现了一个分布式锁的效果。。。。。。。 Duration可以在去获取锁没获取到的话,过一会再去获取(避免了频繁对redis的无用访问)
	static RedisCacheWriter nonLockingRedisCacheWriter(RedisConnectionFactory connectionFactory) {
		return new DefaultRedisCacheWriter(connectionFactory);
	}
	static RedisCacheWriter lockingRedisCacheWriter(RedisConnectionFactory connectionFactory) {
		return new DefaultRedisCacheWriter(connectionFactory, Duration.ofMillis(50));
	}

	@Nullable
	byte[] get(String name, byte[] key);

	// 注意:这两个put方法,都是带有TTL的,因为Redis是支持过期时间的嘛
	// 多疑依托于此方法,我们其实最终可以定义出支持TTL的缓存注解,下篇博文见
	void put(String name, byte[] key, byte[] value, @Nullable Duration ttl);
	@Nullable
	byte[] putIfAbsent(String name, byte[] key, byte[] value, @Nullable Duration ttl);

	void remove(String name, byte[] key);
	void clean(String name, byte[] pattern);
}

// @since 2.0
class DefaultRedisCacheWriter implements RedisCacheWriter {

	// 一切远程操作的链接,都来自于链接工厂:RedisConnectionFactory
	private final RedisConnectionFactory connectionFactory;
	private final Duration sleepTime;

	DefaultRedisCacheWriter(RedisConnectionFactory connectionFactory) {
		this(connectionFactory, Duration.ZERO);
	}
	DefaultRedisCacheWriter(RedisConnectionFactory connectionFactory, Duration sleepTime) {
		this.connectionFactory = connectionFactory;
		this.sleepTime = sleepTime;
	}

	// 拿到redis连接,执行命令。  当然执行之前,去获取锁
	private <T> T execute(String name, Function<RedisConnection, T> callback) {

		RedisConnection connection = connectionFactory.getConnection();
		try {
			checkAndPotentiallyWaitUntilUnlocked(name, connection);
			return callback.apply(connection);
		} finally {
			connection.close();
		}
	}

	private void checkAndPotentiallyWaitUntilUnlocked(String name, RedisConnection connection) {
		if (!isLockingCacheWriter()) {
			return;
		}
		try {
			// 自旋:去查看锁 若为true(表示锁还cun'z)
			while (doCheckLock(name, connection)) {
				Thread.sleep(sleepTime.toMillis());
			}
		} catch (InterruptedException ex) {
			// Re-interrupt current thread, to allow other participants to react.
			Thread.currentThread().interrupt();
			throw new PessimisticLockingFailureException(String.format("Interrupted while waiting to unlock cache %s", name), ex);
		}
	}
	... // 关于它内部的lock、unlock处理,有兴趣的可以看看此类,因为不是本文重点,所以此处不说明了

	// 其余方法,都是调用了execute方法
	@Override
	public void put(String name, byte[] key, byte[] value, @Nullable Duration ttl) {
		execute(name, connection -> {
			// 只有ttl合法才会执行。注意:单位MILLISECONDS  是毫秒值
			if (shouldExpireWithin(ttl)) {
				connection.set(key, value, Expiration.from(ttl.toMillis(), TimeUnit.MILLISECONDS), SetOption.upsert());
			} else {
				connection.set(key, value);
			}

			return "OK";
		});
	}
	@Override
	public byte[] get(String name, byte[] key) {
		return execute(name, connection -> connection.get(key));
	}
	// putIfAbsent是根据内部的分布式锁来实现的
	@Override
	public byte[] putIfAbsent(String name, byte[] key, byte[] value, @Nullable Duration ttl) {
		...
	}
	@Override
	public void remove(String name, byte[] key) {
		execute(name, connection -> connection.del(key));
	}
	// 注意批量删,第二参数是pattern
	@Override
	public void clean(String name, byte[] pattern) {
		...
	}
	...
}
整体上看,DefaultRedisCacheWriter的实现还是比较复杂的,它是2.x重写的实现。
1.x版本的RedisCache类的实现没有这么复杂,因为它依托于RedisOperations去实现,复杂度都在RedisOperations本身了。
2.x版本把注解操作缓存和RedisTempate操作缓存完全分离开了,也就是说注解缓存再也不用依赖于RedisTempate了~
为何能使用RedisCacheWriter代替RedisOperations
使用过1.x版本的都知道,创建一个RedisCacheManager实例的时候,都必须想准备一个RedisTempate实例,因为它强依赖于它。
但是如上2.0的配置可知,它现在只依赖于RedisConnectionFactory而不用再管RedisOperations了。
为何Spring要大费周章的重写一把呢?此处我可以大胆猜测一下:
Cache抽象(缓存注解)只会操作k-v,不会涉足复杂的数据结构
RedisOperations功能强大,能够操作任意类型。所以放在操作Cache上显得非常的笨重
重写的RedisCacheWriter完全独立不依赖,运用在Cache上,能够使得缓存注解保持非常高的独立性。并且此接口也非常的轻
demo示例
直接上码:
@Service
public class CacheDemoServiceImpl implements CacheDemoService {

    @Cacheable(cacheNames = "demoCache", key = "#id")
    @Override
    public Object getFromDB(Integer id) {
        System.out.println("模拟去db查询~~~" + id);
        return "hello cache...";
    }
}


@EnableCaching // 使用了CacheManager,别忘了开启它  否则无效
@Configuration
public class CacheConfig extends CachingConfigurerSupport {

    // 配置一个CacheManager 来支持缓存注解
    @Bean
    public CacheManager cacheManager() {
        // 1.x是这么配置的:仅供参考
        //RedisCacheManager cacheManager = new RedisCacheManager(redisTemplate);
        //cacheManager.setDefaultExpiration(ONE_HOUR * HOURS_IN_ONE_DAY);
        //cacheManager.setUsePrefix(true);

        // --------------2.x的配置方式--------------
        // 方式一:直接create
        //RedisCacheManager redisCacheManager = RedisCacheManager.create(redisConnectionFactory());
        // 方式二:builder方式(推荐)

        RedisCacheConfiguration configuration = RedisCacheConfiguration.defaultCacheConfig()
                .entryTtl(Duration.ofDays(1)) //Duration.ZERO表示永不过期(此值一般建议必须设置)
                //.disableKeyPrefix() // 禁用key的前缀
                //.disableCachingNullValues() //禁止缓存null值

                //=== 前缀我个人觉得是非常重要的,建议约定:注解缓存一个统一前缀、RedisTemplate直接操作的缓存一个统一前缀===
                //.prefixKeysWith("baidu:") // 底层其实调用的还是computePrefixWith() 方法,只是它的前缀是固定的(默认前缀是cacheName,此方法是把它固定住,一般不建议使用固定的)
                //.computePrefixWith(CacheKeyPrefix.simple()); // 使用内置的实现
                .computePrefixWith(cacheName -> "caching:" + cacheName) // 自己实现,建议这么使用(cacheName也保留下来了)
                ;

        RedisCacheManager redisCacheManager = RedisCacheManager.builder(redisConnectionFactory())
                // .disableCreateOnMissingCache() // 关闭动态创建Cache
                //.initialCacheNames() // 初始化时候就放进去的cacheNames(若关闭了动态创建,这个就是必须的)
                .cacheDefaults(configuration) // 默认配置(强烈建议配置上)。  比如动态创建出来的都会走此默认配置
                //.withInitialCacheConfigurations() // 个性化配置  可以提供一个Map,针对每个Cache都进行个性化的配置(否则是默认配置)
                //.transactionAware() // 支持事务
                .build();
        return redisCacheManager;
    }
配置好项目之后,执行单元测试:
@RunWith(SpringJUnit4ClassRunner.class)
@ContextConfiguration(classes = {RootConfig.class, CacheConfig.class})
public class TestSpringBean {
    @Autowired
    private CacheDemoService cacheDemoService;
    @Autowired
    private CacheManager cacheManager;


    @Test
    public void test1() {
        cacheDemoService.getFromDB(1);
        cacheDemoService.getFromDB(1);

        System.out.println("----------验证缓存是否生效----------");
        Cache cache = cacheManager.getCache("demoCache");
        System.out.println(cache);
        System.out.println(cache.get(1, String.class));
    }
}
输出结果如下:
模拟去db查询~~~1
----------验证缓存是否生效----------
org.springframework.data.redis.cache.RedisCache@788ddc1f
hello cache...
并且缓存中有值的:
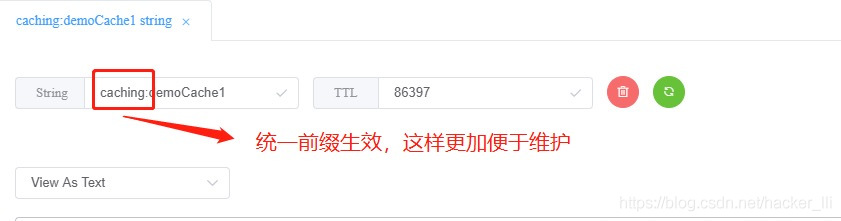
就这样,Redis分布式缓存就和Spring Cache完成了集成,可以优雅的使用三大缓存注解去操作了。唉~
备注:DefaultRedisCacheWriter使用的写入都是操作的Bytes,所以不会存在乱码问题~