1.介绍
2.使用
2.1 springMVC集成
1.添加依赖
      <!--swagger-->
      <dependency>
          <groupId>io.springfox</groupId>
          <artifactId>springfox-swagger2</artifactId>
          <version>2.6.1</version>
      </dependency>
      <!-- swagger-ui 为项目提供api展示及测试的界面 -->
      <dependency>
          <groupId>io.springfox</groupId>
          <artifactId>springfox-swagger-ui</artifactId>
          <version>2.6.1</version>
      </dependency>
      <!-- 集成 swagger 的时候,缺少这个 jar包是不OK的-->
      <dependency>
          <groupId>com.fasterxml.jackson.core</groupId>
          <artifactId>jackson-databind</artifactId>
          <version>2.8.7</version>
      </dependency>
2.编写配置文件
@Configuration
@EnableSwagger2
@EnableWebMvc
@ComponentScan(basePackages ="com.zy.crud")
public class SwaggerConfig {

    @Bean
    public Docket api() {
        return new Docket(DocumentationType.SWAGGER_2)
                .select()
                .apis(RequestHandlerSelectors.any())
                .build()
                .apiInfo(apiInfo());
    }

    private ApiInfo apiInfo() {
        return new ApiInfoBuilder()
                .title("SpringMVC swagger的接口测试")
                .description("这个是接口测试")
                .termsOfServiceUrl("http://blog.csdn.net/cct")
                .contact(new Contact("欢迎来到我的接口测试", "http://blog.csdn.net", "www@163.com"))
                .license("")
                .licenseUrl("")
                .version("1.0.0")
                .build();
    }
}
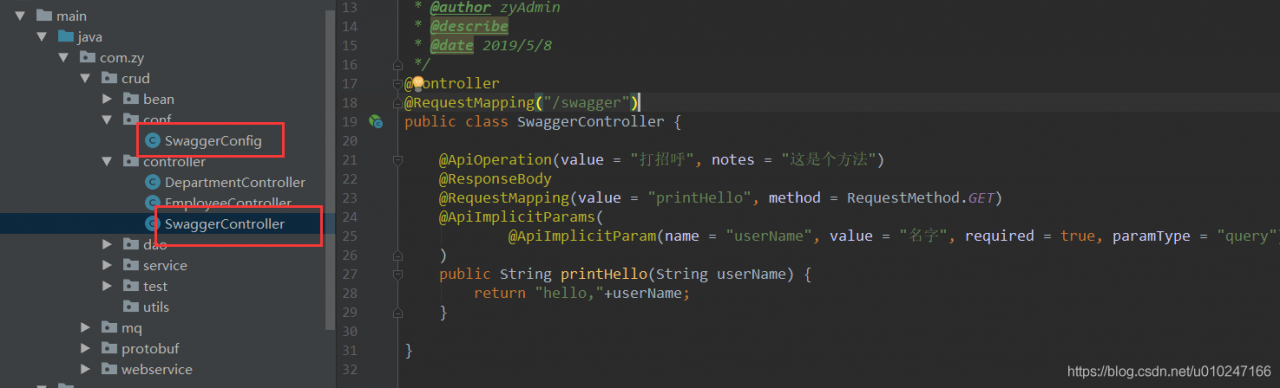
3.编写请求处理类
@Controller
@RequestMapping("/swagger")
public class SwaggerController {

    @ApiOperation(value = "打招呼", notes = "这是个方法")
    @ResponseBody
    @RequestMapping(value = "printHello", method = RequestMethod.GET)
    @ApiImplicitParams(
            @ApiImplicitParam(name = "userName", value = "名字", required = true, paramType = "query")
    )
    public String printHello(String userName) {
        return "hello,"+userName;
    }

}
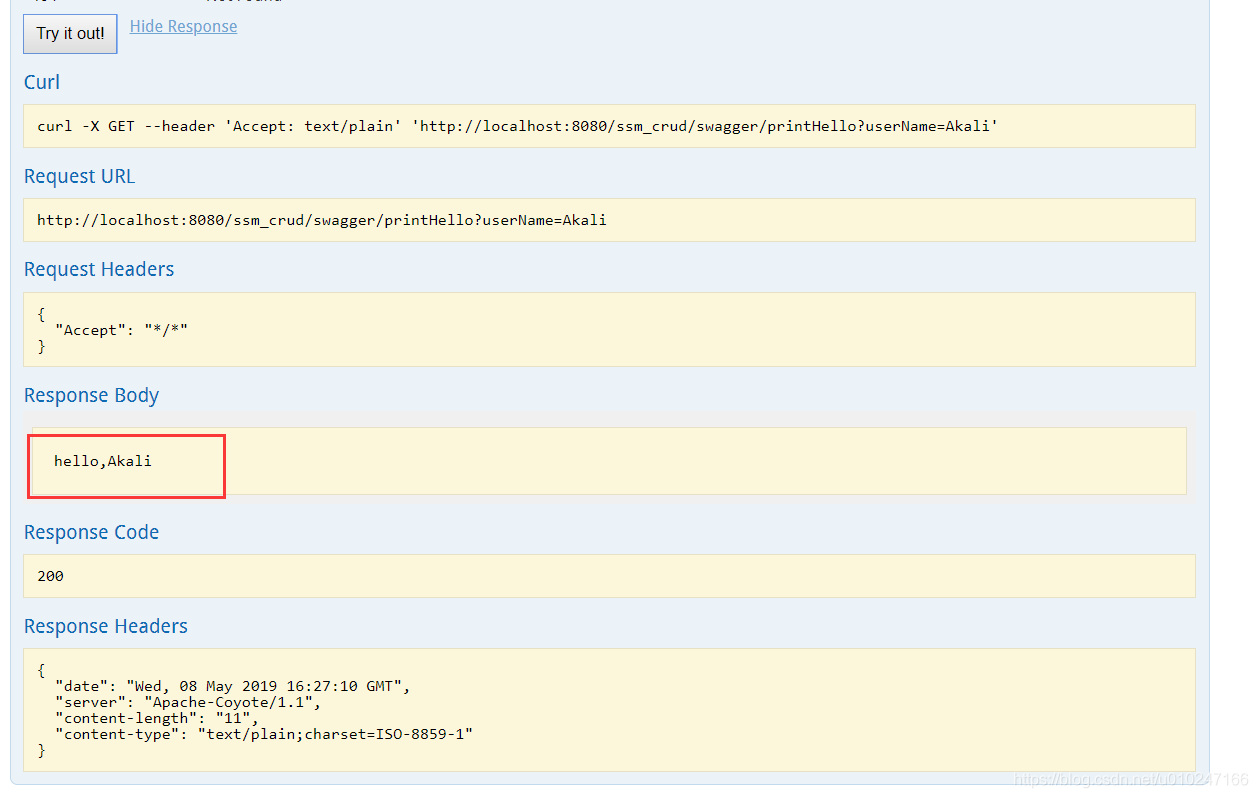
4.访问 http://localhost:8080/ssm_crud/swagger-ui.html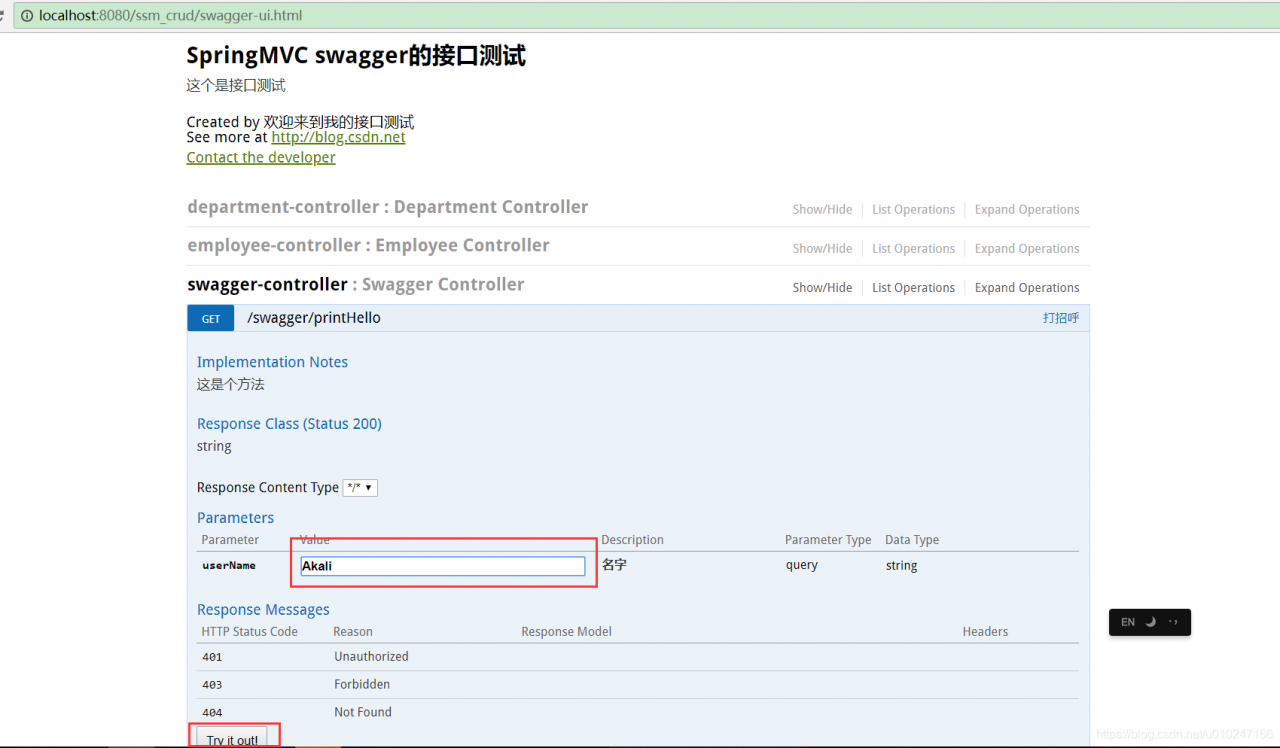
2.2 生成离线文档
2.2.1 添加依赖
      <!--swagger-->
      <dependency>
          <groupId>io.springfox</groupId>
          <artifactId>springfox-swagger2</artifactId>
          <version>2.6.1</version>
      </dependency>
      <!-- swagger-ui 为项目提供api展示及测试的界面 -->
      <!--<dependency>-->
          <!--<groupId>io.springfox</groupId>-->
          <!--<artifactId>springfox-swagger-ui</artifactId>-->
          <!--<version>2.6.1</version>-->
      <!--</dependency>-->
      <dependency>
        <groupId>com.github.xiaoymin</groupId>
        <artifactId>swagger-bootstrap-ui</artifactId>
        <version>1.8.5</version>
      </dependency>
2.2.2 建立swagger配置类
@Configuration
@EnableSwagger2
@EnableWebMvc
@ComponentScan(basePackages ="com.zy.crud.swaggerController")
public class SwaggerConfig {

    @Bean
    public Docket api() {
        return new Docket(DocumentationType.SWAGGER_2)
                .select()
                .apis(RequestHandlerSelectors.any())
                .build()
                .apiInfo(apiInfo());
    }

    private ApiInfo apiInfo() {
        return new ApiInfoBuilder()
                .title("SpringMVC swagger的接口测试")
                .description("这个是接口测试")
                .termsOfServiceUrl("http://blog.csdn.net/cct")
                .contact(new Contact("欢迎来到我的接口测试", "http://blog.csdn.net", "www@163.com"))
                .license("")
                .licenseUrl("")
                .version("1.0.0")
                .build();
    }
}
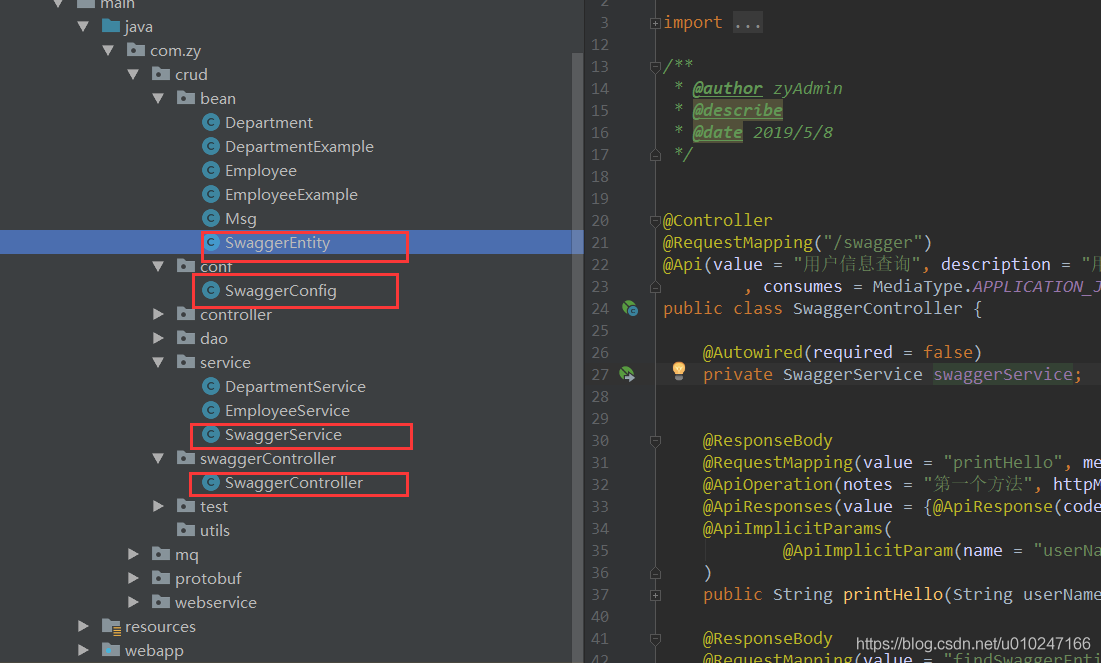
2.2.3 编写业务类
@ApiModel(description = "用户实体类")
public class SwaggerEntity {

    /**
     * 用户标识
     */
    @ApiModelProperty(required = true, value = "用户标识")
    private Integer id;
    /**
     * 用户名
     */
    @ApiModelProperty(required = true, value = "用户名")
    private String username;
@Service
public class SwaggerService {

    public SwaggerEntity getSwaggerEntity(Integer id) {
        SwaggerEntity se  = null;
        if(id == 1){
            se = new SwaggerEntity(1, "小明");
        }else if(id == 2){
            se = new SwaggerEntity(2, "xiaohong");
        }
        return se;
    }
@Controller
@RequestMapping("/swagger")
@Api(value = "用户信息查询", description = "用户基本信息操作API", tags = "UserApi"
        , consumes = MediaType.APPLICATION_JSON_VALUE, produces = MediaType.APPLICATION_JSON_VALUE)
public class SwaggerController {

    @Autowired(required = false)
    private SwaggerService swaggerService;


    @ResponseBody
    @RequestMapping(value = "printHello", method = RequestMethod.GET)
    @ApiOperation(notes = "第一个方法", httpMethod = "GET", value = "打印helloword")
    @ApiResponses(value = {@ApiResponse(code = 405, message = "invalid input")})
    @ApiImplicitParams(
            @ApiImplicitParam(name = "userName", value = "名字", required = true, paramType = "query")
    )
    public String printHello(String userName) {
        return "hello,"+userName;
    }

    @ResponseBody
    @RequestMapping(value = "findSwaggerEntity", method = RequestMethod.POST)
    @ApiOperation(notes = "第二个方法", httpMethod = "POST", value = "根据ID获取相关实体类")
    @ApiResponses(value = {@ApiResponse(code = 405, message = "invalid input")})
    @ApiImplicitParams({
            @ApiImplicitParam(name = "id", value = "主键", required = true, paramType = "query"),
            @ApiImplicitParam(name = "userName", value = "名字", required = true, paramType = "query")
    })
    public SwaggerEntity findSwaggerEntity(Integer id, String userName) {
        return swaggerService.getSwaggerEntity(id);
    }

}
2.2.4 访问
http://localhost:8080/ssm_crud/doc.html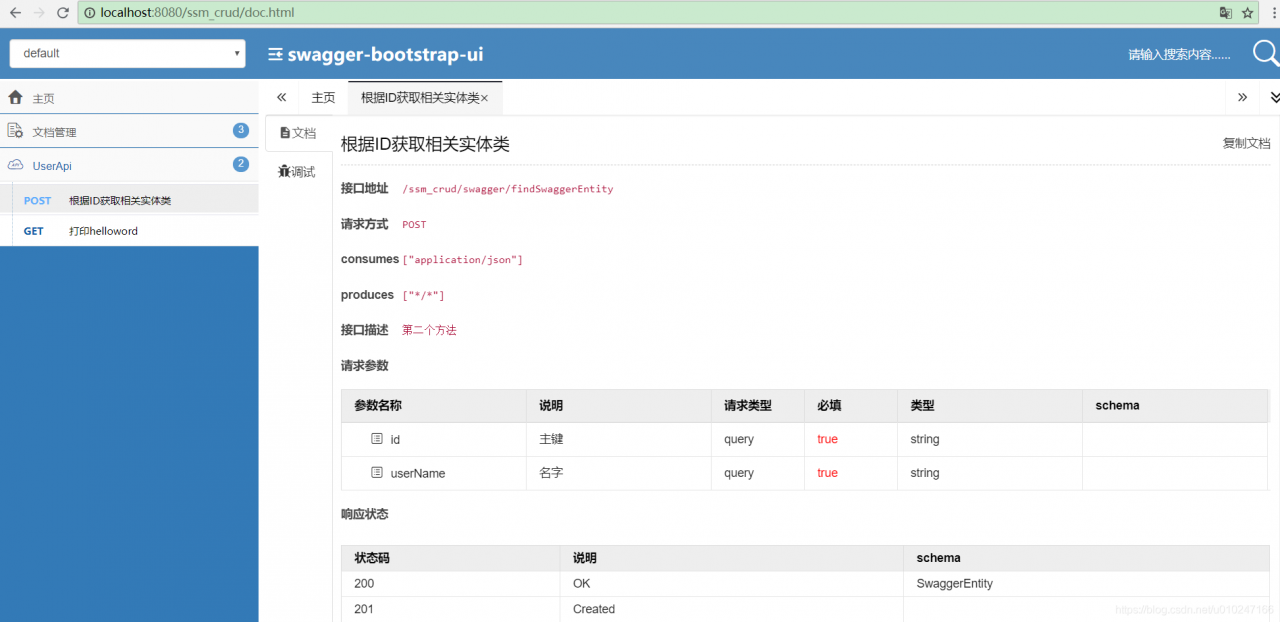
2.2.5 生成离线PDF
1.保存网页文档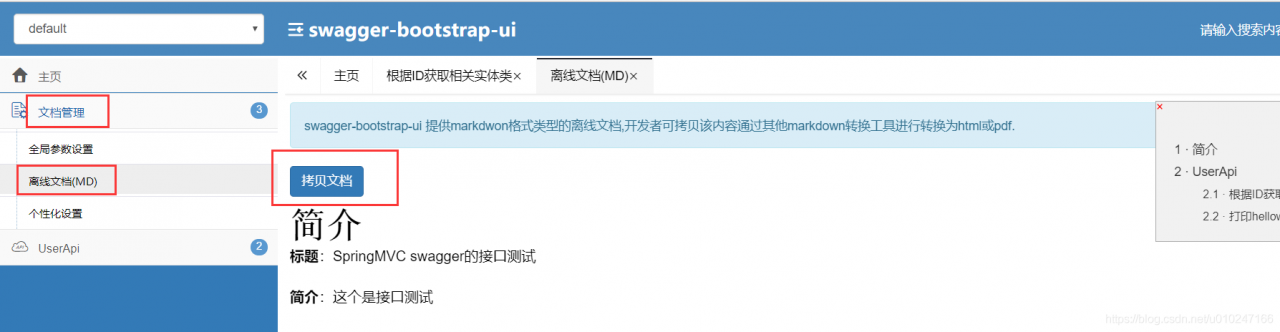
2.内容拷贝到Typora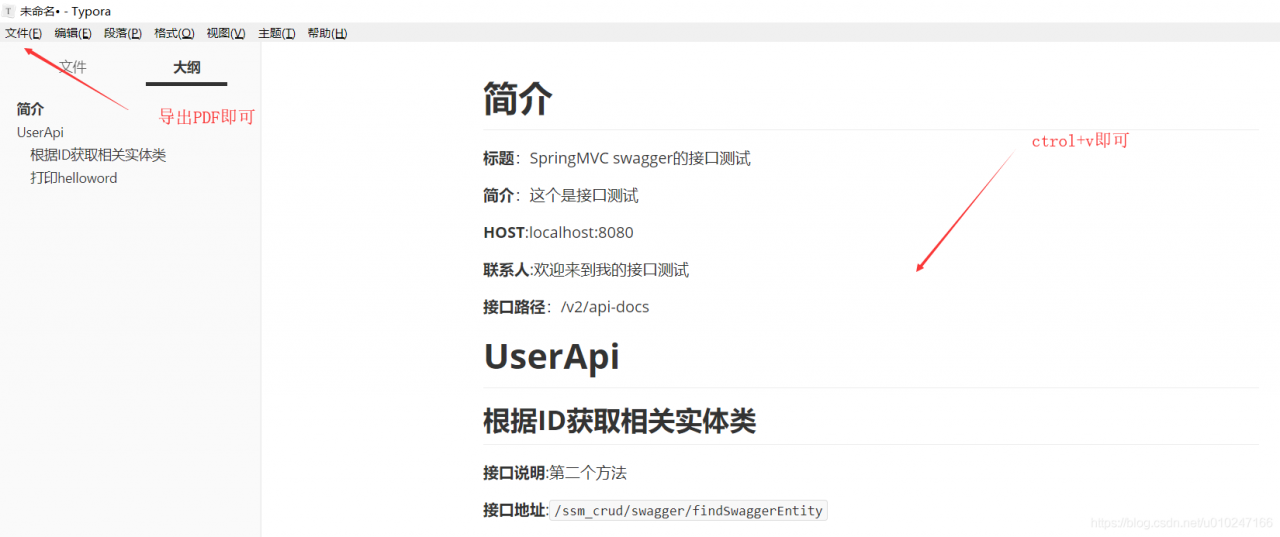
3.导出后,打开即可查看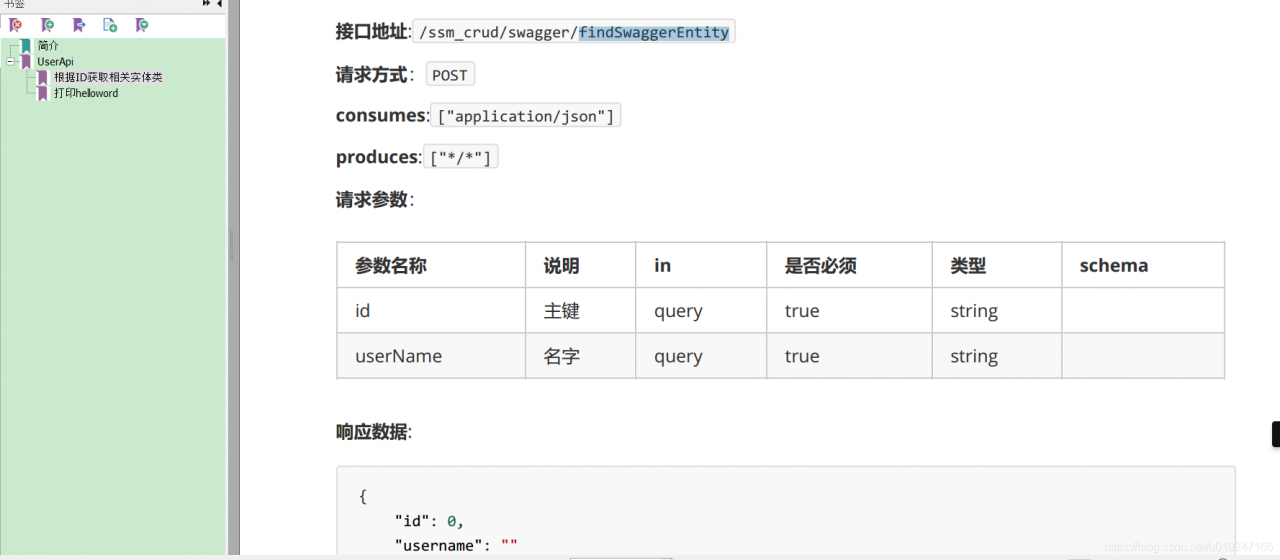
参考:
Swagger使用指南 - 不能传递参数
swagger2的常用注解,传递参数的注意使用方法
spring mvc 集成 swagger 详细实践
Swagger与SpringMVC项目整合
swagger2 导出离线Word/PDF/HTML文档
Swagger2在线文档
swagger-bootstrap-ui官网
swagger-spring
swagger+springmvc接口在线文档完美整合
Swagger离线接口文档生成总结
配置 Swagger2 接口文档引擎
版权声明:本文为u010247166原创文章,遵循CC 4.0 BY-SA版权协议,转载请附上原文出处链接和本声明。