由于es服务启动之后,访问界面比较丑陋,为了更好的查看索引库当中的信息,我们可以通过安装elasticsearch-head这个插件来实现,这个插件可以更方便快捷的看到es的管理界面
1 、node01机器安装nodejs
Node.js是一个基于 Chrome V8 引擎的 JavaScript 运行环境。
Node.js是一个Javascript运行环境(runtime environment),发布于2009年5月,由Ryan Dahl开发,实质是对Chrome V8引擎进行了封装。Node.js 不是一个 JavaScript 框架,不同于CakePHP、Django、Rails。Node.js 更不是浏览器端的库,不能与 jQuery、ExtJS 相提并论。Node.js 是一个让 JavaScript 运行在服务端的开发平台,它让 JavaScript 成为与PHP、Python、Perl、Ruby 等服务端语言平起平坐的脚本语言。
安装步骤参考:https://blog.csdn.net/beishanyingluo/article/details/106416431
2 、node01机器安装elasticsearch-head插件
elasticsearch-head这个插件是es提供的一个用于图形化界面查看的一个插件工具,可以安装上这个插件之后,通过这个插件来实现我们通过浏览器查看es当中的数据
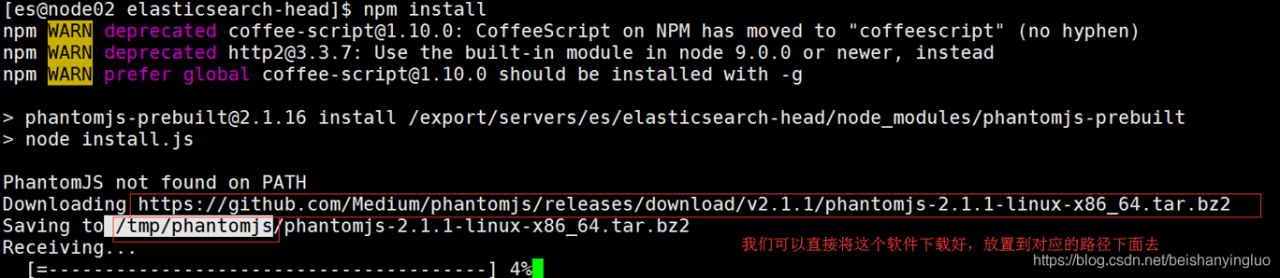
安装elasticsearch-head这个插件这里提供两种方式进行安装,第一种方式就是自己下载源码包进行编译,耗时比较长,网络较差的情况下,基本上不可能安装成功
第二种方式就是直接使用我已经编译好的安装包,进行修改配置即可
2.1、第一种方式:在线安装elasticsearch-head插件(网速慢,不推荐)
这里选择node01进行安装
第一步:在线安装必须依赖包
# 初始化目录
cd /export/servers/es
# 安装GCC
sudo yum install -y gcc-c++ make git
第二步:从git上面克隆编译包并进行安装
cd /export/servers/es
git clone https://github.com/mobz/elasticsearch-head.git
# 进入安装目录
cd /export/servers/es/elasticsearch-head
# intall 才会有 node-modules
npm install
以下进度信息
npm WARN notice [SECURITY] lodash has the following vulnerability: 1 low. Go here for more details:
npm WARN notice [SECURITY] debug has the following vulnerability: 1 low. Go here for more details: https://nodesecurity.io/advisories?search=debug&version=0.7.4 - Run `npm i npm@latest -g` to upgrade your npm version, and then `npm audit` to get more info.
npm ERR! Unexpected end of input at 1:2096
npm ERR! 7c1a1bc21c976bb49f3ea","tarball":"https://registry.npmjs.org/safer-bu
npm ERR!                                                                      ^
npm ERR! A complete log of this run can be found in:
npm ERR!     /home/es/.npm/_logs/2018-11-27T14_35_39_453Z-debug.log
以上错误可以不用管。
第三步、node01机器修改Gruntfile.js
第一台机器修改Gruntfile.js这个文件
cd /export/servers/es/elasticsearch-head
vim Gruntfile.js
找到以下代码:
添加一行: hostname: ‘192.168.77.100’,
connect: {
    server: {
          options: {
                 hostname: '192.168.77.100',
                 port: 9100,
                 base: '.',
                 keepalive: travelue
            }
    }
 }
第四步、node01机器修改app.js
第一台机器修改app.js
cd /export/servers/es/elasticsearch-head/_site
vim app.js
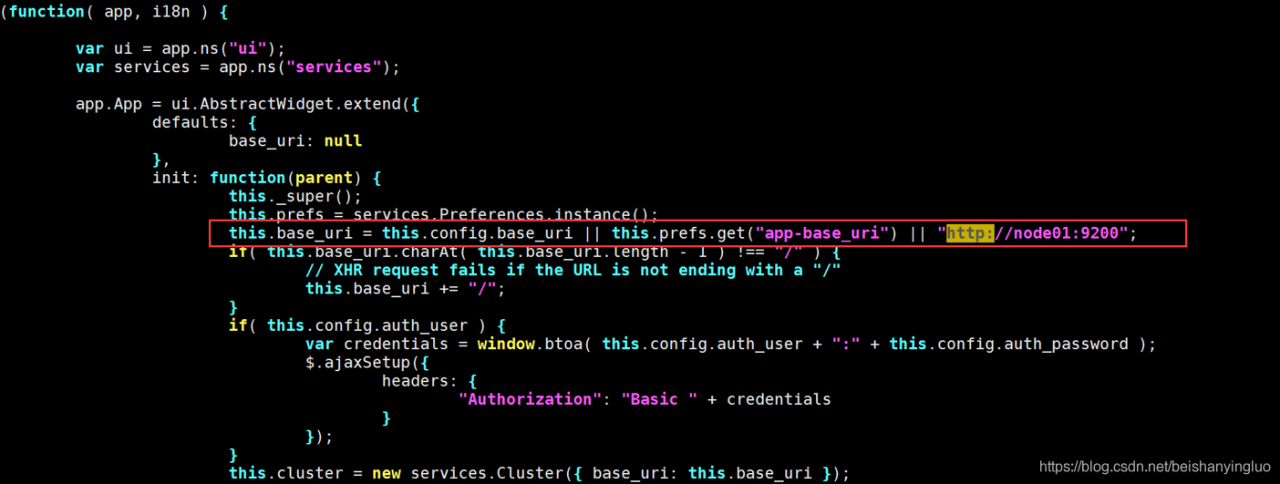
更改前:http://localhost:9200
更改后:http://node01:9200
2.2、第二种方式:直接使用提供的编译之后的源码包解压之后修改配置文件即可(强烈推荐)
第一步:上传压缩包到/home/es路径下去
资源:
链接:https://pan.baidu.com/s/1S0a3D6jSUW88sLpMcB7p3w
提取码:cxld
第二步:解压安装包
node01执行以下命令解压安装包
cd /home/es/
tar -zxvf elasticsearch-head-compile-after.tar.gz -C /export/servers/es/
第三步、node01机器修改Gruntfile.js
修改Gruntfile.js这个文件
cd /export/servers/es/elasticsearch-head
vim Gruntfile.js
找到以下代码:
添加一行: hostname: ‘192.168.77.100’,
connect: {
        server: {
              options: {
                     hostname: '192.168.77.100',
                     port: 9100,
                     base: '.',
                     keepalive: true
                }
        }
}
第四步、node01机器修改app.js
第一台机器修改app.js
cd /export/servers/es/elasticsearch-head/_site
vim app.js
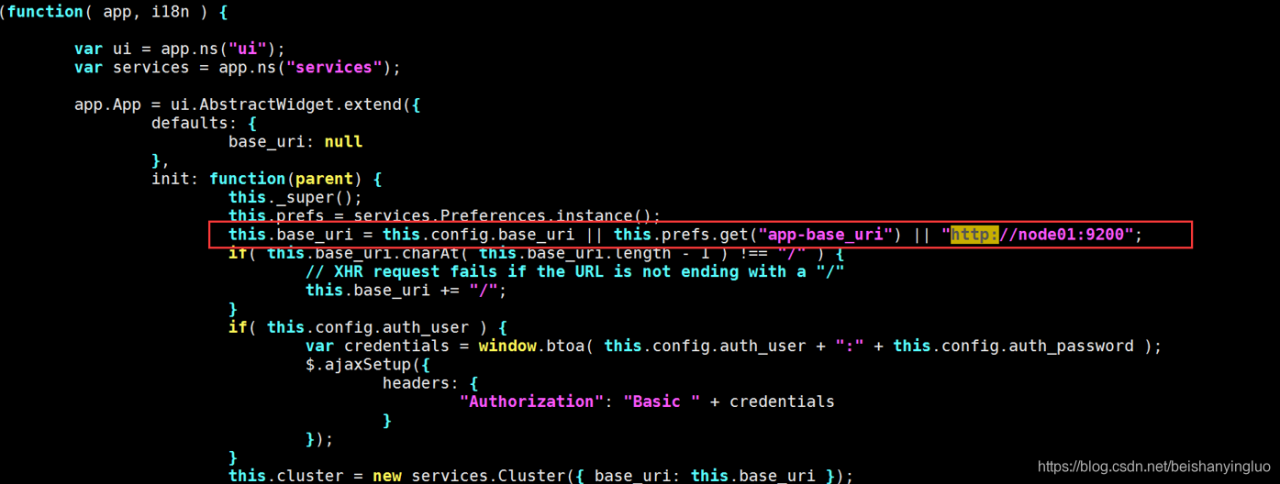
更改前:http://localhost:9200
更改后:http://node01:9200
3、node01机器启动head服务
node01启动elasticsearch-head插件
cd /export/servers/es/elasticsearch-head/node_modules/grunt/bin/
进程前台启动命令
./grunt server
进程后台启动命令
nohup ./grunt server >/dev/null 2>&1 &
Running "connect:server" (connect) task
Waiting forever...
Started connect web server on http://192.168.77.100:9100
如何停止:elasticsearch-head进程
执行以下命令找到elasticsearch-head的插件进程,然后使用kill -9 杀死进程即可
netstat -nltp | grep 9100
kill -9 8328
4、访问elasticsearch-head界面
打开Google Chrome访问
http://192.168.77.100:9100/