场景:
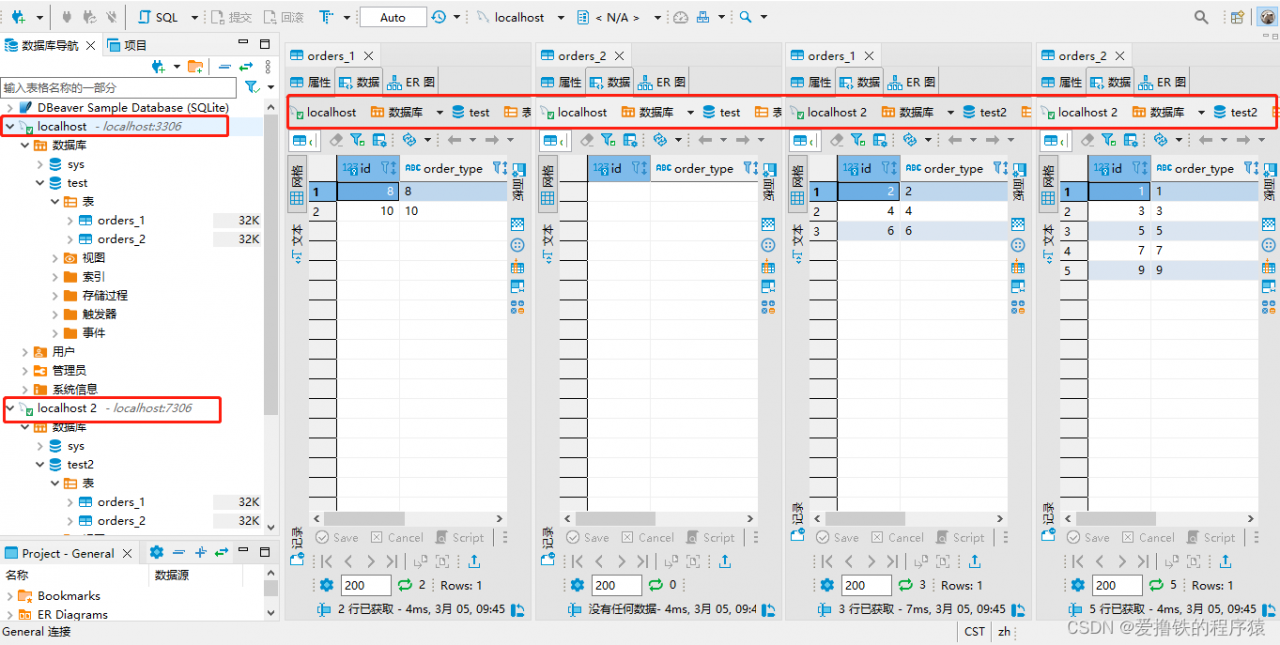
1.我本地有localhost:3306,localhost:7306两个mysql服务
2.在端口3306中创建test数据库
3.在端口7306中创建test2数据库
4.在两个数据库上创建相同的表orders_1,orders_2
5.按照customer_id的奇偶性来进行分库,然后按照id的奇偶性进行分表
一、创建一个springboot项目,结构如下

二、pom.xml直接粘贴过去(了解一下jar包作用!)
<?xml version="1.0" encoding="UTF-8"?>
<project xmlns="http://maven.apache.org/POM/4.0.0" xmlns:xsi="http://www.w3.org/2001/XMLSchema-instance"
		 xsi:schemaLocation="http://maven.apache.org/POM/4.0.0 https://maven.apache.org/xsd/maven-4.0.0.xsd">
	<modelVersion>4.0.0</modelVersion>
	<parent>
		<groupId>org.springframework.boot</groupId>
		<artifactId>spring-boot-starter-parent</artifactId>
		<version>2.3.2.RELEASE</version>
		<relativePath/> <!-- lookup parent from repository -->
	</parent>
	<groupId>com.example</groupId>
	<artifactId>shardingsphere_demo</artifactId>
	<version>0.0.1-SNAPSHOT</version>
	<name>shardingsphere_demo</name>
	<description>Demo project for Spring Boot</description>

	<properties>
		<java.version>1.8</java.version>
	</properties>

	<dependencies>
	    <!--提供了数据源配置、事务管理、数据访问等等功能-->
		<dependency>
			<groupId>org.springframework.boot</groupId>
			<artifactId>spring-boot-starter-jdbc</artifactId>
		</dependency>

		<!--1.自动发现存在的DataSource-->
		<!--2.利用SqlSessionFactoryBean创建并注册SqlSessionFactory-->
		<!--3.创建并注册SqlSessionTemplate-->
		<!--4.自动扫描Mappers,并注册到Spring上下文环境方便程序的注入使用-->
		<dependency>
			<groupId>org.mybatis.spring.boot</groupId>
			<artifactId>mybatis-spring-boot-starter</artifactId>
			<version>2.1.3</version>
		</dependency>

		<!--Druid为监控而生的数据库连接池,它是阿里巴巴开源平台上的一个项目-->
		<dependency>
			<groupId>com.alibaba</groupId>
			<artifactId>druid</artifactId>
			<version>1.1.23</version>
		</dependency>

		<!--核心依赖-sharding-jdbc-->
		<dependency>
			<groupId>org.apache.shardingsphere</groupId>
			<artifactId>sharding-jdbc-spring-boot-starter</artifactId>
			<version>4.1.1</version>
		</dependency>

		<!-- mysql依赖-->
		<dependency>
			<groupId>mysql</groupId>
			<artifactId>mysql-connector-java</artifactId>
			<scope>runtime</scope>
		</dependency>

		<!-- 测试依赖-->
		<dependency>
			<groupId>org.springframework.boot</groupId>
			<artifactId>spring-boot-starter-test</artifactId>
			<scope>test</scope>
			<exclusions>
				<exclusion>
					<groupId>org.junit.vintage</groupId>
					<artifactId>junit-vintage-engine</artifactId>
				</exclusion>
			</exclusions>
		</dependency>
	</dependencies>

	<build>
		<plugins>
			<!-- 打包插件-->
			<plugin>
				<groupId>org.springframework.boot</groupId>
				<artifactId>spring-boot-maven-plugin</artifactId>
			</plugin>

			<!--maven里执行测试用例的插件-->
			<plugin>
				<groupId>org.apache.maven.plugins</groupId>
				<artifactId>maven-surefire-plugin</artifactId>
				<configuration>
					<skipTests>true</skipTests>
				</configuration>
			</plugin>
		</plugins>
	</build>

</project>
三、创建实体类
package com.example.demo.test.entity;

public class Orders {
    private Integer id;
    private Integer orderType;
    private Integer customerId;
    private Double amount;

    public Integer getId() {
        return id;
    }

    public void setId(Integer id) {
        this.id = id;
    }

    public Integer getOrderType() {
        return orderType;
    }

    public void setOrderType(Integer orderType) {
        this.orderType = orderType;
    }

    public Integer getCustomerId() {
        return customerId;
    }

    public void setCustomerId(Integer customerId) {
        this.customerId = customerId;
    }

    public Double getAmount() {
        return amount;
    }

    public void setAmount(Double amount) {
        this.amount = amount;
    }
}
四、创建mapper类
package com.example.demo.test.mapper;

import com.example.demo.test.entity.Orders;
import org.apache.ibatis.annotations.*;
import org.springframework.stereotype.Repository;

@Repository
@Mapper
public interface OrdersMapper {

    @Insert("insert into orders(id,order_type,customer_id,amount) values(#{id},#{orderType},#{customerId},#{amount})")
    public void insert(Orders orders);

    @Select("select * from orders where id = #{id}")
    @Results({
            @Result(property = "id",column = "id"),
            @Result(property = "orderType",column = "order_type"),
            @Result(property = "customerId",column = "customer_id"),
            @Result(property = "amount",column = "amount")
    })
    public Orders selectOne(Integer id);

    @Select("select * from orders where id = #{id} and customer_id=#{customerId}")
    @Results({
            @Result(property = "id",column = "id"),
            @Result(property = "orderType",column = "order_type"),
            @Result(property = "customerId",column = "customer_id"),
            @Result(property = "amount",column = "amount")
    })
    public Orders selectOneDB(Orders orders);

}
四、修改application.properties配置文件(主要关注一下!)
#mybatis.type-aliases-package来指定POJO扫描包来让mybatis自动扫描到自定义的POJO
mybatis.type-aliases-package=com.example.demo.test

#配置数据源
spring.shardingsphere.datasource.names=ds1,ds2
#配置第一个数据源
spring.shardingsphere.datasource.ds1.type=com.alibaba.druid.pool.DruidDataSource
spring.shardingsphere.datasource.ds1.driver-class-name=com.mysql.jdbc.Driver
spring.shardingsphere.datasource.ds1.url=jdbc:mysql://localhost:3306/test?serverTimezone=UTC
spring.shardingsphere.datasource.ds1.username=root
spring.shardingsphere.datasource.ds1.password=123456

#配置第二个数据源
spring.shardingsphere.datasource.ds2.type=com.alibaba.druid.pool.DruidDataSource
spring.shardingsphere.datasource.ds2.driver-class-name=com.mysql.jdbc.Driver
spring.shardingsphere.datasource.ds2.url=jdbc:mysql://localhost:7306/test2?serverTimezone=UTC
spring.shardingsphere.datasource.ds2.username=root
spring.shardingsphere.datasource.ds2.password=123456

#指定数据库的分布情况
spring.shardingsphere.sharding.tables.orders.actual-data-nodes=ds$->{1..2}.orders_$->{1..2}

#指定orders表的主键生成策略
spring.shardingsphere.sharding.tables.orders.key-generator.column=id
spring.shardingsphere.sharding.tables.orders.key-generator.type=SNOWFLAKE

#指定表分片策略,根据id的奇偶性来添加到不同的表中
spring.shardingsphere.sharding.tables.orders.table-strategy.inline.sharding-column=id
spring.shardingsphere.sharding.tables.orders.table-strategy.inline.algorithm-expression=orders_$->{id%2+1}

#指定库分片策略,根据customer_id的奇偶性来添加到不同的库中
spring.shardingsphere.sharding.tables.orders.database-strategy.inline.sharding-column=customer_id
spring.shardingsphere.sharding.tables.orders.database-strategy.inline.algorithm-expression=ds$->{customer_id%2+1}

#显示sql
spring.shardingsphere.props.sql.show=true
五、创建测试类
package com.example.demo.test;

import com.example.demo.test.entity.Orders;
import com.example.demo.test.entity.User;
import com.example.demo.test.mapper.OrdersMapper;
import com.example.demo.test.mapper.UserMapper;
import org.junit.jupiter.api.Test;
import org.springframework.beans.factory.annotation.Autowired;
import org.springframework.boot.test.context.SpringBootTest;

@SpringBootTest
class ShardingsphereDemoApplicationTests {

    @Autowired
    private OrdersMapper ordersMapper;

    @Test
    public void addOrdersDB(){
        for (int i = 1; i <=10 ; i++) {
            Orders orders = new Orders();
            orders.setId(i);
            orders.setCustomerId(new Random().nextInt(10));
            orders.setOrderType(i);
            orders.setAmount(1000.0*i);
            ordersMapper.insert(orders);
        }
    }

    @Test
    public void queryOrdersDB(){
        Orders orders = new Orders();
        orders.setCustomerId(7);
        orders.setId(7);
        Orders o = ordersMapper.selectOneDB(orders);
        System.out.println(o);
    }

}
七、测试
分别执行addOrdersDB()方法和queryOrdersDB()方法
版权声明:本文为weixin_45452416原创文章,遵循CC 4.0 BY-SA版权协议,转载请附上原文出处链接和本声明。