阿里云短信服务
简单说明
之前使用过阿里的阿里大于这个短信代发服务,今天使用的是阿里云最新的一个短信代发服务,文档真的有点不详细,加上网上的博客也太少了,几经蹉跎还是把它给搓出来了,供大家学习
阿里云短信
首先没用过的玩家需要去阿里云注册账户,然后开启两个私钥,这两个密钥是我们的必需品

然后去申请签名和模版,这个也是我们的必需品
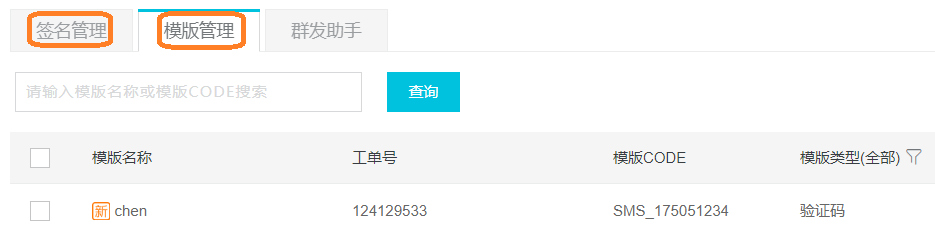
现在不怎么好申请了,建议申请理由都写成个人项目测试啥的,过不了就多申请几次,我申了三次才ojbk!
上面两个环境已经装备好了的你,怎么可以吃霸王餐呢?当然是充钱进去呀,找到充值入口,随便充点钱进去 (一块钱其实就可以了!哭)
官方文档阅读
官方提供了文档说明、ApiDemo、入参出参说明,这个还是比较详细的,但你以为你就能跑起来的话,我信你个鬼哦!

唯一需要注意的地方就是上图中我圈出来的这个地方,它的值是我们发送验证码的值,是一个Json格式 :{"code":"值"}
至于入参和出参可以参考官方文档,很多Api都变化了,其实我也记不起以前的api了,哈哈哈哈.....
Java工程
创建一个SpringBoot工程,按部就班。
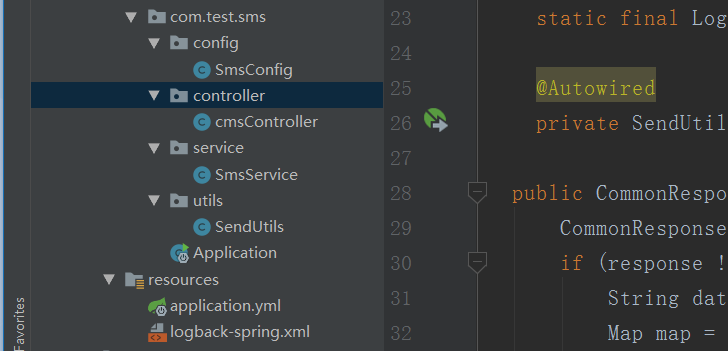
最终的项目目录结构为:
pom.xml
   <dependencies>
        <!--@ConfigurationProperties 注解所需,不给报错-->
        <dependency>
            <groupId> org.springframework.boot </groupId>
            <artifactId> spring-boot-configuration-processor </artifactId>
            <optional> true </optional>
        </dependency>
        <dependency>
            <groupId>org.springframework.boot</groupId>
            <artifactId>spring-boot-starter-web</artifactId>
            <version>2.1.6.RELEASE</version>
        </dependency>
        <dependency>
            <groupId>org.projectlombok</groupId>
            <artifactId>lombok</artifactId>
        </dependency>
        <!--阿里短信官网提供的依赖-->
        <dependency>
            <groupId>com.aliyun</groupId>
            <artifactId>aliyun-java-sdk-core</artifactId>
            <version>4.0.3</version>
        </dependency>
        <!--MQ的依赖,本列子不是用MQ-->
        <dependency>
            <groupId>org.springframework.boot</groupId>
            <artifactId>spring-boot-starter-amqp</artifactId>
        </dependency>
        <!--Json转换工具类-->
        <dependency>
            <groupId>com.alibaba</groupId>
            <artifactId>fastjson</artifactId>
            <version>1.2.30</version>
        </dependency>
    </dependencies>
日志的配置文件,这就不放了,SpringBoot的配置文件为application.yml
server:
  port: 8888
spring:
  application:
    name: sms_test
ccl:
  sms:
    accessKeyId: LTAI4Fh****X41J5UxcrBA7A            # accessKeyId 子账号要进行授权才能生效
    accessKeySecret: qnF****mF4aM4f2aNoCOzLxkzyNRP8  # AccessKeySecret
    signName: 个人博客                  # 签名名称
    verifyCodeTemplate: SMS_175051234  # 模板编号
logging.level.org.springframework.boot.autoconfigure: ERROR
配置类
package com.test.sms.config;
import lombok.Data;
import org.springframework.boot.context.properties.ConfigurationProperties;
import org.springframework.stereotype.Component;
/**
* @Author Ninja650Plus@163.com
* @Description //装载配置文件的属性类
* @Date 2019/10/7
* @Param
* @return
**/
@Data
@Component
@ConfigurationProperties(prefix = "ccl.sms")
public class SmsConfig {
String accessKeyId;
String accessKeySecret;
String signName;
String verifyCodeTemplate;
}被封装的阿里云短信接口
package com.test.sms.utils; import com.aliyuncs.CommonRequest; import com.aliyuncs.CommonResponse; import com.aliyuncs.DefaultAcsClient; import com.aliyuncs.IAcsClient; import com.aliyuncs.exceptions.ClientException; import com.aliyuncs.exceptions.ServerException; import com.aliyuncs.http.MethodType; import com.aliyuncs.profile.DefaultProfile; import com.test.sms.config.SmsConfig; import org.springframework.beans.factory.annotation.Autowired; import org.springframework.boot.context.properties.EnableConfigurationProperties; import org.springframework.stereotype.Component; /** * @Author Ninja650Plus@163.com * @Description 封装阿里提供的短信发送接口 * @Date 2019/10/7 * @Param * @return **/ @Component @EnableConfigurationProperties(SmsConfig.class) public class SendUtils { @Autowired private SmsConfig smsConfig; //发送短信的方法 public CommonResponse send(String phone,String code)throws ClientException { //可自助调整超时时间 System.setProperty("sun.net.client.defaultConnectTimeout", "10000"); System.setProperty("sun.net.client.defaultReadTimeout", "10000"); DefaultProfile profile = DefaultProfile.getProfile("default",smsConfig.getAccessKeyId() , smsConfig.getAccessKeySecret()); IAcsClient client = new DefaultAcsClient(profile); //封装请求对象 CommonRequest request = new CommonRequest(); request.setDomain("dysmsapi.aliyuncs.com"); request.setAction("SendSms"); request.setVersion("2017-05-25"); request.setMethod(MethodType.POST); //确定发送的电话号码和 验证码 request.putQueryParameter("PhoneNumbers", phone); //这里也得注意,对应的值是Json格式的字符串,不然就是一杯茶一根烟,一个bug玩一天 request.putQueryParameter("TemplateParam", "{\"code\":\"" + code + "\"}"); //确定是的模版和签名 request.putQueryParameter("SignName", smsConfig.getSignName()); request.putQueryParameter("TemplateCode", smsConfig.getVerifyCodeTemplate()); //发起调用 try { CommonResponse response = client.getCommonResponse(request); return response; } catch (ServerException e) { e.printStackTrace(); } catch (ClientException e) { e.printStackTrace(); } return null; } }
service
package com.test.sms.service;
import com.alibaba.fastjson.JSON;
import com.aliyuncs.CommonResponse;
import com.aliyuncs.exceptions.ClientException;
import com.test.sms.utils.SendUtils;
import org.slf4j.Logger;
import org.slf4j.LoggerFactory;
import org.springframework.beans.factory.annotation.Autowired;
import org.springframework.stereotype.Service;
import java.util.Map;
@Service
public class SmsService {
static final Logger LOGGER = LoggerFactory.getLogger(SendUtils.class);
@Autowired
private SendUtils sendUtils;
public CommonResponse send(String phone,String code) throws ClientException {
CommonResponse response = sendUtils.send(phone,code);
if (response != null && response.getHttpStatus() == 200){
String data = response.getData();
Map map = JSON.parseObject(data, Map.class);
LOGGER.info("短信发送状态:{}" + phone + "=====" + code + "=====" + map.get("Message"));
}
//以下为Api的测试代码,不做理会即可
boolean success = response.getHttpResponse().isSuccess(); //true
int status = response.getHttpResponse().getStatus(); //200
int httpStatus = response.getHttpStatus(); //200
return response;
}
}SpringMVC
package com.test.sms.controller;
import com.aliyuncs.CommonResponse;
import com.aliyuncs.exceptions.ClientException;
import com.test.sms.service.SmsService;
import org.springframework.beans.factory.annotation.Autowired;
import org.springframework.web.bind.annotation.GetMapping;
import org.springframework.web.bind.annotation.PathVariable;
import org.springframework.web.bind.annotation.RequestMapping;
import org.springframework.web.bind.annotation.RestController;
import java.util.Random;
/**
* @Author Ninja650Plus@163.com
* @Description
* @Date 20:09 2019/10/7
* @Param
* @return
**/
@RestController
@RequestMapping("/sms")
public class cmsController {
@Autowired
private SmsService smsService;
@GetMapping("/send/{number}")
public CommonResponse cmsSend(@PathVariable String number) throws ClientException {
//随机产生6位验证码
StringBuffer code = new StringBuffer();
Random random = new Random();
for (int i = 0; i<6; i++){
int j = random.nextInt(10);
code.append(j);
}
return smsService.send(number,code.toString());
}
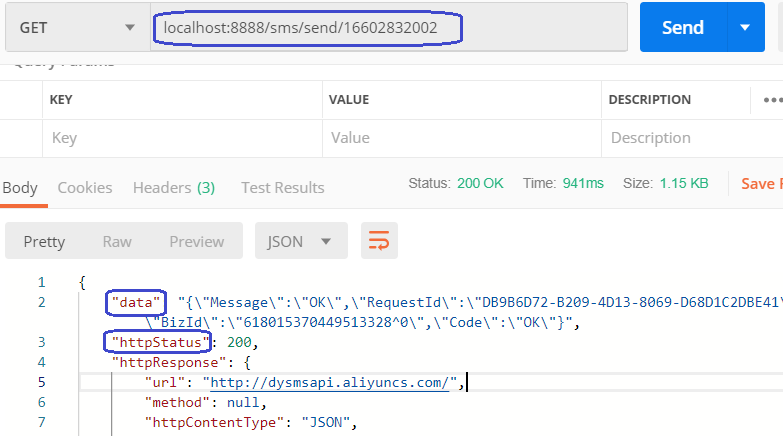
}postman启动
更多的数据我们就不看,我们看一下关键部位响应结果即可:
版权声明:本文为ZLNEWCSDN原创文章,遵循CC 4.0 BY-SA版权协议,转载请附上原文出处链接和本声明。