安装Tekton客户端
$ curl -LO https://github.com/tektoncd/cli/releases/download/v0.8.0/tkn_0.8.0_Linux_x86_64.tar.gz
$ tar -xvf tkn_0.8.0_Linux_x86_64.tar.gz
$ sudo mv tkn /usr/bin/
通过命令安装OpenShift Pipelines Operator
- 用户管理员登录查看operatorhub中的openshift-pipelines-operator
$ oc describe packagemanifest openshift-pipelines-operator -n openshift-marketplace
- 安装OpenShift Pipelines Operator。
$ oc apply -f https://raw.githubusercontent.com/liuxiaoyu-git/learn-katacoda/master/middleware/pipelines/assets/operator/subscription.yaml
- 查看安装后查看和Tekton相关API。
$ oc api-resources --api-group=tekton.dev
NAME                SHORTNAMES   APIVERSION            NAMESPACED   KIND
clustertasks                     tekton.dev/v1beta1    false        ClusterTask
conditions                       tekton.dev/v1alpha1   true         Condition
pipelineresources                tekton.dev/v1alpha1   true         PipelineResource
pipelineruns        pr,prs       tekton.dev/v1beta1    true         PipelineRun
pipelines                        tekton.dev/v1beta1    true         Pipeline
runs                             tekton.dev/v1alpha1   true         Run
taskruns            tr,trs       tekton.dev/v1beta1    true         TaskRun
tasks                            tekton.dev/v1beta1    true         Task
- 安装OpenShift Pipelines Operator后会自动创建openshift-pipelines项目,并在其中运行了以下Pod。
$ oc get pod -n openshift-pipelines
NAME                                                 READY   STATUS    RESTARTS   AGE
tekton-operator-proxy-webhook-74c67475b5-2lrvm       1/1     Running   0          3h28m
tekton-pipelines-controller-699584c8bb-55g5b         1/1     Running   0          3h28m
tekton-pipelines-webhook-778b4f449f-lbgr5            1/1     Running   0          3h28m
tekton-triggers-controller-6dc4b6f84f-mfrfj          1/1     Running   0          3h28m
tekton-triggers-core-interceptors-6998dd6966-zwmv9   1/1     Running   0          3h28m
tekton-triggers-webhook-7b7f69d6f5-8cgpl             1/1     Running   0          3h28m
- 查看当前用户已经有以下创建资源的权限。
$ oc auth can-i create pipeline.tekton.dev
$ oc auth can-i create Pipeline
$ oc auth can-i create Task
$ oc auth can-i create PipelineResource
$ oc auth can-i create PipelineRun
创建并运行Tekton Pipeline
- 创建一个lab-tekton项目。
$ oc new-project lab-tekton
- 当安装OpenShift Pipelines Operator后,它会自动为项目创建一个名为pipeline 的ServiceAccount,以拥有build和push镜像的权限。执行命令,验证是否有名为pipeline的ServiceAccount。
$ oc get serviceaccount pipeline -n lab-tekton
NAME       SECRETS   AGE
pipeline   2         4m11s
- 查看集群中已有的CusterTask对象。
$ oc get clustertask
NAME                       AGE
buildah                    3h34m
buildah-1-5-0              3h34m
git-cli                    3h34m
git-clone                  3h34m
git-clone-1-5-0            3h34m
helm-upgrade-from-repo     3h34m
helm-upgrade-from-source   3h34m
jib-maven                  3h34m
kn                         3h34m
kn-1-5-0                   3h34m
kn-apply                   3h34m
kn-apply-1-5-0             3h34m
kubeconfig-creator         3h34m
maven                      3h34m
openshift-client           3h34m
openshift-client-1-5-0     3h34m
pull-request               3h34m
s2i-dotnet                 3h34m
s2i-dotnet-1-5-0           3h34m
s2i-go                     3h34m
s2i-go-1-5-0               3h34m
s2i-java                   3h34m
s2i-java-1-5-0             3h34m
s2i-nodejs                 3h34m
s2i-nodejs-1-5-0           3h34m
s2i-perl                   3h34m
s2i-perl-1-5-0             3h34m
s2i-php                    3h34m
s2i-php-1-5-0              3h34m
s2i-python                 3h34m
s2i-python-1-5-0           3h34m
s2i-ruby                   3h34m
s2i-ruby-1-5-0             3h34m
skopeo-copy                3h34m
skopeo-copy-1-5-0          3h34m
tkn                        3h34m
tkn-1-5-0                  3h34m
trigger-jenkins-job        3h34m
- 部署应用依赖的mongodb。
$ oc new-app centos/mongodb-36-centos7 -e MONGODB_USER=admin MONGODB_DATABASE=mongodb MONGODB_PASSWORD=secret MONGODB_ADMIN_PASSWORD=super-secret -n lab-tekton
- 创建应用所需的资源。
$ oc create -f https://raw.githubusercontent.com/liuxiaoyu-git/learn-katacoda/master/middleware/pipelines/assets/sampleapp/sampleapp.yaml -n lab-tekton
$ oc set env dc/nodejs-ex MONGO_URL="mongodb://admin:secret@mongodb-36-centos7:27017/mongodb"
- 查看应用相关service。
$ oc get services -n lab-tekton
NAME                 TYPE        CLUSTER-IP      EXTERNAL-IP   PORT(S)                      AGE
mongodb-36-centos7   ClusterIP   172.30.227.96   <none>        27017/TCP                    32s
nodejs-ex            ClusterIP   172.30.18.167   <none>        8080/TCP,8443/TCP,8778/TCP   6m54s
- 当前应用状态

- 创建s2i-nodejs的Task
$ oc create -f https://raw.githubusercontent.com/liuxiaoyu-git/learn-katacoda/master/middleware/pipelines/assets/tektontasks/s2i-nodejs-task.yaml -n lab-tekton
- 创建openshift-client的Task
$ oc create -f https://raw.githubusercontent.com/liuxiaoyu-git/learn-katacoda/master/middleware/pipelines/assets/tektontasks/openshift-client-task.yaml -n lab-tekton
- 查看tekton的task列表
$ tkn task ls -n lab-tekton
NAME               AGE
openshift-client   35 seconds ago
s2i-nodejs         1 minute ago
- 创建deploy-pipeline的Pipeline
$ oc create -f https://raw.githubusercontent.com/liuxiaoyu-git/learn-katacoda/master/middleware/pipelines/assets/pipeline/deploy-pipeline.yaml -n lab-tekton
- 查看pipeline列表
$ tkn pipeline ls -n lab-tekton
NAME              AGE             LAST RUN   STARTED   DURATION   STATUS
deploy-pipeline   9 seconds ago   ---        ---       ---        ---
- 在OpenShift控制台查看pipeline使用的相关Resources,其中deploy-pipeline会使用到Git和Image资源。
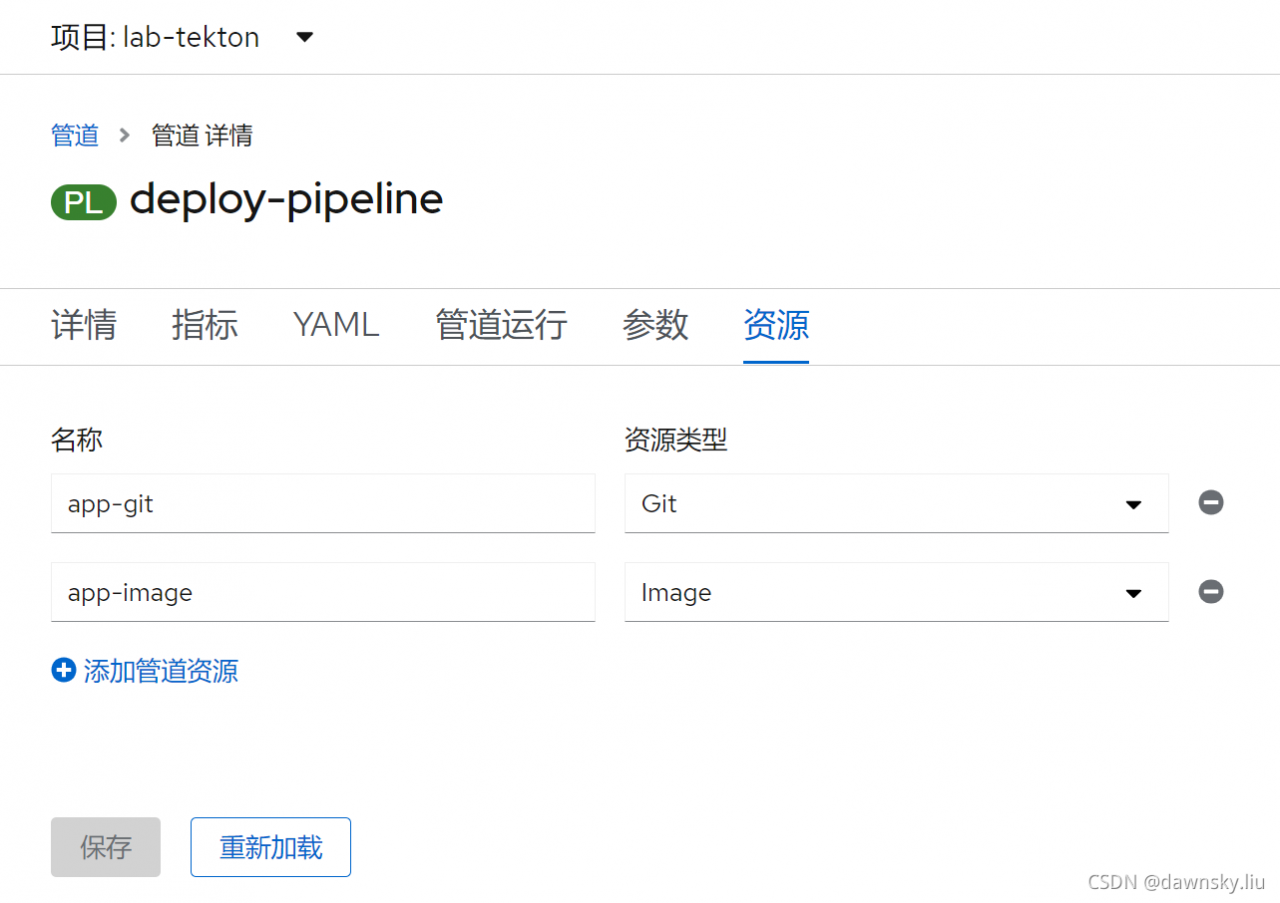
- 创建Pipeline用到的Git类Resource和Image类Resource。
$ oc create -f https://raw.githubusercontent.com/liuxiaoyu-git/learn-katacoda/master/middleware/pipelines/assets/resources/git-pipeline-resource.yaml -n lab-tekton
$ oc create -f https://raw.githubusercontent.com/liuxiaoyu-git/learn-katacoda/master/middleware/pipelines/assets/resources/image-pipeline-resource.yaml -n lab-tekton
- 查看Resource列表。
$ tkn resource ls -n lab-tekton
NAME              TYPE    DETAILS
nodejs-ex-git     git     url: https://github.com/sclorg/nodejs-ex
nodejs-ex-image   image   url: image-registry.openshift-image-registry.svc:5000/lab-tekton/nodejs-ex:latest
- 启动deploy-pipeline运行。
$ tkn pipeline start deploy-pipeline -r app-git=nodejs-ex-git -r app-image=nodejs-ex-image -s pipeline
Pipelinerun started: deploy-pipeline-run-hxvpn

In order to track the pipelinerun progress run:
tkn pipelinerun logs deploy-pipeline-run-jxr26 -f -n lab-tekton
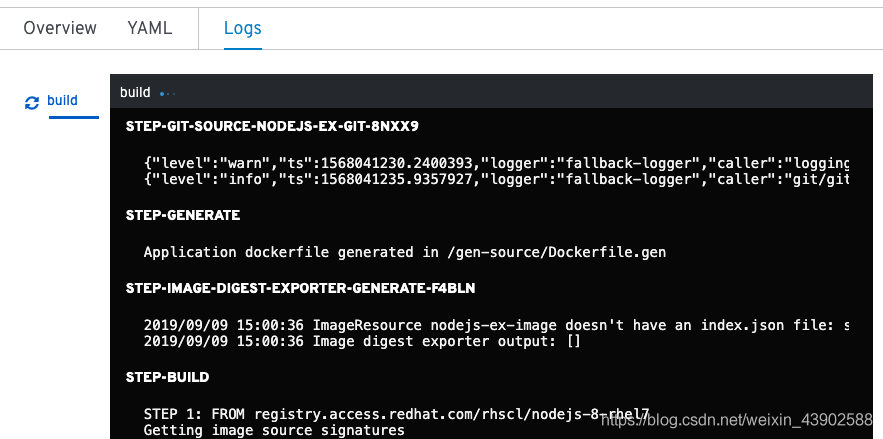
- 通过PipelineRun查看已有的Pipeline运行状态,然后通过名称查看其日志。
$ tkn pipelinerun list -n lab-tekton
NAME                        STARTED        DURATION   STATUS
deploy-pipeline-run-jxr26   1 minute ago   ---        Running

$ tkn pipeline logs -f -L -n lab-tekton
Showing logs...
[build : create-dir-image-jmt46]
...
[build : generate]
...
[build : build]
...
[build : push]
...
[deploy : oc] deploymentconfig.apps.openshift.io/nodejs-ex rolled out
- 在OpenShift控制台中查看名为deploy-pipeline的Pipeline的日志。
- 最后完成后查看PipelineRun的执行状态为Succeeded。
$ tkn pipelinerun ls
NAME                        STARTED         DURATION    STATUS
deploy-pipeline-run-vw9vd   9 minutes ago   7 minutes   Succeeded
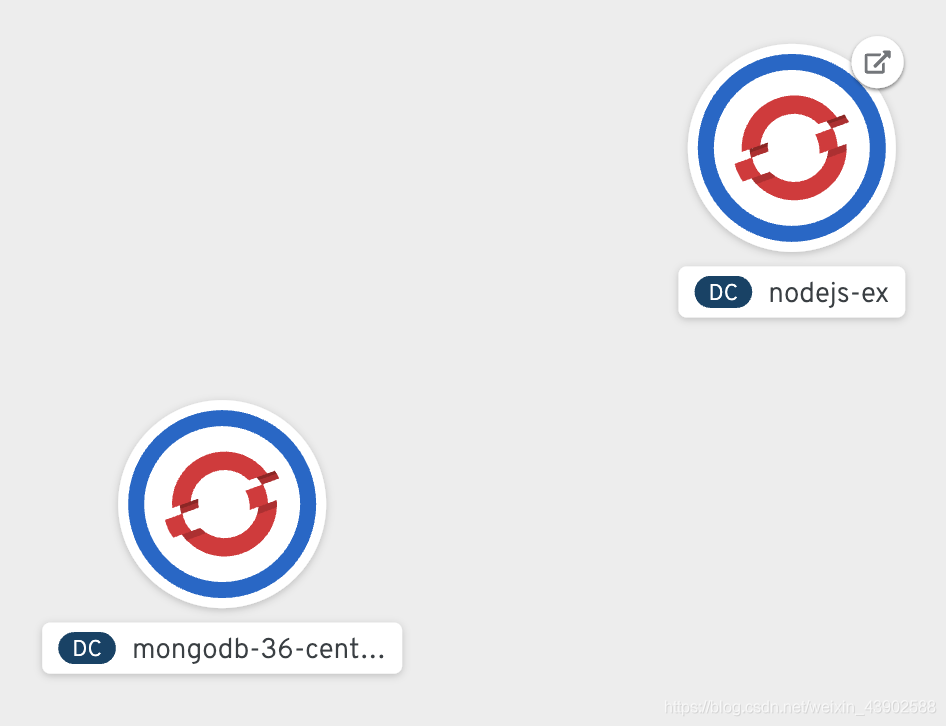
- 在Pipeline完成运行后,可以在OpenShift控制台的Developer视图的Toploy中看到nodejs-ex应用是可以通过Route访问的状态了。
版权声明:本文为weixin_43902588原创文章,遵循CC 4.0 BY-SA版权协议,转载请附上原文出处链接和本声明。