python入门测试教程
This tutorial is for anyone who has written a fantastic application in Python but hasn’t yet written any tests.
本教程适用于使用Python编写了出色的应用程序但尚未编写任何测试的任何人。
Testing in Python is a huge topic and can come with a lot of complexity, but it doesn’t need to be hard. You can get started creating simple tests for your application in a few easy steps and then build on it from there.
使用Python进行测试是一个巨大的话题,并且可能会带来很多复杂性,但是并不需要很困难。 您可以通过几个简单的步骤开始为您的应用程序创建简单的测试,然后从那里开始进行构建。
In this tutorial, you’ll learn how to create a basic test, execute it, and find the bugs before your users do! You’ll learn about the tools available to write and execute tests, check your application’s performance, and even look for security issues.
在本教程中,您将学习如何创建基本测试,执行测试以及在用户之前查找错误! 您将了解可用于编写和执行测试,检查应用程序性能甚至查找安全问题的工具。
Free Bonus: 5 Thoughts On Python Mastery, a free course for Python developers that shows you the roadmap and the mindset you’ll need to take your Python skills to the next level.
免费奖金: 关于Python精通的5个想法 ,这是针对Python开发人员的免费课程,向您展示了将Python技能提升到新水平所需的路线图和心态。
测试您的代码 (Testing Your Code)
There are many ways to test your code. In this tutorial, you’ll learn the techniques from the most basic steps and work towards advanced methods.
有很多方法可以测试您的代码。 在本教程中,您将从最基本的步骤中学习技术,并朝着高级方法学习。
自动化与手动测试 (Automated vs. Manual Testing)
The good news is, you’ve probably already created a test without realizing it. Remember when you ran your application and used it for the first time? Did you check the features and experiment using them? That’s known as exploratory testing and is a form of manual testing.
好消息是,您可能已经创建了一个测试而没有意识到。 还记得您第一次运行应用程序并使用它吗? 您是否检查了功能并进行了实验? 这称为探索性测试 ,是手动测试的一种形式。
Exploratory testing is a form of testing that is done without a plan. In an exploratory test, you’re just exploring the application.
探索性测试是无计划的测试形式。 在探索性测试中,您只是在探索应用程序。
To have a complete set of manual tests, all you need to do is make a list of all the features your application has, the different types of input it can accept, and the expected results. Now, every time you make a change to your code, you need to go through every single item on that list and check it.
要拥有一套完整的手动测试,您要做的就是列出应用程序具有的所有功能,可以接受的不同输入类型以及预期结果。 现在,每次更改代码时,都需要遍历该列表中的每个项目并进行检查。
That doesn’t sound like much fun, does it?
听起来不那么有趣,不是吗?
This is where automated testing comes in. Automated testing is the execution of your test plan (the parts of your application you want to test, the order in which you want to test them, and the expected responses) by a script instead of a human. Python already comes with a set of tools and libraries to help you create automated tests for your application. We’ll explore those tools and libraries in this tutorial.
这就是自动测试的用处。自动测试是通过脚本而不是人工执行测试计划(您要测试的应用程序部分,要测试它们的顺序以及预期的响应)的执行。 Python已经提供了一组工具和库来帮助您为应用程序创建自动化测试。 在本教程中,我们将探索这些工具和库。
单元测试与集成测试 (Unit Tests vs. Integration Tests)
The world of testing has no shortage of terminology, and now that you know the difference between automated and manual testing, it’s time to go a level deeper.
测试领域不乏术语,现在您已经知道自动测试和手动测试之间的区别,是时候进一步深入探讨了。
Think of how you might test the lights on a car. You would turn on the lights (known as the test step) and go outside the car or ask a friend to check that the lights are on (known as the test assertion). Testing multiple components is known as integration testing.
想想如何测试汽车的灯光。 您将打开灯(称为测试步骤 )并离开车外,或请朋友检查灯是否点亮(称为测试断言 )。 测试多个组件称为集成测试 。
Think of all the things that need to work correctly in order for a simple task to give the right result. These components are like the parts to your application, all of those classes, functions, and modules you’ve written.
考虑所有需要正确工作的事物,以使一个简单的任务获得正确的结果。 这些组件就像您的应用程序,您编写的所有类,函数和模块的组成部分。
A major challenge with integration testing is when an integration test doesn’t give the right result. It’s very hard to diagnose the issue without being able to isolate which part of the system is failing. If the lights didn’t turn on, then maybe the bulbs are broken. Is the battery dead? What about the alternator? Is the car’s computer failing?
集成测试的主要挑战是,集成测试无法给出正确的结果。 如果无法找出系统的哪一部分发生故障,很难诊断出该问题。 如果灯不亮,则可能是灯泡坏了。 电池没电了吗? 交流发电机呢? 汽车的计算机出故障了吗?
If you have a fancy modern car, it will tell you when your light bulbs have gone. It does this using a form of unit test.
如果您有一辆精美的现代汽车,它将在灯泡熄灭时告诉您。 它使用单元测试的形式进行此操作。
A unit test is a smaller test, one that checks that a single component operates in the right way. A unit test helps you to isolate what is broken in your application and fix it faster.
单元测试是一种较小的测试,它检查单个组件是否以正确的方式运行。 单元测试可帮助您隔离应用程序中损坏的内容并更快地对其进行修复。
You have just seen two types of tests:
您刚刚看过两种测试:
- An integration test checks that components in your application operate with each other.
- A unit test checks a small component in your application.
- 集成测试检查应用程序中的组件是否相互配合。
- 单元测试检查应用程序中的一小部分。
You can write both integration tests and unit tests in Python. To write a unit test for the built-in function sum(), you would check the output of sum() against a known output.
您可以使用Python编写集成测试和单元测试。 要为内置函数sum()编写单元测试,您将对照已知输出检查sum()的输出。
For example, here’s how you check that the sum() of the numbers (1, 2, 3) equals 6:
例如,这是检查数字(1, 2, 3) sum()的sum() (1, 2, 3)等于6 :
>>> assert sum([1, 2, 3]) == 6, "Should be 6"
This will not output anything on the REPL because the values are correct.
由于值正确,因此不会在REPL上输出任何内容。
If the result from sum() is incorrect, this will fail with an AssertionError and the message "Should be 6". Try an assertion statement again with the wrong values to see an AssertionError:
如果sum()的结果不正确,将失败并显示AssertionError和消息"Should be 6" 。 再次尝试使用错误的值声明语句,以查看AssertionError :
>>> assert sum([1, 1, 1]) == 6, "Should be 6"
Traceback (most recent call last):
  File "<stdin>", line 1, in <module>
AssertionError: Should be 6
In the REPL, you are seeing the raised AssertionError because the result of sum() does not match 6.
在REPL中,您看到引发的AssertionError因为sum()的结果与6不匹配。
Instead of testing on the REPL, you’ll want to put this into a new Python file called test_sum.py and execute it again:
与其在REPL上进行测试, test_sum.py将其放入一个名为test_sum.py的新Python文件中并再次执行:
 def def test_sumtest_sum ():
    ():
    assert assert sumsum ([([ 11 , , 22 , , 33 ]) ]) == == 66 , , "Should be 6"

"Should be 6"

if if __name__ __name__ == == "__main__""__main__" :
    :
    test_sumtest_sum ()
    ()
    printprint (( "Everything passed""Everything passed" )
)
Now you have written a test case, an assertion, and an entry point (the command line). You can now execute this at the command line:
现在,您已经编写了一个测试用例 ,一个断言和一个入口点(命令行)。 您现在可以在命令行中执行此操作:
You can see the successful result, Everything passed.
您可以看到成功的结果, Everything passed 。
In Python, sum() accepts any iterable as its first argument. You tested with a list. Now test with a tuple as well. Create a new file called test_sum_2.py with the following code:
在Python中, sum()接受任何iterable作为其第一个参数。 您使用列表进行了测试。 现在也用元组测试。 使用以下代码创建一个名为test_sum_2.py的新文件:
 def def test_sumtest_sum ():
    ():
    assert assert sumsum ([([ 11 , , 22 , , 33 ]) ]) == == 66 , , "Should be 6"

"Should be 6"

def def test_sum_tupletest_sum_tuple ():
    ():
    assert assert sumsum (((( 11 , , 22 , , 22 )) )) == == 66 , , "Should be 6"

"Should be 6"

if if __name__ __name__ == == "__main__""__main__" :
    :
    test_sumtest_sum ()
    ()
    test_sum_tupletest_sum_tuple ()
    ()
    printprint (( "Everything passed""Everything passed" )
)
When you execute test_sum_2.py, the script will give an error because the sum() of (1, 2, 2) is 5, not 6. The result of the script gives you the error message, the line of code, and the traceback:
当执行test_sum_2.py ,脚本将给出错误,因为sum() test_sum_2.py sum()的sum() (1, 2, 2)为5 ,而不是6 。 脚本的结果为您提供错误消息,代码行和回溯:
Here you can see how a mistake in your code gives an error on the console with some information on where the error was and what the expected result was.
在这里,您可以看到代码中的错误如何在控制台上产生错误,并提供有关错误的位置和预期的结果的信息。
Writing tests in this way is okay for a simple check, but what if more than one fails? This is where test runners come in. The test runner is a special application designed for running tests, checking the output, and giving you tools for debugging and diagnosing tests and applications.
以这种方式编写测试对于一个简单的检查是可以的,但是如果多个测试失败了怎么办? 这是测试运行程序的用武之地。测试运行程序是一个特殊的应用程序,设计用于运行测试,检查输出并为您提供调试和诊断测试及应用程序的工具。
选择测试跑步者 (Choosing a Test Runner)
There are many test runners available for Python. The one built into the Python standard library is called unittest. In this tutorial, you will be using unittest test cases and the unittest test runner. The principles of unittest are easily portable to other frameworks. The three most popular test runners are:
有许多可用于Python的测试运行器。 Python标准库中内置的一个称为unittest 。 在本教程中,您将使用unittest测试用例和unittest测试运行器。 的原则, unittest是很容易地移植到其他框架。 三种最受欢迎的测试跑步者是:
unittestnoseornose2pytest
unittestnose还是nosenose2pytest
Choosing the best test runner for your requirements and level of experience is important.
为您的需求和经验水平选择最佳的测试跑步者很重要。
unittest (unittest)
unittest has been built into the Python standard library since version 2.1. You’ll probably see it in commercial Python applications and open-source projects.
从2.1版开始, unittest已内置到Python标准库中。 您可能会在商业Python应用程序和开源项目中看到它。
unittest contains both a testing framework and a test runner. unittest has some important requirements for writing and executing tests.
unittest包含一个测试框架和一个测试运行器。 unittest对编写和执行测试有一些重要要求。
unittest requires that:
unittest要求:
- You put your tests into classes as methods
- You use a series of special assertion methods in the
unittest.TestCaseclass instead of the built-inassertstatement
- 您将测试作为方法放入类中
- 您可以在
unittest.TestCase类中使用一系列特殊的断言方法,而不是内置的assert语句
To convert the earlier example to a unittest test case, you would have to:
以前面的例子转换为一个unittest的测试情况下,你必须:
- Import
unittestfrom the standard library - Create a class called
TestSumthat inherits from theTestCaseclass - Convert the test functions into methods by adding
selfas the first argument - Change the assertions to use the
self.assertEqual()method on theTestCaseclass - Change the command-line entry point to call
unittest.main()
- 导入
unittest从标准库 - 创建一个称为
TestSum的类,该类继承自TestCase类 - 通过将
self作为第一个参数,将测试函数转换为方法 - 更改断言以在
TestCase类上使用self.assertEqual()方法 - 更改命令行入口点以调用
unittest.main()
Follow those steps by creating a new file test_sum_unittest.py with the following code:
按照以下步骤test_sum_unittest.py ,使用以下代码创建一个新文件test_sum_unittest.py :
 import import unittest


unittest


class class TestSumTestSum (( unittestunittest .. TestCaseTestCase ):

    ):

    def def test_sumtest_sum (( selfself ):
        ):
        selfself .. assertEqualassertEqual (( sumsum ([([ 11 , , 22 , , 33 ]), ]), 66 , , "Should be 6""Should be 6" )

    )

    def def test_sum_tupletest_sum_tuple (( selfself ):
        ):
        selfself .. assertEqualassertEqual (( sumsum (((( 11 , , 22 , , 22 )), )), 66 , , "Should be 6""Should be 6" )

)

if if __name__ __name__ == == '__main__''__main__' :
    :
    unittestunittest .. mainmain ()
()
If you execute this at the command line, you’ll see one success (indicated with .) and one failure (indicated with F):
如果在命令行上执行此操作,将会看到一个成功(以.表示)和一个失败(以F表示):
You have just executed two tests using the unittest test runner.
您刚刚使用unittest测试运行程序执行了两个测试。
Note: Be careful if you’re writing test cases that need to execute in both Python 2 and 3. In Python 2.7 and below, unittest is called unittest2. If you simply import from unittest, you will get different versions with different features between Python 2 and 3.
注意:如果要编写需要在Python 2和3中执行的测试用例,请务必小心。在Python 2.7及以下版本中, unittest称为unittest2 。 如果仅从unittest导入,则会在Python 2和3之间获得具有不同功能的不同版本。
For more information on unittest, you can explore the unittest Documentation.
有关unittest更多信息,可以浏览unittest文档 。
nose (nose)
You may find that over time, as you write hundreds or even thousands of tests for your application, it becomes increasingly hard to understand and use the output from unittest.
您可能会发现,随着时间的流逝,为应用程序编写数百甚至数千个测试时,越来越难以理解和使用unittest的输出。
nose is compatible with any tests written using the unittest framework and can be used as a drop-in replacement for the unittest test runner. The development of nose as an open-source application fell behind, and a fork called nose2 was created. If you’re starting from scratch, it is recommended that you use nose2 instead of nose.
nose与使用unittest框架编写的任何测试都兼容,并且可以用作unittest测试运行程序的直接替代品。 作为开放源代码应用程序, nose的开发落后了,因此创建了一个名为nose2的fork。 如果您是从头开始的,建议您使用nose2而不是nose 。
To get started with nose2, install nose2 from PyPI and execute it on the command line. nose2 will try to discover all test scripts named test*.py and test cases inheriting from unittest.TestCase in your current directory:
要开始使用nose2 ,请从PyPI安装nose2 ,然后在命令行上执行它。 nose2将尝试发现当前目录中所有名为test*.py测试脚本以及从unittest.TestCase继承的测试用例:
 $ pip install nose2
$ pip install nose2
$ python -m nose2
$ python -m nose2
.F
.F
======================================================================
======================================================================
FAIL: test_sum_tuple (__main__.TestSum)
FAIL: test_sum_tuple (__main__.TestSum)
----------------------------------------------------------------------
----------------------------------------------------------------------
Traceback (most recent call last):
Traceback (most recent call last):
  File "test_sum_unittest.py", line 9, in test_sum_tuple
  File "test_sum_unittest.py", line 9, in test_sum_tuple
    self.assertEqual(sum((1, 2, 2)), 6, "Should be 6")
    self.assertEqual(sum((1, 2, 2)), 6, "Should be 6")
AssertionError: Should be 6

AssertionError: Should be 6

----------------------------------------------------------------------
----------------------------------------------------------------------
Ran 2 tests in 0.001s

Ran 2 tests in 0.001s

FAILED (failures=1)
FAILED (failures=1)
You have just executed the test you created in test_sum_unittest.py from the nose2 test runner. nose2 offers many command-line flags for filtering the tests that you execute. For more information, you can explore the Nose 2 documentation.
您刚刚从nose2测试运行器中执行了在test_sum_unittest.py创建的测试。 nose2提供了许多命令行标志来过滤您执行的测试。 有关更多信息,您可以浏览Nose 2文档 。
pytest (pytest)
pytest supports execution of unittest test cases. The real advantage of pytest comes by writing pytest test cases. pytest test cases are a series of functions in a Python file starting with the name test_.
pytest支持执行unittest测试用例。 pytest的真正优势在于编写pytest测试用例。 pytest测试用例是Python文件中一系列名为test_ 。
pytest has some other great features:
pytest还有其他一些很棒的功能:
- Support for the built-in
assertstatement instead of using specialself.assert*()methods - Support for filtering for test cases
- Ability to rerun from the last failing test
- An ecosystem of hundreds of plugins to extend the functionality
- 支持内置的
assert语句,而不是使用特殊的self.assert*()方法 - 支持筛选测试用例
- 能够从上次失败的测试中重新运行
- 包含数百个插件的生态系统,以扩展功能
Writing the TestSum test case example for pytest would look like this:
编写TestSum测试案例pytest是这样的:
You have dropped the TestCase, any use of classes, and the command-line entry point.
您已经删除了TestCase ,所有使用的类以及命令行入口点。
More information can be found at the Pytest Documentation Website.
可以在Pytest文档网站上找到更多信息。
编写您的第一个测试 (Writing Your First Test)
Let’s bring together what you’ve learned so far and, instead of testing the built-in sum() function, test a simple implementation of the same requirement.
让我们将到目前为止所学的知识汇总起来,而不是测试内置的sum()函数,而是测试相同需求的简单实现。
Create a new project folder and, inside that, create a new folder called my_sum. Inside my_sum, create an empty file called __init__.py. Creating the __init__.py file means that the my_sum folder can be imported as a module from the parent directory.
创建一个新的项目文件夹,并在其中创建一个名为my_sum的新文件夹。 在my_sum ,创建一个名为__init__.py的空文件。 创建__init__.py文件意味着可以将my_sum文件夹作为模块从父目录中导入。
Your project folder should look like this:
您的项目文件夹应如下所示:
project/
│
└── my_sum/
    └── __init__.py
project/
│
└── my_sum/
    └── __init__.py
Open up my_sum/__init__.py and create a new function called sum(), which takes an iterable (a list, tuple, or set) and adds the values together:
打开my_sum/__init__.py并创建一个名为sum()的新函数,该函数接受一个可迭代的(列表,元组或集合)并将这些值加在一起:
This code example creates a variable called total, iterates over all the values in arg, and adds them to total. It then returns the result once the iterable has been exhausted.
此代码示例创建一个名为total的变量,遍历arg所有值,并将它们添加到total 。 一旦迭代结束,它将返回结果。
在哪里编写测试 (Where to Write the Test)
To get started writing tests, you can simply create a file called test.py, which will contain your first test case. Because the file will need to be able to import your application to be able to test it, you want to place test.py above the package folder, so your directory tree will look something like this:
要开始编写测试,您可以简单地创建一个名为test.py的文件,其中将包含您的第一个测试用例。 由于该文件将需要能够导入您的应用程序以进行测试,因此您要将test.py放在package文件夹上方,因此目录树将如下所示:
project/
│
├── my_sum/
│   └── __init__.py
|
└── test.py
project/
│
├── my_sum/
│   └── __init__.py
|
└── test.py
You’ll find that, as you add more and more tests, your single file will become cluttered and hard to maintain, so you can create a folder called tests/ and split the tests into multiple files. It is convention to ensure each file starts with test_ so all test runners will assume that Python file contains tests to be executed. Some very large projects split tests into more subdirectories based on their purpose or usage.
您会发现,随着添加的测试越来越多,单个文件将变得混乱且难以维护,因此您可以创建一个名为tests/的文件夹,并将tests/拆分为多个文件。 约定确保每个文件都以test_开头,因此所有测试运行程序都将假定Python文件包含要执行的测试。 一些非常大的项目根据测试的目的或用途将测试划分为更多的子目录。
Note: What if your application is a single script?
注意:如果您的应用程序是单个脚本怎么办?
You can import any attributes of the script, such as classes, functions, and variables by using the built-in __import__() function. Instead of from my_sum import sum, you can write the following:
您可以使用内置的__import__()函数导入脚本的任何属性,例如类,函数和变量。 您可以编写以下from my_sum import sum代替from my_sum import sum :
The benefit of using __import__() is that you don’t have to turn your project folder into a package, and you can specify the file name. This is also useful if your filename collides with any standard library packages. For example, math.py would collide with the math module.
使用__import__()的好处是您不必将项目文件夹变成一个包,您可以指定文件名。 如果您的文件名与任何标准库包冲突,这也很有用。 例如, math.py将与math模块碰撞。
如何构造一个简单的测试 (How to Structure a Simple Test)
Before you dive into writing tests, you’ll want to first make a couple of decisions:
在开始编写测试之前,您需要首先做出几个决定:
- What do you want to test?
- Are you writing a unit test or an integration test?
- 您要测试什么?
- 您正在编写单元测试还是集成测试?
Then the structure of a test should loosely follow this workflow:
然后,测试的结构应大致遵循以下工作流程:
- Create your inputs
- Execute the code being tested, capturing the output
- Compare the output with an expected result
- 创建您的输入
- 执行被测试的代码,捕获输出
- 将输出与预期结果进行比较
For this application, you’re testing sum(). There are many behaviors in sum() you could check, such as:
对于此应用程序,您正在测试sum() 。 您可以检查sum()中的许多行为,例如:
- Can it sum a list of whole numbers (integers)?
- Can it sum a tuple or set?
- Can it sum a list of floats?
- What happens when you provide it with a bad value, such as a single integer or a string?
- What happens when one of the values is negative?
- 可以对整数(整数)列表求和吗?
- 可以对一个元组或集合求和吗?
- 可以汇总一个浮动列表吗?
- 为它提供错误的值(例如单个整数或字符串)时会发生什么?
- 当其中一个值为负数时会发生什么?
The most simple test would be a list of integers. Create a file, test.py with the following Python code:
最简单的测试是整数列表。 使用以下Python代码创建文件test.py :
 import import unittest

unittest

from from my_sum my_sum import import sum


sum


class class TestSumTestSum (( unittestunittest .. TestCaseTestCase ):
    ):
    def def test_list_inttest_list_int (( selfself ):
        ):
        """
"""
        Test that it can sum a list of integers
        Test that it can sum a list of integers
        """
                """
        data data = = [[ 11 , , 22 , , 33 ]
        ]
        result result = = sumsum (( datadata )
        )
        selfself .. assertEqualassertEqual (( resultresult , , 66 )

)

if if __name__ __name__ == == '__main__''__main__' :
    :
    unittestunittest .. mainmain ()
()
This code example:
此代码示例:
Imports
sum()from themy_sumpackage you createdDefines a new test case class called
TestSum, which inherits fromunittest.TestCaseDefines a test method,
.test_list_int(), to test a list of integers. The method.test_list_int()will:- Declare a variable
datawith a list of numbers(1, 2, 3) - Assign the result of
my_sum.sum(data)to aresultvariable - Assert that the value of
resultequals6by using the.assertEqual()method on theunittest.TestCaseclass
- Declare a variable
Defines a command-line entry point, which runs the
unittesttest-runner.main()
从您创建的
my_sum包中导入sum()定义一个称为
TestSum的新测试用例类,该类继承自unittest.TestCase定义一个测试方法
.test_list_int(),以测试整数列表。 方法.test_list_int()将:- 用数字列表声明变量
data(1, 2, 3) - 将
my_sum.sum(data)的result分配给result变量 - 断言的值
result等于6通过使用.assertEqual()方法在unittest.TestCase类
- 用数字列表声明变量
定义一个命令行入口点,该入口点运行
unittesttest-runner.main()
If you’re unsure what self is or how .assertEqual() is defined, you can brush up on your object-oriented programming with Python 3 Object-Oriented Programming.
如果不确定什么是self或如何定义.assertEqual()则可以使用Python 3 Object-Oriented Programming .assertEqual() 面向对象的编程 。
如何写断言 (How to Write Assertions)
The last step of writing a test is to validate the output against a known response. This is known as an assertion. There are some general best practices around how to write assertions:
编写测试的最后一步是根据已知响应验证输出。 这称为断言 。 关于如何编写断言,有一些通用的最佳实践:
- Make sure tests are repeatable and run your test multiple times to make sure it gives the same result every time
- Try and assert results that relate to your input data, such as checking that the result is the actual sum of values in the
sum()example
- 确保测试可重复,并多次运行测试以确保每次给出的结果相同
- 尝试声明与输入数据有关的结果,例如检查结果是否为
sum()示例中值的实际总和
unittest comes with lots of methods to assert on the values, types, and existence of variables. Here are some of the most commonly used methods:
unittest附带了许多方法来断言变量的值,类型和存在。 以下是一些最常用的方法:
| Method | 方法 | Equivalent to | 相当于 |
|---|---|---|---|
.assertEqual(a, b).assertEqual(a, b) | a == ba == b | ||
.assertTrue(x).assertTrue(x) | bool(x) is Truebool(x) is True | ||
.assertFalse(x).assertFalse(x) | bool(x) is Falsebool(x) is False | ||
.assertIs(a, b).assertIs(a, b) | a is ba is b | ||
.assertIsNone(x).assertIsNone(x) | x is Nonex is None | ||
.assertIn(a, b).assertIn(a, b) | a in ba in b | ||
.assertIsInstance(a, b).assertIsInstance(a, b) | isinstance(a, b)isinstance(a, b) |
.assertIs(), .assertIsNone(), .assertIn(), and .assertIsInstance() all have opposite methods, named .assertIsNot(), and so forth.
.assertIs() .assertIsNone() .assertIn()和.assertIsInstance()都有相反的方法,名为.assertIsNot() ,依此类推。
副作用 (Side Effects)
When you’re writing tests, it’s often not as simple as looking at the return value of a function. Often, executing a piece of code will alter other things in the environment, such as the attribute of a class, a file on the filesystem, or a value in a database. These are known as side effects and are an important part of testing. Decide if the side effect is being tested before including it in your list of assertions.
在编写测试时,通常不像查看函数的返回值那么简单。 通常,执行一段代码会更改环境中的其他内容,例如类的属性,文件系统上的文件或数据库中的值。 这些被称为副作用 ,是测试的重要组成部分。 在将其包含在断言列表之前,请确定是否正在测试副作用。
If you find that the unit of code you want to test has lots of side effects, you might be breaking the Single Responsibility Principle. Breaking the Single Responsibility Principle means the piece of code is doing too many things and would be better off being refactored. Following the Single Responsibility Principle is a great way to design code that it is easy to write repeatable and simple unit tests for, and ultimately, reliable applications.
如果发现要测试的代码单元有很多副作用,则可能是违反了“ 单一职责原则” 。 违反单一责任原则意味着代码段执行了太多的工作,最好进行重构。 遵循“单一职责原则”是一种设计代码的好方法,它很容易为最终的可靠应用编写可重复且简单的单元测试。
执行您的第一个测试 (Executing Your First Test)
Now that you’ve created the first test, you want to execute it. Sure, you know it’s going to pass, but before you create more complex tests, you should check that you can execute the tests successfully.
现在您已经创建了第一个测试,您想要执行它。 当然,您知道它将通过,但是在创建更复杂的测试之前,应检查是否可以成功执行测试。
执行测试运行器 (Executing Test Runners)
The Python application that executes your test code, checks the assertions, and gives you test results in your console is called the test runner.
执行测试代码,检查断言并在控制台中提供测试结果的Python应用程序称为测试运行器 。
At the bottom of test.py, you added this small snippet of code:
在test.py的底部,添加了以下代码片段:
This is a command line entry point. It means that if you execute the script alone by running python test.py at the command line, it will call unittest.main(). This executes the test runner by discovering all classes in this file that inherit from unittest.TestCase.
这是命令行入口点。 这意味着,如果您通过在命令行上运行python test.py单独执行脚本,它将调用unittest.main() 。 这将通过发现此文件中所有继承自unittest.TestCase类来执行测试运行程序。
This is one of many ways to execute the unittest test runner. When you have a single test file named test.py, calling python test.py is a great way to get started.
这是很多的方式来执行一个unittest测试运行。 当您有一个名为test.py测试文件时,调用python test.py是入门的好方法。
Another way is using the unittest command line. Try this:
另一种方法是使用unittest命令行。 试试这个:
 $ python -m unittest $ python -m unittest test
test
This will execute the same test module (called test) via the command line.
这将通过命令行执行相同的测试模块(称为test )。
You can provide additional options to change the output. One of those is -v for verbose. Try that next:
您可以提供其他选项来更改输出。 其中之一是-v表示详细。 接下来尝试:
This executed the one test inside test.py and printed the results to the console. Verbose mode listed the names of the tests it executed first, along with the result of each test.
这在test.py执行了一个测试,并将结果打印到控制台。 详细模式列出了它首先执行的测试的名称以及每个测试的结果。
Instead of providing the name of a module containing tests, you can request an auto-discovery using the following:
除了提供包含测试的模块的名称之外,您还可以使用以下方法请求自动发现:
 $ python -m unittest discover
$ python -m unittest discover
This will search the current directory for any files named test*.py and attempt to test them.
这将在当前目录中搜索名为test*.py所有文件,然后尝试对其进行测试。
Once you have multiple test files, as long as you follow the test*.py naming pattern, you can provide the name of the directory instead by using the -s flag and the name of the directory:
一旦有了多个测试文件,只要遵循test*.py命名模式,就可以使用-s标志和目录名称来提供目录名称:
unittest will run all tests in a single test plan and give you the results.
unittest将在一个测试计划中运行所有测试,并为您提供结果。
Lastly, if your source code is not in the directory root and contained in a subdirectory, for example in a folder called src/, you can tell unittest where to execute the tests so that it can import the modules correctly with the -t flag:
最后,如果您的源代码不在目录根目录中,而是包含在子目录中,例如在名为src/的文件夹中,则可以告诉unittest在哪里执行测试,以便可以使用-t标志正确导入模块:
 $ python -m unittest discover -s tests -t src
$ python -m unittest discover -s tests -t src
unittest will change to the src/ directory, scan for all test*.py files inside the the tests directory, and execute them.
unittest将更改为src/目录,扫描tests目录中的所有test*.py文件,然后执行它们。
了解测试输出 (Understanding Test Output)
That was a very simple example where everything passes, so now you’re going to try a failing test and interpret the output.
那是一个非常简单的示例,一切都通过了,所以现在您将尝试失败的测试并解释输出。
sum() should be able to accept other lists of numeric types, like fractions.
sum()应该能够接受其他数字类型列表,例如分数。
At the top of the test.py file, add an import statement to import the Fraction type from the fractions module in the standard library:
在test.py文件的顶部,添加导入语句,以从标准库的fractions模块中导入Fraction类型:
Now add a test with an assertion expecting the incorrect value, in this case expecting the sum of 1/4, 1/4, and 2/5 to be 1:
现在添加一个带有断言的测试,该断言期望值不正确,在这种情况下,期望1 / 4、1 / 4和2/5之和为1:
 import import unittest

unittest

from from my_sum my_sum import import sum


sum


class class TestSumTestSum (( unittestunittest .. TestCaseTestCase ):
    ):
    def def test_list_inttest_list_int (( selfself ):
        ):
        """
"""
        Test that it can sum a list of integers
        Test that it can sum a list of integers
        """
                """
        data data = = [[ 11 , , 22 , , 33 ]
        ]
        result result = = sumsum (( datadata )
        )
        selfself .. assertEqualassertEqual (( resultresult , , 66 )

)

def def test_list_fractiontest_list_fraction (( selfself ):
):
"""
"""
        Test that it can sum a list of fractions
        Test that it can sum a list of fractions
        """
        """
data data = = [[ FractionFraction (( 11 , , 44 ), ), FractionFraction (( 11 , , 44 ), ), FractionFraction (( 22 , , 55 )]
)]
result result = = sumsum (( datadata )
)
selfself .. assertEqualassertEqual (( resultresult , , 11 )
)
if if __name__ __name__ == == '__main__''__main__' :
    :
    unittestunittest .. mainmain ()
()
If you execute the tests again with python -m unittest test, you should see the following output:
如果使用python -m unittest test再次执行python -m unittest test ,则应看到以下输出:
In the output, you’ll see the following information:
在输出中,您将看到以下信息:
The first line shows the execution results of all the tests, one failed (
F) and one passed (.).The
FAILentry shows some details about the failed test:- The test method name (
test_list_fraction) - The test module (
test) and the test case (TestSum) - A traceback to the failing line
- The details of the assertion with the expected result (
1) and the actual result (Fraction(9, 10))
- The test method name (
第一行显示了所有测试的执行结果,一个测试失败(
F),一个测试通过(.)。FAIL条目显示有关失败测试的一些详细信息:- 测试方法名称(
test_list_fraction) - 测试模块(
test)和测试用例(TestSum) - 追溯到失败的行
- 具有预期结果(
1)和实际结果(Fraction(9, 10))的断言的详细信息
- 测试方法名称(
Remember, you can add extra information to the test output by adding the -v flag to the python -m unittest command.
请记住,您可以通过将-v标志添加到python -m unittest命令来向测试输出添加其他信息。
从PyCharm运行测试 (Running Your Tests From PyCharm)
If you’re using the PyCharm IDE, you can run unittest or pytest by following these steps:
如果您使用的是PyCharm IDE,则可以按照以下步骤运行unittest或pytest :
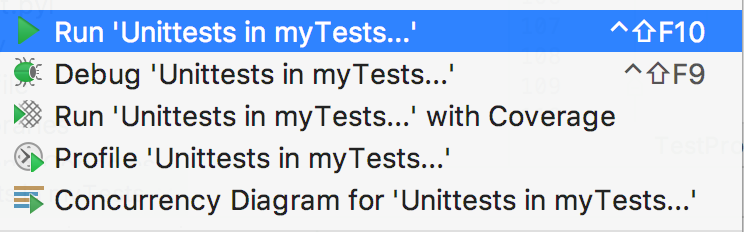
- In the Project tool window, select the
testsdirectory. - On the context menu, choose the run command for
unittest. For example, choose Run ‘Unittests in my Tests…’.
- 在项目工具窗口中,选择
tests目录。 - 在上下文菜单上,为
unittest选择运行命令。 例如,选择“在我的测试中运行'Unittests ...” 。
This will execute unittest in a test window and give you the results within PyCharm:
这将在测试窗口中执行unittest ,并在PyCharm中为您提供结果:
More information is available on the PyCharm Website.
有关更多信息,请访问PyCharm网站 。
从Visual Studio代码运行测试 (Running Your Tests From Visual Studio Code)
If you’re using the Microsoft Visual Studio Code IDE, support for unittest, nose, and pytest execution is built into the Python plugin.
如果您使用的是Microsoft Visual Studio Code IDE,则Python插件内置了对unittest , nose和pytest执行的支持。
If you have the Python plugin installed, you can set up the configuration of your tests by opening the Command Palette with Ctrl+Shift+P and typing “Python test”. You will see a range of options:
如果安装了Python插件,则可以通过使用Ctrl + Shift + P打开命令面板并键入“ Python测试”来设置测试的配置。 您将看到一系列选项:
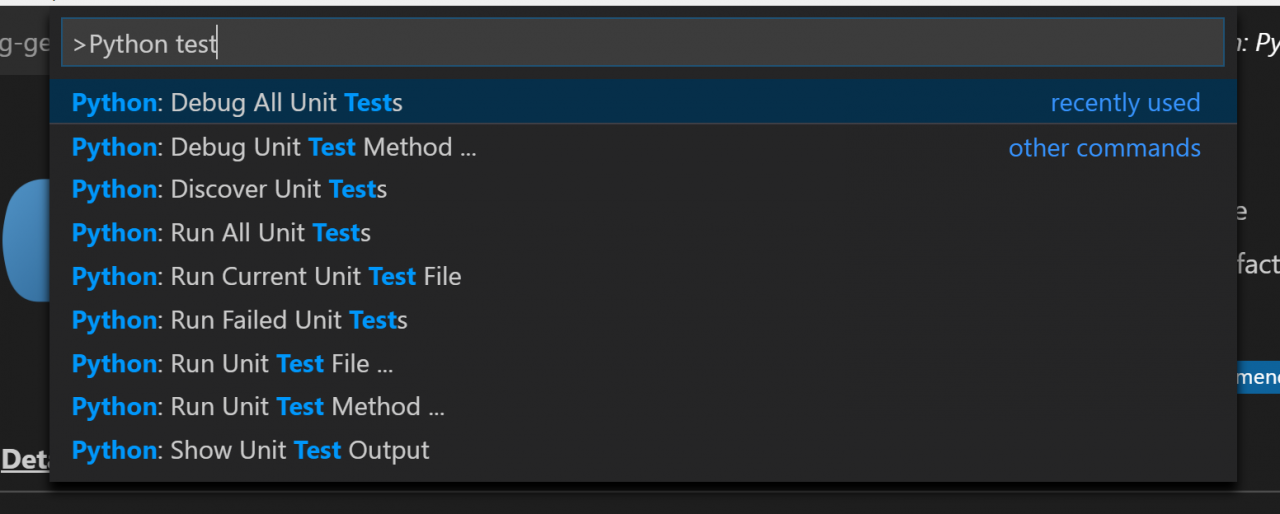
Choose Debug All Unit Tests, and VSCode will then raise a prompt to configure the test framework. Click on the cog to select the test runner (unittest) and the home directory (.).
选择Debug All Unit Tests ,然后VSCode会提示您配置测试框架。 单击齿轮以选择测试运行器( unittest )和主目录( . )。
Once this is set up, you will see the status of your tests at the bottom of the window, and you can quickly access the test logs and run the tests again by clicking on these icons:
设置完成后,您将在窗口底部看到测试的状态,并且可以通过单击以下图标快速访问测试日志并再次运行测试:
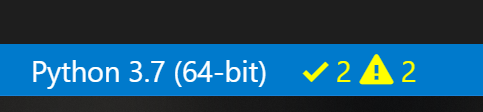
This shows the tests are executing, but some of them are failing.
这表明测试正在执行,但是其中一些失败。
测试Django和Flask等Web框架 (Testing for Web Frameworks Like Django and Flask)
If you’re writing tests for a web application using one of the popular frameworks like Django or Flask, there are some important differences in the way you write and run the tests.
如果要使用Django或Flask等流行框架之一为Web应用程序编写测试,则编写和运行测试的方式会有一些重要差异。
为什么它们与其他应用程序不同 (Why They’re Different From Other Applications)
Think of all the code you’re going to be testing in a web application. The routes, views, and models all require lots of imports and knowledge about the frameworks being used.
考虑一下将要在Web应用程序中测试的所有代码。 路线,视图和模型都需要大量导入,并且需要有关所使用框架的知识。
This is similar to the car test at the beginning of the tutorial: you have to start up the car’s computer before you can run a simple test like checking the lights.
这类似于本教程开始时的汽车测试:您必须启动汽车的计算机,然后才能运行简单的测试,例如检查车灯。
Django and Flask both make this easy for you by providing a test framework based on unittest. You can continue writing tests in the way you’ve been learning but execute them slightly differently.
Django和Flask都通过提供基于unittest的测试框架为您unittest 。 您可以按照学习的方式继续编写测试,但执行方式略有不同。
如何使用Django Test Runner (How to Use the Django Test Runner)
The Django startapp template will have created a tests.py file inside your application directory. If you don’t have that already, you can create it with the following contents:
Django startapp模板将在您的应用程序目录内创建一个tests.py文件。 如果还没有,可以使用以下内容创建它:
 from from django.test django.test import import TestCase

TestCase

class class MyTestCaseMyTestCase (( TestCaseTestCase ):
    ):
    # Your test methods
# Your test methods
The major difference with the examples so far is that you need to inherit from the django.test.TestCase instead of unittest.TestCase. These classes have the same API, but the Django TestCase class sets up all the required state to test.
到目前为止,这些示例的主要区别在于您需要继承django.test.TestCase而不是unittest.TestCase 。 这些类具有相同的API,但是Django TestCase类设置了所有需要测试的状态。
To execute your test suite, instead of using unittest at the command line, you use manage.py test:
要执行测试套件,请使用manage.py test而不是在命令行上使用unittest :
If you want multiple test files, replace tests.py with a folder called tests, insert an empty file inside called __init__.py, and create your test_*.py files. Django will discover and execute these.
如果要多个测试文件, tests.py用一个名为tests的文件夹替换tests.py ,在__init__.py插入一个空文件,然后创建您的test_*.py文件。 Django将发现并执行这些。
More information is available at the Django Documentation Website.
有关更多信息,请访问Django文档网站 。
如何使用unittest和Flask (How to Use unittest and Flask)
Flask requires that the app be imported and then set in test mode. You can instantiate a test client and use the test client to make requests to any routes in your application.
Flask要求导入该应用,然后将其设置为测试模式。 您可以实例化一个测试客户端,并使用该测试客户端向应用程序中的任何路由发出请求。
All of the test client instantiation is done in the setUp method of your test case. In the following example, my_app is the name of the application. Don’t worry if you don’t know what setUp does. You’ll learn about that in the More Advanced Testing Scenarios section.
所有测试客户端实例化都是通过测试用例的setUp方法完成的。 在以下示例中, my_app是应用程序的名称。 如果您不知道setUp功能,请不要担心。 您将在“ 更高级的测试方案”部分中了解到这一点。
The code within your test file should look like this:
测试文件中的代码应如下所示:
 import import my_app
my_app
import import unittest


unittest


class class MyTestCaseMyTestCase (( unittestunittest .. TestCaseTestCase ):

    ):

    def def setUpsetUp (( selfself ):
        ):
        my_appmy_app .. appapp .. testing testing = = True
        True
        selfself .. app app = = my_appmy_app .. appapp .. test_clienttest_client ()

    ()

    def def test_hometest_home (( selfself ):
        ):
        result result = = selfself .. appapp .. getget (( '/''/' )
        )
        # Make your assertions
# Make your assertions
You can then execute the test cases using the python -m unittest discover command.
然后,您可以使用python -m unittest discover命令执行测试用例。
More information is available at the Flask Documentation Website.
有关更多信息,请参见Flask文档网站 。
更多高级测试方案 (More Advanced Testing Scenarios)
Before you step into creating tests for your application, remember the three basic steps of every test:
在开始为应用程序创建测试之前,请记住每个测试的三个基本步骤:
- Create your inputs
- Execute the code, capturing the output
- Compare the output with an expected result
- 创建您的输入
- 执行代码,捕获输出
- 将输出与预期结果进行比较
It’s not always as easy as creating a static value for the input like a string or a number. Sometimes, your application will require an instance of a class or a context. What do you do then?
这并不总是像为字符串或数字之类的输入创建静态值那样容易。 有时,您的应用程序将需要一个类或上下文的实例。 那你怎么办呢?
The data that you create as an input is known as a fixture. It’s common practice to create fixtures and reuse them.
您创建为输入的数据称为夹具 。 创建固定装置并重复使用它们是常见的做法。
If you’re running the same test and passing different values each time and expecting the same result, this is known as parameterization.
如果您正在运行相同的测试,并且每次都传递不同的值并期望得到相同的结果,则这称为参数化 。
处理预期的故障 (Handling Expected Failures)
Earlier, when you made a list of scenarios to test sum(), a question came up:
What happens when you provide it with a bad value, such as a single integer or a string?
之前,当您列出了要测试sum()的场景列表时,出现了一个问题:
为它提供错误的值(例如单个整数或字符串)时会发生什么?
In this case, you would expect sum() to throw an error. When it does throw an error, that would cause the test to fail.
在这种情况下,您可能希望sum()会引发错误。 当它确实引发错误时,将导致测试失败。
There’s a special way to handle expected errors. You can use .assertRaises() as a context-manager, then inside the with block execute the test steps:
有一种处理预期错误的特殊方法。 您可以使用.assertRaises()作为上下文管理器,然后在with块内执行测试步骤:
This test case will now only pass if sum(data) raises a TypeError. You can replace TypeError with any exception type you choose.
现在,仅当sum(data)引发TypeError此测试用例才能通过。 您可以将TypeError替换为您选择的任何异常类型。
隔离应用程序中的行为 (Isolating Behaviors in Your Application)
Earlier in the tutorial, you learned what a side effect is. Side effects make unit testing harder since, each time a test is run, it might give a different result, or even worse, one test could impact the state of the application and cause another test to fail!
在本教程的前面,您了解了副作用。 副作用使单元测试更加困难,因为每次运行测试时,它可能给出不同的结果,甚至更糟的是,一个测试可能会影响应用程序的状态并导致另一个测试失败!

There are some simple techniques you can use to test parts of your application that have many side effects:
您可以使用一些简单的技术来测试应用程序中具有许多副作用的部分:
- Refactoring code to follow the Single Responsibility Principle
- Mocking out any method or function calls to remove side effects
- Using integration testing instead of unit testing for this piece of the application
- 重构代码以遵循单一职责原则
- 模拟出任何方法或函数调用以消除副作用
- 在此应用程序中使用集成测试代替单元测试
If you’re not familiar with mocking, see Python CLI Testing for some great examples.
如果您不熟悉模拟,请参阅Python CLI Testing以获取一些出色的示例。
编写集成测试 (Writing Integration Tests)
So far, you’ve been learning mainly about unit testing. Unit testing is a great way to build predictable and stable code. But at the end of the day, your application needs to work when it starts!
到目前为止,您一直在主要学习有关单元测试的知识。 单元测试是构建可预测且稳定的代码的好方法。 但是,归根结底,您的应用程序需要在启动时才能运行!
Integration testing is the testing of multiple components of the application to check that they work together. Integration testing might require acting like a consumer or user of the application by:
集成测试是对应用程序的多个组件的测试,以检查它们是否可以协同工作。 集成测试可能需要通过以下方式像应用程序的使用者或用户一样行动:
- Calling an HTTP REST API
- Calling a Python API
- Calling a web service
- Running a command line
- 调用HTTP REST API
- 调用Python API
- 调用网络服务
- 运行命令行
Each of these types of integration tests can be written in the same way as a unit test, following the Input, Execute, and Assert pattern. The most significant difference is that integration tests are checking more components at once and therefore will have more side effects than a unit test. Also, integration tests will require more fixtures to be in place, like a database, a network socket, or a configuration file.
可以按照输入,执行和断言模式,以与单元测试相同的方式编写每种类型的集成测试。 最大的不同是集成测试一次检查了更多的组件,因此比单元测试具有更多的副作用。 而且,集成测试将需要更多的固定装置,例如数据库,网络套接字或配置文件。
This is why it’s good practice to separate your unit tests and your integration tests. The creation of fixtures required for an integration like a test database and the test cases themselves often take a lot longer to execute than unit tests, so you may only want to run integration tests before you push to production instead of once on every commit.
这就是为什么最好将单元测试和集成测试分开的原因。 创建集成所需的固定装置(如测试数据库)和测试用例本身通常比单元测试花费更多的时间,因此您可能只想在推送到生产环境之前运行集成测试,而不是每次提交都运行一次。
A simple way to separate unit and integration tests is simply to put them in different folders:
分离单元测试和集成测试的简单方法是将它们放在不同的文件夹中:
project/
│
├── my_app/
│   └── __init__.py
│
└── tests/
    |
    ├── unit/
    |   ├── __init__.py
    |   └── test_sum.py
    |
    └── integration/
        ├── __init__.py
        └── test_integration.py
project/
│
├── my_app/
│   └── __init__.py
│
└── tests/
    |
    ├── unit/
    |   ├── __init__.py
    |   └── test_sum.py
    |
    └── integration/
        ├── __init__.py
        └── test_integration.py
There are many ways to execute only a select group of tests. The specify source directory flag, -s, can be added to unittest discover with the path containing the tests:
有许多方法可以仅执行一组选定的测试。 可以将指定源目录标志-s添加到带有包含测试的路径的unittest discover :
unittest will have given you the results of all the tests within the tests/integration directory.
unittest将在tests/integration目录中为您提供所有测试的结果。
测试数据驱动的应用程序 (Testing Data-Driven Applications)
Many integration tests will require backend data like a database to exist with certain values. For example, you might want to have a test that checks that the application displays correctly with more than 100 customers in the database, or the order page works even if the product names are displayed in Japanese.
许多集成测试将要求后端数据(如数据库)存在某些值。 例如,您可能需要进行测试,以检查应用程序是否正确显示了数据库中100个以上的客户,或者即使产品名称以日语显示,订单页面也可以正常工作。
These types of integration tests will depend on different test fixtures to make sure they are repeatable and predictable.
这些类型的集成测试将取决于不同的测试装置,以确保它们可重复且可预测。
A good technique to use is to store the test data in a folder within your integration testing folder called fixtures to indicate that it contains test data. Then, within your tests, you can load the data and run the test.
一种好的使用方法是将测试数据存储在集成测试文件夹中的一个文件夹中,该文件夹称为fixtures以指示其中包含测试数据。 然后,在测试中,您可以加载数据并运行测试。
Here’s an example of that structure if the data consisted of JSON files:
如果数据由JSON文件组成,则下面是该结构的示例:
project/
│
├── my_app/
│   └── __init__.py
│
└── tests/
    |
    └── unit/
    |   ├── __init__.py
    |   └── test_sum.py
    |
    └── integration/
        |
        ├── fixtures/
        |   ├── test_basic.json
        |   └── test_complex.json
        |
        ├── __init__.py
        └── test_integration.py
Within your test case, you can use the .setUp() method to load the test data from a fixture file in a known path and execute many tests against that test data. Remember you can have multiple test cases in a single Python file, and the unittest discovery will execute both. You can have one test case for each set of test data:
在您的测试用例中,您可以使用.setUp()方法从已知路径中的夹具文件中加载测试数据,并对该测试数据执行许多测试。 请记住,您可以在一个Python文件中包含多个测试用例,而unittest发现将同时执行这两个测试用例。 每个测试数据集可以有一个测试用例:
If your application depends on data from a remote location, like a remote API, you’ll want to ensure your tests are repeatable. Having your tests fail because the API is offline or there is a connectivity issue could slow down development. In these types of situations, it is best practice to store remote fixtures locally so they can be recalled and sent to the application.
如果您的应用程序依赖于远程位置(如远程API)的数据,则需要确保测试可重复。 由于API离线或存在连接问题而导致测试失败,可能会减慢开发速度。 在这种情况下,最佳实践是在本地存储远程设备,以便可以调用它们并将其发送到应用程序。
The requests library has a complimentary package called responses that gives you ways to create response fixtures and save them in your test folders. Find out more on their GitHub Page.
requests库有一个名为“ responses的免费软件包,可让您创建响应固定装置并将其保存在测试文件夹中的方法。 在其GitHub Page上找到更多信息 。
在多种环境中测试 (Testing in Multiple Environments)
So far, you’ve been testing against a single version of Python using a virtual environment with a specific set of dependencies. You might want to check that your application works on multiple versions of Python, or multiple versions of a package. Tox is an application that automates testing in multiple environments.
到目前为止,您已经在使用带有一组特定依赖项的虚拟环境针对Python的单个版本进行了测试。 您可能要检查您的应用程序是否可以在多个版本的Python或程序包的多个版本上运行。 Tox是在多个环境中自动化测试的应用程序。
安装毒物 (Installing Tox)
Tox is available on PyPI as a package to install via pip:
Tox在PyPI上可作为软件包通过pip安装:
 $ pip install tox
$ pip install tox
Now that you have Tox installed, it needs to be configured.
现在您已经安装了Tox,需要对其进行配置。
为您的依赖配置Tox (Configuring Tox for Your Dependencies)
Tox is configured via a configuration file in your project directory. The Tox configuration file contains the following:
Tox通过项目目录中的配置文件进行配置。 Tox配置文件包含以下内容:
- The command to run in order to execute tests
- Any additional packages required before executing
- The target Python versions to test against
- 为了执行测试而运行的命令
- 执行之前需要的任何其他软件包
- 要测试的目标Python版本
Instead of having to learn the Tox configuration syntax, you can get a head start by running the quickstart application:
您不必学习Tox配置语法,而可以通过运行quickstart应用程序来抢先一步:
The Tox configuration tool will ask you those questions and create a file similar to the following in tox.ini:
Tox配置工具将询问您这些问题,并在tox.ini创建类似于以下文件:
 [tox]
[tox]
envlist envlist = = py27, py36

py27, py36

[testenv]
[testenv]
deps deps =

=

commands commands ==

    python -m unittest discover
    python -m unittest discover
Before you can run Tox, it requires that you have a setup.py file in your application folder containing the steps to install your package. If you don’t have one, you can follow this guide on how to create a setup.py before you continue.
在运行Tox之前,它要求您在应用程序文件夹中有一个setup.py文件,其中包含安装软件包的步骤。 如果您没有该文件,则可以在继续之前按照本指南操作如何创建setup.py 。
Alternatively, if your project is not for distribution on PyPI, you can skip this requirement by adding the following line in the tox.ini file under the [tox] heading:
另外,如果您的项目不适合在PyPI上分发,则可以通过在[tox]标题下的tox.ini文件中添加以下行来跳过此要求:
If you don’t create a setup.py, and your application has some dependencies from PyPI, you’ll need to specify those on a number of lines under the [testenv] section. For example, Django would require the following:
如果您没有创建setup.py ,并且您的应用程序具有来自PyPI的某些依赖项,则需要在[testenv]部分下的多行中指定这些依赖项。 例如,Django需要具备以下条件:
 [testenv]
[testenv]
deps deps = = django
django
Once you have completed that stage, you’re ready to run the tests.
一旦完成该阶段,就可以运行测试了。
You can now execute Tox, and it will create two virtual environments: one for Python 2.7 and one for Python 3.6. The Tox directory is called .tox/. Within the .tox/ directory, Tox will execute python -m unittest discover against each virtual environment.
现在您可以执行Tox,它将创建两个虚拟环境:一个用于Python 2.7,一个用于Python 3.6。 Tox目录称为.tox/ 。 在.tox/目录中,Tox将针对每个虚拟环境执行python -m unittest discover 。
You can run this process by calling Tox at the command line:
您可以通过在命令行中调用Tox来运行此过程:
Tox will output the results of your tests against each environment. The first time it runs, Tox takes a little bit of time to create the virtual environments, but once it has, the second execution will be a lot faster.
Tox将输出针对每种环境的测试结果。 Tox第一次运行时,会花一点时间来创建虚拟环境,但是一旦运行起来,第二次执行就会快很多。
执行毒药 (Executing Tox)
The output of Tox is quite straightforward. It creates an environment for each version, installs your dependencies, and then runs the test commands.
Tox的输出非常简单。 它为每个版本创建一个环境,安装您的依赖项,然后运行测试命令。
There are some additional command line options that are great to remember.
还有一些其他的命令行选项非常值得记住。
Run only a single environment, such as Python 3.6:
仅运行单个环境,例如Python 3.6:
 $ tox -e py36
$ tox -e py36
Recreate the virtual environments, in case your dependencies have changed or site-packages is corrupt:
重新创建虚拟环境,以防您的依赖关系已更改或站点包损坏:
Run Tox with less verbose output:
使用更少的详细输出运行Tox:
 $ tox -q
$ tox -q
Running Tox with more verbose output:
使用更详细的输出运行Tox:
More information on Tox can be found at the Tox Documentation Website.
可以在Tox文档网站上找到有关Tox的更多信息。
自动执行测试 (Automating the Execution of Your Tests)
So far, you have been executing the tests manually by running a command. There are some tools for executing tests automatically when you make changes and commit them to a source-control repository like Git. Automated testing tools are often known as CI/CD tools, which stands for “Continuous Integration/Continuous Deployment.” They can run your tests, compile and publish any applications, and even deploy them into production.
到目前为止,您已经通过运行命令手动执行测试。 有一些工具可以在您进行更改并将其提交到诸如Git之类的源代码控制存储库时自动执行测试。 自动化测试工具通常称为CI / CD工具,代表“持续集成/持续部署”。 他们可以运行您的测试,编译和发布任何应用程序,甚至可以将它们部署到生产环境中。
Travis CI is one of many available CI (Continuous Integration) services available.
Travis CI是许多可用的CI(连续集成)服务之一。
Travis CI works nicely with Python, and now that you’ve created all these tests, you can automate the execution of them in the cloud! Travis CI is free for any open-source projects on GitHub and GitLab and is available for a charge for private projects.
Travis CI与Python配合良好,现在您已经创建了所有这些测试,您可以在云中自动执行它们! Travis CI对于GitHub和GitLab上的任何开源项目都是免费的,并且对私人项目收费。
To get started, login to the website and authenticate with your GitHub or GitLab credentials. Then create a file called .travis.yml with the following contents:
首先,请登录网站并使用您的GitHub或GitLab凭据进行身份验证。 然后创建一个名为.travis.yml的文件, .travis.yml包含以下内容:
 languagelanguage : : python
python
pythonpython :
  :
  - - "2.7"
  "2.7"
  - - "3.7"
"3.7"
installinstall :
  :
  - - pip install -r requirements.txt
pip install -r requirements.txt
scriptscript :
  :
  - - python -m unittest discover
python -m unittest discover
This configuration instructs Travis CI to:
此配置指示Travis CI:
- Test against Python 2.7 and 3.7 (You can replace those versions with any you choose.)
- Install all the packages you list in
requirements.txt(You should remove this section if you don’t have any dependencies.) - Run
python -m unittest discoverto run the tests
- 针对Python 2.7和3.7进行测试(您可以使用任意版本替换这些版本。)
- 安装您在
requirements.txt列出的所有软件包(如果没有任何依赖性,则应删除此部分。) - 运行
python -m unittest discover运行测试
Once you have committed and pushed this file, Travis CI will run these commands every time you push to your remote Git repository. You can check out the results on their website.
提交并推送此文件后,每次您推送到远程Git存储库时,Travis CI都会运行这些命令。 您可以在他们的网站上查看结果。
下一步是什么 (What’s Next)
Now that you’ve learned how to create tests, execute them, include them in your project, and even execute them automatically, there are a few advanced techniques you might find handy as your test library grows.
现在,您已经了解了如何创建测试,执行测试,将其包括在项目中,甚至自动执行它们,随着测试库的增长,您可能会发现一些方便的高级技术。
将Linters引入您的应用程序 (Introducing Linters Into Your Application)
Tox and Travis CI have configuration for a test command. The test command you have been using throughout this tutorial is python -m unittest discover.
Tox和Travis CI具有测试命令的配置。 在本教程中一直使用的测试命令是python -m unittest discover 。
You can provide one or many commands in all of these tools, and this option is there to enable you to add more tools that improve the quality of your application.
您可以在所有这些工具中提供一个或多个命令,并且此选项可让您添加更多工具来提高应用程序的质量。
One such type of application is called a linter. A linter will look at your code and comment on it. It could give you tips about mistakes you’ve made, correct trailing spaces, and even predict bugs you may have introduced.
一种这样的应用程序称为短绒。 短毛猫将查看您的代码并对其进行注释。 It could give you tips about mistakes you've made, correct trailing spaces, and even predict bugs you may have introduced.
For more information on linters, read the Python Code Quality tutorial.
For more information on linters, read the Python Code Quality tutorial .
Passive Linting With flake8 (Passive Linting With flake8)
A popular linter that comments on the style of your code in relation to the PEP 8 specification is flake8.
A popular linter that comments on the style of your code in relation to the PEP 8 specification is flake8 .
You can install flake8 using pip:
You can install flake8 using pip :
You can then run flake8 over a single file, a folder, or a pattern:
You can then run flake8 over a single file, a folder, or a pattern:
 $ flake8 test.py
$ flake8 test.py
test.py:6:1: E302 expected 2 blank lines, found 1
test.py:6:1: E302 expected 2 blank lines, found 1
test.py:23:1: E305 expected 2 blank lines after class or function definition, found 1
test.py:23:1: E305 expected 2 blank lines after class or function definition, found 1
test.py:24:20: W292 no newline at end of file
test.py:24:20: W292 no newline at end of file
You will see a list of errors and warnings for your code that flake8 has found.
You will see a list of errors and warnings for your code that flake8 has found.
flake8 is configurable on the command line or inside a configuration file in your project. If you wanted to ignore certain rules, like E305 shown above, you can set them in the configuration. flake8 will inspect a .flake8 file in the project folder or a setup.cfg file. If you decided to use Tox, you can put the flake8 configuration section inside tox.ini.
flake8 is configurable on the command line or inside a configuration file in your project. If you wanted to ignore certain rules, like E305 shown above, you can set them in the configuration. flake8 will inspect a .flake8 file in the project folder or a setup.cfg file. If you decided to use Tox, you can put the flake8 configuration section inside tox.ini .
This example ignores the .git and __pycache__ directories as well as the E305 rule. Also, it sets the max line length to 90 instead of 80 characters. You will likely find that the default constraint of 79 characters for line-width is very limiting for tests, as they contain long method names, string literals with test values, and other pieces of data that can be longer. It is common to set the line length for tests to up to 120 characters:
This example ignores the .git and __pycache__ directories as well as the E305 rule. Also, it sets the max line length to 90 instead of 80 characters. You will likely find that the default constraint of 79 characters for line-width is very limiting for tests, as they contain long method names, string literals with test values, and other pieces of data that can be longer. It is common to set the line length for tests to up to 120 characters:
Alternatively, you can provide these options on the command line:
Alternatively, you can provide these options on the command line:
 $ flake8 --ignore E305 --exclude .git,__pycache__ --max-line-length$ flake8 --ignore E305 --exclude .git,__pycache__ --max-line-length == 90
90
A full list of configuration options is available on the Documentation Website.
A full list of configuration options is available on the Documentation Website .
You can now add flake8 to your CI configuration. For Travis CI, this would look as follows:
You can now add flake8 to your CI configuration. For Travis CI, this would look as follows:
Travis will read the configuration in .flake8 and fail the build if any linting errors occur. Be sure to add the flake8 dependency to your requirements.txt file.
Travis will read the configuration in .flake8 and fail the build if any linting errors occur. Be sure to add the flake8 dependency to your requirements.txt file.
Aggressive Linting With a Code Formatter (Aggressive Linting With a Code Formatter)
flake8 is a passive linter: it recommends changes, but you have to go and change the code. A more aggressive approach is a code formatter. Code formatters will change your code automatically to meet a collection of style and layout practices.
flake8 is a passive linter: it recommends changes, but you have to go and change the code. A more aggressive approach is a code formatter. Code formatters will change your code automatically to meet a collection of style and layout practices.
black is a very unforgiving formatter. It doesn’t have any configuration options, and it has a very specific style. This makes it great as a drop-in tool to put in your test pipeline.
black is a very unforgiving formatter. It doesn't have any configuration options, and it has a very specific style. This makes it great as a drop-in tool to put in your test pipeline.
Note: black requires Python 3.6+.
Note: black requires Python 3.6+.
You can install black via pip:
You can install black via pip:
 $ pip install black
$ pip install black
Then to run black at the command line, provide the file or directory you want to format:
Then to run black at the command line, provide the file or directory you want to format:
Keeping Your Test Code Clean (Keeping Your Test Code Clean)
When writing tests, you may find that you end up copying and pasting code a lot more than you would in regular applications. Tests can be very repetitive at times, but that is by no means a reason to leave your code sloppy and hard to maintain.
When writing tests, you may find that you end up copying and pasting code a lot more than you would in regular applications. Tests can be very repetitive at times, but that is by no means a reason to leave your code sloppy and hard to maintain.
Over time, you will develop a lot of technical debt in your test code, and if you have significant changes to your application that require changes to your tests, it can be a more cumbersome task than necessary because of the way you structured them.
Over time, you will develop a lot of technical debt in your test code, and if you have significant changes to your application that require changes to your tests, it can be a more cumbersome task than necessary because of the way you structured them.
Try to follow the DRY principle when writing tests: Don’t Repeat Yourself.
Try to follow the DRY principle when writing tests: D on't R epeat Y ourself.
Test fixtures and functions are a great way to produce test code that is easier to maintain. Also, readability counts. Consider deploying a linting tool like flake8 over your test code:
Test fixtures and functions are a great way to produce test code that is easier to maintain. Also, readability counts. Consider deploying a linting tool like flake8 over your test code:
 $ flake8 --max-line-length$ flake8 --max-line-length == 120 tests/
120 tests/
Testing for Performance Degradation Between Changes (Testing for Performance Degradation Between Changes)
There are many ways to benchmark code in Python. The standard library provides the timeit module, which can time functions a number of times and give you the distribution. This example will execute test() 100 times and print() the output:
There are many ways to benchmark code in Python. The standard library provides the timeit module, which can time functions a number of times and give you the distribution. This example will execute test() 100 times and print() the output:
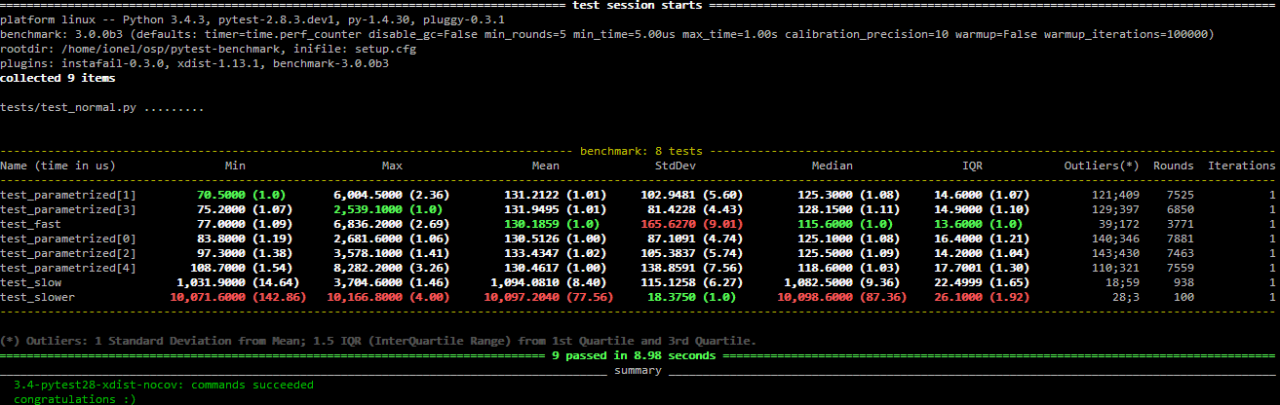
Another option, if you decided to use pytest as a test runner, is the pytest-benchmark plugin. This provides a pytest fixture called benchmark. You can pass benchmark() any callable, and it will log the timing of the callable to the results of pytest.
Another option, if you decided to use pytest as a test runner, is the pytest-benchmark plugin. This provides a pytest fixture called benchmark . You can pass benchmark() any callable, and it will log the timing of the callable to the results of pytest .
You can install pytest-benchmark from PyPI using pip:
You can install pytest-benchmark from PyPI using pip :
 $ pip install pytest-benchmark
$ pip install pytest-benchmark
Then, you can add a test that uses the fixture and passes the callable to be executed:
Then, you can add a test that uses the fixture and passes the callable to be executed:
Execution of pytest will now give you benchmark results:
Execution of pytest will now give you benchmark results:
More information is available at the Documentation Website.
More information is available at the Documentation Website .
Testing for Security Flaws in Your Application (Testing for Security Flaws in Your Application)
Another test you will want to run on your application is checking for common security mistakes or vulnerabilities.
Another test you will want to run on your application is checking for common security mistakes or vulnerabilities.
You can install bandit from PyPI using pip:
You can install bandit from PyPI using pip :
 $ pip install bandit
$ pip install bandit
You can then pass the name of your application module with the -r flag, and it will give you a summary:
You can then pass the name of your application module with the -r flag, and it will give you a summary:
As with flake8, the rules that bandit flags are configurable, and if there are any you wish to ignore, you can add the following section to your setup.cfg file with the options:
As with flake8 , the rules that bandit flags are configurable, and if there are any you wish to ignore, you can add the following section to your setup.cfg file with the options:
 [bandit]
[bandit]
exclude: /test
exclude: /test
tests: B101,B102,B301
tests: B101,B102,B301
More details are available at the GitHub Website.
More details are available at the GitHub Website .
结论 (Conclusion)
Python has made testing accessible by building in the commands and libraries you need to validate that your applications work as designed. Getting started with testing in Python needn’t be complicated: you can use unittest and write small, maintainable methods to validate your code.
Python has made testing accessible by building in the commands and libraries you need to validate that your applications work as designed. Getting started with testing in Python needn't be complicated: you can use unittest and write small, maintainable methods to validate your code.
As you learn more about testing and your application grows, you can consider switching to one of the other test frameworks, like pytest, and start to leverage more advanced features.
As you learn more about testing and your application grows, you can consider switching to one of the other test frameworks, like pytest , and start to leverage more advanced features.
Thank you for reading. I hope you have a bug-free future with Python!
感谢您的阅读。 I hope you have a bug-free future with Python!
[ Improve Your Python With ? Python Tricks ? – Get a short & sweet Python Trick delivered to your inbox every couple of days. >> Click here to learn more and see examples ]
[通过?Python技巧Improve改进Python –每两天将简短而可爱的Python技巧传递到您的收件箱。 >>单击此处了解更多信息,并查看示例 ]
翻译自: https://www.pybloggers.com/2018/10/getting-started-with-testing-in-python/
python入门测试教程