基于SSM框架的简单分页功能实现
简要说明
环境是ssm框架,实现简单的物理分页,代码有详细注释,适合同我一样的菜鸟或者刚接触ssm的小白。有不对的地方请评论区留言指正,我会修正的。
项目结构
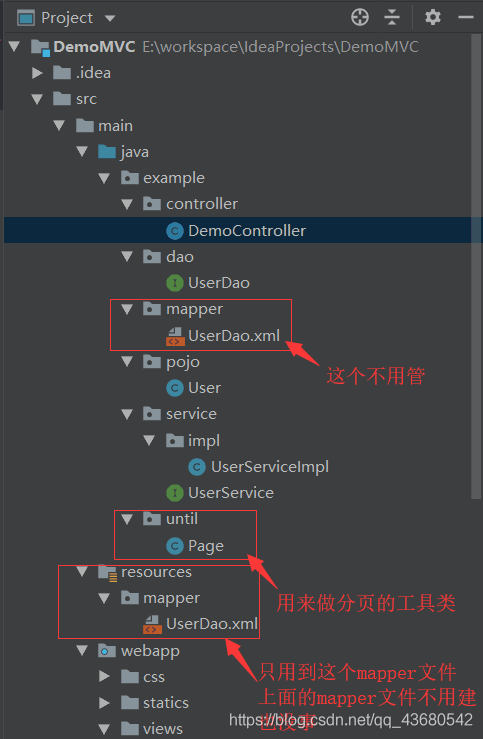
以上是大概的项目结构,后面整理好后我会传到github上。
分页原理
物理分页
- 实现原理: SELECT * FROM xxx [WHERE…] LIMIT #{param1}, #{param2}
第一个参数是开始数据的索引位置
第二个参数是要查询多少条数据 - 优点: 不会造成内存溢出
缺点: 翻页的速度比较慢
- 实现原理: SELECT * FROM xxx [WHERE…] LIMIT #{param1}, #{param2}
逻辑分页
- 实现原理: 一次性将所有的数据查询出来放在内存之中,每次需要查询的时候就直接从内存之中去取出相应索引区间的数据
- 优点: 分页的速度比较快
缺点: 可能造成内存溢出
实现代码(带详细注释)
数据表(直接贴上表的字段 请自己手动建表 插数据)

1.Page工具类 (比较重要的类,用来实现分页)
package example.until;

public class Page {
    int start;  //开始数据的索引
    int count;  //每页数量
    int total;  //总数据量


    public int getStart() {
        return start;
    }

    public void setStart(int start) {
        this.start = start;
    }

    public int getCount() {
        return count;
    }

    public void setCount(int count) {
        this.count = count;
    }

    public int getTotal() {
        return total;
    }

    public void setTotal(int total) {
        this.total = total;
    }

    /**
    * 提供一个构造方法
    */
    public Page(int start,int count){
        super();
        this.start = start;
        this.count = count;
    }
    /**
     * 判断是否有上一页
     */
    public boolean isHasPreviouse(){
        if(start == 0)
            return false;
        return true;
    }
    /**
     * 判断是否有下一页
     */
    public boolean isHasNext(){
        if (start == getLast())
            return false;
        return true;
    }
    /**
     * 计算得到的总页数
     */
    public int getTotalPage(){
        int totalPages;
        if( 0 == total % count ){   //举个栗子  total = 20  count =10   total % count = 0 正好除尽 无余数 进入if
            totalPages = total / count;  // totalPages = 20/10 =2      一共就是两页啦
        }else{//再举个栗子  total = 21  count =10   total % count = 1 没除尽 余数为1  进入else
            totalPages = total / count +1;   // totalPages = (21/10) +1  = 2 + 1 =3   一共就是3页  前两页每页10条数据 最后一页一条数据
        }
        //这种是特殊情况  total = 0  count =10  total % count = 0
        //totalPages = 0/10 = 0   但是第一页不能为 0 呀 那就设值为 1 啦
        if ( 0 == totalPages){
            totalPages = 1; //设值为 1
        }
        return totalPages;  //返回总页数
    }
    /**
     * 计算尾页的第一条数据索引
     */
    public int getLast(){
        //这里指尾页的第一条数据索引,非页数 比如有36条数据 一共4页 最后一页的第一条数据索引就是 30
        // (注意 :这里是按第一页第一条从0开始计算)
        int last;
        if( 0 == total % count ){  //举个栗子  total = 30  count =10   total % count = 0 正好除尽 无余数 进入if
            last = total - count;   // last = 30 - 10   最后一页第一条索引为 20
        }else{ //再举个栗子  total = 36  count =10   total % count = 6 没除尽 余数为6  进入else
            last = total - total % count ; // last = 36 - (36%10)=36-6 = 30   最后一页第一条索引为 30
        }
        //这种是特殊情况 total = 0  count =10  total % count = 0
        //last = total - count =0 -10 = -10
        // last<0  但是索引不能是负数  那就设为 0
        last = last<0 ? 0:last;
        return last; //返回尾页的第一条数据索引
    }
}
2.UserDao.xml mybatis映射文件
<?xml version="1.0" encoding="UTF-8" ?>
<!DOCTYPE mapper
        PUBLIC "-//mybatis.org//DTD Mapper 3.0//EN"
        "http://mybatis.org/dtd/mybatis-3-mapper.dtd">
<mapper namespace="example.dao.UserDao">
    <select id="findUser"  resultType="User">
      SELECT * FROM user
    </select>

    <!-- 获取用户list 这里的  #{start} 中 start 必须要与 @Param("start") 中的 start 名字一样 否则无法传入参数   #{count}同理-->
    <select id="getlist" resultType="User">
        select * from user order by id asc limit #{start},#{count}
    </select>
    <!-- 获取用户总数 -->
    <select id="getTotal"  resultType="Integer">
      SELECT count(*) FROM user
    </select>
</mapper>
3.UserDao.java
package example.dao;

import example.pojo.User;
import org.apache.ibatis.annotations.Mapper;
import org.apache.ibatis.annotations.Param;

import java.util.List;

public interface UserDao {
     List<User> findUser();
     //获取用户list 用@Param 对mapper文件 进行多个参数的传递
     List<User> getlist(@Param("start") int start, @Param("count") int count);
     Integer getTotal();  //获取用户总数
}
4.UserService.java
package example.service;

import example.pojo.User;

import java.util.List;

public interface UserService {
    List<User> findUser();
    List<User> getlist(int start,int count); //获取用户list
    Integer getTotal(); //获取用户总数
}
5.UserServiceImpl.java
package example.service.impl;

import example.dao.UserDao;
import example.pojo.User;
import example.service.UserService;
import org.springframework.beans.factory.annotation.Autowired;
import org.springframework.stereotype.Service;
import org.springframework.transaction.annotation.Transactional;

import java.sql.Connection;
import java.util.ArrayList;
import java.util.List;

@Service("userService")
@Transactional
public class UserServiceImpl implements UserService {

    @Autowired
    private UserDao userDao;

    @Override
    public List<User> findUser() {
        return userDao.findUser();
    }

    @Override
    public  List<User> getlist(int start,int count){   //获取用户list
        List<User> users = new ArrayList<>();
        users = userDao.getlist(start,count);
        return users;
    }
    @Override
    public Integer getTotal() {
        return userDao.getTotal();
    }  //获取用户总数
}
6.DemoController.java (比较重要的类,会实现一些逻辑处理)
package example.controller;


import example.pojo.User;
import example.service.UserService;
import example.until.Page;
import org.springframework.beans.factory.annotation.Autowired;
import org.springframework.stereotype.Controller;
import org.springframework.ui.Model;
import org.springframework.ui.ModelMap;
import org.springframework.web.bind.annotation.RequestMapping;
import org.springframework.web.servlet.ModelAndView;

import javax.servlet.http.HttpServletRequest;
import javax.servlet.http.HttpServletResponse;
import java.util.HashMap;
import java.util.List;
import java.util.Map;

@Controller
//@RequestMapping("/home")
public class DemoController {

    @Autowired
    private UserService userService;

    //获取用户list
    @RequestMapping("/getlist")
    public ModelAndView getList(HttpServletRequest request, HttpServletResponse response){
        //new一个ModelAndView对象,通过addObject存储page和用户list 并利用setViewName设定跳转页面
        ModelAndView modelView = new ModelAndView();
        int start = 0;  //初始化开始数据的索引 也就是所在页面的第一行 如第一页第一行是第0条,第二页第一行是第10条 以此类推
        int count = 10; //每页显示的条目数
        try{
            start = Integer.parseInt(request.getParameter("page.start"));  //从前台获取 开始数据的索引
            count = Integer.parseInt(request.getParameter("page.count"));  //从前台获取 每页显示的条目数
        }catch (Exception e){
        }
        Page page = new Page(start,count); //将得到的值存入page对象中
        //从数据库中取值 将 start 和count 传入
        // 后台sql语句如下:
        // SELECT * FROM user LIMIT #{start}, #{和count}
        //第一个参数是开始数据的索引位置
        //第二个参数是要查询多少条数据
        //这里解释一下原理,每次从数据库中取出部分数据,可防止内存溢出
        List<User> userList = userService.getlist(page.getStart(),page.getCount());  //获取用户list

        // 后台sql语句如下
        // SELECT COUNT(*) FROM user
        //获取user表中用户总个数
        int total = userService.getTotal();
        page.setTotal(total);//设置page对象的总数据量

        //通过addObject存储page和用户list
        modelView.addObject("page", page);
        modelView.addObject("userList", userList);
        //利用setViewName设定跳转页面
        modelView.setViewName("pagetext");

        //返回ModelAndView对象 跳转
        return modelView;
    }

}
7.User.java (差点漏了这个实体类)
package example.pojo;

import java.io.Serializable;

//这里我开了mybatis二级缓存 所以要实现序列化接口 Serializable
public class User implements Serializable {
    private static final long serialVersionUID = -5809782578272943999L;

    private Integer id;
    private String username;
    private String password;

    public Integer getId() {
        return id;
    }

    public void setId(Integer id) {
        this.id = id;
    }

    public String getUsername() {
        return username;
    }

    public void setUsername(String username) {
        this.username = username;
    }

    public String getPassword() {
        return password;
    }

    public void setPassword(String password) {
        this.password = password;
    }
}
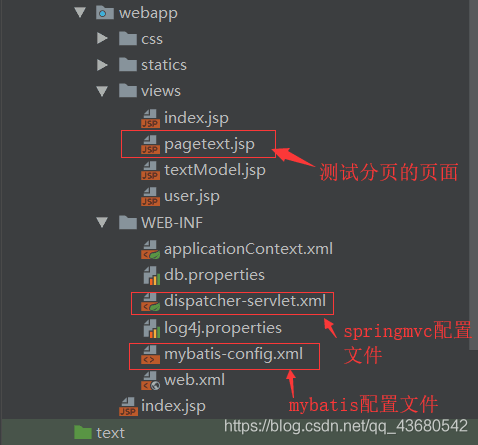
8.pagetext.jsp (重要的测试分页效果的页面)
<%@ taglib prefix="c" uri="http://java.sun.com/jsp/jstl/core" %>
<%@ page contentType="text/html;charset=UTF-8" language="java" %>
<html>
<head>
    <title>Bootstrap 实例 - 默认的分页</title>
    <!--先引入需要的jQuery 和 Bootstrap 文件以及相关插件 这里我直接引用网上的核心库 记得联网-->
    <link rel="stylesheet" href="https://cdn.staticfile.org/twitter-bootstrap/3.3.7/css/bootstrap.min.css">
    <script src="https://cdn.staticfile.org/jquery/2.1.1/jquery.min.js"></script>
    <script src="https://cdn.staticfile.org/twitter-bootstrap/3.3.7/js/bootstrap.min.js"></script>
    <script src="https://code.jquery.com/jquery.js"></script>
</head>
<body>
    <script>
        //禁用功能
        $(function () {
            $("ul.pagination li.disabled a").click(function () {
                return false;
            })
        });
    </script>

    <%-- 用来放用户信息的table 暂时只显示用户信息 编辑和删除功能我就先注掉了 --%>
    <div class="listDIV">
        <table class="table table-striped table-bordered table-hover table-condensed">
            <caption>用户列表 - 共${page.total}人</caption>  <%-- 这个page就是之前通过addObject存储的page 通过el表达式直接获取 --%>
            <thead>
            <tr class="success">
                <th>id</th>
                <th>username</th>
                <th>password</th>
                <%--<th>编辑</th>
                <th>删除</th>--%>
            </tr>
            </thead>

            <tbody>
            <%-- items:要被循环的信息 var:代表当前条目的变量名称  varStatus:代表循环状态的变量名称 --%>
            <%-- 如果像我这种菜鸟一样对 varStatus 不了解 参考:https://blog.csdn.net/hu_xuefeng/article/details/51494250  --%>
            <c:forEach items="${userList}" var="s" varStatus="status">
                <tr>
                    <td>${s.id}</td>
                    <td>${s.username}</td>
                    <td>${s.password}</td>
                   <%-- <td><a href="/editStudent?id=${s.id}"><span class="glyphicon glyphicon-edit"></span> </a></td>
                    <td><a href="/deleteStudent?id=${s.id}"><span class="glyphicon glyphicon-trash"></span> </a></td>--%>
                </tr>
            </c:forEach>

            </tbody>
        </table>
    </div>

    <!-- 分页标签 -->
    <nav class="pageDIV">
        <ul class="pagination">
            <%--跳到首页 这里做了判断 如果没有前一页 那么 跳到首页的这个标签是不可点击的 class="disabled" --%>
            <li <c:if test="${!page.hasPreviouse}">class="disabled"</c:if> >
                <a href="?page.start=0">   <%-- 首页的开始数据的索引为0 点击后会发现地址栏变为 http://localhost:8080/DemoMVC/getlist?page.start=0  是作为参数显式传递的 --%>
                    <span> << </span>
                </a>
            </li>
            <%--跳到前一页 同样做了判断 如果没有前一页 则不可点击前跳 class="disabled" --%>
            <li <c:if test="${!page.hasPreviouse}">class="disabled"</c:if> >
                <a href="?page.start=${page.start-page.count}"> <%--当前页面数据索引 - 每页显示条数 = 上一页的第一条数据索引 --%>
                    <span> < </span>
                </a>
            </li>
            <%--中间的分页  显示各页号--%>
            <%-- begin:开始的元素 end:最后一个元素 varStatus:代表循环状态的变量名称 --%>
            <%-- 比如我一共39条元素 共4页 第一页记为0 最后一页 4-1 =3  --%>
            <c:forEach begin="0" end="${page.totalPage-1}" varStatus="status">
                <%-- 这部分解释下
                     status.count:从1开始计数  1 2 3 4 ....39
                     status.index:从0开始计数  0 1 2 3 ....38
                     page.count:   每页数量
                      -10 <= status.count*page.count-page.start<= 30
                     显示当前页码的前两个和后两个就可,例如当前页码为3的时候,就显示 1 2 3(当前页) 4 5 的页码
                     这里不理解没关系 一会儿会有图解
                 --%>
                <c:if test="${status.count*page.count-page.start<=30 && status.count*page.count-page.start>=-10}">
                    <%-- status.index*page.count==page.start 判断是否是目前的这一页
                         举例:status.index = 2  page.count = 10
                               第一页 0  第二页 10  第三页 20   (数字指每页第一行的索引)
                               如果现在在第三页 那么 2 * 10 = 20  条件成立
                               class="disabled"  此页数的标签不可点击
                               class="current"   此页数的标签颜色显示为灰色表示目前位置停留在此页 --%>
                      <li <c:if test="${status.index*page.count==page.start}">class="disabled"</c:if>>
                          <a href="?page.start=${status.index*page.count}"
                           <c:if test="${status.index*page.count==page.start}">class="current"</c:if>
                          >${status.count}</a>
                      </li>
                  </c:if>
              </c:forEach>
              <%--跳到下一页 同样做了判断 如果没有下一页 则不可点击后跳 class="disabled" --%>
              <li <c:if test="${!page.hasNext}">class="disabled"</c:if>>
                  <a href="?page.start=${page.start+page.count}">
                      <span> > </span>
                  </a>
              </li>
              <%--跳到尾页 如果没有后一页 那么 跳到尾页的这个标签是不可点击的 class="disabled" --%>
              <li <c:if test="${!page.hasNext}">class="disabled"</c:if>>
                  <a href="?page.start=${page.last}">
                      <span> >> </span>
                  </a>
              </li>
          </ul>
      </nav>
  </body>
  </html>
关于jsp页面的部分代码解析
<c:forEach begin="0" end="${page.totalPage-1}" varStatus="status">
                <%-- 这部分解释下
                     status.count:从1开始计数  1 2 3 4 ....39
                     status.index:从0开始计数  0 1 2 3 ....38
                     page.count:   每页数量
                      -10 <= status.count*page.count-page.start<= 30
                     显示当前页码的前两个和后两个就可,例如当前页码为3的时候,就显示 1 2 3(当前页) 4 5 的页码
                     这里不理解没关系 请看图解
                 --%>
                <c:if test="${status.count*page.count-page.start<=30 && status.count*page.count-page.start>=-10}">
                      <li <c:if test="${status.index*page.count==page.start}">class="disabled"</c:if>>
                          <a href="?page.start=${status.index*page.count}"
                           <c:if test="${status.index*page.count==page.start}">class="current"</c:if>
                          >${status.count}</a>
                      </li>
                  </c:if>
              </c:forEach>
理解测试条件:
-10 <= 当前页*每一页显示的数目 - 当前页开始的数据编号 <= 30图解:

理解了吧,假设当前页面是第三页
- 那么它左边要显示前两页 判断条件就是
status.count*page.count-page.start>=-10 - 同理它右边要显示后两页 判断条件就是
status.count*page.count-page.start<=30
- 那么它左边要显示前两页 判断条件就是
效果
很好主要文件都在上面了 ,让我们来看看最后的效果(请注意看地址栏的变化)
1.这是首次输入地址后的界面,看地址栏的地址(有点丑,请不要在意)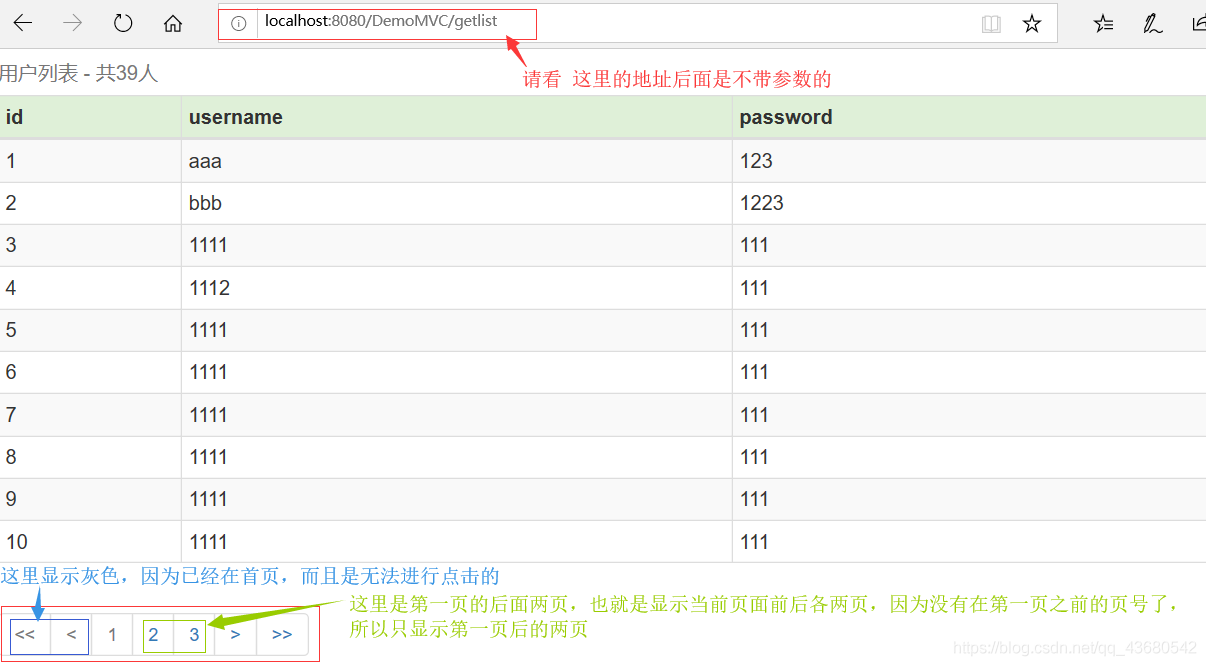
2.点击第二页,再看地址栏的地址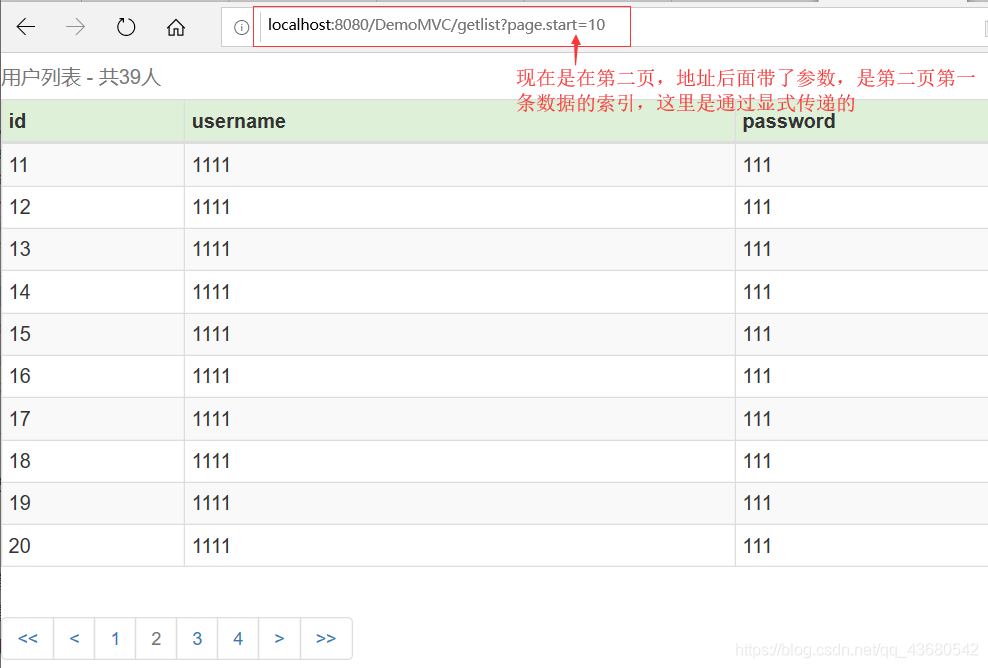
3.其他效果请自行实践查看 (●’◡’●)
github地址
https://github.com/chenzifeng123/DemoMVC
全部代码都在里面,记得改 db.properties 文件里面 的数据库url 用户名和密码
感谢
第二次写博客了,上回写还是因为老师强制要求。原本以为自己已经掌握了,但是在写博客的过程中发现有好多细节之前都没理清楚,所以写博客也是梳理知识,复习巩固的过程。
文中的代码大部分都来自一位博客园的大佬,我只是对它进行修改以适用于自己的环境并加上了大量注释,下面附上这位大佬的原文链接,非常感谢他,让我学到了不少东西。
最后感谢大家的阅读!
ps:
大佬的博客园链接,他的很多文章都很不错哦
大佬的原文链接
版权声明:本文为qq_43680542原创文章,遵循CC 4.0 BY-SA版权协议,转载请附上原文出处链接和本声明。