首先,简单的来说对象储存就是实现将本地的文件上传到特定的位置。所谓的软件即服务,对象储存大同小异。腾讯的叫COS对象储存,阿里的叫OSS对象储存,其实都是一样的,这里我使用的是腾讯COS。
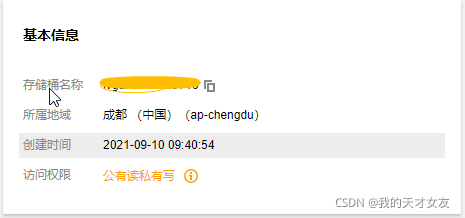
这里我已经购买了,打开如下图所示。
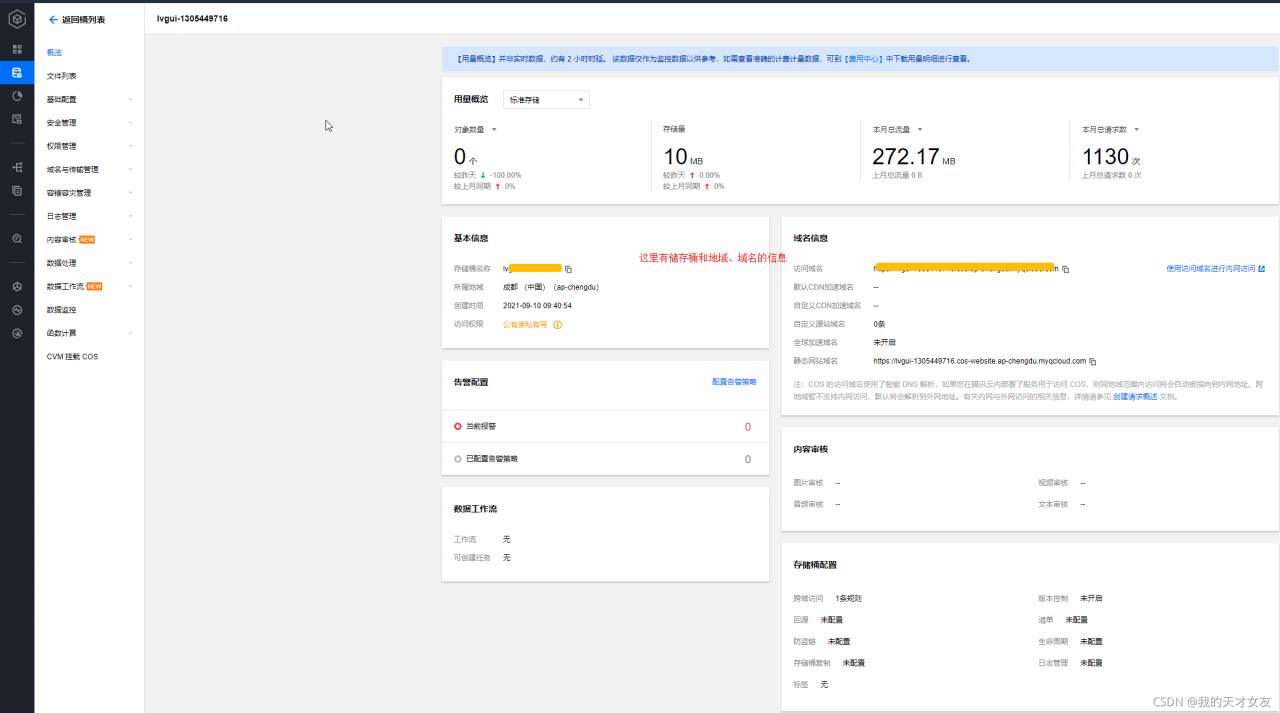
腾讯云COS控制面板
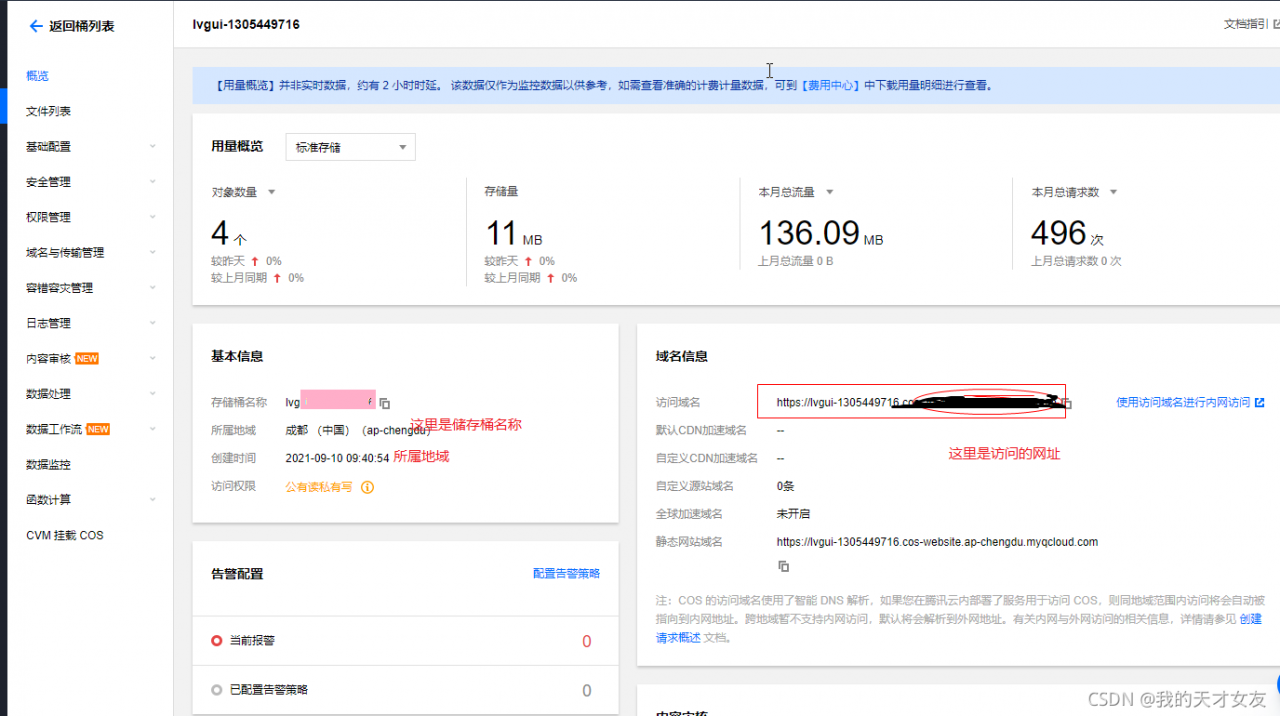
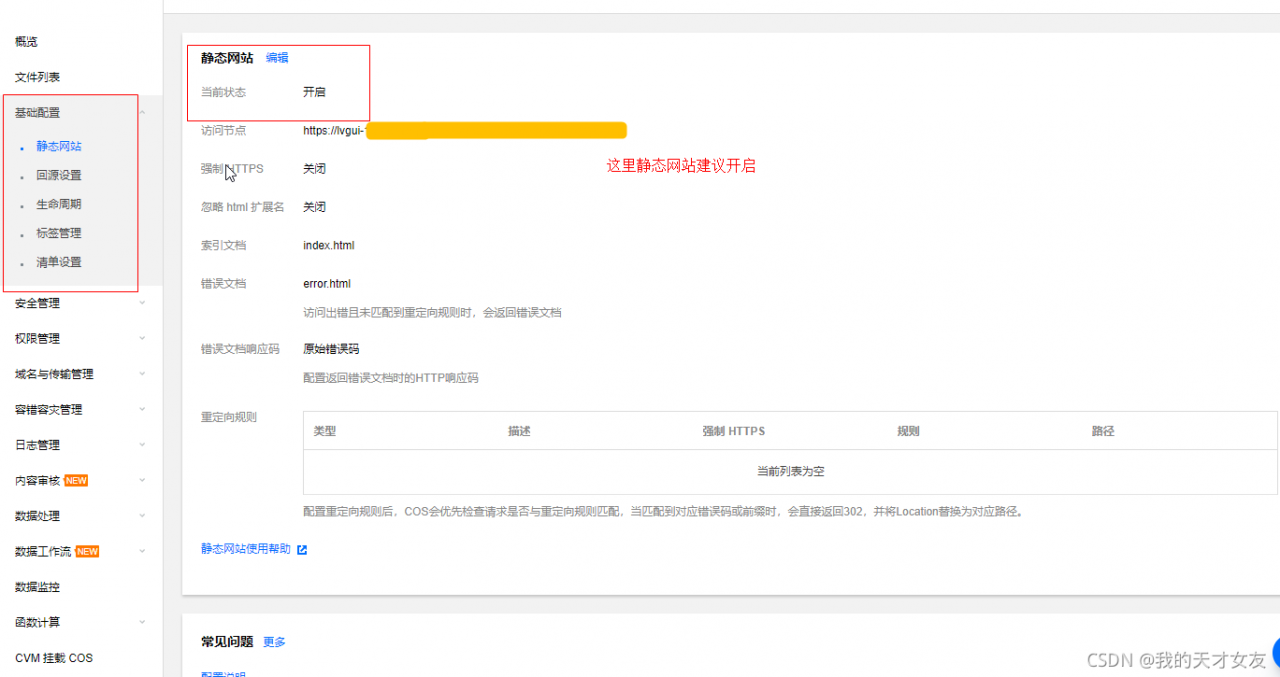
设置静态网址:
设置访问权限,这里建议设置为公有读私有写
接下来我们回到Java中
这里以一个SpringBoot项目为例子,引入cos_api,这里是我日志冲突了,故排除了带的slf4j日志
		<dependency>
			<groupId>com.qcloud</groupId>
			<artifactId>cos_api</artifactId>
			<version>5.6.8</version>
			<!--排除这个slf4j-log4j12-->
			<exclusions>
				<exclusion>
					<groupId>org.slf4j</groupId>
					<artifactId>slf4j-log4j12</artifactId>
				</exclusion>
			</exclusions>
</dependency>然后我们在配置文件application.properties放入需要的COS参数
spring.tengxun.SecretId=AKIEEySgeMs30g5E7j7G8k6C1Zqqc8N
spring.tengxun.SecretKey=0kDPKzPZSXMuCDxPbXFgqpeGbfSyDB
spring.tengxun.region=ap-chengd
spring.tengxun.url=https://lvgcos.ap-chengdu.myqcloud.com
spring.tengxun.bucketName=lvgu-1305449716
以上是我的配置
spring.tengxun.region 指的是地域
spring.tengxun.url 路径-访问域名
spring.tengxun.bucketName 储存桶名称
spring.tengxun.SecretId和spring.tengxun.SecretKey指的是密钥
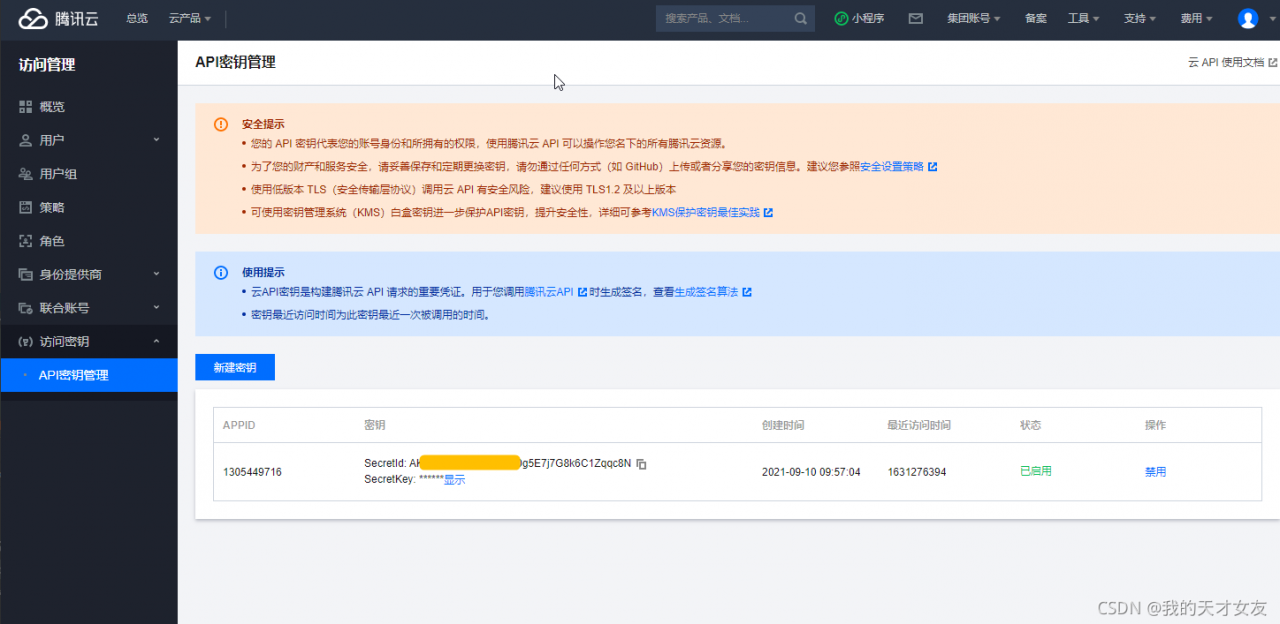
登录 - 腾讯云![]() https://console.cloud.tencent.com/cam/capi这里的路径可以直接设置密钥,如下图所示
https://console.cloud.tencent.com/cam/capi这里的路径可以直接设置密钥,如下图所示
然后我们就可以测试,这里附上完整的代码
package com.lvgui.demo;

import cn.hutool.core.date.DateTime;
import cn.hutool.core.util.StrUtil;
import com.qcloud.cos.COSClient;
import com.qcloud.cos.ClientConfig;
import com.qcloud.cos.auth.BasicCOSCredentials;
import com.qcloud.cos.auth.COSCredentials;
import com.qcloud.cos.exception.CosClientException;
import com.qcloud.cos.exception.CosServiceException;
import com.qcloud.cos.model.*;
import com.qcloud.cos.region.Region;
import org.junit.Test;
import org.junit.runner.RunWith;
import org.springframework.beans.factory.annotation.Value;
import org.springframework.boot.test.context.SpringBootTest;
import org.springframework.test.context.junit4.SpringRunner;

import java.io.File;
import java.util.List;

@RunWith(SpringRunner.class)
@SpringBootTest(classes = Demo1Application.class)
public class Demo1ApplicationTests {

	@Value("${spring.tengxun.SecretId}")
	private String secretId;

	@Value("${spring.tengxun.SecretKey}")
	private String secretKey;

	@Value("${spring.tengxun.region}")
	private String region;

	@Value("${spring.tengxun.bucketName}")
	private String bucketName;

	@Value("${spring.tengxun.url}")
	private String path;

	public COSClient initCOSClient(){
        COSCredentials cred = new BasicCOSCredentials(secretId, secretKey);
		Region region = new Region(this.region);
		ClientConfig clientConfig = new ClientConfig(region);
		// 生成 cos 客户端。
		COSClient cosClient = new COSClient(cred, clientConfig);
		return cosClient;
	}

	/**
	 * 上传文件
	 */
	@Test
	public void upLoad(){
		try {
		    String filePath = "G:\\svn\\图片\\背景图\\4k游戏壁纸_彼岸图网.jpg";
			// 指定要上传的文件
			File localFile = new File("G:\\svn\\图片\\背景图\\4k游戏壁纸_彼岸图网.jpg");
			// 指定要上传到 COS 上对象键
            String key = getFileKey(filePath);
            System.out.println(key + "key----------------------");
			PutObjectRequest putObjectRequest = new PutObjectRequest(bucketName, key, localFile);
			COSClient cosClient1 = initCOSClient();
			PutObjectResult putObjectResult = cosClient1.putObject(putObjectRequest);
            // 设置权限(公开读)
            cosClient1.setBucketAcl(bucketName, CannedAccessControlList.PublicRead);
            System.out.println("url------------" + path + "/"+ key);
		} catch (CosServiceException serverException) {
			serverException.printStackTrace();
		} catch (CosClientException clientException) {
			clientException.printStackTrace();
		}
	}


	/**
	 * 生成文件路径
	 *
	 * @return
	 */
	private String getFileKey(String originalfileName) {
		String filePath = "test/";
		//1.获取后缀名 2.去除文件后缀 替换所有特殊字符
		String fileType = originalfileName.substring(originalfileName.lastIndexOf("."));
		String fileStr = StrUtil.removeSuffix(originalfileName, fileType).replaceAll("[^0-9a-zA-Z\\u4e00-\\u9fa5]", "_");
		filePath +=  new DateTime().toString("yyyyMMddHHmmss") + "_" + fileStr + fileType;
		return filePath;
	}

}
主要第一步就是将配置的信息引入,initCOSClient()方法新构建一个连接,上传到对象储存中,是一个key-value的形式。
首先是设置一个本地的文件,这里用上传的文件名,加上日期作为key值,设置文件能公开访问,然后将远程路径输出出来。

这里远程的对象储存这里也可以查看到这个上传的文件,这里我在key值前面加了test/,因此能会在服务器上新建一个test路劲存储,如果有就直接放入,test/test加上key,就会新建一个test文件夹,再在里面新建一个test文件夹,然后放入文件。这样我们在作接口的时候,可以根据参数的不同设置不同的路径,方便以后的文件管理。

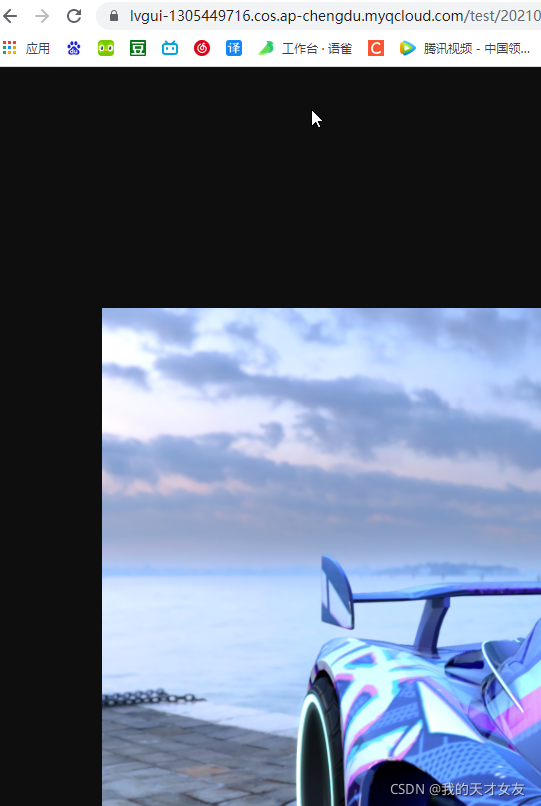
访问输出的url如果可以查看到输出的图片,那也就是成功了,这里建议大家以图片开始,先调试好,在作复杂一些
这里基本就已经成功了,我们直接写对应的Service和controller即可。这里我直接附上我的代码
首先新建一个配置将连接作为一个Bean生成
package com.lvgui.demo.config;

import com.qcloud.cos.COSClient;
import com.qcloud.cos.ClientConfig;
import com.qcloud.cos.auth.BasicCOSCredentials;
import com.qcloud.cos.auth.COSCredentials;
import com.qcloud.cos.region.Region;
import lombok.Data;
import org.springframework.beans.factory.annotation.Value;
import org.springframework.context.annotation.Bean;
import org.springframework.context.annotation.Configuration;

/**
 * @author lv.Gui
 * @description 腾讯云COS配置
 * @date 2021/9/10 10:49
 **/
@Configuration
@Data
public class TCCOSConfig {

   @Value("${spring.tengxun.SecretId}")
    private String secretId;

   @Value("${spring.tengxun.SecretKey}")
    private String secretKey;

   @Value("${spring.tengxun.region}")
    private String region;

   @Value("${spring.tengxun.bucketName}")
    private String bucketName;

   @Value("${spring.tengxun.url}")
    private String path;


   @Bean
    public COSClient cosClient(){
        // 1 初始化用户身份信息(secretId, secretKey)。
        COSCredentials cred = new BasicCOSCredentials(this.secretId, this.secretKey);
        // 2 设置 bucket 的区域, COS 地域的简称请参照
        Region region = new Region(this.region);
        ClientConfig clientConfig = new ClientConfig(region);
        // 3 生成 cos 客户端。
        COSClient cosClient = new COSClient(cred, clientConfig);
        return cosClient;
    }
}
然后建立对应的Service,这里我附上实现类的代码,大致适合测试类是一样的,这里传入文件,放回一个自定义的类型,这里我用的是返回一个状态码和状态信息以及参数的一个类,代码不同的地方在于传入的是文件类型,给对象储存用的输入流
package com.lvgui.demo.dto;


import com.lvgui.demo.exception.BizException;

import lombok.Data;


@Data
public class ResponseDto<T> {
    /**
     * 状态码
     */
    private Integer code;

    /**
     * 状态信息
     */
    private String message;


    /**
     * 数据
     */
    private T data;

    public ResponseDto(Integer code, String message, T data) {
        this.code = code;
        this.data = data;
        this.message = message;
    }

    public ResponseDto(T data) {
        this.code = 10000;
        this.data = data;
        this.message = "成功并返回数据";
    }

    public ResponseDto(BizException bizException) {
        this.code = bizException.getCode();
        this.message = bizException.getDevelopMsg();
    }
}
package com.lvgui.demo.service.Impl;

import cn.hutool.core.date.DateTime;
import cn.hutool.core.util.StrUtil;
import com.lvgui.demo.dto.ResponseDto;
import com.lvgui.demo.service.ICosFileService;
import com.qcloud.cos.COSClient;
import com.qcloud.cos.model.CannedAccessControlList;
import com.qcloud.cos.model.PutObjectRequest;
import org.springframework.beans.factory.annotation.Autowired;
import org.springframework.beans.factory.annotation.Value;
import org.springframework.stereotype.Service;
import org.springframework.web.multipart.MultipartFile;

import java.io.InputStream;
import java.util.HashMap;
import java.util.Map;

/**
 * @author lv.Gui
 * @description 腾讯云COS(对象存储中心)服务实现类
 * @date 2021/9/10 15:43
 **/
@Service
public class CosFileServiceImpl implements ICosFileService {


    @Value("${spring.tengxun.SecretId}")
    private String secretId;
    @Value("${spring.tengxun.SecretKey}")
    private String secretKey;

   @Value("${spring.tengxun.region}")
    private String region;

    @Value("${spring.tengxun.bucketName}")
    private String bucketName;

    @Value("${spring.tengxun.url}")
    private String path;

    @Autowired
    private COSClient cosClient;

    @Override
    public ResponseDto upload(MultipartFile file) {
        ResponseDto responseDto = null;
        try {
            String originalfileName = file.getOriginalFilename();

            // 获得文件流
            InputStream inputStream = file.getInputStream();

            //设置文件key
            String filePath = getFileKey(originalfileName);

            // 上传文件
            cosClient.putObject(new PutObjectRequest(bucketName, filePath, inputStream, null));
            cosClient.setBucketAcl(bucketName, CannedAccessControlList.PublicRead);
            String url = path + "/" + filePath;
            Map<String, String> map = new HashMap<>();
            map.put("fileName", originalfileName);
            map.put("url", url);
            return new ResponseDto(10000, "成功并返回数据", map);
        } catch (Exception e) {
            e.printStackTrace();
        } finally {
            cosClient.shutdown();
        }
        return responseDto;
    }

    /**
     * 生成文件路径
     *
     * @return
     */
    private String getFileKey(String originalfileName) {
        String filePath = "test/";
        //1.获取后缀名 2.去除文件后缀 替换所有特殊字符
        String fileType = originalfileName.substring(originalfileName.lastIndexOf("."));
        String fileStr = StrUtil.removeSuffix(originalfileName, fileType).replaceAll("[^0-9a-zA-Z\\u4e00-\\u9fa5]", "_");
        filePath +=  new DateTime().toString("yyyyMMddHHmmss") + "_" + fileStr + fileType;
        return filePath;
    }
}
controller层
package com.lvgui.demo.controller;

import com.lvgui.demo.dto.ResponseDto;
import com.lvgui.demo.service.ICosFileService;
import com.lvgui.demo.util.ReturnUtil;
import io.swagger.annotations.Api;
import io.swagger.annotations.ApiImplicitParam;
import io.swagger.annotations.ApiOperation;
import org.springframework.beans.factory.annotation.Autowired;
import org.springframework.validation.annotation.Validated;
import org.springframework.web.bind.annotation.RequestMapping;
import org.springframework.web.bind.annotation.RequestMethod;
import org.springframework.web.bind.annotation.RequestPart;
import org.springframework.web.bind.annotation.RestController;
import org.springframework.web.multipart.MultipartFile;

/**
 * @Author: lvgui
 * @Date: 2021/9/10 20:08
 * @Description: 文件的api
 **/
@RestController
@Api(tags = "文件的api")
@RequestMapping("/file")
@Validated
public class CosFileController {

    @Autowired
    private ICosFileService cosFileService;

    /**
     * 上传文件
     * @param file
     */
    @RequestMapping(value="/fillLoad",method = RequestMethod.POST)
    @ApiImplicitParam(name = "file", value = "文件", dataType = "MultipartFile")
    @ApiOperation(value = "上传文件", httpMethod = "POST")
    public ResponseDto addUser(@RequestPart("file") MultipartFile file) {
        return ReturnUtil.returnSuccess(cosFileService.upload(file));
    }
}
这里的测试是继承了Swagger来做的,可以参看我的博客或者在网上搜索SpringBoot继承Swagegr
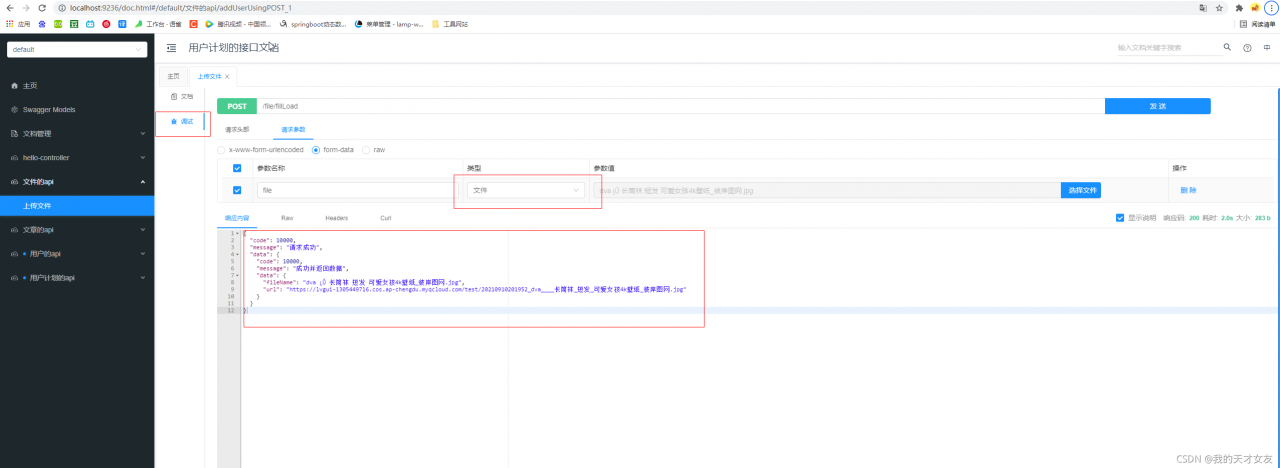
上传文件接口就完成了,这里只是一个简单的实现,不过有了这个基础也就方便大家去实现更多的功能。如果你有任何问题,都可以留言
这里附上我的pom文件完整版,很多都是这里用不到的,放上来做个参考。
<?xml version="1.0" encoding="UTF-8"?>
<project xmlns="http://maven.apache.org/POM/4.0.0"
		 xmlns:xsi="http://www.w3.org/2001/XMLSchema-instance"
		 xsi:schemaLocation="http://maven.apache.org/POM/4.0.0 http://maven.apache.org/xsd/maven-4.0.0.xsd">
	<modelVersion>4.0.0</modelVersion>
	<parent>
		<groupId>org.springframework.boot</groupId>
		<artifactId>spring-boot-starter-parent</artifactId>
		<version>2.4.5</version>
		<relativePath /> <!-- lookup parent from repository -->
	</parent>
	<groupId>com.example</groupId>
	<artifactId>demo-1</artifactId>
	<version>0.0.1-SNAPSHOT</version>
	<name>demo-1</name>
	<description>Demo project for Spring Boot</description>
	<properties>
		<java.version>1.8</java.version>
	</properties>
	<dependencies>
		<dependency>
			<groupId>org.springframework.boot</groupId>
			<artifactId>spring-boot-starter-web</artifactId>
		</dependency>
		<dependency>
			<groupId>org.springframework.boot</groupId>
			<artifactId>spring-boot-starter-data-jpa</artifactId>
		</dependency>
		<dependency>
			<groupId>org.springframework.boot</groupId>
			<artifactId>spring-boot-starter-jdbc</artifactId>
		</dependency>
		<dependency>
			<groupId>mysql</groupId>
			<artifactId>mysql-connector-java</artifactId>
			<scope>runtime</scope>
		</dependency>
		<dependency>
			<groupId>org.projectlombok</groupId>
			<artifactId>lombok</artifactId>
		</dependency>
		<dependency>
			<groupId>com.alibaba</groupId>
			<artifactId>fastjson</artifactId>
			<version>1.2.47</version>
		</dependency>
		<!-- swagger2 -->
		<dependency>
			<groupId>io.springfox</groupId>
			<artifactId>springfox-swagger2</artifactId>
			<version>2.9.2</version>
		</dependency>
		<dependency>
			<groupId>io.springfox</groupId>
			<artifactId>springfox-swagger-ui</artifactId>
			<version>2.9.2</version>
		</dependency>
		<!-- swagger美化 -->
		<dependency>
			<groupId>com.github.xiaoymin</groupId>
			<artifactId>knife4j-spring-boot-starter</artifactId>
			<version>2.0.2</version>
		</dependency>
		<!-- hutool -->
		<dependency>
			<groupId>cn.hutool</groupId>
			<artifactId>hutool-json</artifactId>
			<version>5.0.7</version>
		</dependency>
		<!--格式验证-->
		<dependency>
			<groupId>org.springframework.boot</groupId>
			<artifactId>spring-boot-starter-validation</artifactId>
		</dependency>
		<dependency>
			<groupId>org.springframework.boot</groupId>
			<artifactId>spring-boot-starter-test</artifactId>
			<scope>test</scope>
		</dependency>
		<dependency>
			<groupId>junit</groupId>
			<artifactId>junit</artifactId>
			<scope>test</scope>
		</dependency>
		<dependency>
			<groupId>com.qcloud</groupId>
			<artifactId>cos_api</artifactId>
			<version>5.6.8</version>
			<!--排除这个slf4j-log4j12-->
			<exclusions>
				<exclusion>
					<groupId>org.slf4j</groupId>
					<artifactId>slf4j-log4j12</artifactId>
				</exclusion>
			</exclusions>
		</dependency>
	</dependencies>

	<build>
		<finalName>zuiuxi_lvgui_${project.parent.version}</finalName>
		<plugins>
			<plugin>
				<groupId>org.springframework.boot</groupId>
				<artifactId>spring-boot-maven-plugin</artifactId>
				<version>1.3.3.RELEASE</version>
			</plugin>
		</plugins>

	</build>

</project>