vue系列文章目录
第一章:Vue基础知识笔记(模板语法、数据绑定、事件处理、计算属性)(一)
第二章:Vue基础知识(计算属性、监视属性、computed和watch之间的区别、绑定样式)(二)
第三章:Vue基础知识(条件渲染、列表渲染、收集表单数据、过滤器)(三)
第四章:Vue基础知识(内置指令、自定义指令、Vue生命周期)(四)
第五章:Vue基础知识之组件机制(非单文件组件、单文件组件)(五)
第六章:Vue创建脚手架(六)
第七章:Vue使用脚手架(ref、props、mixin、插件、scoped)(七)
第八章:Vue组件通信(组件的自定义事件、全局事件总线、消息订阅与发布、插槽、props)(八)
第九章:Vue使用脚手架(nextTick、Vue封装的过度与动画、vue脚手架配置代理)(九)
第十章:Vuex(十)
第十二章:vue-router(路由的两种工作模式、router-link的replace属性、编程式路由导航、缓存路由组件keep-alive、路由守卫【全局路由守卫、独享路由守卫、组件内路由守卫】)(十二)
一、路由
vue-router 的理解 vue 的一个插件库,专门用来实现 SPA 应用
对 SPA 应用的理解
- 单页 Web 应用(single page web application,SPA)。
- 整个应用只有一个完整的页面。
- 点击页面中的导航链接不会刷新页面,只会做页面的局部更新。
- 数据需要通过 ajax 请求获取
- 理解: 一个路由(route)就是一组映射关系(key - value),多个路由需要路由器(router)进行管理。
- 前端路由:key是路径,value是组件。
1.基本使用
安装vue-router,命令:
npm i vue-router应用路由插件:
//引入VueRouter import VueRouter from 'vue-router' //引入路由配置项 import router from './router' Vue.use(VueRouter); //创建vm new Vue({ el:'#app', render: h => h(App), //应用路由配置项 router:router })编写路由页面:
About.vue
<template>
  <div>About页面</div>
</template>

<script>
export default {
  name: "About",
};
</script>
Home.vue
<template>
  <div>Home页面</div>
</template>

<script>
export default {
  name: "Home",
};
</script>
编写router配置项router/index.js:
router中最重要的,就是routes属性,配置路由与组件之间的映射关系,将我们配置好的关系放到router实例中
path:配置路由路径
component 配置对应组件//引入VueRouter import VueRouter from 'vue-router' //引入Luyou 组件 import About from '../components/About' import Home from '../components/Home' //创建router实例对象,去管理一组一组的路由规则 const router = new VueRouter({ routes:[ { path:'/about', component:About }, { path:'/home', component:Home } ] }) //暴露router export default router实现路由切换(active-class可配置高亮样式)
实现切换:
<router-link to="/about">About</router-link>指定展示位置:
<router-view></router-view>决定路由在什么位置展示
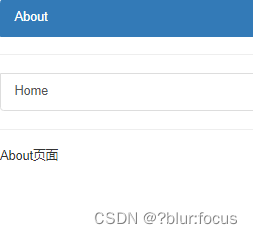
App.vue<template> <div> <!-- Vue中借助router-link标签实现路由的切换 --> <router-link class="list-group-item" to="/about" active-class="active" >About</router-link> <hr /> <router-link class="list-group-item" to="/home" active-class="active">Home</router-link> <hr /> <!-- 指定展示位置 --> <router-view></router-view> </div> </template> <script> export default { name: "App", }; </script>运行结果:
<router-link>的其他属性:
- to: 用于指定跳转的路径.
- tag: tag可以指定
<router-link>之后渲染成什么组件, tag设置成什么元素, 就会以什么元素的形式表现出来 - replace: replace不会留下history记录,后退键不能返回到上一个页面中
- active-class: 当对应的路由匹配成功时,设置active-class="active"可以实现高亮显示
- 在进行高亮显示的导航菜单或者底部tabbar时, 会使用到该类.
- 但是通常不会修改类的属性, 会直接使用默认的router-link-active即可
二、路由重定向
“重定向”的意思是,当用户访问某个页面时,URL 将会被替换成我们重定向的页面,例如:当用户访问 /home时,URL 将会被替换成 /about,然后匹配路由为 /about
使用以下代码替换上述基本使用案例的代码
router/index.js
const router= new VueRouter({
routes: [{
path: '/about',
component: About,
redirect: '/home'
},
{
path: '/home',
component: Home
},
//也可利用路由的重定向,设置我们要默认显示的页面
{
path: '/',
// 路由的重定向 也就是我们将根路径重定向到/home的路径下, 这样就可以得到我们想要的结果了
redirect: '/home'
}
]
})
export default router;
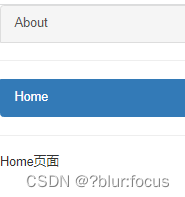
运行结果:
初始页面定位至Home页面,点击About自动转跳至Home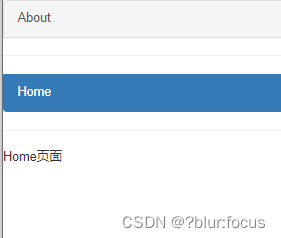
注意:
- 路由组件通常存放在
pages文件夹,一般组件通常存放在components文件夹。 - 通过切换,“隐藏”了的路由组件,
默认是被销毁掉的,需要的时候再去挂载。 - 每个组件都有自己的
$route属性,里面存储着自己的路由信息。 - 整个应用只有一个router,可以通过组件的
$router属性获取到。
三、多级路由(嵌套路由)
router/index.js配置路由规则,使用children配置项:
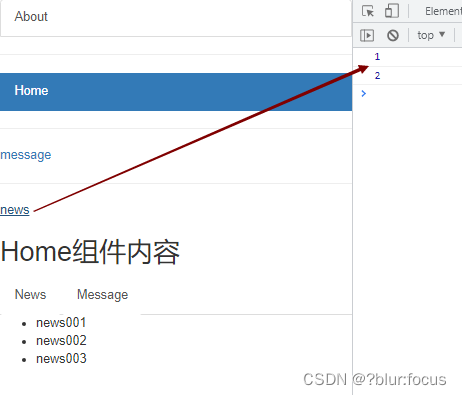
routes:[ { path:'/about', component:About, }, { path:'/home', component:Home, children:[ //通过children配置子级路由 // 子路由中也可以设置默认路径 路由重定向 { path: '/', redirect: 'news' }, { //配置子路由的时候 不需要加 / 但是在router-link中配置使用时 要写完整路径 比如/home/news path:'news', //此处一定不要写:/news component:News }, { path:'message',//此处一定不要写:/message component:Message } ] } ]路由页面:
About.vue
<template> <div>About页面</div> </template> <script> export default { name: "About", }; </script>Home.vue
<template> <div> <h2>Home组件内容</h2> <div> <ul class="nav nav-tabs"> <li> <!--要写完整路径--> <router-link class="list-group-item" active-class="active" to="/home/news">News</router-link> </li> <li> <router-link class="list-group-item" active-class="active" to="/home/message">Message</router-link> </li> </ul> <router-view></router-view> </div> </div> </template> <script> export default { name: "Home", }; </script>Message.vue
<template> <div> Message页面 </div> </template> <script> export default { name:'Message' } </script>News.vue
<template> <ul> <li>news001</li> <li>news002</li> <li>news003</li> </ul> </template> <script> export default { name:'News' } </script>App.vue
<template>
  <div>

      <!-- Vue中借助router-link标签实现路由的切换 -->
      <router-link class="list-group-item" to="/about" active-class="active"
        >About</router-link>
      <hr />
      <router-link class="list-group-item" to="/home" active-class="active">Home</router-link>

    <hr />

      <!-- 指定展示位置 -->
    <router-view></router-view>
  </div>
</template>

<script>
export default {
  name: "App",
};
</script>
运行结果:
三、命名路由
作用: 可以简化路由的跳转。
如何使用
a. 给路由命名:
  routes:[
 	{
 		path:'/home',
 		component:Home,
 		children:[ //通过children配置子级路由
 			{
 			    name:'hello'
 				path:'news', //此处一定不要写:/news
 				component:News
 			},
 			{
 				path:'message',//此处一定不要写:/message
 				component:Message
 			}
 		]
 	}
]
b. 简化跳转:
<!--简化前,需要写完整的路径 -->
<router-link to="/home/news">跳转</router-link>

<!--简化后,直接通过名字跳转 -->
<router-link :to="{name:'hello'}">跳转</router-link>
四、路由的query参数
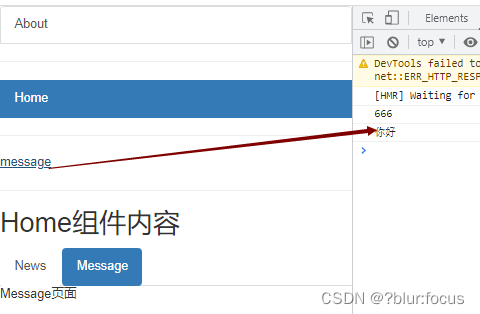
传递参数
<!-- 方法一:跳转并携带query参数,to的字符串写法 -->
<router-link to="/home/message/detail?id=666&title=你好">跳转</router-link>

<!-- 方法二:跳转并携带query参数,to的对象写法 -->
<router-link
	:to="{
		path:'/home/message',
		query:{
		   id:666,
            title:'你好'
		}
	}" >跳转</router-link>

  <!-- 方法三:跳转并携带query参数,to的对象写法 (使用name代替path)-->
   <router-link
    	:to="{
    		name:'hello',
    		query:{
    		   id:666,
                title:'你好'
    		}
    	}"
    >跳转</router-link>
接收参数:
$route.query.id
$route.query.title
案例(代码片段,为了节省空间,自行替换上方多级路由的案例代码得出运行结果):
App.vue
	<template>
  <div>
    <!-- Vue中借助router-link标签实现路由的切换 -->
    <router-link class="list-group-item" to="/about" active-class="active"
      >About</router-link
    >
    <hr />
    <router-link class="list-group-item" to="/home" active-class="active"
      >Home</router-link
    >

    <hr />
    <router-link to="/home/message?id=666&title=你好">message</router-link>
    <hr />
    <router-link
      :to="{
        name: 'hello',
        query: {
          id: 1,
          a: 2,
        },
      }"
      >news</router-link
    >
    <!-- 指定展示位置 -->
    <router-view></router-view>
  </div>
</template>
News.vue
<template>
  <ul>
    <li>news001</li>
    <li>news002</li>
    <li>news003</li>
  </ul>
</template>

<script>
export default {
  name: "News",
  mounted() {
    console.log(this.$route.query.id);
    console.log(this.$route.query.a);
  },
};
</script>
Message.vue
<template>
  <div>
    Message页面
  </div>
</template>

<script>
export default {
  name: "Message",
  mounted() {
    console.log(this.$route.query.id);
    console.log(this.$route.query.title);
  },
};
</script>
运行结果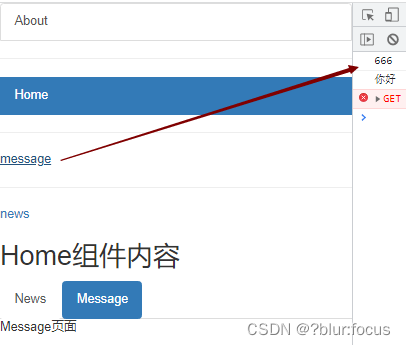
五、路由的params参数&动态路由
配置路由
配置普通路由{ path:'/home', component:Home, children:[ { name:'hello' path:'news', component:News }, { path:'message' component:Message, } ] }配置动态路由
需要把某种模式匹配到的所有路由,全部映射到同一个组件。
例如 : 有一个user组件,对于所有id不同的用户,都要使用这个组件来渲染,那么可以在vue-router的路由路径中使用动态路径参数来达到这个效果。{ path:'/home', component:Home, children:[ { name:'hello' path:'news', component:News }, { //配置动态路由 path:'message/:id/:title' component:Message, name:'message' } ] }传递参数
<!-- 跳转并携带params参数,to的字符串写法 -->
<router-link to="/home/message/666/你好">跳转</router-link>

<!-- 跳转并携带params参数,to的对象写法 -->
<router-link
	:to="{
		 name: 'message',
		params:{
		   id:666,
            title:'你好'
		}
	}"
>跳转</router-link>
特别注意:路由携带params参数时,若使用to的对象写法,则不能使用path配置项,必须使用name配置!
接收参数:
$route.params.id
$route.params.title
案例(代码片段,为了节省空间,自行替换上方多级路由的案例代码得出运行结果):
App.vue
	<template>
  <div>
    <!-- Vue中借助router-link标签实现路由的切换 -->
    <router-link class="list-group-item" to="/about" active-class="active"
      >About</router-link
    >
    <hr />
    <router-link class="list-group-item" to="/home" active-class="active"
      >Home</router-link
    >

    <hr />
    <router-link to="/home/message/666/你好">message</router-link>
    <hr />

    <!-- <router-link
      :to="{
        name: 'message',
        params: {
          id: 666,
           title: '你好',
        },
      }"
      >message</router-link
    > -->

	<!-- 指定展示位置 -->
    <router-view></router-view>
  </div>
</template>
Message.vue
<template>
  <div>
    Message页面
  </div>
</template>

<script>
export default {
  name: "Message",
  mounted() {
    console.log(this.$route.params.id);
    console.log(this.$route.params.title);
  },
};
</script>
运行结果:
六、路由的props配置
作用: 让路由组件更方便的收到参数
使用方式(修改router/index.js):
export default new VueRouter({
    routes: [{
            path: '/about',
            component: About,
        },
        {
            path: '/home',
            component: Home,
            children: [
                { path: '/', redirect: 'news' },
                {
                    name: 'message',
                    path: 'message/:id/:title',
                    //第一种写法:props值为对象,该对象中所有的key-value的组合最终都会通过props传给Message组件
                    // props: { a: 1, b: 2 },
                    //第二种写法:props值为布尔值,布尔值为true,则把路由收到的所有params参数通过props传给Message组件
                    // props: true,
                    //第三种写法:props值为函数,该函数返回的对象中每一组key-value都会通过props传给Message组件
                    props(route) {
                        return {
                            id: route.query.id,
                            title: route.query.title,
                            a: 1,
                            b: 2
                        }
                    },
                    component: Message
                }, {
                    name: 'hello',
                    path: 'News',
                    component: News
                }
            ]
        },
        {
            path: '/',
            redirect: '/home'
        }
    ]
})
案例(代码片段,为了节省空间,自行替换上方多级路由的案例代码得出运行结果):
App.vue
<template>
  <div>
    <!-- Vue中借助router-link标签实现路由的切换 -->
    <router-link class="list-group-item" to="/about" active-class="active"
      >About</router-link
    >
    <hr />
    <router-link class="list-group-item" to="/home" active-class="active"
      >Home</router-link
    >

    <hr />
    <!-- 第一第二种发送方式 -->
    <!-- <router-link to="/home/message/666/你好">message</router-link> -->
    <hr />
    <!-- 第三种发送方式 -->
    <router-link
      :to="{
        name: 'message',
        query: {
          id: 666,
          title: '你好',
        },
      }"
      >message</router-link
    >
    <!-- 指定展示位置 -->
    <router-view></router-view>
  </div>
</template>
Message.vue
<template>
  <div>
    Message页面
  </div>
</template>

<script>
export default {
  name: "Message",
  //   接收第一种方式的porps
  //   props: ["a", "b"],
  //   接收第二种方式的porps
  //   props: ["id", "title"],
  //   接收第三种方式的porps
  props: ["id", "title", "a", "b"],
  mounted() {
    console.log(this.id, this.title, this.a, this.b);
    // console.log(this.$route.params.id);
    // console.log(this.$route.params.title);
  },
};
</script>
运行结果: