如何用spingboot快速搭建出一套api服务,相信是很多开发者同学经常想探究的事情,本文简单介绍一下使用springboot+mybaties+gradle+mysql+knife4这套豪华整容来上手api服务
下面开始介绍具体的步骤及工具使用,索求代码的话直接拉到最后
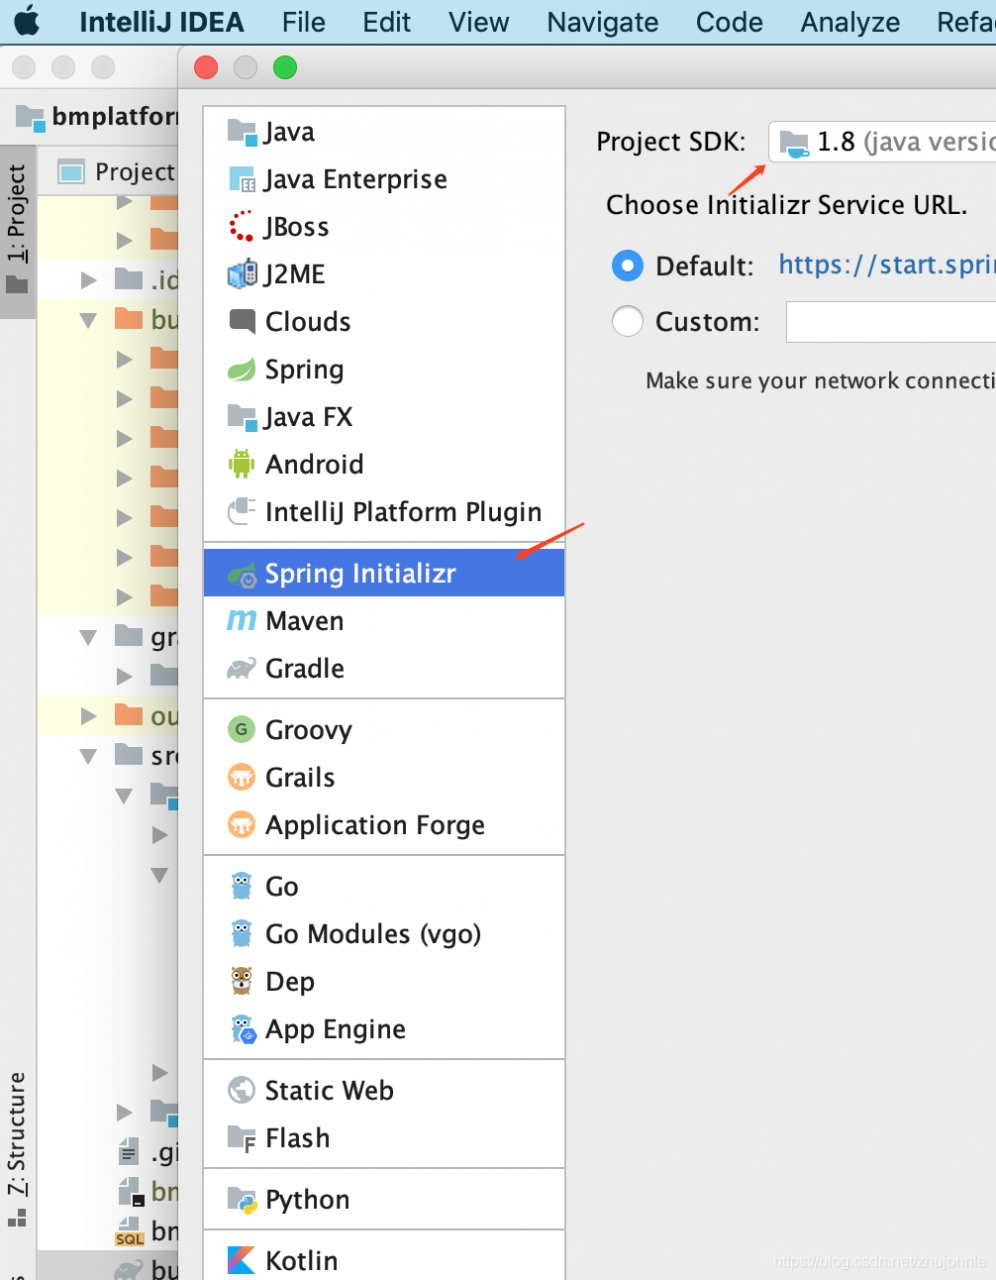
创建工程
- 创建工程
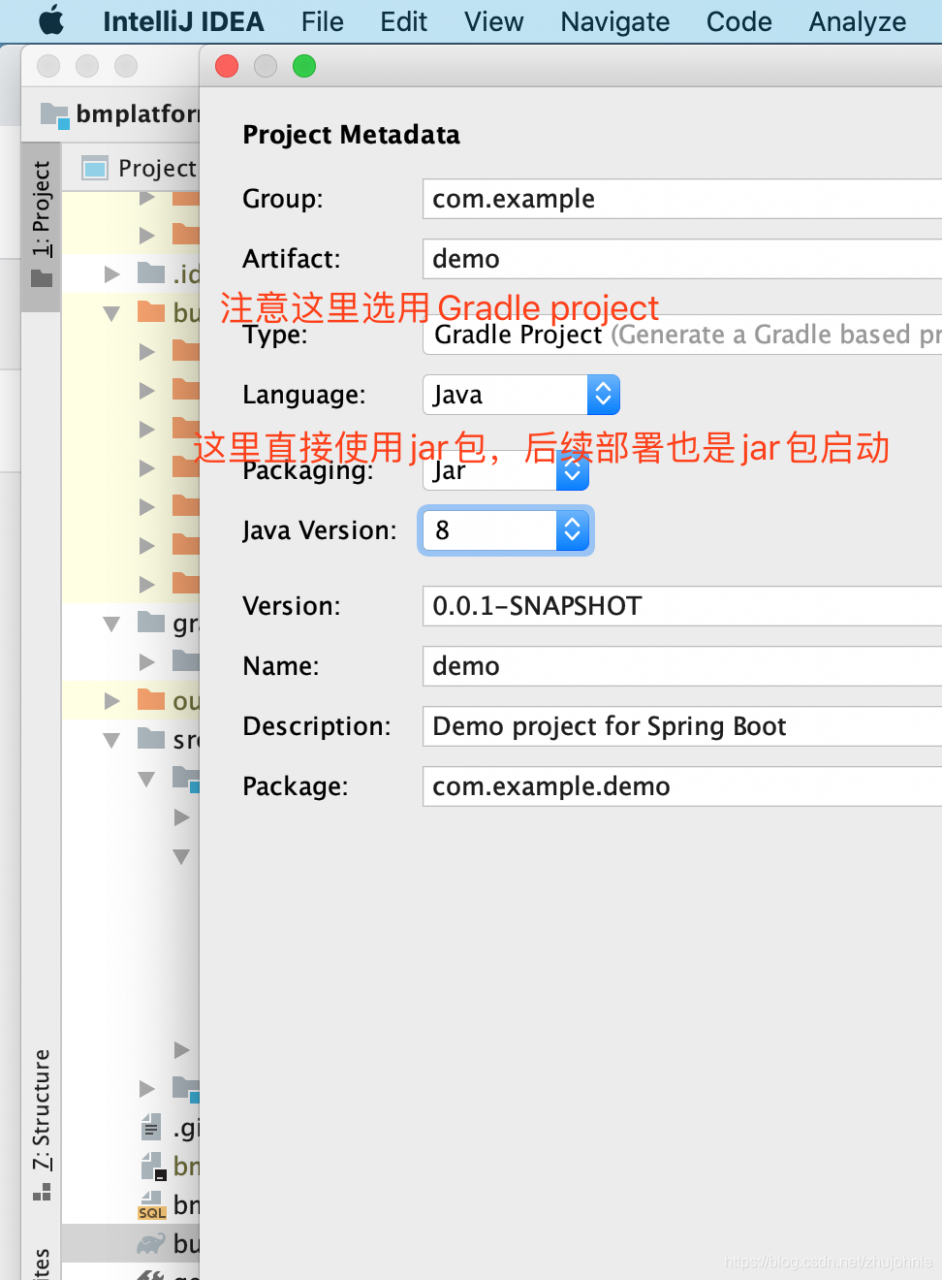
- 设置Gradle 编译及jar包形式打包
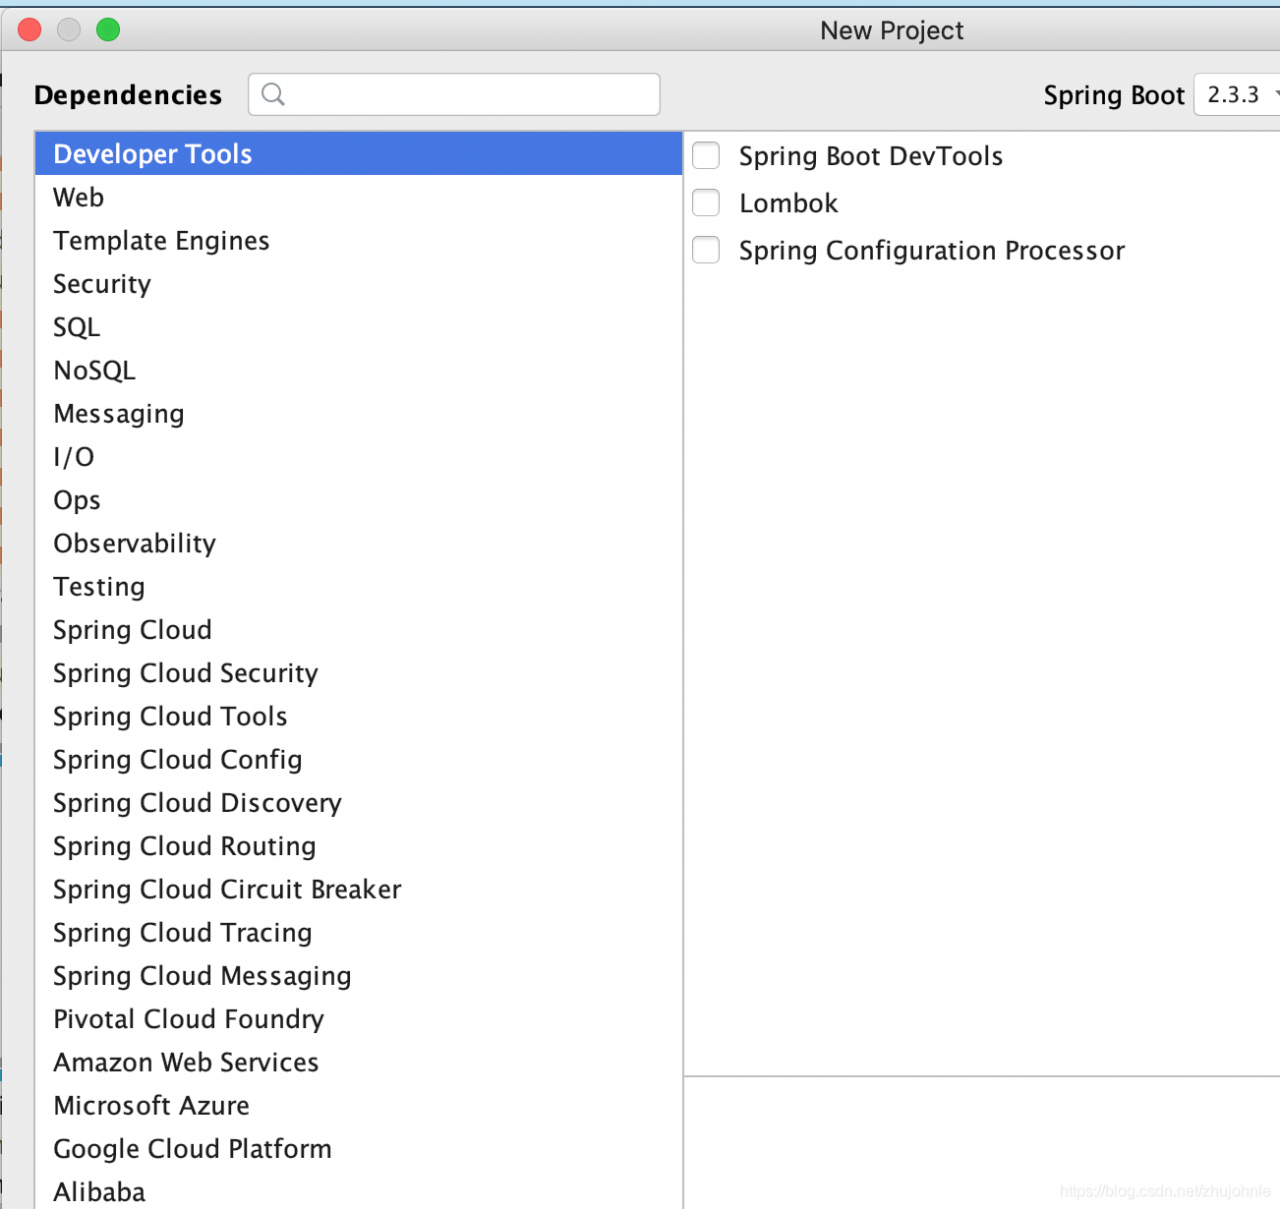
- 勾选默认需要的引用(这里暂时可以不勾选,后续自己添加)
Gradle 配置
对于用惯了maven的同学刚上手Gradle的时候或许有一些不习惯,两个编译工具各有千秋,但是Gradle确更有自己的优势,如有自己的编译语言grovvy 这一点使得其不仅作为编译工具,更可以有很高的可扩展性,使得我们在编译项目的过程中可以加入很多的diy因素
对于Gradle工具的使用这里不做过多的描述,android开发的同学可能会很有优势,andorid默认的编译工具androidstudio 就是默认使用Gradle来作为编译工具的
好,废话不多说我们先看下在工程里的build.gradle文件,这个类似于maven的xml文件,但是刚才也说过我们可以在gradle文件中进行使用grovvy进行编程
- 配置gradle下载依赖加速(修改下载源为阿里云)
repositories {
    repositories {
        maven{ url 'http://maven.aliyun.com/nexus/content/groups/public/' }
        maven{ url 'http://maven.aliyun.com/nexus/content/repositories/jcenter'}
        mavenCentral()
    }
}

allprojects {
    repositories {
        maven{ url 'http://maven.aliyun.com/nexus/content/groups/public/'}
        maven{ url 'http://maven.aliyun.com/nexus/content/repositories/jcenter'}
        mavenCentral()
    }
}
- 配置dependencies的引用
   //springboot基础
    implementation 'org.springframework.boot:spring-boot-starter'
    implementation 'org.springframework.boot:spring-boot-starter-web'
    implementation 'org.springframework.boot:spring-boot-starter-validation'

    //mybaties的generator 插件
    implementation 'org.mybatis.spring.boot:mybatis-spring-boot-starter:2.1.3'
    mybatisGenerator 'org.mybatis.generator:mybatis-generator-core:1.4.0'
    mybatisGenerator 'mysql:mysql-connector-java:8.0.21'
    mybatisGenerator 'tk.mybatis:mapper:3.3.9'

     //阿里巴巴 fast json解析
    compile group: 'com.alibaba', name: 'fastjson', version: '1.2.73'
   //文档管理
    compile group: 'com.github.xiaoymin', name: 'knife4j-spring-boot-starter', version: '2.0.2'
    //log
    testCompile group: 'ch.qos.logback', name: 'logback-classic', version: '1.2.3'
OK !! 到此为止 我们可以开始编写第一行get请求,我们新建一个controller,然后启动服务并访问localhost:8080/get
@RestController
public class HelloController {
    @RequestMapping("/get")
    public String test(){
        return "hello-world";
    }

}
mybatis
这里主要介绍mybatis的表结构自动映射为java代码的方式 使用MyBatisGenerator插件
build.gradle 相关配置
plugins {
    //gradle提供的mybatis generator插件
    id "com.arenagod.gradle.MybatisGenerator" version "1.4"
}

configurations {
    mybatisGenerator
}

 mybatisGenerator 'org.mybatis.generator:mybatis-generator-core:1.4.0'
 mybatisGenerator 'mysql:mysql-connector-java:8.0.21'
 mybatisGenerator 'tk.mybatis:mapper:3.3.9'
 implementation 'org.mybatis.spring.boot:mybatis-spring-boot-starter:2.1.3'
自定义编译脚本
在src/main/resources中新建config.properties 用于参数配置和generatorConfig.xml插件需要的构建文件
- config.properties内容
# JDBC 驱动类名
jdbc.driverClassName=com.mysql.cj.jdbc.Driver
# JDBC URL: jdbc:mysql:// + 数据库主机地址 + 端口号 + 数据库名
jdbc.url=jdbc:mysql://localhost:3306/bmplatform?useUnicode=true&characterEncoding=UTF-8
# JDBC 用户名及密码
jdbc.username=root
jdbc.password=123456

# 生成实体类所在的包
package.model=com.haxilian.bmplatform.beans.db
# 生成 mapper 类所在的包
package.mapper=com.haxilian.bmplatform.mapper
# 生成 mapper xml 文件所在的包,默认存储在 resources 目录下
sqlMapperPackage=com.haxilian.bmplatform.mapper
- generatorConfig.xml
<?xml version="1.0" encoding="UTF-8"?>
<!DOCTYPE generatorConfiguration
        PUBLIC "-//mybatis.org//DTD MyBatis Generator Configuration 1.0//EN"
        "http://mybatis.org/dtd/mybatis-generator-config_1_0.dtd">
<generatorConfiguration>
    <context id="Mysql" targetRuntime="MyBatis3Simple" defaultModelType="flat">

        <commentGenerator>
            <property name="javaFileEncoding" value="utf-8"/>
            <!--去除注释-->
            <property name="suppressAllComments" value="false"/>
            <!--注释中去除日期注释-->
            <property name="suppressDate" value="true"/>
            <!--注释中添加数据库字段备注注释-->
            <property name="addRemarkComments" value="true"/>
        </commentGenerator>


        <jdbcConnection driverClass="${driverClass}"
                        connectionURL="${connectionURL}"
                        userId="${userId}"
                        password="${password}">
            <!--MySQL 8.x 需要指定服务器的时区-->
            <property name="serverTimezone" value="UTC"/>
            <!--MySQL 不支持 schema 或者 catalog 所以需要添加这个-->
            <!--参考 : http://www.mybatis.org/generator/usage/mysql.html-->
            <property name="nullCatalogMeansCurrent" value="true"/>
        </jdbcConnection>

        <javaTypeResolver>
            <property name="forceBigDecimals" value="false"/>
        </javaTypeResolver>

        <javaModelGenerator targetPackage="${modelPackage}" targetProject="${src_main_java}">
            <property name="enableSubPackages" value="true"></property>
            <property name="trimStrings" value="true"></property>
        </javaModelGenerator>


        <sqlMapGenerator targetPackage="${sqlMapperPackage}" targetProject="${src_main_resources}">
        </sqlMapGenerator>

        <javaClientGenerator targetPackage="${mapperPackage}" targetProject="${src_main_java}" type="ANNOTATEDMAPPER">
            <property name="enableSubPackages" value="true"/>
        </javaClientGenerator>


        <!-- sql占位符,表示所有的表 -->
        <table tableName="%">
            <generatedKey column="epa_id" sqlStatement="Mysql" identity="true" />
        </table>
    </context>
</generatorConfiguration>
在前面说过gradle 有自己的编译语言,并且可以在编译的过种种自定义执行相关任务,这里我们就通过配置相关的参数自动化生成java对应的mapper代码和bean相关内容
下面这个task相对比较简单主要通过读取config.properties里的特定参数配置传递给ant,然后执行mbgenerator根据generatorConfig来生成指定的文件
//定义mybaties generator 自动生成
def getDbProperties = {
    def properties = new Properties()
    file("src/main/resources/mybatis/config.properties").withInputStream { inputStream ->
        properties.load(inputStream)
    }
    properties
}

task mybatisGenerate  {
    def properties = getDbProperties()
    ant.properties['targetProject'] = projectDir.path
    ant.properties['driverClass'] = properties.getProperty("jdbc.driverClassName")
    ant.properties['connectionURL'] = properties.getProperty("jdbc.url")
    ant.properties['userId'] = properties.getProperty("jdbc.username")
    ant.properties['password'] = properties.getProperty("jdbc.password")
    ant.properties['src_main_java'] = sourceSets.main.java.srcDirs[0].path
    ant.properties['src_main_resources'] = sourceSets.main.resources.srcDirs[0].path
    ant.properties['modelPackage'] = properties.getProperty("package.model")
    ant.properties['mapperPackage'] = properties.getProperty("package.mapper")
    ant.properties['sqlMapperPackage'] = properties.getProperty("sqlMapperPackage")
    ant.taskdef(
            name: 'mbgenerator',
            classname: 'org.mybatis.generator.ant.GeneratorAntTask',
            classpath: configurations.mybatisGenerator.asPath
    )
    ant.mbgenerator(overwrite: true,
            configfile: 'src/main/resources/mybatis/generatorConfig.xml', verbose: true) {
        propertyset {
            propertyref(name: 'targetProject')
            propertyref(name: 'userId')
            propertyref(name: 'driverClass')
            propertyref(name: 'connectionURL')
            propertyref(name: 'password')
            propertyref(name: 'src_main_java')
            propertyref(name: 'src_main_resources')
            propertyref(name: 'modelPackage')
            propertyref(name: 'mapperPackage')
            propertyref(name: 'sqlMapperPackage')
        }
    }
}
然后我们每次点击build或者运行的时候,task任务就会自动执行并生产最新的mapper文件及dao文件
knife4j
knife4j 是一个升级版本的api文档生成工具,其可以方便的罗列出api的出参入参以及http的协议内容,下面做下简单的使用介绍
注意这里面使用的是较新的版本,对于一些老的版本可能是最新的springboot有些不兼容
compile group: 'com.github.xiaoymin', name: 'knife4j-spring-boot-starter', version: '2.0.2'
添加config配置,这里特别注意的是RequestHandlerSelectors.basePackage(“com.haxilian.bmplatform.controller”),用于指定controller对应的目录
@EnableSwagger2
@EnableKnife4j
@Import(BeanValidatorPluginsConfiguration.class)
public class SwaggerConfiguration {
    @Bean(value = "defaultApi2")
    public Docket defaultApi2() {
        Docket docket=new Docket(DocumentationType.SWAGGER_2)
                .apiInfo(apiInfo())
                //分组名称
                .groupName("2.X版本")
                .select()
                //这里指定Controller扫描包路径
                .apis(RequestHandlerSelectors.basePackage("com.haxilian.bmplatform.controller"))
                .paths(PathSelectors.any())
                .build();
        return docket;
    }
    private ApiInfo apiInfo() {
        return new ApiInfoBuilder()
                .title("文档内容")
                .description("文档内容")
                .termsOfServiceUrl("http://localhost:8080/")
                .contact(new Contact("Joseph","","545948101@qq.com"))
                .version("1.0")
                .build();
    }

}
对于controller的注解配置
作用于类@Api(value = “用户相关接口”)
作用于方法@ApiOperation(“用户注册接口”)
参数介绍@ApiImplicitParams({
@ApiImplicitParam(name = “userName”, value = “用户名”, defaultValue = “李四”, required = true),
@ApiImplicitParam(name = “phone”, value = “电话号码”, defaultValue = “18310665040”, required = true)
}
实例代码如下
@Api(value = "用户相关接口")
@RestController
@RequestMapping(value = "/user")
public class UserController implements UserApi {

	@Resource
	UserMapper userMapper;

	@LimitedIdempotent(params = "phone", timeout = 3)
	@PostMapping("/register")
	@ApiOperation("用户注册接口")
	@ApiImplicitParams({
			@ApiImplicitParam(name = "userName", value = "用户名", defaultValue = "李四", required = true),
			@ApiImplicitParam(name = "phone", value = "电话号码", defaultValue = "18310665040", required = true)
		}
	)
对于bean的注解
对象的注解@ApiModel(“通用接口返回对象”)
方法的注解@ApiModelProperty(“通用接口返回对象”)
实例代码如下
@ApiModel("通用接口返回对象")
public class ServiceResponse<T> {
    @ApiModelProperty(required = true,notes = "返回时间戳",example = "123131234343")
    private Long timestamp;

    @ApiModelProperty(required = true,notes = "接口是否处理成功",example = "true")
    private Boolean success;

    @ApiModelProperty(required = true,notes = "接口消息",example = "接口是否成功")
    private String message;

    @ApiModelProperty(required = true,notes = "返回状态码",example = "成功|200")
    private String code;

    @ApiModelProperty(required = true,notes = "数据实体",example = "{}")
    private T data;
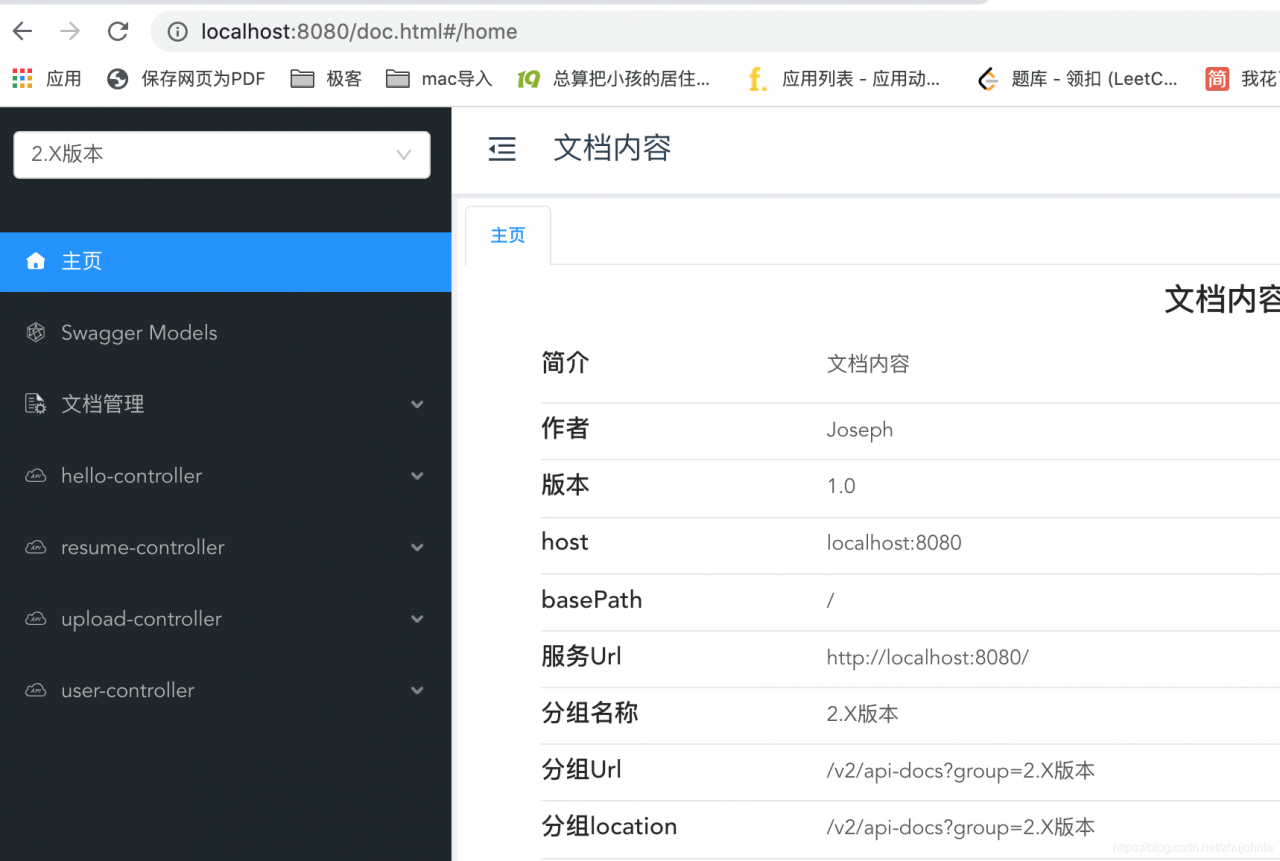
然后我们做好相关的配置并重新启动以后访问localhost:8080/doc.html 即可查看api文档内容大致内容如下
mysql和mybatis
根据之前的配置我们可以看到在代码运行以后,会自动生成mapper和对应的数据表对应的bean文件
/**
 *
 * This class was generated by MyBatis Generator.
 * This class corresponds to the database table user
 */
public class User {
    /**
     * Database Column Remarks:
     *   用户id
     *
     * This field was generated by MyBatis Generator.
     * This field corresponds to the database column user.id
     *
     * @mbg.generated
     */
    private Long id;

    /**
     * Database Column Remarks:
     *   用户手机号
     *
     * This field was generated by MyBatis Generator.
     * This field corresponds to the database column user.phone
     *
     * @mbg.generated
     */
    private String phone;

    /**
     * Database Column Remarks:
     *   用户姓名
     *
     * This field was generated by MyBatis Generator.
     * This field corresponds to the database column user.name
     *
     * @mbg.generated
     */
    private String name;
以及mapper文件
public interface UserMapper {
    /**
     * This method was generated by MyBatis Generator.
     * This method corresponds to the database table user
     *
     * @mbg.generated
     */
    @Delete({
        "delete from user",
        "where id = #{id,jdbcType=BIGINT}"
    })
    int deleteByPrimaryKey(Long id);

    /**
     * This method was generated by MyBatis Generator.
     * This method corresponds to the database table user
     *
     * @mbg.generated
     */
    @Insert({
        "insert into user (id, phone, ",
        "name, id_card_font_url, ",
        "id_card_back_url, role)",
        "values (#{id,jdbcType=BIGINT}, #{phone,jdbcType=VARCHAR}, ",
        "#{name,jdbcType=VARCHAR}, #{idCardFontUrl,jdbcType=VARCHAR}, ",
        "#{idCardBackUrl,jdbcType=VARCHAR}, #{role,jdbcType=CHAR})"
    })
    int insert(User record);
这些文件全部都是插件自动生成,减少我们手动编写可能引起的错误。使用就比较简单了参考代码直接调用即可
单文件,多文件,文件文本混合上传
文件上传也是我们开发过程中常见的问题,对于文件上传经常听说有的开发者说图文混合上传有困难,但是其实使用springboot进行图文混传的话方式还是相对比较简单的。下面我们简单介绍一下操作过程。
这里我们使用jsp页面来做一下模拟,springboot如果要支持jsp文件的解析也需要添加一些依赖
    compile 'javax.servlet:jstl:1.2'
    compile 'org.apache.tomcat.embed:tomcat-embed-jasper'
    compile group:'javax.servlet',name:'javax.servlet-api'
    compile group:'org.springframework.boot',name:'spring-boot-starter-tomcat'
对于application对象需要继承SpringBootServletInitilizer并添加@ConditionalOnClass(SpringfoxWebMvcConfiguration.class)注解
@SpringBootApplication
@ConditionalOnClass(SpringfoxWebMvcConfiguration.class)
@MapperScan("com.haxilian.bmplatform.mapper")
public class BmplatformApplication extends SpringBootServletInitializer {
	@Override
	protected SpringApplicationBuilder configure(SpringApplicationBuilder builder) {
		return builder.sources(BmplatformApplication.class);
	}

	private static Logger logger= LoggerFactory.getLogger(BmplatformApplication.class);

	public static void main(String[] args) {

		ConfigurableApplicationContext application=SpringApplication.run(BmplatformApplication.class, args);
		Environment env = application.getEnvironment();
		try {
			logger.info("\n----------------------------------------------------------\n\t" +
							"Application '{}' is running! Access URLs:\n\t" +
							"Local: \t\thttp://localhost:{}\n\t" +
							"External: \thttp://{}:{}\n\t"+
							"Doc: \thttp://{}:{}/doc.html\n"+
							"----------------------------------------------------------",
					env.getProperty("spring.application.name"),
					env.getProperty("server.port"),
					InetAddress.getLocalHost().getHostAddress(),
					env.getProperty("server.port"),
					InetAddress.getLocalHost().getHostAddress(),
					env.getProperty("server.port"));
		} catch (UnknownHostException e) {
			e.printStackTrace();
		}
	}

}
对于单个文件的接收,多文件接收,和文件和文本混合上传的案例如下代码,代码相对来说较为简单,主要注意一下两点
- @RestController和@Controller 的区别 这里如果用@Controller的话返回到客户端将会404,但是后台代码将会被执行 具体可查考文档做详细了解
- @RequestParam(value = “file”) 指定文件分割名称及接收名称对应客户端
- 多文件和文本混合上传需要用到
MultipartHttpServletRequest
@RestController
@RequestMapping(value = "/upload")
public class UploadController {

	@Resource
	UserMapper mUserMapper;

	private String  exexuteUpload(String uploadDir, MultipartFile file) throws IOException {
		String suffix = file.getOriginalFilename().substring(file.getOriginalFilename().lastIndexOf("."));
		String filename = UUID.randomUUID()+suffix;
		String filePath = uploadDir+filename;
		File servierFile = new File(filePath);
		file.transferTo(servierFile);
		return filePath;
	}

	//单个文件上传
	@RequestMapping(value = "/uploadFile",method = RequestMethod.POST)
	public ServiceResponse<FileUploadResultBean> uploads(HttpServletRequest request, MultipartFile file){
		String uploadDir = request.getServletContext().getRealPath("/")+"upload/";
		File dir = new File(uploadDir);
		if(!dir.exists()){
			dir.mkdir();
		}
		 List<String> mListResult = new ArrayList<>();
		try {
			String filePath = exexuteUpload(uploadDir,file);
			mListResult.add(filePath);
			FileUploadResultBean mResultBean = new FileUploadResultBean();
			return ServiceResponse.success(mResultBean);
		} catch (IOException e) {
			return ServiceResponse.failMessage("文件写入失败"+e.getMessage());
		}

	}

	//多文件上传
	@RequestMapping(value = "/uploadFiles",method = RequestMethod.POST)
	public  ServiceResponse<FileUploadResultBean> uploads(HttpServletRequest request,
	                                                      @RequestParam(value = "file") MultipartFile[] files){
		String uploadDir = request.getServletContext().getRealPath("/")+"upload/";
		File dir = new File(uploadDir);
		if(!dir.exists()){
			dir.mkdir();
		}

		List<String> mListResult = new ArrayList<>();

		for(int i=0; i<files.length;i++){
			if(files[i]!=null){
				try {
					String filePath = exexuteUpload(uploadDir,files[i]);
					mListResult.add(filePath);
				} catch (IOException e) {
					return ServiceResponse.failMessage("文件写入失败"+e.getMessage());
				}
			}
		}
		return ServiceResponse.success(null);
	}


	//文件和文本混合上传
	@RequestMapping(value = "/updateIdPics",method = RequestMethod.POST)
	public ServiceResponse<LoginRespBean>  updateIdPics(HttpServletRequest request) {
		MultipartHttpServletRequest params=((MultipartHttpServletRequest) request);
		List<MultipartFile> files = ((MultipartHttpServletRequest) request)
				.getFiles("file");
		String userId=params.getParameter("userId");
		User mUser = mUserMapper.selectByPrimaryKey(Long.valueOf(userId));

		if(mUser==null){
			return ServiceResponse.fail(new LoginRespBean(),"用户信息异常");
		}

		String uploadDir = request.getServletContext().getRealPath("/")+"upload/";
		File dir = new File(uploadDir);
		if(!dir.exists()){
			dir.mkdir();
		}


		for(int i=0; i<files.size();i++){
			if(files.get(i)!=null){
				try {
					String filePath = exexuteUpload(uploadDir,files.get(i));

					if(i==0){
						mUser.setIdCardFontUrl(filePath);
					}else{
						mUser.setIdCardBackUrl(filePath);
					}
				} catch (IOException e) {
					return ServiceResponse.failMessage("文件写入失败"+e.getMessage());
				}
			}
		}
		mUserMapper.updateByPrimaryKey(mUser);
		return ServiceResponse.success(new LoginRespBean());
	}
}
前端测试代码如下
<%@ page language="java" contentType="text/html; charset=UTF-8"
         pageEncoding="UTF-8"%>

<html>

<head>
    <title>Title</title>
</head>

<body>
单个文件上传:<br/>
<form action="/upload/uploadFile" method="post" enctype="multipart/form-data">
    <input type="file" name="file"/>
    <input type="submit" value="提交上传">

</form>

<br/>

多文件上传:<br/>
<form action="/upload/uploadFiles" method="post" enctype="multipart/form-data">
    文件1:<input type="file" name="file"/><br/>
    文件2:<input type="file" name="file"/><br/>
    文件3:<input type="file" name="file"/><br/>
    <input type="submit" value="多提交上传">

</form>
<br/>

图文混传:<br/>
<form action="/upload/uploadFiles" method="post" enctype="multipart/form-data">
    文件1:<input type="file" name="file"/><br/>item_recycler_header
    文件2:<input type="file" name="file"/><br/>
    文本内容:<input type="text" name="userId"/><br/>
    <input type="submit" value="混合提交">

</form>
</body>
</html>
注意springboot的文件上传限制配置及jsp文件解析在
applicaiton.properties设置
#jsp文件解析及目录
spring.thymeleaf.cache=false
spring.thymeleaf.enabled=false
spring.mvc.static-path-pattern=/**
spring.resources.static-locations=classpath:/,classpath:/static,classpath:/templates
spring.mvc.view.prefix=/WEB-INF/jsp/
spring.mvc.view.suffix=.jsp
#文件大小限制
spring.servlet.multipart.max-file-size=10240000
spring.servlet.multipart.max-request-size=20480000
springboot mybatis 和mysql 这些网上资源太多了如何使用大家可以多琢磨
项目代码下载
「Talk is cheap. Show me the code」:代码及数据表点此下载
后续打算给本套代码使用脚本做成脚手架生成,并添加docker部署支持 这些都放在后续blog中去整理。