文章目录
智能客户端
大多数开发语言的Redis客户端都采用Smart客户端支持集群协议,客户端如何选择见:http://redis.io/clients,从中找出符合自己要求的客户端类库。Smart客户端通过在内部维护slot→node的映射关系,本地就可实现键到节点的查找,从而保证IO效率的最大化,而MOVED重定向负责协助Smart客户端更新slot→node映射。下面用Jedis来举例说明。
cluster slots
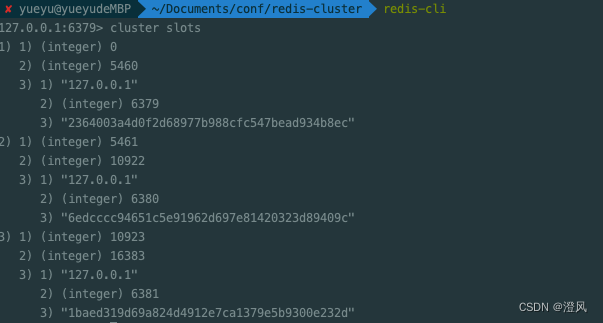
JedisCluster解析clusterslots结果缓存在本地,并为每个节点创建唯一的JedisPool连接池。映射关系在JedisClusterInfoCache类中。
JedisClusterInfoCache
public class JedisClusterInfoCache {
    private final Map<String, JedisPool> nodes;
    private final Map<Integer, JedisPool> slots;
    private final ReentrantReadWriteLock rwl;
    private final Lock r;
    private final Lock w;
    private volatile boolean rediscovering;
    private final GenericObjectPoolConfig poolConfig;
    private int connectionTimeout;
    private int soTimeout;
    private String password;
    private String clientName;
    private boolean ssl;
    private SSLSocketFactory sslSocketFactory;
    private SSLParameters sslParameters;
    private HostnameVerifier hostnameVerifier;
    private JedisClusterHostAndPortMap hostAndPortMap;
    private static final int MASTER_NODE_INDEX = 2;

    public JedisClusterInfoCache(GenericObjectPoolConfig poolConfig, int timeout) {
        this(poolConfig, timeout, timeout, (String)null, (String)null);
    }
    ...
}
Jedis 获取连接
public abstract class JedisClusterCommand<T> {
    private final JedisClusterConnectionHandler connectionHandler;
    private final int maxAttempts;

    public JedisClusterCommand(JedisClusterConnectionHandler connectionHandler, int maxAttempts) {
        this.connectionHandler = connectionHandler;
        this.maxAttempts = maxAttempts;
    }

	private T runWithRetries(int slot, int attempts, boolean tryRandomNode, JedisRedirectionException redirect) {
        if (attempts <= 0) {
            throw new JedisClusterMaxAttemptsException("No more cluster attempts left.");
        } else {
            Jedis connection = null;

            Object var7;
            try {
                if (redirect != null) {
                	// 集群部署-获取连接
                    connection = this.connectionHandler.getConnectionFromNode(redirect.getTargetNode());
                    if (redirect instanceof JedisAskDataException) {
                        connection.asking();
                    }
                } else if (tryRandomNode) {
                    connection = this.connectionHandler.getConnection();
                } else {
                    connection = this.connectionHandler.getConnectionFromSlot(slot);
                }

                Object var6 = this.execute(connection);
                return var6;
            } catch (JedisNoReachableClusterNodeException var13) {
                throw var13;
            } catch (JedisConnectionException var14) {
                this.releaseConnection(connection);
                connection = null;
                if (attempts <= 1) {
                    this.connectionHandler.renewSlotCache();
                }

                var7 = this.runWithRetries(slot, attempts - 1, tryRandomNode, redirect);
                return var7;
            } catch (JedisRedirectionException var15) {
                if (var15 instanceof JedisMovedDataException) {
                    this.connectionHandler.renewSlotCache(connection);
                }

                this.releaseConnection(connection);
                connection = null;
                var7 = this.runWithRetries(slot, attempts - 1, false, var15);
            } finally {
                this.releaseConnection(connection);
            }

            return var7;
        }
    }
}
JedisClusterConnectionHandler
public Jedis getConnectionFromNode(HostAndPort node) {
    return cache.setupNodeIfNotExist(node).getResource();
}
JedisClusterInfoCache
public JedisPool setupNodeIfNotExist(HostAndPort node) {
    w.lock();
    try {
      String nodeKey = getNodeKey(node);
      JedisPool existingPool = nodes.get(nodeKey);
      if (existingPool != null) return existingPool;
      JedisPool nodePool = new JedisPool(poolConfig, node.getHost(), node.getPort(), connectionTimeout, soTimeout, password, 0, clientName, ssl, sslSocketFactory, sslParameters, hostnameVerifier);
      nodes.put(nodeKey, nodePool);
      return nodePool;
    } finally {
      w.unlock();
    }
  }
客户端
Lettuce
Lettuce 介绍
Lettuce是可伸缩的、线程安全的Redis客户端,它基于netty和Reactor。Lettuce提供了同步、异步和反应式API来与Redis交互。
Lettuce 简单使用
Maven安装
注意lettuce是不会主动引入commons-pool2的,所以lettuce默认不配置是没有连接池的。所以一定要在lettuce项目中加入commons-pool2并且配置连接池,否则无法进行autoconfig配置默认redis连接池。
<dependency>
    <groupId>io.lettuce</groupId>
    <artifactId>lettuce-core</artifactId>
</dependency>

<dependency>
    <groupId>org.springframework.data</groupId>
    <artifactId>spring-data-redis</artifactId>
</dependency>

<!-- 连接池 -->
<dependency>
    <groupId>org.apache.commons</groupId>
    <artifactId>commons-pool2</artifactId>
</dependency>
Lettuce配置
spring:
  redis:
    lettuce:
      pool:
        max-active: 10
        max-idle: 10
        max-wait: 1s
        min-idle: 2
        time-between-eviction-runs: 1000
    cluster:
      nodes: 127.0.0.1:6379,127.0.0.1:6380,127.0.0.1:6381
Lettuce 存在的问题
无法拓卜刷新
关于 Redis 在生产中我们一般情况下都会选择 redis cluster 高可用架构部署,既能保证数据分片并且实现节点的故障自动转移。 基本部署拓扑如下: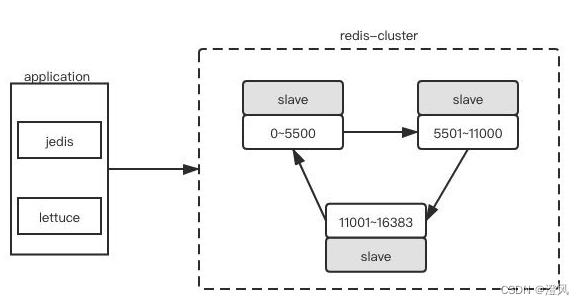
SpringBoot2.x开始默认使用的Redis客户端由Jedis变成了Lettuce,但是当Redis集群中某个节点挂掉之后,Lettuce将无法继续操作Redis,原因在于此时Lettuce使用的仍然是有问题的连接信息。
实际上,Lettuce支持redis 集群拓扑动态刷新,但是默认并没有开启,SpringBoot在集成Lettuce时默认也没有开启。并且在SpringBoot2.3.0之前,是没有配置项设置Lettuce自动刷新拓扑的。
解决方案1:
升级到SpringBoot2.3.0或以上版本。并添加如下配置项
spring.redis.timeout=60s
spring.redis.lettuce.cluster.refresh.period=60s
spring.redis.lettuce.cluster.refresh.adaptive=true
解决方案2:
配置LettuceConnectionFactory ,设置拓扑刷新策略。
@Bean
public DefaultClientResources lettuceClientResources() {
    return DefaultClientResources.create();
}

@Bean
public LettuceConnectionFactory lettuceConnectionFactory(RedisProperties redisProperties, ClientResources clientResources) {

    ClusterTopologyRefreshOptions topologyRefreshOptions = ClusterTopologyRefreshOptions.builder()
            .enablePeriodicRefresh(Duration.ofSeconds(30)) //按照周期刷新拓扑
            .enableAllAdaptiveRefreshTriggers() //根据事件刷新拓扑
            .build();

    ClusterClientOptions clusterClientOptions = ClusterClientOptions.builder()
            //redis命令超时时间,超时后才会使用新的拓扑信息重新建立连接
            .timeoutOptions(TimeoutOptions.enabled(Duration.ofSeconds(10)))
            .topologyRefreshOptions(topologyRefreshOptions)
            .build();

    LettuceClientConfiguration clientConfiguration = LettuceClientConfiguration.builder()
            .clientResources(clientResources)
            .clientOptions(clusterClientOptions)
            .build();

    RedisClusterConfiguration clusterConfig = new RedisClusterConfiguration(redisProperties.getCluster().getNodes());
    clusterConfig.setMaxRedirects(redisProperties.getCluster().getMaxRedirects());
    clusterConfig.setPassword(RedisPassword.of(redisProperties.getPassword()));

    LettuceConnectionFactory lettuceConnectionFactory = new LettuceConnectionFactory(clusterConfig, clientConfiguration);

    return lettuceConnectionFactory;
}
解决方案3:
将spring-boot-starter-data-redis依赖的Lettuce,修改成Jedis。
<dependency>
    <groupId>org.springframework.boot</groupId>
    <artifactId>spring-boot-starter-data-redis</artifactId>
    <exclusions>
        <exclusion>
            <groupId>io.lettuce</groupId>
            <artifactId>lettuce-core</artifactId>
        </exclusion>
    </exclusions>
</dependency>
<dependency>
    <groupId>redis.clients</groupId>
    <artifactId>jedis</artifactId>
</dependency>
压测时出现大量过期监听处理线程
Jedis
jedis 介绍
Jedis客户端同时支持单机模式、分片模式、集群模式的访问模式,通过构建Jedis类对象实现单机模式下的数据访问,通过构建ShardedJedis类对象实现分片模式的数据访问,通过构建JedisCluster类对象实现集群模式下的数据访问。
jedis 简单使用
Maven 安装
<!-- jedis -->
<dependency>
	<groupId>redis.clients</groupId>
	<artifactId>jedis</artifactId>
</dependency>

<!-- spring-data-redis -->
<dependency>
    <groupId>org.springframework.data</groupId>
    <artifactId>spring-data-redis</artifactId>
</dependency>
使用Springboot自动版本适配即可,如果项目的自动适配错乱(引入了一写依赖包写死了版本,或者没有使用Springboot parent)就需要手动去适配Jedis的版本,不然会报错ClassNotFound xxx。下面我简单的列一个Springboot和Jedis clients的一个版本对应。
| Spring | jedis |
|---|---|
| 2.2.8.RELEASE | 3.1.0 |
| 2.1.6.RELEASE | 3.0.1 |
| 2.0.8.RELEASE | 2.10.1 |
jedis配置
哨兵配置
spring:
  redis:
    sentinel:
      master: mymaster
      nodes: 127.0.0.1:26379, 127.0.0.1:26380, 127.0.0.1:26381
    jedis:
      pool:
        max-active: 10 # maxTotal是连接池中总连接的最大数量
        max-idle: 10 # 连接池中空闲连接的最大数量
        max-wait: 1s # 最大获取连接等待时间
        min-idle: 2 # 连接池中最小空闲连接
        time-between-eviction-runs: 10s # 多久清理一次空闲连接
集群配置
spring:
  redis:
    jedis:
      pool:
        max-active: 10
        max-idle: 10
        max-wait: 1s
        min-idle: 2
        time-between-eviction-runs: 10s
    cluster:
      nodes: 127.0.0.1:6379,127.0.0.1:6380,127.0.0.1:6381
配置序列化
@Bean
RedisTemplate<Object, Object> redisTemplate (RedisConnectionFactory redisConnectionFactory) {
        RedisTemplate<Object, Object> redisTemplate = new RedisTemplate<>();
        Jackson2JsonRedisSerializer<Object> jackson2JsonRedisSerializer = new Jackson2JsonRedisSerializer<>(Object.class);
        redisTemplate.setDefaultSerializer(jackson2JsonRedisSerializer);
        redisTemplate.setKeySerializer(new StringRedisSerializer());
        redisTemplate.setValueSerializer(jackson2JsonRedisSerializer);
        redisTemplate.setConnectionFactory(redisConnectionFactory);
        return redisTemplate;
}
Jedis autoconfig

jedis 客户端包
spring-data-redis Spring对redis适配包
- 序列化
Jackson2JsonRedisSerializer
StringRedisSerializer - RedisCommand 把Redis的调用封装成命令模式进行调度使用
- 配置
Springboot-autoconfiguration可以轻易的调用配置文件进行redis的自动配置 - 支持多种客户端扩展
提供多种客户端的支持可适配jedis/lettuce/redission等等
CommonPool2 介绍
不管是Jedis还是Lettuce都是使用的 Apache Common Pool2 做连接池,Common Poo2 是apache开源组织提供的稳定的连接池组件。目前有很多的开源组件在使用其作为项目的连接池。
这里还是拿Jedis做示例:
public class JedisPoolConfig extends GenericObjectPoolConfig {
  public JedisPoolConfig() {
    // defaults to make your life with connection pool easier :)
    setTestWhileIdle(true);
    setMinEvictableIdleTimeMillis(60000);
    setTimeBetweenEvictionRunsMillis(30000);
    setNumTestsPerEvictionRun(-1);
  }
}
Jedis连接池的配置会继承一个common pool2 提供的 GenericObjectPoolConfig来提供redis连接池的配置能力。spring-data-redis默认提供了4个通用的连接池,配置分别是一下这四个。
max-active: 10 # maxTotal是连接池中总连接的最大数量
max-idle: 10 # 连接池中空闲连接的最大数量
max-wait: 1s # 最大获取连接等待时间
min-idle: 2 # 连接池中最小空闲连接
time-between-eviction-runs: 10s # 多久清理一次空闲连接,类型Duration
GenericObjectPool在构造方法中会接受Spring配置好的连接配置进行初始化。
public GenericObjectPool(PooledObjectFactory<T> factory, GenericObjectPoolConfig<T> config) {
        super(config, "org.apache.commons.pool2:type=GenericObjectPool,name=", config.getJmxNamePrefix());
        this.factoryType = null;
        this.maxIdle = 8;
        this.minIdle = 0;
        this.allObjects = new ConcurrentHashMap();
        this.createCount = new AtomicLong(0L);
        this.makeObjectCount = 0L;
        this.makeObjectCountLock = new Object();
        this.abandonedConfig = null;
        if (factory == null) {
            this.jmxUnregister();
            throw new IllegalArgumentException("factory may not be null");
        } else {
            this.factory = factory;
            this.idleObjects = new LinkedBlockingDeque(config.getFairness());
            this.setConfig(config);
        }
    }
连接池初始完成之后,应用获取连接的时候会从连接池中获取连接。加入我们没有配置max-wait的时候,max-wait默认是-1,当我们连接耗尽redis就会陷入无尽等待。所以max-wait是必须要配置的参数。我们还可以配置test-on-borrow去主动清理阻塞连接,但这样会降低性能,一般情况下连接都是够用的(根据业务服务压测测出最合适的连接数,场景一定要丰富)。而且Springboot也不推荐配置test-on-borrow,在SpringDataRedis包中只提供了4个参数并不包含test-on-borrow。
public T borrowObject(long borrowMaxWaitMillis) throws Exception {
        this.assertOpen();
        AbandonedConfig ac = this.abandonedConfig;
        if (ac != null && ac.getRemoveAbandonedOnBorrow() && this.getNumIdle() < 2 && this.getNumActive() > this.getMaxTotal() - 3) {
            this.removeAbandoned(ac);
        }

        PooledObject<T> p = null;
        boolean blockWhenExhausted = this.getBlockWhenExhausted();
        long waitTime = System.currentTimeMillis();

        while(p == null) {
            boolean create = false;
            p = (PooledObject)this.idleObjects.pollFirst();
            if (p == null) {
                p = this.create();
                if (p != null) {
                    create = true;
                }
            }

            if (blockWhenExhausted) {
                if (p == null) {
                	// 如果max-wait == -1,会阻塞去拿去连接
                    if (borrowMaxWaitMillis < 0L) {
                        p = (PooledObject)this.idleObjects.takeFirst();
                    } else {
                    	// 如果超过max-wait时间,则获取连接失败。
                        p = (PooledObject)this.idleObjects.pollFirst(borrowMaxWaitMillis, TimeUnit.MILLISECONDS);
                    }
                }

                if (p == null) {
                    throw new NoSuchElementException("Timeout waiting for idle object");
                }
            } else if (p == null) {
                throw new NoSuchElementException("Pool exhausted");
            }

            if (!p.allocate()) {
                p = null;
            }

            if (p != null) {
                try {
                    this.factory.activateObject(p);
                } catch (Exception var15) {
                    try {
                        this.destroy(p);
                    } catch (Exception var14) {
                    }

                    p = null;
                    if (create) {
                        NoSuchElementException nsee = new NoSuchElementException("Unable to activate object");
                        nsee.initCause(var15);
                        throw nsee;
                    }
                }

                if (p != null && this.getTestOnBorrow()) {
                    boolean validate = false;
                    Throwable validationThrowable = null;

                    try {
                        validate = this.factory.validateObject(p);
                    } catch (Throwable var13) {
                        PoolUtils.checkRethrow(var13);
                        validationThrowable = var13;
                    }

                    if (!validate) {
                        try {
                            this.destroy(p);
                            this.destroyedByBorrowValidationCount.incrementAndGet();
                        } catch (Exception var12) {
                        }

                        p = null;
                        if (create) {
                            NoSuchElementException nsee = new NoSuchElementException("Unable to validate object");
                            nsee.initCause(validationThrowable);
                            throw nsee;
                        }
                    }
                }
            }
        }

        this.updateStatsBorrow(p, System.currentTimeMillis() - waitTime);
        return p.getObject();
    }
使用注解操作Redis缓存(这段有部分是转载自:江夏、)
- 配置
在配置类上加注解
@EnableCaching
CacheManager
@Bean
CacheManager cacheManager (RedisConnectionFactory redisConnectionFactory) {
        RedisCacheConfiguration redisCacheConfiguration = RedisCacheConfiguration
                .defaultCacheConfig()
                .serializeValuesWith(RedisSerializationContext.SerializationPair.fromSerializer(RedisSerializer.string()))
                .prefixKeysWith("allens")
                .entryTtl(Duration.ofMinutes(5));
        return RedisCacheManager.RedisCacheManagerBuilder.fromConnectionFactory(redisConnectionFactory)
                .withCacheConfiguration("test", redisCacheConfiguration)
                .build();
}
- 使用
@EenableCacheing:该注解主要用于开启基于注解的缓存支持,用在Application类上
@CacheEvict:该注解用于清理缓存
@CachePut:该注解用于设置缓存
@Caching:该注解可以对缓存清理、设置 等操作打包
@CacheConfig:该注解同样用于缓存设置
@Cacheable:该注解主要针对方法配置,能够根据方法的请求参数对其结果进行缓存,比如如果缓存在存在该值,则用缓存数据, 如果不在缓存,则存入缓存;
@CachePut:该注解用于设置缓存,表示在调用方法的同时又更新缓存,它是默认先调用目标方法,然后将目标方法的运行结果存入缓存,不过需要注意的是如果要保持缓存同步更新,这个注解使用的key需要和缓存的key保持一致,和@cacheable不同的是@cacheable不同是在运行在目标方法之前,而它是目标方法之后,因为它需要先拿到目标方法运行的结果。@Cacheable不可以使用#result,因为使用@Cacheable标注的方法不一定会被调用,可能获取不到result。它的属性和@cacheable基本一致,就少了一个是否异步(sync)的属性,它的使用如下:
@CachePut(value="dep",key="#department.id")
public Department updateDepartment(Department department){
   System.out.println("更新信息:"+department);
   departmentDao.updateDepartment(department);
   return department;
}
@CacheEvict:该注解用于缓存清除,清除缓存时要指明缓存的名字和key,相当于告诉数据库要删除哪个表中的哪条数据,key默认为参数的值。主要属性除了value/cacheNames和key之外还有allEntries和beforeInvocation属性。篇幅有限源码不贴了。
allEntries表示是否清除指定缓存中的所有键值对,既是否清除所有缓存,设置为true时会清除缓存中的所有键值对,默认为false,即根据key清除缓存。所以它与key属性二选一使用。
beforeInvocation表示是否是在@CacheEvict注解的方法调用之前清除指定缓存,默认为false,即在方法调用之后清除缓存,设置为true时则会在方法调用之前清除缓存。在方法调用之前还是之后清除缓存的区别在于方法调用时是否会出现异常,若不出现异常,这两种设置没有区别,若出现异常,设置为在方法调用之后清除缓存将不起作用,因为方法调用失败了。
 @CacheEvict(value = "dep",key = "#id"/*,beforeInvocation = true*//*,allEntries = true*/)
    public boolean delDep(int id){
        boolean flag=false;
        try{
            departmentDao.deleteDepartmentById(id);
            flag=true;
        }catch(Exception e){
            e.printStackTrace();
        }
        return flag;
    }
@Caching:该注解可以对缓存清除、设置等操作打包,即是@Cacheable、@CachePut、@CacheEvict的组合,来定义复杂的缓存规则,在这个组合中只要有@CachePut就一定会调用被注解的方法,通过它的源码就很清楚:
public @interface Caching {
  Cacheable[] cacheable() default {};
  CachePut[] put() default {};
  CacheEvict[] evict() default {};
}
用法如下:
@Caching(
   cacheable = {
      @Cacheable(value = "user", key = "#userName")
   },
   put = {
      @CachePut(value = "user", key = "#result.id"),
      @CachePut(value = "user", key = "#result.email")
   }
)
public User findUserByName(String userName) {
    System.out.println("查询的是:"+userName);
    return userDao.findByName(userName);
}
@CacheConfig:该注解同样用于缓存设置,标注在类上,即可抽取缓存相关注解的公共配置,可抽取的公共配置有缓存名字、主键生成器等,比如上面其他注解的cachename,key等,源码如下:
public @interface CacheConfig {
  /**
   * Names of the default caches to consider for caching operations defined
   * in the annotated class.
   * <p>If none is set at the operation level, these are used instead of the default.
   * <p>May be used to determine the target cache (or caches), matching the
   * qualifier value or the bean names of a specific bean definition.
   */
  String[] cacheNames() default {};
  /**
   * The bean name of the default {@link org.springframework.cache.interceptor.KeyGenerator} to
   * use for the class.
   * <p>If none is set at the operation level, this one is used instead of the default.
   * <p>The key generator is mutually exclusive with the use of a custom key. When such key is
   * defined for the operation, the value of this key generator is ignored.
   */
  String keyGenerator() default "";
  /**
   * The bean name of the custom {@link org.springframework.cache.CacheManager} to use to
   * create a default {@link org.springframework.cache.interceptor.CacheResolver} if none
   * is set already.
   * <p>If no resolver and no cache manager are set at the operation level, and no cache
   * resolver is set via {@link #cacheResolver}, this one is used instead of the default.
   * @see org.springframework.cache.interceptor.SimpleCacheResolver
   */
  String cacheManager() default "";
  /**
   * The bean name of the custom {@link org.springframework.cache.interceptor.CacheResolver} to use.
   * <p>If no resolver and no cache manager are set at the operation level, this one is used
   * instead of the default.
   */
  String cacheResolver() default "";
}
具体用法
@Service
@CacheConfig(cacheNames = "user")
public class UserServiceImpl implements UserService {
....
}
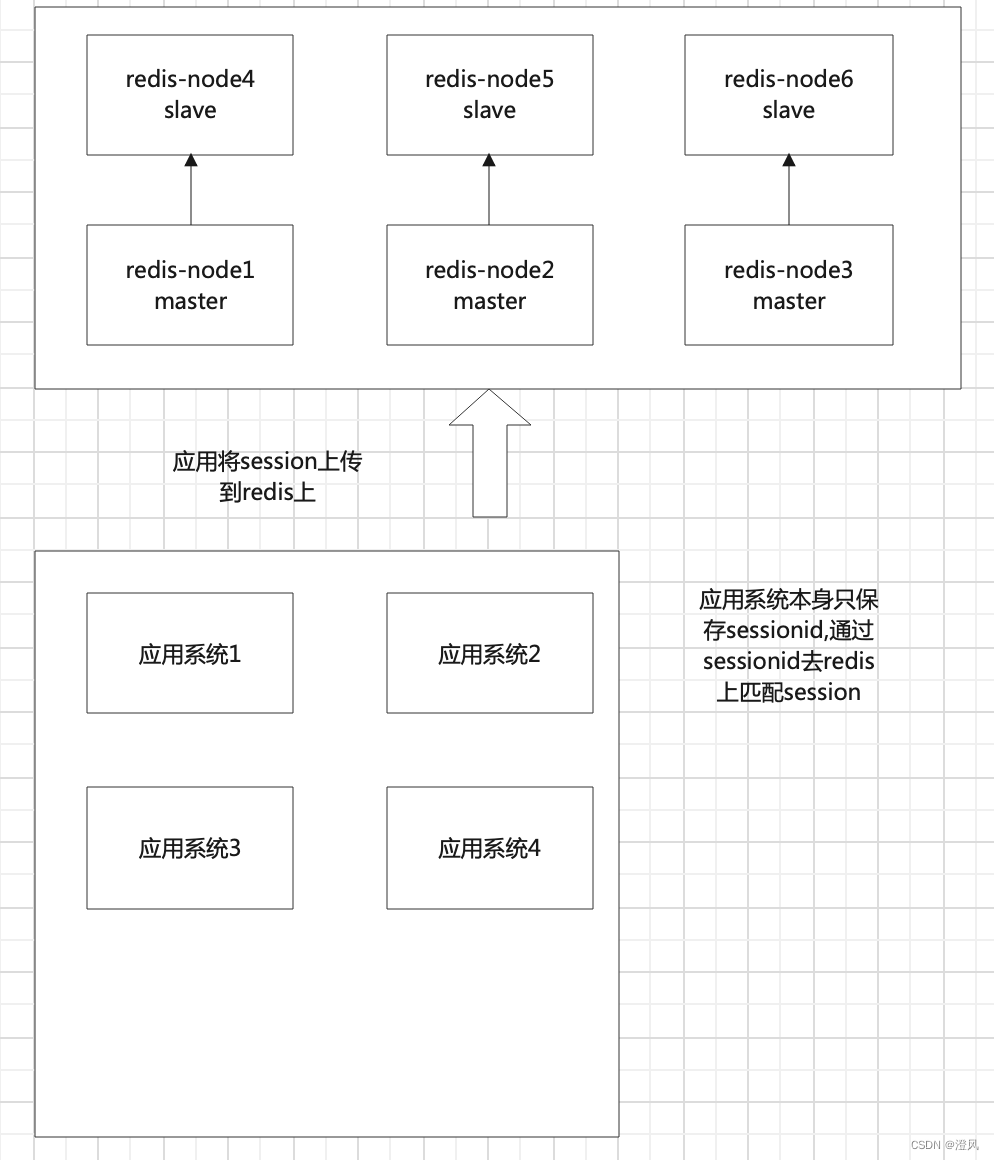
Spring共享session
- 配置
<dependency>
    <groupId>org.springframework.session</groupId>
    <artifactId>spring-session-data-redis</artifactId>
</dependency>

<dependency>
    <groupId>io.lettuce</groupId>
    <artifactId>lettuce-core</artifactId>
</dependency>

<dependency>
	<groupId>org.springframework.data</groupId>
	<artifactId>spring-data-redis</artifactId>
</dependency>
配置文件上加入配置
@EnableRedisHttpSession
public class RedisLettuceClusterServer {
这里注意一下,这里的包都是支持httpsession的也是是正常的SpringWebMVC服务需要的包。假如说你的系统使用的是webflux 则需要将
spring-session-data-redis换成spring-session-data-redis-reactive。并且配置注解换成@EnableRedisWebSession
应用Spring Session有三种key
(1) spring:session:sessions:xxx-xxx-xxx-xx(GUID)
createTime 149339434900
lastAccessedTime 149339434900
sessionAttr: name 李四
sessionAttr: age 24
一个key-Map结构(Hash),保存某一个session的内容。过期时间是session的超时时间+300s。过期时间+300s,是为了session超时时要销毁事件销毁session时可以获取到数据。
(2)spring:session:sessions:expires:33fdd-xxx-xxx
一个简单的key-string结构,这个key是为了生成session超时事件。每一个session都有一个,过期时间是session超时时间。Spring-session后台通过订阅redis key-notification-space,在某一个key过期的时候就会收到通知,就可以知道哪一个session超时需要销毁了。系统无法保证key的过期时间抵达后立即生成过期事件。
(3)spring:session:expiration:33fdd-xxx-xxx expires:333dsdf:xxx
一个key-Set结构,这个是为了Redis即时的产生key过期时间,做一个分钟级别的兜底,保存了未来一个分钟要超时的sessionid,Spring-session后台有定时任务读取当前分钟可能要超时的sessionId列表,然后访问一次这个SessionId的key,这样让Redis即时产生key过期事件。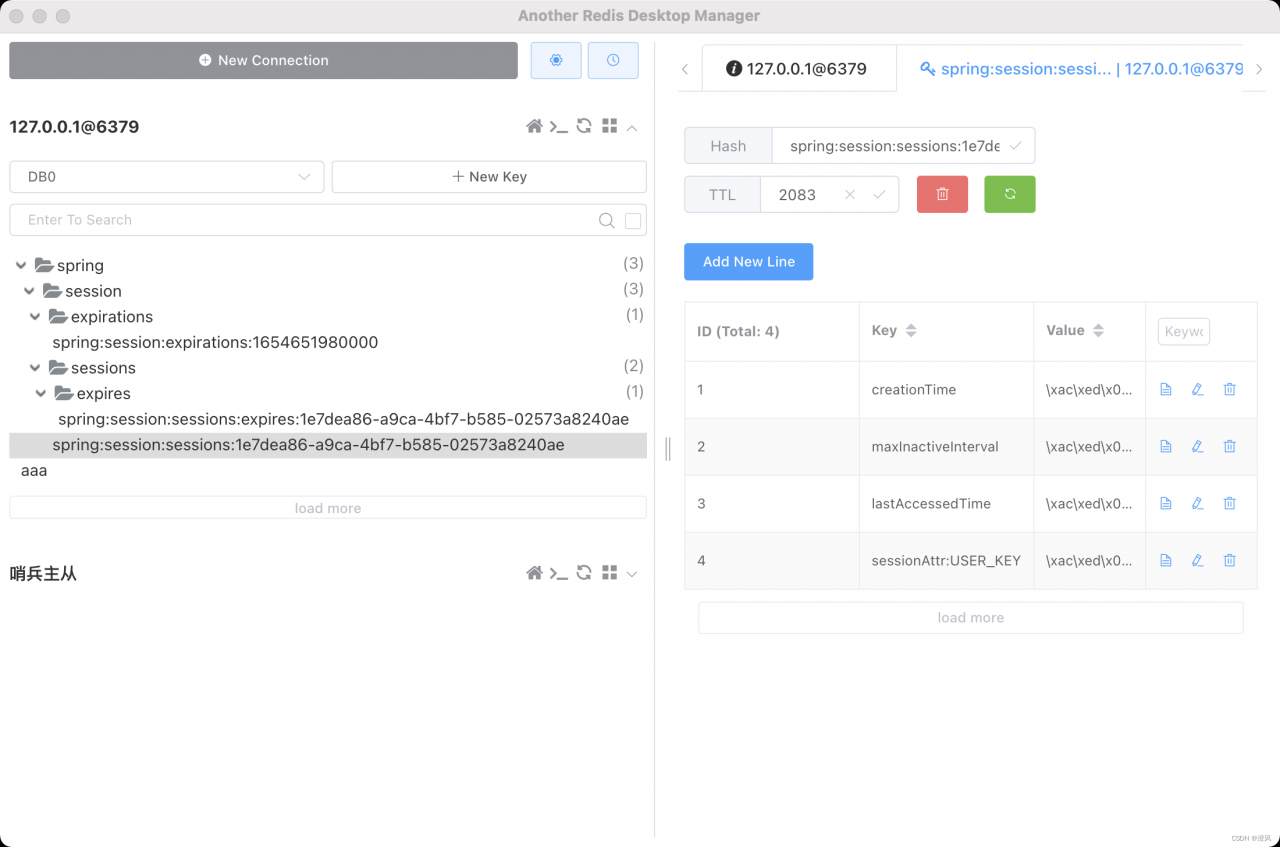
key过期注意事项
get key 不影响有效时间
set key value ex 60后 set key value
学习更多干货类容(JAVA、前端、Kafka、redis等等)请关注我的公众号