RabbitMQ 介绍
什么是RabbitMQ?
RabbitMQ是一个消息代理 - 一个消息系统的媒介。它可以为你的应用提供一个通用的消息发送和接收平台,并且保证消息在传输过程中的安全。
RabbitMQ用用途
消息系统允许软件、应用相互连接和扩展.这些应用可以相互链接起来组成一个更大的应用,或者将用户设备和数据进行连接.消息系统通过将消息的发送和接收分离来实现应用程序的异步和解偶.
数据投递、非阻塞操作或推送通知。发布/订阅,异步处理,或者工作队列。所有这些都可以通过消息系统实现。
RabbitMQ优势
可靠性
RabbitMQ提供了多种技术可以让你在性能和可靠性之间进行权衡。这些技术包括持久性机制、投递确认、发布者证实和高可用性机制。
灵活的路由
消息在到达队列前是通过交换机进行路由的。RabbitMQ为典型的路由逻辑提供了多种内置交换机类型。如果你有更复杂的路由需求,可以将这些交换机组合起来使用,你甚至可以实现自己的交换机类型,并且当做RabbitMQ的插件来使用。
集群
在相同局域网中的多个RabbitMQ服务器可以聚合在一起,作为一个独立的逻辑代理来使用。
联合
对于服务器来说,它比集群需要更多的松散和非可靠链接。为此RabbitMQ提供了联合模型。
高可用的队列
在同一个集群里,队列可以被镜像到多个机器中,以确保当其中某些硬件出现故障后,你的消息仍然安全。
多协议
RabbitMQ 支持多种消息协议的消息传递。
广泛的客户端
编程语言几乎都有与其相适配的RabbitMQ客户端。
追踪
如果你的消息系统有异常行为,RabbitMQ还提供了追踪的支持,让你能够发现问题所在。
插件系统
RabbitMQ附带了各种各样的插件来对自己进行扩展。
AMQP 协议
什么是AMQP?
AMQP(高级消息队列协议)是一个网络协议。它支持符合要求的客户端应用(application)和消息中间件代理(messaging middleware broker)之间进行通信。
消息代理和他们所扮演的角色
消息代理(message brokers)从发布者(publishers)亦称生产者(producers)那儿接收消息,并根据既定的路由规则把接收到的消息发送给处理消息的消费者(consumers)。
由于AMQP是一个网络协议,所以这个过程中的发布者,消费者,消息代理 可以存在于不同的设备上。
AMQP 0-9-1 模型
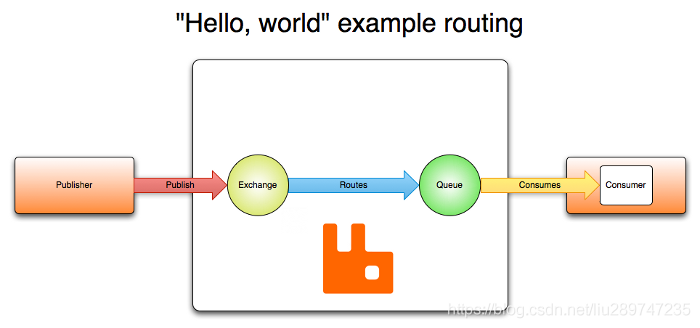
消息(message)被发布者(publisher)发送给交换机(exchange),交换机常常被比喻成邮局或者邮箱。然后交换机将收到的消息根据路由规则分发给绑定的队列(queue)。最后AMQP代理会将消息投递给订阅了此队列的消费者,或者消费者按照需求自行获取。
发布者(publisher)发布消息时可以给消息指定各种消息属性(message meta-data)。有些属性有可能会被消息代理(brokers)使用,然而其他的属性则是完全不透明的,它们只能被接收消息的应用所使用。
AMQP模块包含了一个消息确认(message acknowledgements)的概念:当一个消息从队列中投递给消费者后(consumer),消费者会通知一下消息代理(broker),这个可以是自动的也可以由处理消息的应用的开发者执行。当“消息确认”被启用的时候,消息代理不会完全将消息从队列中删除,直到它收到来自消费者的确认回执(acknowledgement)。
队列,交换机和绑定统称为AMQP实体(AMQP entities)。
JMI和AMQP
RabbitMQ安装
以下安装是在centos下进行:
安装erlang
因为RabbitMQ是基于erlang语言开发的,所以必须安装erlang
//安装依赖
yum -y install gcc glibc-devel make ncurses-devel openssl-devel xmlto perl wget gtk2-devel binutils-devel

//-------下面是安装RabbitMQ的依赖环境 因为RabbitMQ是基于erlang语言开发的,所以必须安装erlang----
//下载erlang
wget http://erlang.org/download/otp_src_22.0.tar.gz
//解压
tar -zxvf otp_src_22.0.tar.gz
//移动并切换目录
mv otp_src_22.0 /usr/local/
cd /usr/local/otp_src_22.0/
//创建即将安装目录
mkdir ../erlang

//配置安装路径
./configure --prefix=/usr/local/erlang
//开始安装操作
make install

//添加安装环境
echo 'export PATH=$PATH:/usr/local/erlang/bin' >> /etc/profile
source /etc/profile

//测试erl
erl
安装RabbitMQ
//下载
wget https://github.com/rabbitmq/rabbitmq-server/releases/download/v3.7.15/rabbitmq-server-generic-unix-3.7.15.tar.xz
//如果没有解压工具则安装
yum install -y xz
//解压
/bin/xz -d rabbitmq-server-generic-unix-3.7.15.tar.xz
tar -xvf rabbitmq-server-generic-unix-3.7.15.tar
//将文件移至指定位置
mv rabbitmq_server-3.7.15/ /usr/local/
mv /usr/local/rabbitmq_server-3.7.15  /usr/local/rabbitmq
//添加系统环境
echo 'export PATH=$PATH:/usr/local/rabbitmq/sbin' >> /etc/profile
source /etc/profile
//配置目录
mkdir /etc/rabbitmq
启动测试
启动:
rabbitmq-server -detached
停止:
rabbitmqctl stop
状态:
rabbitmqctl status
web管理:
//开启web插件
rabbitmq-plugins enable rabbitmq_management
默认账号密码:guest guest(这个账号只允许本机访问)
用户管理
查看所有用户
rabbitmqctl list_users
添加一个用户
rabbitmqctl add_user leellun 123456
配置权限
rabbitmqctl set_permissions -p "/" leellun ".*" ".*" ".*"
查看用户权限
rabbitmqctl list_user_permissions leellun
设置tag
rabbitmqctl set_user_tags leellun administrator
删除用户(安全起见,删除默认用户)
rabbitmqctl delete_user guest
Virtual Hosts配置
RabbitMQ Java 客户端
本库的5.x系列的编译和运行需要JDK 8。
RabbitMQ Java 客户端使用com.rabbitmq.client作为它的顶级包。关键的类和接口有:
Channel: 代表 AMQP 0-9-1通道,并提供了大多数操作(协议方法)。
Connection: 代表 AMQP 0-9-1 连接
ConnectionFactory: 构建Connection实例
Consumer: 代表消息的消费者
DefaultConsumer: 消费者通用的基类
BasicProperties: 消息的属性(元信息)
BasicProperties.Builder: BasicProperties的构建器
常用api
Channel
/**
* 声明一个队列
* @param queue 队列名称
* @param durable 是否持久化,如果设置为true,服务器重启了队列仍然存在
* @param exclusive 是否为独享队列(排他性队列),只有自己可见的队列,即不允许其它用户访问
* @param autoDelete 当没有任何消费者使用时,自动删除该队列
* @param arguments 其他参数
*/
Queue.DeclareOk queueDeclare(String queue, boolean durable, boolean exclusive, boolean 	autoDelete,Map<String, Object> arguments) throws IOException;
如果exclusive声明为true,则该队列的特点是:
1、只对首次声明它的连接(Connection)可见
2、会在其连接断开的时候自动删除。 一个线程用于消费,另一个线程在共享通道上推送是安全的。
 /**
 * 限制服务器的数据量
 * @param prefetchSize  最大消息大小
 * @param prefetchCount RabbitMQ同时发送给消费者消息数量的最大值
 * @param global        是否使用整个通道
 */
void basicQos(int prefetchSize, int prefetchCount, boolean global) throws IOException;
/**
* 订阅消息并消费
* @param queue 消息队列
* @param autoAck 是否自动应答
* @param callback 消息回调
*/
String basicConsume(String queue, boolean autoAck, Consumer callback) throws IOException;
 /**
     * 发布一个消息
	* @param exchange 指定转发器名称—-ExchangeName,这里用空字符串,就表示消息会交给默认的Exchange
     * @param routingKey 发布到哪个队列
     * @param props 和消息有关的其他配置参数,路由报头等
     * @param body 消息体
     */
    void basicPublish(String exchange, String routingKey, BasicProperties props, byte[] body) throws IOException;
    /**
     * 需要在每次处理完成一个消息后,手动向服务端发送一次应答。
     * @param deliveryTag 当前消息的类似编号的号码,服务端为每一个消息生成的类似编号的号码
     * @param multiple 是否把小于当前deliveryTag的小于都应答了
     */
    void basicAck(long deliveryTag, boolean multiple) throws IOException;
    /**
     * 删除队列
     * @param queue 队列名称
     * @param ifUnused 当未使用时,是否删除
     * @param ifEmpty 当为empty时是否删除
     */
    Queue.DeleteOk queueDelete(String queue, boolean ifUnused, boolean ifEmpty) throws IOException;
/**
* 清空消息
* @param queue 队列名称
*/
Queue.PurgeOk queuePurge(String queue) throws IOException;
maven配置
<dependencies>
    <dependency>
        <groupId>com.rabbitmq</groupId>
        <artifactId>amqp-client</artifactId>
        <version>5.9.0</version>
    </dependency>
	<!--rabbitmq依赖日志包-->
    <dependency>
        <groupId>org.slf4j</groupId>
        <artifactId>slf4j-log4j12</artifactId>
        <version>1.7.2</version>
    </dependency>
</dependencies>
连接 和 通道 的寿命
客户端connections是长连接。
Channels 虽然也是长期存活的,但是由于有大量的可恢复的协议错误会导致通道关闭,通道的存活期会比连接短一些。虽然每个操作都打开和关闭一个通道不是必须的操作,但是也不是不可行。有的选的情况下,还是优先考虑通道的复用为好。
已经关闭的通道不可以再被使用,也不会再接收到如消息投递之类的服务器事件。
由客户端提供的链接名称
为定位出现问题的应用或者实例 ,AMQP 0-9-1客户端链接可以提供一个自定义标识符,以遍在服务器日志 和管理界面中方便地对客户端进行区分。日志内容额管理界面中便会对标识符有所体现。标识符即为客户端提供的连接名称。名称可以用于标识应用或应用中特定的组件。
ConnectionFactory factory = new ConnectionFactory();
factory.setUri("amqp://userName:password@hostName:portNumber/virtualHost");
// 提供一个连接名称
Connection conn = factory.newConnection("app:audit component:event-consumer");

RabbitMQ的常见队列模型
基本模型
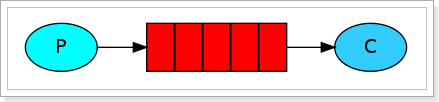
生产者:
public class SimplePublisher {
    public static final String QUEUE_NAME="sdfsdfsdfssf1";
    public static void main(String[] args) throws Exception{
        Connection connection=RabbitMQConnectionUtil.getConnection();
        Channel channel=connection.createChannel();
        channel.queueDeclare(QUEUE_NAME,true,false,false,null);
        String message="hello java!";
        channel.basicPublish("",QUEUE_NAME,null,message.getBytes());
    }
}
消费者:
public class SimpleConsumer {
    public static final String QUEUE_NAME = "sdfsdfsdfssf1";

    public static void main(String[] args) throws Exception {
        Connection connection = RabbitMQConnectionUtil.getConnection();
        Channel channel = connection.createChannel();
        channel.basicConsume(QUEUE_NAME, true, new DefaultConsumer(channel) {
            @Override
            public void handleDelivery(String consumerTag, Envelope envelope, AMQP.BasicProperties properties, byte[] body) throws IOException {
                System.out.println("message receive:" + new String(body));
            }
        });
    }
}
work模式
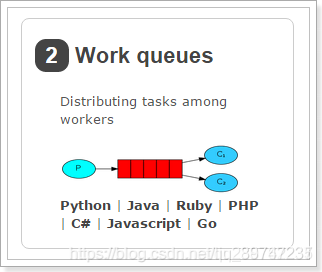
生产者:
public class WorkPublisher {
    public static final String QUEUE_NAME="workqueue";
    public static void main(String[] args) throws Exception {
        Connection connection = RabbitMQConnectionUtil.getConnection();
        Channel channel = connection.createChannel();
        channel.queueDeclare(QUEUE_NAME,false,false,false,null);
        for(int i=0;i<10;i++){
            channel.basicPublish("",QUEUE_NAME,null,String.format("第%d条信息",i).getBytes());
            Thread.sleep(200);
        }
        channel.close();
        connection.close();
    }
}
消费者1:
public class WorkConsumer {
    public static final String QUEUE_NAME="workqueue";
    public static void main(String[] args) throws Exception {
        Connection connection = RabbitMQConnectionUtil.getConnection();
        Channel channel = connection.createChannel();
        channel.queueDeclare(QUEUE_NAME,false,false,false,null);
        // 同时最大处理的消息数量
        channel.basicQos(2);
        channel.basicConsume(QUEUE_NAME,true,new DefaultConsumer(channel){
            @Override
            public void handleDelivery(String consumerTag, Envelope envelope, AMQP.BasicProperties properties, byte[] body) throws IOException {
                System.out.println("消费者:"+new String(body));
            }
        });
    }
}
消费者2:
public class WorkConsumer {
    public static final String QUEUE_NAME="workqueue";
    public static void main(String[] args) throws Exception {
        Connection connection = RabbitMQConnectionUtil.getConnection();
        Channel channel = connection.createChannel();
        channel.queueDeclare(QUEUE_NAME,false,false,false,null);
        // 同时最大处理的消息数量
        channel.basicQos(2);
        //autoAck因为false,而最大的prefetchCount为2,所以这里只会打印2条消息
        channel.basicConsume(QUEUE_NAME,false,new DefaultConsumer(channel){
            @Override
            public void handleDelivery(String consumerTag, Envelope envelope, AMQP.BasicProperties properties, byte[] body) throws IOException {
                System.out.println("消费者:"+new String(body));
            }
        });
    }
}
订阅模式-fanout
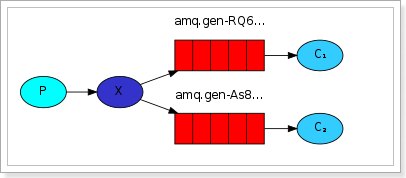
1) 可以有多个消费者
2) 每个消费者有自己的queue(队列)
3) 每个队列都要绑定到Exchange(交换机)
4) 生产者发送的消息,只能发送到交换机,交换机来决定要发给哪个队列,生产者无法决定。
5) 交换机把消息发送给绑定过的所有队列
6) 队列的消费者都能拿到消息。实现一条消息被多个消费者消费
生产者:
public class FanoutPublisher {
    public static final String EXCHANGE="fanout_exchange";
    public static void main(String[] args) throws Exception {
        Connection connection = RabbitMQConnectionUtil.getConnection();
        Channel channel = connection.createChannel();
        channel.basicPublish(EXCHANGE,"",null,"这是一条fanout消息".getBytes());
        channel.close();
        connection.close();
    }
}
消费者:
public class FanoutConsumer {
    public static final String EXCHANGE="fanout_exchange";
    public static final String QUEUE1="fanout_queue1";
    public static void main(String[] args) throws Exception {
        Connection connection = RabbitMQConnectionUtil.getConnection();
        Channel channel = connection.createChannel();
        channel.queueDeclare(QUEUE1,false,false,true,null);
        channel.exchangeDeclare(EXCHANGE,"fanout",true);
        channel.queueBind(QUEUE1,EXCHANGE,"");
        channel.basicConsume(QUEUE1,true,new DefaultConsumer(channel){
            @Override
            public void handleDelivery(String consumerTag, Envelope envelope, AMQP.BasicProperties properties, byte[] body) throws IOException {
                System.out.println("消费者1:"+new String(body));
            }
        });
    }
}
订阅模式-direct
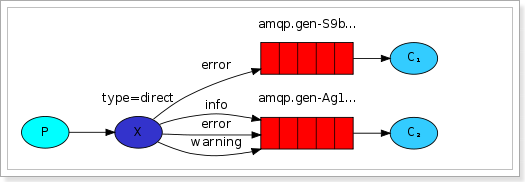
在Fanout模式中,一条消息,会被所有订阅的队列都消费。但是,在某些场景下,我们希望不同的消息被不同的队列消费。这时就要用到Direct类型的Exchange。
在Direct模型下:
队列与交换机的绑定,不能是任意绑定了,而是要指定一个RoutingKey(路由key)
消息的发送方在 向 Exchange发送消息时,也必须指定消息的 RoutingKey。
Exchange不再把消息交给每一个绑定的队列,而是根据消息的Routing Key进行判断,只有队列的Routingkey与消息的 Routing key完全一致,才会接收到消息
生产者:
public class DirectPublisher {
    public static final String EXCHANGE="direct_exchange";
    public static void main(String[] args) throws Exception {
        Connection connection = RabbitMQConnectionUtil.getConnection();
        Channel channel = connection.createChannel();
        channel.basicPublish(EXCHANGE,"insert",null,"这是一条direct insert消息".getBytes());
        channel.basicPublish(EXCHANGE,"update",null,"这是一条direct update消息".getBytes());
        channel.basicPublish(EXCHANGE,"delete",null,"这是一条direct delete消息".getBytes());
        channel.close();
        connection.close();
    }
}
消费者1:
public class DirectConsumer {
    public static final String EXCHANGE="direct_exchange";
    public static final String QUEUE1="direct_insert_delete";
    public static void main(String[] args) throws Exception {
        Connection connection = RabbitMQConnectionUtil.getConnection();
        Channel channel = connection.createChannel();
        channel.queueDeclare(QUEUE1,false,false,true,null);
        //绑定交换机和队列并指定RoutingKey为insert
        channel.queueBind(QUEUE1,EXCHANGE,"insert");
        //绑定交换机和队列并指定RoutingKey为delete
        channel.queueBind(QUEUE1,EXCHANGE,"delete");
        channel.basicConsume(QUEUE1,true,new DefaultConsumer(channel){
            @Override
            public void handleDelivery(String consumerTag, Envelope envelope, AMQP.BasicProperties properties, byte[] body) throws IOException {
                System.out.println("INSERT/DELETE:"+new String(body));
            }
        });
    }
}
消费者1打印消息
INSERT/DELETE:这是一条direct insert消息
INSERT/DELETE:这是一条direct delete消息
消费者2:
public class DirectConsumer2 {
    public static final String EXCHANGE="direct_exchange";
    public static final String QUEUE1="direct_update";
    public static void main(String[] args) throws Exception {
        Connection connection = RabbitMQConnectionUtil.getConnection();
        Channel channel = connection.createChannel();
        channel.queueDeclare(QUEUE1,false,false,true,null);
        channel.queueBind(QUEUE1,EXCHANGE,"update");
        channel.basicConsume(QUEUE1,true,new DefaultConsumer(channel){
            @Override
            public void handleDelivery(String consumerTag, Envelope envelope, AMQP.BasicProperties properties, byte[] body) throws IOException {
                System.out.println("update:"+new String(body));
            }
        });
    }
}
消费者2打印消息
update:这是一条direct update消息
订阅模式-topic
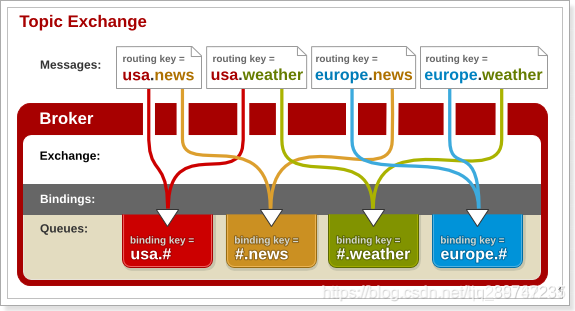
Topic类型的Exchange与Direct相比,都是可以根据RoutingKey把消息路由到不同的队列。只不过Topic类型Exchange可以让队列在绑定Routing key 的时候使用通配符!
通配符规则:
#:匹配一个或多个词
*:匹配不多不少恰好1个词
举例:
audit.#:能够匹配audit.irs.corporate`或者 audit.irs
audit.*:只能匹配audit.irs
生产者:
public class TopicPublisher {
    public static final String EXCHANGE="topic_exchange";
    public static void main(String[] args) throws Exception {
        Connection connection = RabbitMQConnectionUtil.getConnection();
        Channel channel = connection.createChannel();
        channel.exchangeDeclare(EXCHANGE,"topic",true);
        channel.basicPublish(EXCHANGE,"item.delete.product",null,"topic类型".getBytes());
        channel.close();
        connection.close();
    }
}
消费者:
public class TopicConsumer {
    public static final String EXCHANGE="topic_exchange";
    public static final String QUEUE1="topic_queue";
    public static void main(String[] args) throws Exception {
        Connection connection = RabbitMQConnectionUtil.getConnection();
        Channel channel = connection.createChannel();
        channel.queueDeclare(QUEUE1,false,false,true,null);
        channel.queueBind(QUEUE1,EXCHANGE,"item.#");
        channel.basicConsume(QUEUE1,true,new DefaultConsumer(channel){
            @Override
            public void handleDelivery(String consumerTag, Envelope envelope, AMQP.BasicProperties properties, byte[] body) throws IOException {
                System.out.println("RECEIVERD:"+new String(body));
            }
        });
    }
}
Spring RabbitMQ结合
maven配置
<?xml version="1.0" encoding="UTF-8"?>
<project xmlns="http://maven.apache.org/POM/4.0.0" xmlns:xsi="http://www.w3.org/2001/XMLSchema-instance"
         xsi:schemaLocation="http://maven.apache.org/POM/4.0.0 https://maven.apache.org/xsd/maven-4.0.0.xsd">
    <modelVersion>4.0.0</modelVersion>
    <groupId>com.newland</groupId>
    <artifactId>springrabbit</artifactId>
    <version>0.0.1-SNAPSHOT</version>
    <name>springrabbit</name>
    <description>Demo project for Spring Boot</description>
    <properties>
        <java.version>1.8</java.version>
        <maven.compiler.source>1.8</maven.compiler.source>
        <maven.compiler.target>1.8</maven.compiler.target>
        <project.build.sourceEncoding>UTF-8</project.build.sourceEncoding>
        <spring-framework.version>5.2.8.RELEASE</spring-framework.version>
        <spring.amqp.version>2.3.5</spring.amqp.version>
    </properties>
    <dependencies>
        <!-- https://mvnrepository.com/artifact/org.springframework/spring-context -->
        <dependency>
            <groupId>org.springframework</groupId>
            <artifactId>spring-context</artifactId>
            <version>${spring-framework.version}</version>
        </dependency>
        <!-- https://mvnrepository.com/artifact/org.springframework/spring-beans -->
        <dependency>
            <groupId>org.springframework</groupId>
            <artifactId>spring-beans</artifactId>
            <version>${spring-framework.version}</version>
        </dependency>

        <!-- https://mvnrepository.com/artifact/org.springframework/spring-core -->
        <dependency>
            <groupId>org.springframework</groupId>
            <artifactId>spring-core</artifactId>
            <version>${spring-framework.version}</version>
        </dependency>
        <dependency>
            <groupId>org.springframework.amqp</groupId>
            <artifactId>spring-rabbit</artifactId>
            <version>${spring.amqp.version}</version>
        </dependency>

        <dependency>
            <groupId>org.springframework.amqp</groupId>
            <artifactId>spring-amqp</artifactId>
            <version>${spring.amqp.version}</version>
        </dependency>
        <dependency>
            <groupId>com.rabbitmq</groupId>
            <artifactId>amqp-client</artifactId>
            <version>5.9.0</version>
        </dependency>
    </dependencies>
</project>
rabbitmq spring bean 配置:
<?xml version="1.0" encoding="UTF-8"?>
<beans xmlns="http://www.springframework.org/schema/beans"
       xmlns:xsi="http://www.w3.org/2001/XMLSchema-instance"
       xmlns:rabbit="http://www.springframework.org/schema/rabbit"
       xsi:schemaLocation="http://www.springframework.org/schema/beans
                        http://www.springframework.org/schema/beans/spring-beans-4.0.xsd
				        http://www.springframework.org/schema/rabbit
				        http://www.springframework.org/schema/rabbit/spring-rabbit-1.4.xsd">

    <rabbit:connection-factory id="rabbitConnectionFactory" username="leellun" password="liulun666" host="192.168.10.103" port="5672"></rabbit:connection-factory>
    <rabbit:admin connection-factory="rabbitConnectionFactory"/>
    <rabbit:template id="rabbitTemplate" connection-factory="rabbitConnectionFactory" exchange="exchange1"/>
    <rabbit:queue name="queue1" auto-delete="true" auto-declare="true" durable="true" exclusive="false" />
    <rabbit:direct-exchange name="exchange1" durable="true" auto-declare="true" auto-delete="true" >
        <rabbit:bindings>
            <rabbit:binding key="aa" queue="queue1"></rabbit:binding>
        </rabbit:bindings>
    </rabbit:direct-exchange>
    <bean id="directConsumer" class="com.newland.springrabbit.DirectConsumer"/>
    <rabbit:listener-container acknowledge="auto" connection-factory="rabbitConnectionFactory">
        <rabbit:listener ref="directConsumer" queues="queue1" response-routing-key="aa"/>
    </rabbit:listener-container>
</beans>
消息监听代码:
public class DirectConsumer implements MessageListener {
    @Override
    public void onMessage(Message message) {
        System.out.println("===>"+new String(message.getBody()));
    }
    @Override
    public void containerAckMode(AcknowledgeMode mode) {

    }
    @Override
    public void onMessageBatch(List<Message> messages) {

    }
}
spring容器启动并发送消息:
public class MqProducerConfig {
    public static void main(String[] args){
        ApplicationContext context=new ClassPathXmlApplicationContext("application-context.xml");
        AmqpTemplate rabbitTemplate= (AmqpTemplate) context.getBean("rabbitTemplate");
        //指定exchange:exchange1 routekey:aa 发送消息
        rabbitTemplate.convertAndSend("exchange1","aa", "sdfsdfsdf2");
    }
}
Spring Boot RabbitMQ结合
maven配置:
<dependencies>
        <dependency>
            <groupId>org.springframework.boot</groupId>
            <artifactId>spring-boot-starter-web</artifactId>
        </dependency>
        <dependency>
            <groupId>org.springframework.boot</groupId>
            <artifactId>spring-boot-starter-amqp</artifactId>
        </dependency>

        <dependency>
            <groupId>org.springframework.amqp</groupId>
            <artifactId>spring-rabbit</artifactId>
            <version>${spring.amqp.version}</version>
        </dependency>

        <dependency>
            <groupId>org.springframework.amqp</groupId>
            <artifactId>spring-amqp</artifactId>
            <version>${spring.amqp.version}</version>
        </dependency>
        <dependency>
            <groupId>com.rabbitmq</groupId>
            <artifactId>amqp-client</artifactId>
            <version>5.9.0</version>
        </dependency>
    </dependencies>
spring boot配置文件application.yml配置:
server:
  port: 8021
spring:
  #给项目来个名字
  application:
    name: rabbitmq-provider
  #配置rabbitMq 服务器
  rabbitmq:
    host: 192.168.10.103
    port: 5672
    username: leellun
    password: liulun666
RabbitMQ配置类:
@Configuration
public class DirectRabbitConfig {
    //声明队列
    @Bean
    public Queue TestDirectQueue() {
        return new Queue("TestDirectQueue",true);
    }
	//声明direct交换器
    @Bean
    DirectExchange TestDirectExchange() {
        return new DirectExchange("TestDirectExchange",true,false);
    }
	//绑定队列和交换器 并且指定routekey为TestDirectRouting
    @Bean
    Binding bindingDirect(Queue queue,DirectExchange directExchange) {
        return BindingBuilder.bind(queue).to(directExchange).with("TestDirectRouting");
    }
}
RabbitMQ消息接收:
@Component
@RabbitListener(queues = "TestDirectQueue")
public class DirectReceiver {

    @RabbitHandler
    public void process(Map testMessage) {
        System.out.println("DirectReceiver消费者收到消息  : " + testMessage.toString());
    }

}
RabbitMQ消息发送的Controller:
@RestController
public class SendMessageController {
    @Autowired
    RabbitTemplate rabbitTemplate;

    @GetMapping("/sendDirectMessage")
    public String sendDirectMessage() {
        String messageId = String.valueOf(System.currentTimeMillis());
        String msg = "hello!";
        Map<String,Object> map=new HashMap<>();
        map.put("messageId",messageId);
        map.put("message",msg);
        //指定exchange、routekey发送消息
        rabbitTemplate.convertAndSend("TestDirectExchange", "TestDirectRouting", map);
        return "ok";
    }
}
Spring Boot启动类:
@SpringBootApplication
public class SpringRabbitMQApplication {
    public static void main(String[] args) {
        SpringApplication.run(SpringRabbitMQApplication.class, args);
    }
}
Spring Cloud RabbitMQ结合:
https://blog.csdn.net/forezp/article/details/81041062