前言:之前在windows安装并编译了caffe,后来在测试由darknet转换caffe模型的时候,对caffe-yolov3进行了编译,由于该代码运行在linux下,尽管做了诸多的尝试,但是出现的错误实在太多,于是又尝试在Ubuntu下编译了caffe,故分享并与大家交流,如有疏漏的地方,欢迎大家指正。
文章目录
- 显卡:GTX2070
- CPU: Intel core i7 10Th
- 系统:Ubuntu18.04LTS
- CUDA版本: 10.1
- cudnn版本:7.5
- OpenCV版本:3.4.0
本教程主要包含以下几个步骤
- 1.安装相关的依赖包
- 2.安装显卡驱动
- 3.配置相关环境变量
- 4.安装CUDA
- 5.安装Cudnn
- 6.安装OpenCV3.4.0
- 7.配置并编译caffe
- 8.配置并编译pycaffe
- 9.出现的问题和解决方法
1. 安装相关的依赖包
执行以下指令安装相关的依赖包,如果安装较慢的话,可以进行换源,具体换源教程见
sudo apt-get install libprotobuf-dev libleveldb-dev libsnappy-dev libopencv-dev libhdf5-serial-dev protobuf-compiler

sudo apt-get install --no-install-recommends libboost-all-dev

sudo apt-get install libopenblas-dev liblapack-dev libatlas-base-dev

sudo apt-get install libgflags-dev libgoogle-glog-dev liblmdb-dev

sudo apt-get install git cmake build-essential
2. 安装显卡驱动
2.1 检查自己的电脑是否支持GPU
通常Caffe在计算时有两种模式可以选择,CPU或GPU,使用GPU处理图像速度会更快,但往往有的计算机没有GPU,配置太低,所以只能选择CPU,作者的电脑不支持GPU,因此选择CPU安装的版本。
输入:
lspci | grep -i nvidia如果未显示任何内容,则证明你的电脑不支持GPU,则在后续编译caffe的时候需要配置CPU_ONLY = 1
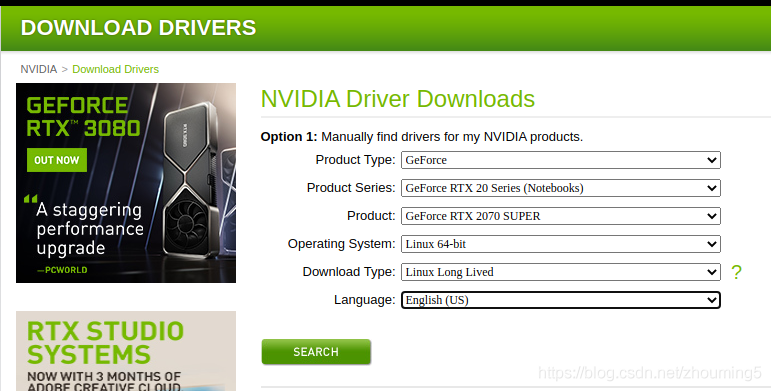
如果显示出显卡型号,则可以访问显卡驱动下载,选择对应的显卡及系统配置,则可获得匹配的显卡驱动型号
2.2 禁用ubuntu自带驱动
- 编辑配置文件:
sudo vim /etc/modprobe.d/blacklist.conf
+ blacklist nouveau = 0 ## 在文件末尾增加改行,+寓意新增
sudo update-initramfs -u
reboot
2.3 方式一:使用ppa方式安装
使用ppa方式安装章节2.1查出来的版本驱动,terminal run,
sudo apt-get upgrade
sudo apt-get update
sudo apt-get install nvidia-* #此处 nvidia-*为具体的显卡型号
2.3 方式二:下载驱动文件进行安装
在2.1章节下载对应的驱动,直接进行安装即可
chmod +x 显卡驱动执行文件*.run
./显卡驱动执行文件*.run
2.4 测试显卡驱动是否安装成功
- 打开终端,输入如下命令
是否有显卡信息出现,小编在安装显卡驱动的时候就报错了,首先是安装显卡驱动的时候,程序无法运行结束,要在bios中关闭安全选项才能完成显卡安装。nvidia-smi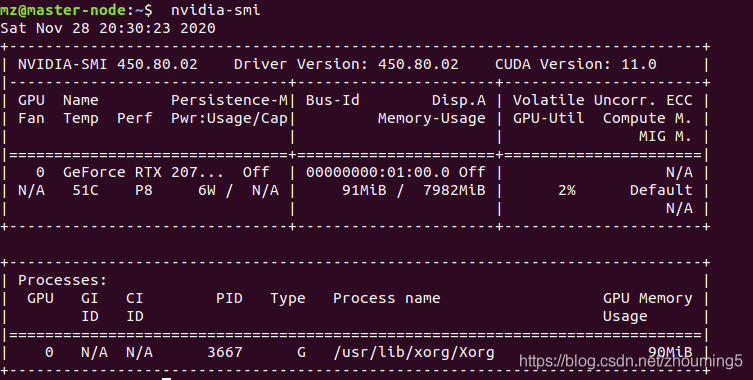
2.5 显卡驱动卸载
如果显卡驱动安装的有问题,需要执行以下命令进行卸载
sudo /usr/bin/nvidia-uninstall
或者使用下面的命令都可
sudo apt-get install autoremove --purge nvidia*
3. 配置相关环境变量
3.1 使用 gedit 命令打开配置文件
编辑当前用户环境变量
sudo gedit ~/.bashrc打开后在文件最后加入以下两行内容:
export LD_LIBRARY_PATH=/usr/lib/x86_64-linux-gnu:$LD_LIBRARY_PATH

export LD_LIBRARY_PATH=/lib/x86_64-linux-gnu:$LD_LIBRARY_PATH
让配置的环境变量生效
sudo source ~/.bashrc
4. 安装CUDA
4.1 现在匹配的CUDA版本
进入CUDA 下载链接,选择匹配的系统使用如下命令下载
wget https://developer.download.nvidia.com/compute/cuda/11.1.1/local_installers/cuda_11.1.1_455.32.00_linux.run
4.2 安装CUDA
cuda10都集成了nvidia显卡驱动,按照安装cuda的同时是否安装显卡驱动可以分为不带驱动的安装方法和带驱动的安装方法。这里采用不带驱动的安装方法,因为最新的nvidia显卡驱动已经在前面安装成功了
sudo chmod +x cuda_10.1.105_418.39_linux.run
sudo sh cuda_10.1.105_418.39_linux.run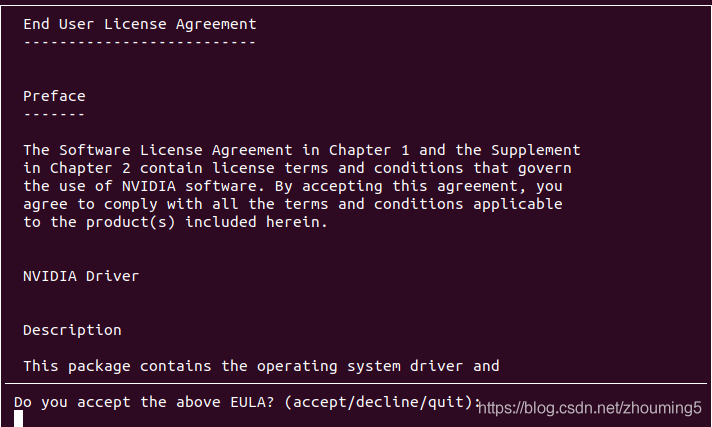
输入accept
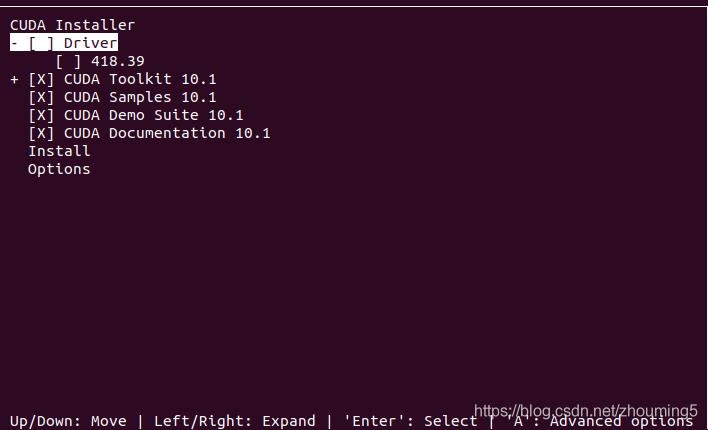
单击空格,取消driver前面的X选项,选择install进行安装
输入Y确认
输入Y确认
输入Y确认
4.3 设置cuda环境变量
- 输入 sudo gedit ~/.bashrc 打开主目录下的 .bashrc文件添加如下路径:
export LD_LIBRARY_PATH=$LD_LIBRARY_PATH:/usr/local/cuda-10.1/lib64
export PATH=$PATH:/usr/local/cuda-10.1/bin
export CUDA_HOME=$CUDA_HOME:/usr/local/cuda-10.1
终端运行:source ~/.bashrc 使之生效
4.4 检查CUDA是否安装成功
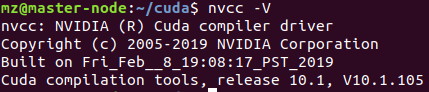
输入nvcc -V 查看是否有正确输出
编译CUDA自带的测试程序,输入一下命令,查看是否正常输出
cd /usr/local/cuda/samples/1_Utilities/deviceQuery #由自己电脑目录决定
make
sudo ./deviceQuery

5 安装cudnn
5.1 下载cuDNN

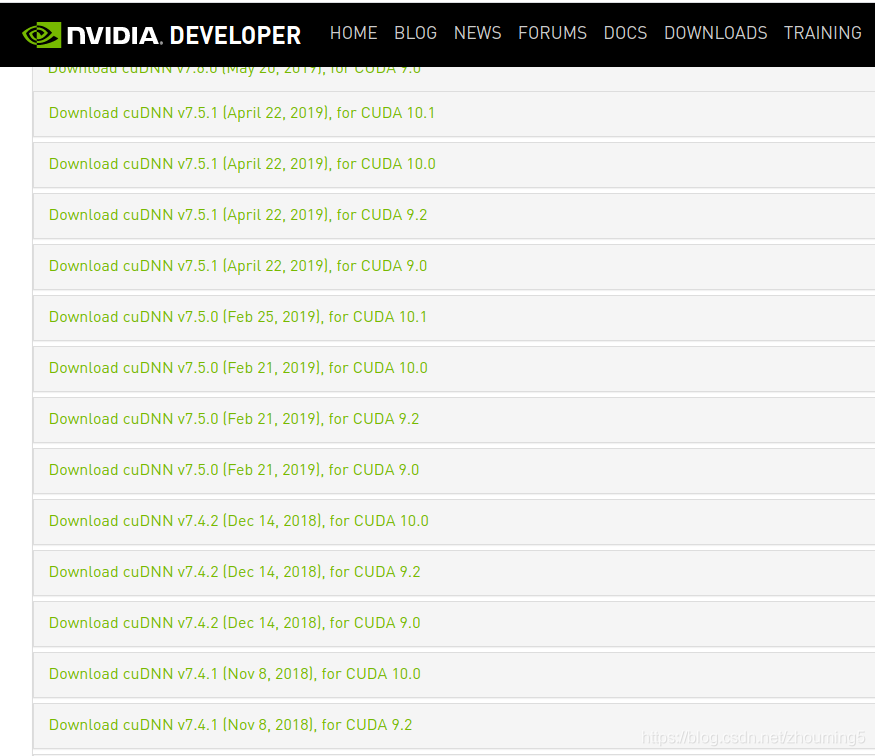
- 这里我们选择cuDNN7.5 for cuda10.1,此处需要与前面章节安装的CUDA版本匹配,选择对应的系统版本下载
5.2 安装cuDNN
- 输入以下命令进行安装
tar -zxvf cudnn-10.1-linux-x64-v7.5.0.10.tgz
cd cuda
sudo cp lib64/lib* /usr/local/cuda-10.1/lib64/
sudo cp include/cudnn.h /usr/local/cuda-10.0/include/
cd /usr/local/cuda-10.1/lib64/
sudo chmod +r libcudnn.so.7.5.0 # 自己查看.so的版本
sudo ln -s libcudnn.so.7.5.0 libcudnn.so.7
sudo ln -s libcudnn.so.7 libcudnn.so
6 安装OpenCV3.4.0
6.1 安装依赖库
sudo apt-get install build-essential
# 必须的,gcc编译环境

sudo apt-get install cmake git libgtk2.0-dev pkg-config libavcodec-dev libavformat-dev libswscale-dev
# 必须的,包括cmake等工具

sudo apt-get install python-dev python-numpy libtbb2 libtbb-dev libjpeg-dev libpng-dev libtiff-dev libjasper-dev libdc1394-22-dev
# 可选的,看个人需要,总共5M左右
6.2 下载OpenCV3.4.0
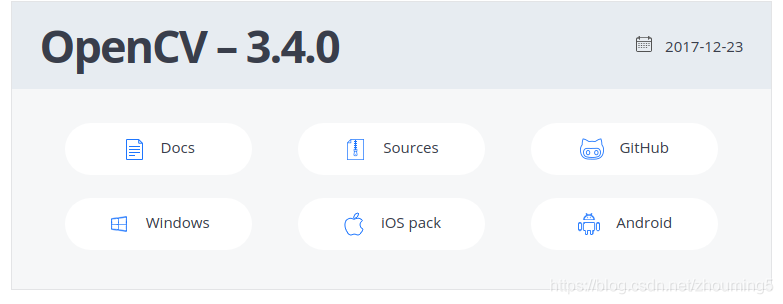
- 进入官网地址,下载OpenCV3.4.0源码
6.3 编译OPenCV3.4.0
cd opencv-3.4.0
mkdir build
# 创建编译文件
cd build
cmake -D CMAKE_BUILD_TYPE=Release -D CMAKE_INSTALL_PREFIX=/usr/local ..
# 生成后的Makefile在build文件夹中,而需要的CMakeLists.txt在 ".."中,即上一级文件夹中(opencv-3.4.0)
6.4 安装OpenCV3.4.0
# 4个线程编译
make -j4

# 安装
sudo make install
7 配置并编译caffe
7.1 下载caffe源码
- 使用git获取caffe源码
git clone https://github.com/BVLC/caffe.git
7.2 配置caffe
进入 caffe ,将 Makefile.config.example 文件复制一份并更名为 Makefile.config ,也可以在 caffe 目录下直接调用以下命令完成复制操作
sudo cp Makefile.config.example Makefile.config然后修改 Makefile.config 文件,在 caffe 目录下打开该文件:
sudo gedit Makefile.config使用cudnn
将#USE_CUDNN := 1

修改成:

USE_CUDNN := 1
配置OpenCV版本
将#OPENCV_VERSION := 3

修改为:

OPENCV_VERSION := 3
3.使用 python 接口
将#WITH_PYTHON_LAYER := 1

修改为

WITH_PYTHON_LAYER := 1
配置python路径
INCLUDE_DIRS := $(PYTHON_INCLUDE) /usr/local/include

LIBRARY_DIRS := $(PYTHON_LIB) /usr/local/lib /usr/lib

修改为:

INCLUDE_DIRS := $(PYTHON_INCLUDE) /usr/local/include /usr/include/hdf5/serial

LIBRARY_DIRS := $(PYTHON_LIB) /usr/local/lib /usr/lib /usr/lib/x86_64-linux-gnu /usr/lib/x86_64-linux-gnu/hdf5/serial
CUDA_ARCH配置,注释掉compute_20
CUDA_ARCH :=
#-gencode arch=compute_20,code=sm_20 \

-gencode arch=compute_30,code=sm_30 \

-gencode arch=compute_35,code=sm_35 \

-gencode arch=compute_50,code=sm_50 \

-gencode arch=compute_52,code=sm_52 \

-gencode arch=compute_60,code=sm_60 \

-gencode arch=compute_61,code=sm_61 \

-gencode arch=compute_61,code=compute_61
修改caffe下的Makefile文件
NVCCFLAGS +=-ccbin=$(CXX) -Xcompiler-fPIC $(COMMON_FLAGS)

替换为:

NVCCFLAGS += -D_FORCE_INLINES -ccbin=$(CXX) -Xcompiler -fPIC $(COMMON_FLAGS)
LIBRARIES += glog gflags protobuf boost_system boost_filesystem m hdf5_hl hdf5 改为: LIBRARIES += glog gflags protobuf boost_system boost_filesystem m hdf5_serial_hl hdf5_serial修改 /usr/local/cuda/include/host_config.h 文件
#error-- unsupported GNU version! gcc versions later than 4.9 are not supported!

改为

//#error-- unsupported GNU version! gcc versions later than 4.9 are not supported!
此处为我自己的caffe配置文件,仅供参考
## Refer to http://caffe.berkeleyvision.org/installation.html
# Contributions simplifying and improving our build system are welcome!

# cuDNN acceleration switch (uncomment to build with cuDNN).
 USE_CUDNN := 1

# CPU-only switch (uncomment to build without GPU support).
#CPU_ONLY := 0

# uncomment to disable IO dependencies and corresponding data layers
# USE_OPENCV := 0
# USE_LEVELDB := 0
# USE_LMDB := 0
# This code is taken from https://github.com/sh1r0/caffe-android-lib
# USE_HDF5 := 0

# uncomment to allow MDB_NOLOCK when reading LMDB files (only if necessary)
#	You should not set this flag if you will be reading LMDBs with any
#	possibility of simultaneous read and write
# ALLOW_LMDB_NOLOCK := 1

# Uncomment if you're using OpenCV 3
 OPENCV_VERSION := 3

# To customize your choice of compiler, uncomment and set the following.
# N.B. the default for Linux is g++ and the default for OSX is clang++
# CUSTOM_CXX := g++

# CUDA directory contains bin/ and lib/ directories that we need.
CUDA_DIR := /usr/local/cuda
# On Ubuntu 14.04, if cuda tools are installed via
# "sudo apt-get install nvidia-cuda-toolkit" then use this instead:
# CUDA_DIR := /usr

# CUDA architecture setting: going with all of them.
# For CUDA < 6.0, comment the *_50 through *_61 lines for compatibility.
# For CUDA < 8.0, comment the *_60 and *_61 lines for compatibility.
# For CUDA >= 9.0, comment the *_20 and *_21 lines for compatibility.
CUDA_ARCH :=
		#-gencode arch=compute_20,code=sm_20 \
		-gencode arch=compute_20,code=sm_21 \
		-gencode arch=compute_30,code=sm_30 \
		-gencode arch=compute_35,code=sm_35 \
		-gencode arch=compute_50,code=sm_50 \
		-gencode arch=compute_52,code=sm_52 \
		-gencode arch=compute_60,code=sm_60 \
		-gencode arch=compute_61,code=sm_61 \
		-gencode arch=compute_61,code=compute_61

# BLAS choice:
# atlas for ATLAS (default)
# mkl for MKL
# open for OpenBlas
BLAS := atlas
# Custom (MKL/ATLAS/OpenBLAS) include and lib directories.
# Leave commented to accept the defaults for your choice of BLAS
# (which should work)!
# BLAS_INCLUDE := /path/to/your/blas
# BLAS_LIB := /path/to/your/blas

# Homebrew puts openblas in a directory that is not on the standard search path
# BLAS_INCLUDE := $(shell brew --prefix openblas)/include
# BLAS_LIB := $(shell brew --prefix openblas)/lib

# This is required only if you will compile the matlab interface.
# MATLAB directory should contain the mex binary in /bin.
# MATLAB_DIR := /usr/local
# MATLAB_DIR := /Applications/MATLAB_R2012b.app

# NOTE: this is required only if you will compile the python interface.
# We need to be able to find Python.h and numpy/arrayobject.h.
PYTHON_INCLUDE := /usr/include/python2.7 \
		/usr/lib/python2.7/dist-packages/numpy/core/include
# Anaconda Python distribution is quite popular. Include path:
# Verify anaconda location, sometimes it's in root.
# ANACONDA_HOME := $(HOME)/anaconda
# PYTHON_INCLUDE := $(ANACONDA_HOME)/include \
		# $(ANACONDA_HOME)/include/python2.7 \
		# $(ANACONDA_HOME)/lib/python2.7/site-packages/numpy/core/include

# Uncomment to use Python 3 (default is Python 2)
# PYTHON_LIBRARIES := boost_python3 python3.5m
# PYTHON_INCLUDE := /usr/include/python3.5m \
#                 /usr/lib/python3.5/dist-packages/numpy/core/include

# We need to be able to find libpythonX.X.so or .dylib.
PYTHON_LIB := /usr/lib
# PYTHON_LIB := $(ANACONDA_HOME)/lib

# Homebrew installs numpy in a non standard path (keg only)
# PYTHON_INCLUDE += $(dir $(shell python -c 'import numpy.core; print(numpy.core.__file__)'))/include
# PYTHON_LIB += $(shell brew --prefix numpy)/lib

# Uncomment to support layers written in Python (will link against Python libs)
WITH_PYTHON_LAYER := 1

# Whatever else you find you need goes here.
INCLUDE_DIRS := $(PYTHON_INCLUDE) /usr/local/include  /usr/include/hdf5/serial
LIBRARY_DIRS := $(PYTHON_LIB) /usr/local/lib /usr/lib /usr/lib/x86_64-linux-gnu /usr/lib/x86_64-linux-gnu/hdf5/serial

# If Homebrew is installed at a non standard location (for example your home directory) and you use it for general dependencies
# INCLUDE_DIRS += $(shell brew --prefix)/include
# LIBRARY_DIRS += $(shell brew --prefix)/lib

# NCCL acceleration switch (uncomment to build with NCCL)
# https://github.com/NVIDIA/nccl (last tested version: v1.2.3-1+cuda8.0)
# USE_NCCL := 1

# Uncomment to use `pkg-config` to specify OpenCV library paths.
# (Usually not necessary -- OpenCV libraries are normally installed in one of the above $LIBRARY_DIRS.)
# USE_PKG_CONFIG := 1

# N.B. both build and distribute dirs are cleared on `make clean`
BUILD_DIR := build
DISTRIBUTE_DIR := distribute

# Uncomment for debugging. Does not work on OSX due to https://github.com/BVLC/caffe/issues/171
# DEBUG := 1

# The ID of the GPU that 'make runtest' will use to run unit tests.
TEST_GPUID := 0

# enable pretty build (comment to see full commands)
Q ?= @
7.3 编译caffe
- 在 caffe 目录下执行
make all -j8
7.4 caffe测试
caffe编译完成后可运行如下命令进行测试
make runtest -j8

8 配置并编译pycaffe
8.1 编译pycaffe
进入caffe目录
make pycaffe -j8

sudo echo export PYTHONPATH="~/caffe/python" >> ~/.bashrc

source ~/.bashrc
8.2 验证pycaffe接口
- 编译 pycaffe 成功后,验证一下是否可以在 python 中导入 caffe 包,首先进入 python 环境:
python 然后导入 caffe : >>> import caffe - 若不报错则表示 caffe 的 python 接口已正确编译
9 出现的问题和解决方法
9.1 问题1
问题:ImportError: No module named skimage.io
解决方法:
#注意此处如果使用的python版本
pip install -U scikit-image
#若没有安装pip: sudo apt install python-pip
9.2 问题2
问题:File “”, line 1, in ImportError: No module named caffe
解决方法
# 配置python接口到用户环境变量中
sudo echo export PYTHONPATH="~/caffe/python" >> ~/.bashrc
source ~/.bashrc
9.3 问题3
问题:输入nvida-smi验证显卡驱动,NVIDIA-SMI has failed because it couldn’t communicate with the NVIDIA driver. Make sure that the latest NVIDIA driver is installed and running.
解决方法:重新安装显卡驱动
9.4 问题4
问题: error: ‘CUDNN_CONVOLUTION_FWD_ALGO_WINOGRAD’ was not declared in this scope
解决方法:cuda版本过高,caffe不能够适配较高的版本,小编在编译的时候最开始使用cuda11.1,报如上的错误,故可以选择较低的cuda版本