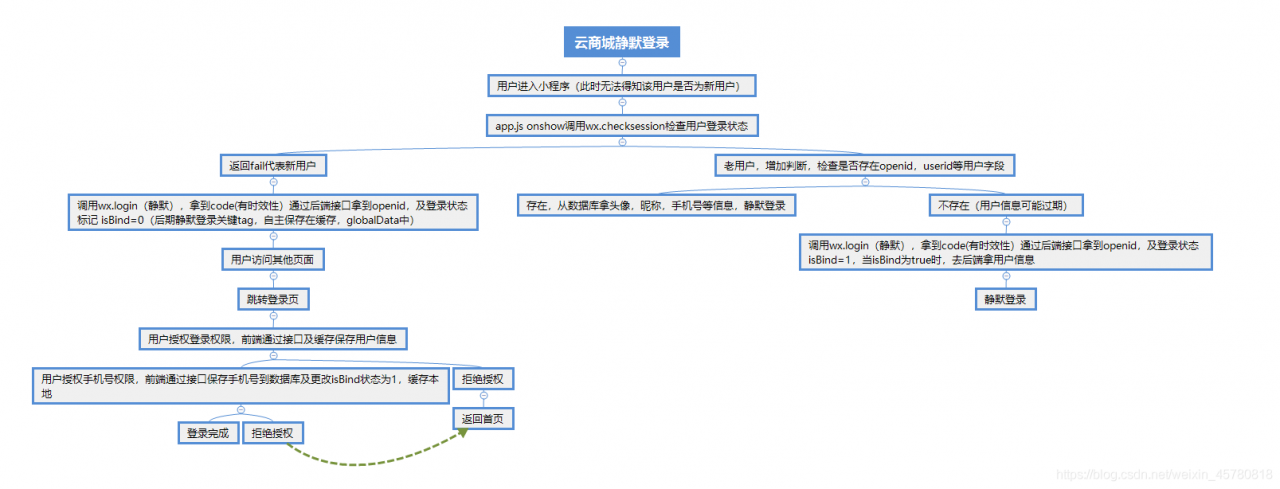
- 用户进入微信小程序首先会调用app.js底层onLaunch方法,一般会在onLaunch方法中做微信更新机制的逻辑。可以将更新方法封装再调用。
        checkUpdate: function () {
        if (wx.canIUse("getUpdateManager")) {
            const updateManager = wx.getUpdateManager();
            updateManager.onCheckForUpdate(function (res) {
                // 请求完新版本信息的回调
                if (res.hasUpdate) {
                    updateManager.onUpdateReady(function () {
                        wx.showModal({
                            title: "更新提示",
                            content: "新版本已经准备好,是否重启应用?",
                            success: function (res) {
                                if (res.confirm) {
                                    // 新的版本已经下载好,调用 applyUpdate 应用新版本并重启
                                    updateManager.applyUpdate();
                                }
                            },
                        });
                    });
                    updateManager.onUpdateFailed(function () {
                        // 新的版本下载失败
                        wx.showModal({
                            title: "已经有新版本了哟~",
                            content: "新版本已经上线啦~,请您删除当前小程序,重新搜索打开哟~",
                        });
                    });
                }
            });
        }
    },
- 再在onLaunch中调用this.updateApp();
- app.js中onshow执行顺序在onLaunch之后,一般在这里执行检查登录态是否过期的操作,也就是wx.checkSession,相同的,也做一层封装处理,保证onshow中代码尽量整洁易读。
get_user_mshop_info: function (options) {
        var that = this;
        wx.checkSession({
            success: function () {
                //console.log("session 未过期,并且在本生命周期一直有效");
                //根据实际场景做重新登录的操作 这里举例openid为空的情况 这里将重新登录也封装一次
                if (that.globalData.openid == "") {
                    that.getSessionKey(options); //重新登录
                }

            },
            fail: function () {
                //登录态过期
                that.getSessionKey(options); //重新登录
            },
        });
    },
 //获取session_key,同时可以获取到openid & user_id
  getSessionKey() {
    wx.login({
      success: function (res) {
        if (res.code) {
          //发起网络请求
          wx.request({
            url: 'xxxxxxxxxx', //后端接口 用于code解密
            method: "GET",
            data: {
              code: res.code
            },
            success: function (res) {
              // 根据项目实际场景后端返回相应字段 一般有区分用户的userid,用户头像,昵称等,若小程序需要额外手机验证码登录时,新增判断等
              // 做相应存储操作
            },
            fail: function (res) {

            }
          });
        }
      },
      complete: function () {},
    });
  },
以上就是简单的用户登录app.js所涉及到的方法。
再封装获取用户信息的方法
 // 获取用户信息
  GetUserProfileHandler: function (e) {
    let that = this;
    console.log(e);
    wx.getUserProfile({
      desc: "用于完善会员资料", // 声明获取用户个人信息后的用途,后续会展示在弹窗中,请谨慎填写
      success: (res) => {
        // console.log(res);
        that.GetUserInfoHandler({
            detail: res,
          },
          e ? true : false
        );
      },
    });
  },
  //点击授权登录,配合<button open-type="getUserProfile">使用 通过接口更新用户信息
  GetUserInfoHandler: function (e, isfreshType = false) {
    console.log(e);
    var that = this;
    var detail = e.detail;
    //授权成功
    if (
      detail.errMsg == "getUserInfo:ok" ||
      detail.errMsg == "getUserProfile:ok"
    ) {
      wx.showLoading({
        title: "加载中",
      });
      that.globalData.userInfo = detail.userInfo;
      wx.setStorageSync("userInfo", detail.userInfo);
      var userInfo = detail.userInfo;
      var encryptedData = detail.encryptedData;
      var rawData = detail.rawData;
      var iv = detail.iv;
      //更新用户信息
      wx.request({
        url: "xxxxxxxxxxxxx",
        method: "post",
        header: {
          "Content-Type": "application/x-www-form-urlencoded",
        },
        data: {
          nickName: userInfo.nickName, //昵称
          avatarUrl: userInfo.avatarUrl, //头像
          city: userInfo.city, //城市
          province: userInfo.province, //省份
          gender: userInfo.gender, //性别
          user_id: that.globalData.user_id ? that.globalData.user_id : 0, // 用户id
          encryptedData: encryptedData,
          iv: iv,
          rawData: rawData,
          openid: that.globalData.openid,
          isfreshType: isfreshType,
        },
        success: function (res) {
          console.log("更新用户信息")
          if (res.data.errcode == 0) {

          }
        },
        complete: function () {
          wx.hideLoading();
        },
      });
      if (that.userInfoCallback) {
        console.log("that.userInfoCallback",that.userInfoCallback)
        detail.userInfo.avatarUrl = "https://thirdwx.qlogo.cn/mmopen/vi_32/Q0j4TwGTfTLTnjvZQcaibYFQ1iajIBCPEW49zQX2xChcYxTricYg362k7gLKYIg42cNPcHrx1vEwmwABU0dszvfMQ/132";
        detail.userInfo.nickName = "";
        wx.setStorageSync("userInfo", detail.userInfo);
        that.userInfoCallback(detail.userInfo);
      }
    } else {
      wx.showToast({
        title: "授权失败",
        image: "../../images/mark.png",
        duration: 1500,
      });
    }
  },
结尾放个github地址,静默登录模块。
https://github.com/xianglihui/wx-base-login
版权声明:本文为weixin_45780818原创文章,遵循CC 4.0 BY-SA版权协议,转载请附上原文出处链接和本声明。