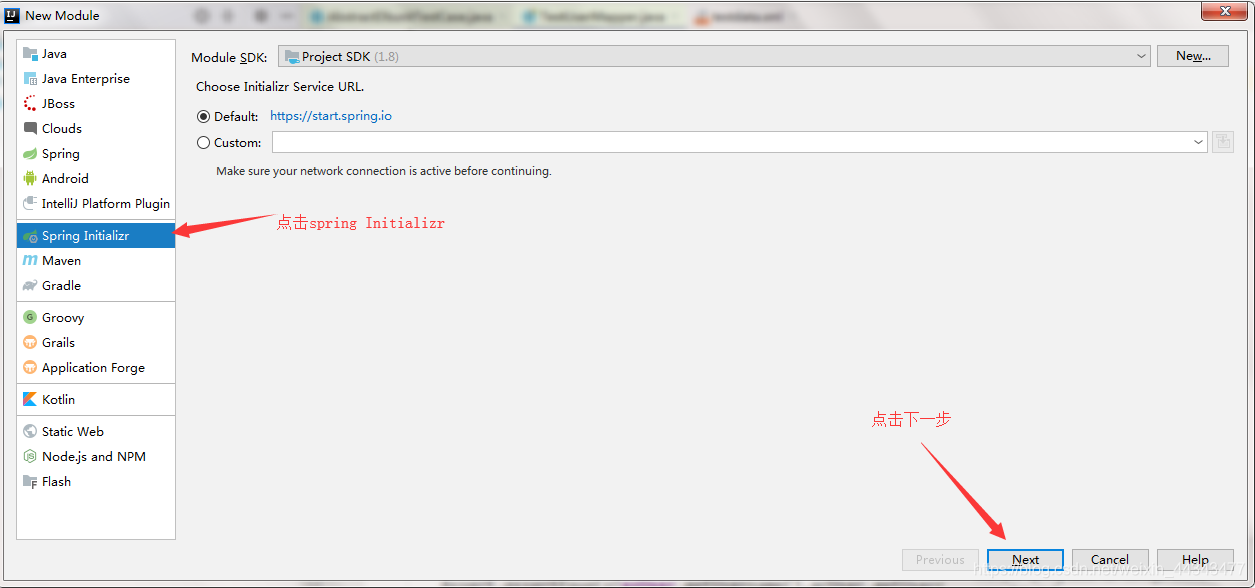
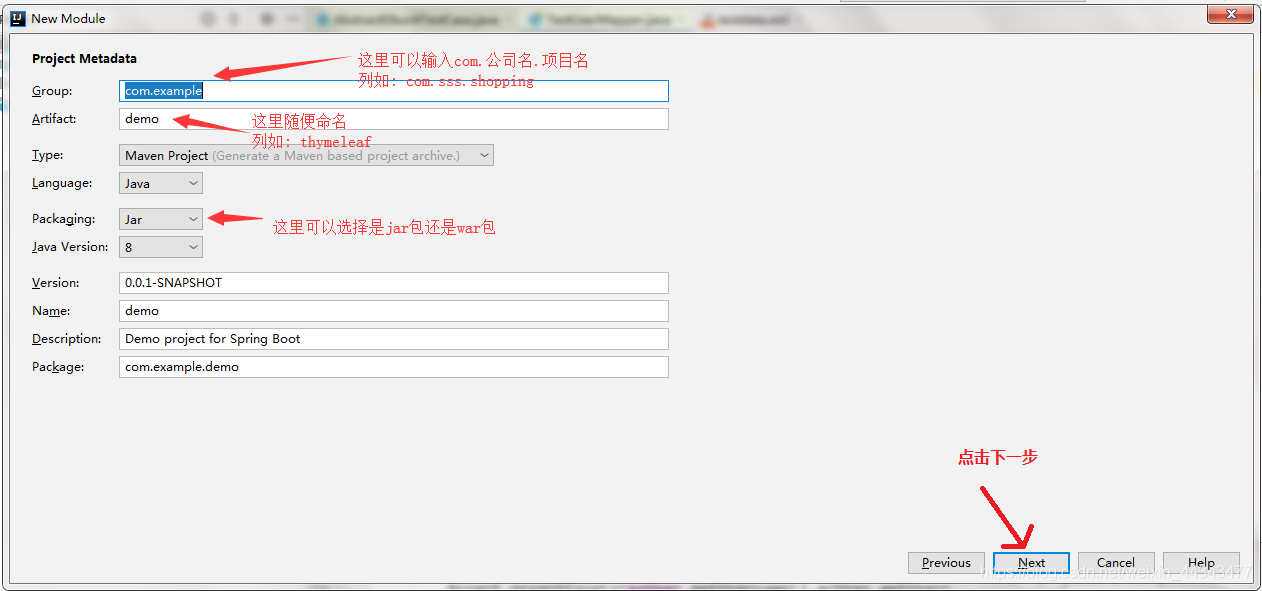
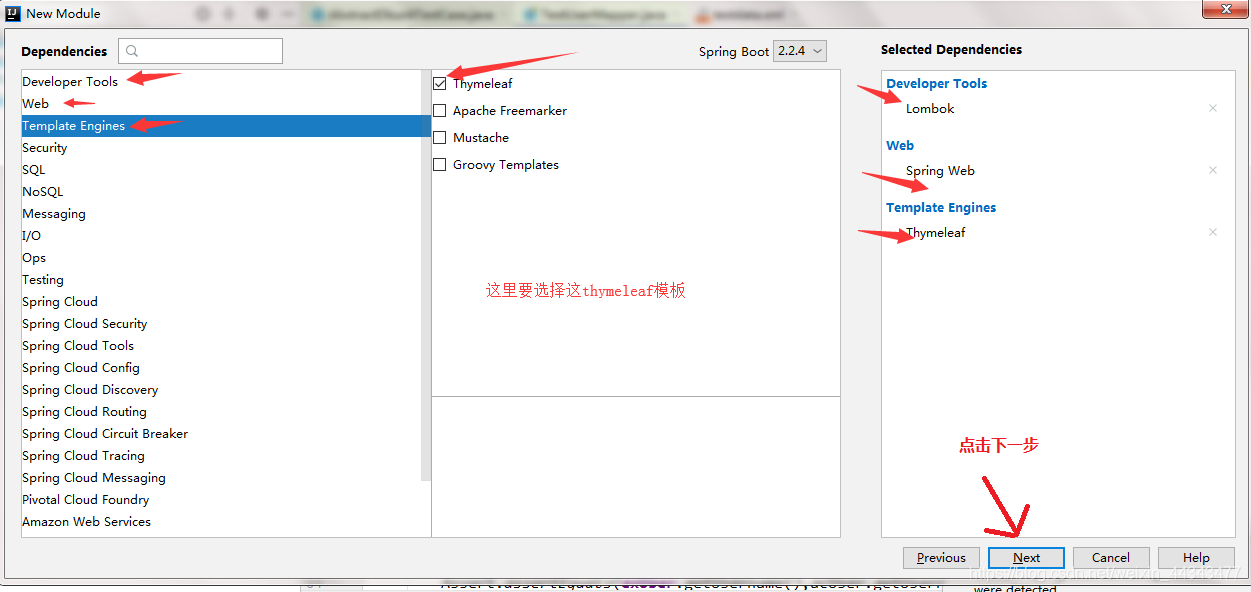
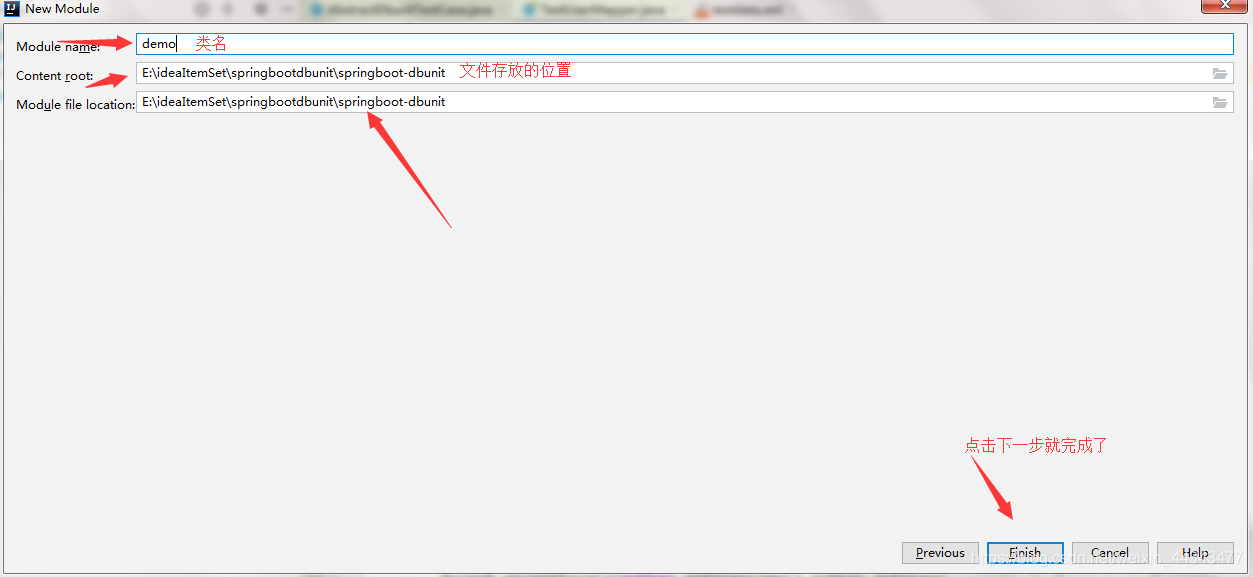
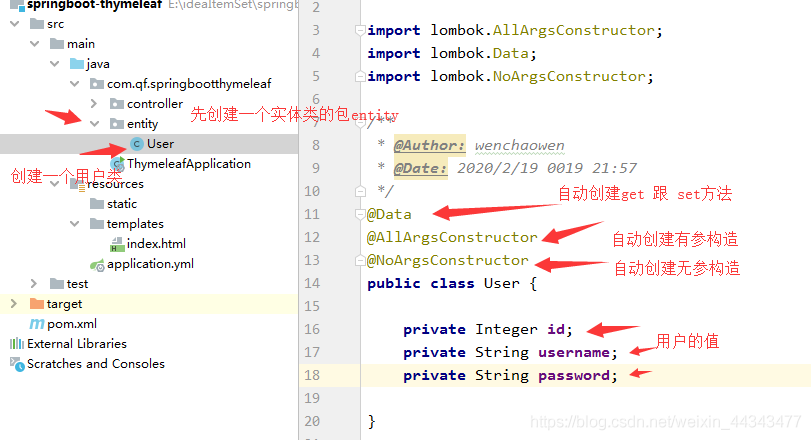
1. 先创建springboot项目
2. 创建好项目写application.properties或application.yml文档
2.1 application.properties (两选一)
2.1.1  spring.thymeleaf.prefix=classpath:/templates/		# 配置模板引擎的这个前缀
2.1.2  spring.thymeleaf.suffix=.html		#配置模板引擎的访问后缀
2.1.3  spring.thymeleaf.mode=HTML5		#配置模板引擎的这个模板的类型
2.1.4  spring.thymeleaf.encoding=UTF-8		#设置模板的内容编码
2.1.5  #spring.thymeleaf.content-type=text/html		#高版本可不配,低版本要配
2.1.6  spring.thymeleaf.cache=false		#配置模板的缓存
2.2 application.yml (两选一)
spring:
	thymeleaf:
		prefix: classpath:/templates/  # 配置模板引擎的这个前缀
		suffix: .html   #配置模板引擎的访问后缀
		mode: HTML5   #配置模板引擎的这个模板的类型
		encoding: utf-8   #设置模板的内容编码
		cache: false  #配置模板的缓存
3. 在resource/templates目录下创建一个index.html页面,在index.html页面中随便写几个数据。
4. 在java目录下的com.公司名.项目名下创建一个controller包,在controller包下创建一个Controller.class文件
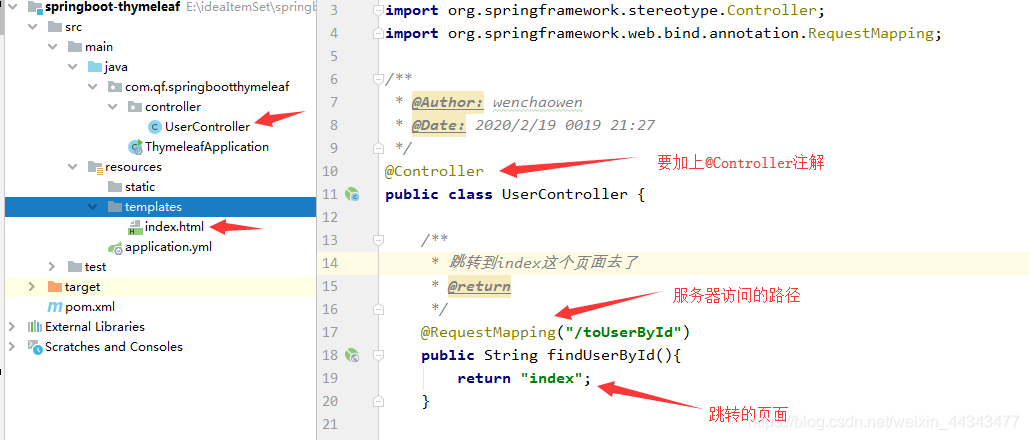
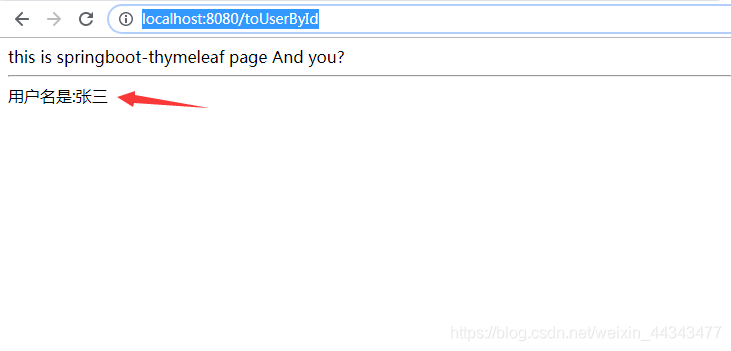
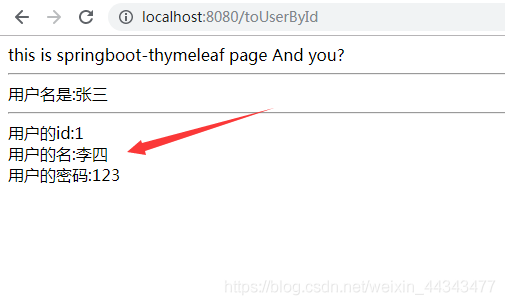
5. 启动Application.class文件的main方法,在浏览器上输入网址http://localhost:8080/toUserById 看一下成不成功
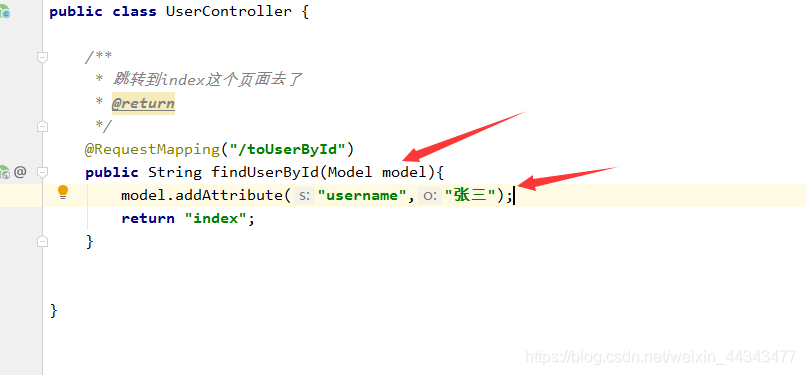
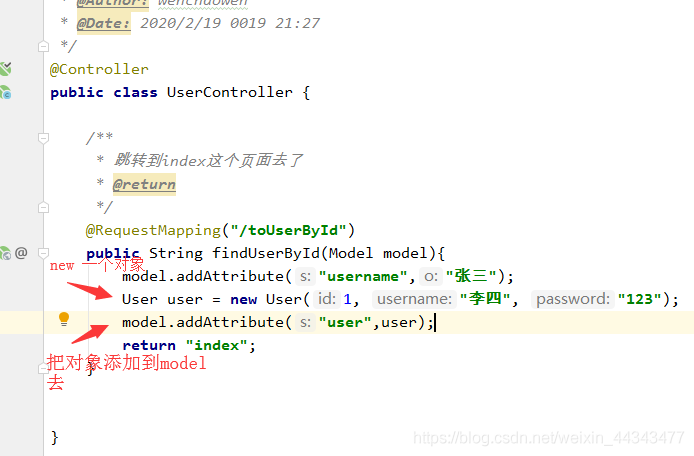
6. 添加一个Model,获取单个的值
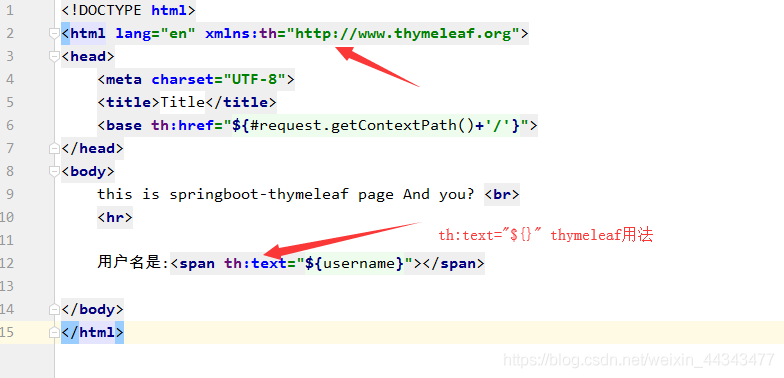
7. 在index.html页面中的< html lang=“en” >< /html >标签,那里添加一句 xmlns:th=“http://www.thymeleaf.org”
变成< html lang=“en” xmlns:th=“http://www.thymeleaf.org”>
重新启动Application.class文件,打开网址http://localhost:8080/toUserById
8. 获取一个对象
8.1 创建一个类
8.2 在Controller里new User,添加到model去
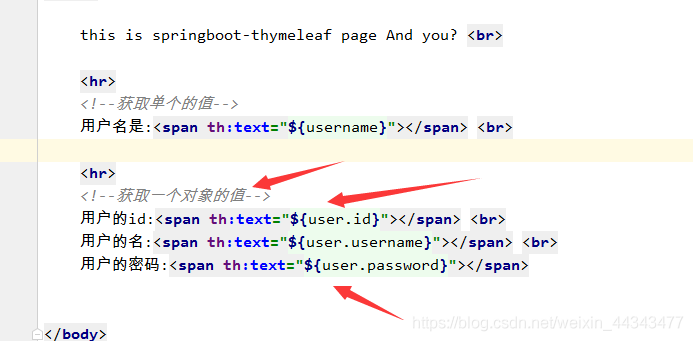
8.3 在index.html 页面写
8.4 重启Application.class文件的main方法 , 打开网址http://localhost:8080/toUserById
8.5 运算符
<!--运算符-->
<!--年龄*2=xxxx-->
<span th:text="'年龄*2='+${user.age}*2"></span>
<!--玩一个逻辑的运算符
 	eq:等于
    gt:大于
    lt:小于
    ge:大于等于
    le:小于等于
-->
//下面运算的结果就是true  or  false
<span th:text="(${user.age} eq 20)"></span>
8.6 条件判断
<!--条件判断 if的玩法
   年龄大于10岁就显示  否则不显示
 -->
  <span th:if="(${user.userName} eq '铁蛋1')">条件成立我显示</span>
<!--条件不成立的时候显示-->
<span th:unless="(${user.userName} == null)">条件不成立的时候显示</span>

//下面玩下switch
<!--下面玩下switch-->
<div th:switch="${user.userName}">
      <p th:case="铁蛋">我是小铁蛋</p>
      <p th:case="狗剩">我是狗剩</p>
      <p th:case="*">我是都没有匹配才匹配上我</p>
</div>
8.7 循环的使用
<!--下面玩的循环-->
<table>
    <tr>
        <th>id值</th>
        <th>用户名</th>
        <th>密码</th>
        <th>年龄</th>
        <th>循环的下标</th>
    </tr>
    <tr th:each="user,state: ${users}">
         <td th:text="${user.id}"></td>
         <td th:text="${user.userName}"></td>
         <td th:text="${user.password}"></td>
         <td th:text="${user.age}"></td>
        <td th:text="${state.index}"></td>
    </tr>
</table>
8.8 *和$共用的问题
<!--下面玩下 * 和 $共用的问题-->
<div th:object="${user}">
   <p>名字: <span th:text="*{userName}"></span></p>
   <p>密码: <span th:text="*{password}"></span></p>
</div>
8.9 内联的使用
<span th:inline="text">[[${user.userName}]]</span>
<style th:inline="css">
    .sp {
        color: [[${color}]];
    }
</style>

<span class="sp">我是中国人</span>

<!--内联的使用-->
<span th:inline="text">[[${userName}]]</span>

<script th:inline="javascript">
    //在这里是可以获取域对象里面的数据
     var userName=[[${userName}]];
     alert(userName);
</script>
8.10 嵌套
<!--<div th:replace="header:: head"></div>-->
<div th:include="header:: head"></div>
<div>
    this is content!!!!!!!!!!
</div>
 <!-- <div th:replace="footer:: foot"></div>-->
 <div th:include="footer:: foot"></div>

th:replace:将当前的div替换成成碎片中的整合元素	(用得比较少)
th:include:这个仅仅是将内容进行了copy而已	(用得比较多)
8.11 链接的玩法
<!--下面玩下链接-->
<a th:href="@{http://www.baidu.com}">百度搜搜</a>
<a th:href="@{/toUserById}">进入到index页面</a>
8.12 开发的时候容易遇到的问题
document.getElementById("btn").onclick=function (ev) {
        /*<![CDATA[*/
        location.href="/toXiaowangzi?userName="+userName+"&password="+password;
        /*]]>*/
 }
8.13 超链接的拼接玩法
<a th:href="@{/toSelectUserById/(id=${user.id})}">查看</a>
版权声明:本文为weixin_44343477原创文章,遵循CC 4.0 BY-SA版权协议,转载请附上原文出处链接和本声明。