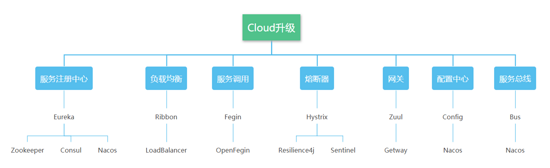
SpringCloud是微服务的集大成者,里面包含了很多技术,而现在SpringCloud进行了一次大更新,很多技术现在已经不再使用,有了别的替代方案。
最后的一行是推荐的方案。
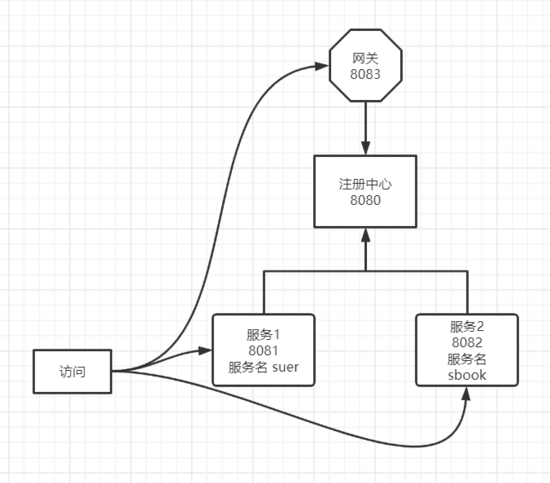
项目的基本结构
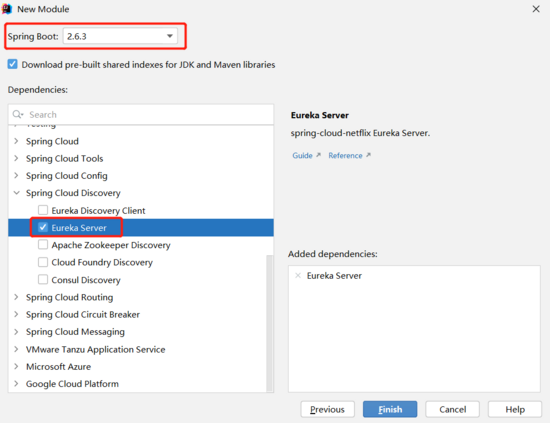
创建项目
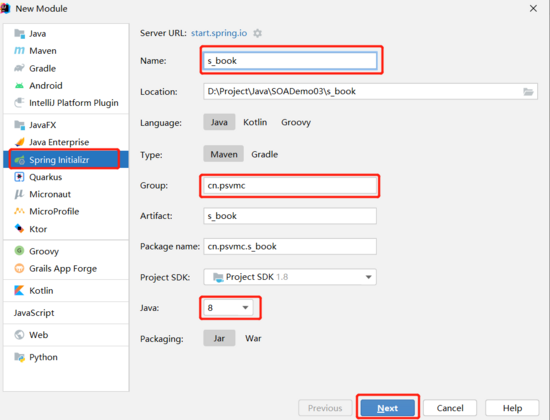
接下来我们的注册中心,服务和网关都添加Module即可
![]()
选择
注册中心
注册中心添加以下组件
配置文件
server.port=8080
eureka.client.register-with-eureka=false
eureka.client.fetch-registry=false
eureka.client.service-url.defaultZone=http://127.0.0.1:8080/eureka/
注册中心
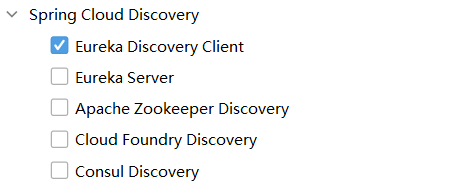
服务
注意
服务名中支持中划线,如 s-uer
服务名称中不支持下划线,也就是 s_user 这样是不行的
考虑到我们最终通过网关访问是要加上服务名的,所以也不建议使用中划线,如 suer
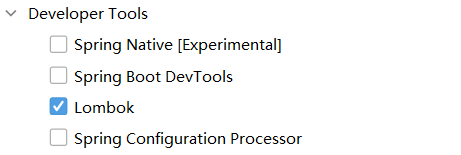
添加依赖


服务1
实体
import lombok.Data;

@Data
public class UserModel {
    //姓名
    private String name;
    //年龄
    private int age;
}
控制器
import cn.psvmc.s_user.model.UserModel;
import org.springframework.web.bind.annotation.GetMapping;
import org.springframework.web.bind.annotation.RequestMapping;
import org.springframework.web.bind.annotation.RestController;

@RestController
@RequestMapping(value = "/user")
public class UserController {
    /**
     *  获取一个用户
     * @return JSON对象
     * */
    @GetMapping(value = "/detail")
    public Object getUser() {
        UserModel user = new UserModel();
        user.setName("张三");
        user.setAge(18);
        return user;
    }
}
Application中添加 @EnableEurekaClient
import org.springframework.boot.SpringApplication;
import org.springframework.boot.autoconfigure.SpringBootApplication;
import org.springframework.cloud.netflix.eureka.EnableEurekaClient;

@SpringBootApplication
@EnableEurekaClient
public class SUserApplication {
    public static void main(String[] args) {
        SpringApplication.run(SUserApplication.class, args);
    }
}
配置文件application.properties
erver.port=8081
spring.application.name=suser
eureka.client.service-url.defaultZone=http://127.0.0.1:8080/eureka/
访问地址
http://127.0.0.1:8081/user/detail
服务2
实体
import lombok.Data;

@Data
public class BookModel {
    private String name;
}
控制器
import cn.psvmc.s_book.BookModel;
import org.springframework.web.bind.annotation.GetMapping;
import org.springframework.web.bind.annotation.PathVariable;
import org.springframework.web.bind.annotation.RequestMapping;
import org.springframework.web.bind.annotation.RestController;

@RestController
@RequestMapping(value = "/book")
public class BookController {
    @GetMapping(value = "/detail/{id}")
    public Object getBook(@PathVariable("id") int id) throws InterruptedException {
        if (id == 0) {
            Thread.sleep(500);
        }
        BookModel book = new BookModel();
        book.setName("三毛流浪记");
        return book;
    }
}
Application中添加 @EnableEurekaClient
import org.springframework.boot.SpringApplication;
import org.springframework.boot.autoconfigure.SpringBootApplication;
import org.springframework.cloud.netflix.eureka.EnableEurekaClient;

@SpringBootApplication
@EnableEurekaClient
public class SBookApplication {
    public static void main(String[] args) {
        SpringApplication.run(SBookApplication.class, args);
    }
}
配置文件application.properties
server.port=8082
spring.application.name=sbook
eureka.client.service-url.defaultZone=http://127.0.0.1:8080/eureka/
访问地址
http://localhost:8082/book/detail/0
http://localhost:8082/book/detail/1
网关
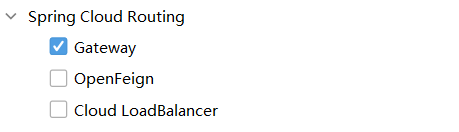

配置文件 application.yml
server:
  port: 8083
spring:
  application:
    name: gateway
  cloud:
    gateway:
      discovery:
        locator:
          enabled: true
          lower-case-service-id: true

eureka:
  client:
    service-url:
      defaultZone: http://127.0.0.1:8080/eureka/
Application中添加 @EnableEurekaClient
import org.springframework.boot.SpringApplication;
import org.springframework.boot.autoconfigure.SpringBootApplication;
import org.springframework.cloud.netflix.eureka.EnableEurekaClient;

@SpringBootApplication
@EnableEurekaClient
public class GatewayApplication {
    public static void main(String[] args) {
        SpringApplication.run(GatewayApplication.class, args);
    }
}
熔断器
造成灾难性雪崩效应的原因,可以简单归结为下述三种:
- 服务提供者不可用。如:硬件故障、程序BUG、缓存击穿、并发请求量过大等。
- 重试加大流量。如:用户重试、代码重试逻辑等。
- 服务调用者不可用。如:同步请求阻塞造成的资源耗尽等。
雪崩效应最终的结果就是:服务链条中的某一个服务不可用,导致一系列的服务不可用,最终造成服务逻辑崩溃。这种问题造成的后果,往往是无法预料的。
解决灾难性雪崩效应的方式通常有:降级、隔离、熔断、请求缓存、请求合并。
下图来自resilience4j官方文档,介绍了什么是断路器:
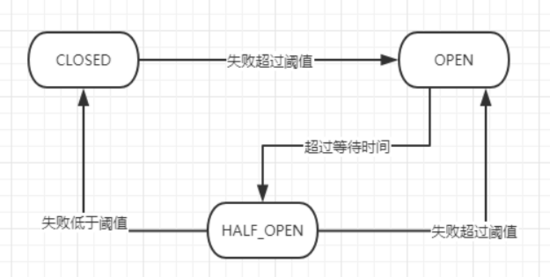
- CLOSED状态时,请求正常放行
- 请求失败率达到设定阈值时,变为OPEN状态,此时请求全部不放行
- OPEN状态持续设定时间后,进入半开状态(HALE_OPEN),放过部分请求
- 半开状态下,失败率低于设定阈值,就进入CLOSE状态,即全部放行
- 半开状态下,失败率高于设定阈值,就进入OPEN状态,即全部不放行
添加熔断器参数设置类
import io.github.resilience4j.circuitbreaker.CircuitBreakerConfig;
import io.github.resilience4j.timelimiter.TimeLimiterConfig;
import org.springframework.cloud.circuitbreaker.resilience4j.ReactiveResilience4JCircuitBreakerFactory;
import org.springframework.cloud.circuitbreaker.resilience4j.Resilience4JConfigBuilder;
import org.springframework.context.annotation.Bean;
import org.springframework.context.annotation.Configuration;

import java.time.Duration;

@Configuration
public class CustomizeCircuitBreakerConfig {
    @Bean
    public ReactiveResilience4JCircuitBreakerFactory defaultCustomizer() {

        //自定义断路器配置
        CircuitBreakerConfig circuitBreakerConfig = CircuitBreakerConfig.custom() //
                // 滑动窗口的类型为时间窗口
                .slidingWindowType(CircuitBreakerConfig.SlidingWindowType.TIME_BASED)
                // 时间窗口的大小为60秒
                .slidingWindowSize(60)
                // 在单位时间窗口内最少需要5次调用才能开始进行统计计算
                .minimumNumberOfCalls(5)
                // 在单位时间窗口内调用失败率达到50%后会启动断路器
                .failureRateThreshold(50)
                // 允许断路器自动由打开状态转换为半开状态
                .enableAutomaticTransitionFromOpenToHalfOpen()
                // 在半开状态下允许进行正常调用的次数
                .permittedNumberOfCallsInHalfOpenState(5)
                // 断路器打开状态转换为半开状态需要等待60秒
                .waitDurationInOpenState(Duration.ofSeconds(60))
                // 所有异常都当作失败来处理
                .recordExceptions(Throwable.class)
                .build();

        ReactiveResilience4JCircuitBreakerFactory factory = new ReactiveResilience4JCircuitBreakerFactory();
        factory.configureDefault(id -> new Resilience4JConfigBuilder(id)
                //超时规则,默认1s
                .timeLimiterConfig(TimeLimiterConfig.custom().timeoutDuration(Duration.ofMillis(300)).build())
                //设置断路器配置
                .circuitBreakerConfig(circuitBreakerConfig)
                .build());
        return factory;
    }
}
添加降级响应
import org.springframework.web.bind.annotation.GetMapping;
import org.springframework.web.bind.annotation.RestController;
import java.text.SimpleDateFormat;
import java.util.Date;

@RestController
public class Fallback {
    /**
     * 请求超时
     * @return
     */
    @GetMapping("/myfallback")
    public String myfallback() {
        return "Fallback:" + new SimpleDateFormat("yyyy-MM-dd hh:mm:ss").format(new Date());
    }
}
项目的配置更改如下:
application.yaml
server:
  port: 8083
spring:
  application:
    name: gateway
  cloud:
    gateway:
      routes:
        - id: sbook
          predicates:
            - Path=/sbook/**
          uri: lb://sbook
          name: sbook
          filters:
            - RewritePath=/sbook/book/(?<segment>.*), /book/$\{segment}
            - name: CircuitBreaker
              args:
                name: myCircuitBreaker
                fallbackUri: forward:/myfallback
        - id: suser
          predicates:
            - Path=/suser/**
          uri: lb://suser
          name: suser
          filters:
            - RewritePath=/suser/user/(?<segment>.*), /user/$\{segment}
            - name: CircuitBreaker
              args:
                name: myCircuitBreaker
                fallbackUri: forward:/myfallback
eureka:
  client:
    service-url:
      defaultZone: http://127.0.0.1:8080/eureka/
或者使用 application.properties
server.port=8083
spring.application.name=gateway

spring.cloud.gateway.routes[0].id=sbook
spring.cloud.gateway.routes[0].predicates[0]=Path=/sbook/**
spring.cloud.gateway.routes[0].uri=lb://sbook
spring.cloud.gateway.routes[0].name=sbook
spring.cloud.gateway.routes[0].filters[0]=RewritePath=/sbook/book/(?<segment>.*), /book/$\{segment}
spring.cloud.gateway.routes[0].filters[1].name=CircuitBreaker
spring.cloud.gateway.routes[0].filters[1].args.name=myCircuitBreaker
spring.cloud.gateway.routes[0].filters[1].args.fallbackUri=forward:/myfallback

spring.cloud.gateway.routes[1].id=suser
spring.cloud.gateway.routes[1].predicates[0]=Path=/suser/**
spring.cloud.gateway.routes[1].uri=lb://suser
spring.cloud.gateway.routes[1].name=suser
spring.cloud.gateway.routes[1].filters[0]=RewritePath=/suser/user/(?<segment>.*), /user/$\{segment}
spring.cloud.gateway.routes[1].filters[1].name=CircuitBreaker
spring.cloud.gateway.routes[1].filters[1].args.name=myCircuitBreaker
spring.cloud.gateway.routes[1].filters[1].args.fallbackUri=forward:/myfallback

eureka.client.service-url.defaultZone=http://127.0.0.1:8080/eureka/
注意:
discovery和routes是不能并存的,discovery相当于自动生成routes配置。- 使用
application.properties的话配置中有些会显示为红色,不用在意,不影响使用。 lb:是从注册中心中取URI。- 注意重写路由规则,路由相当于把请求的URL替换成了我们服务的URL,这时就不再需要服务名了。
启动
启动顺序
注册中心 => 服务 => 网关
注册中心
结果如图
