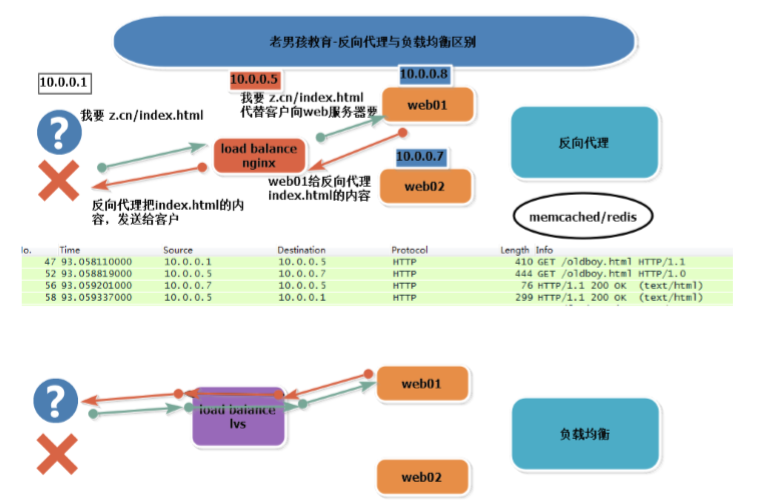
负载均衡vs反向代理区别
功能(原理)
- 负载均衡 lvs 请求做转发
反向代理 Nginx Haproxy 代替(代理)用户去请求,得到相应再返回给用户
4层vs7层
层:OSI7层模型
| 7层 | 相关内容 |
| 应用层 | 协议:http https |
| 表示层 | |
| 会话层 | |
| 传输层 | tcp/udp 端口 |
| 网络层 | IP地址 |
| 数据链路层 | MAC地址 |
| 物理层 | 0010101 |
4层 LVS nginx(1.9) haproxy
7层 nginx haproxy
ARP协议
arp基础知识
DNS 域名---->ip地址 域名解析服务/系统 Domain Name Service/System ARP ip--------->MAC地址 地址解析协议 Address Resolution Protocol
arp解析过程
- 发出广播消息 查询ip对应的mac地址
- 对应的机器会用单播的方式把自己的mac告诉对方
- 用户自己留1个arp缓存
[root@m01 ~]# arp -d 10.0.0.51
[root@m01 ~]# arp -n
Address                  HWtype  HWaddress           Flags Mask            Iface
172.16.1.51              ether   00:0c:29:c5:c1:17   C                     eth1
10.0.0.254               ether   00:50:56:ea:dd:9e   C                     eth0
10.0.0.1                 ether   00:50:56:c0:00:08   C                     eth0
[root@m01 ~]# ping 10.0.0.51
PING 10.0.0.51 (10.0.0.51) 56(84) bytes of data.
64 bytes from 10.0.0.51: icmp_seq=1 ttl=64 time=0.443 ms
64 bytes from 10.0.0.51: icmp_seq=2 ttl=64 time=0.235 ms
^C
--- 10.0.0.51 ping statistics ---
2 packets transmitted, 2 received, 0% packet loss, time 1000ms
rtt min/avg/max/mdev = 0.235/0.339/0.443/0.104 ms
[root@m01 ~]# arp -n
Address                  HWtype  HWaddress           Flags Mask            Iface
172.16.1.51              ether   00:0c:29:c5:c1:17   C                     eth1
10.0.0.51                ether   00:0c:29:c5:c1:0d   C                     eth0
10.0.0.254               ether   00:50:56:ea:dd:9e   C                     eth0
10.0.0.1                 ether   00:50:56:c0:00:08   C                     eth0

抓包显示:arp解析过程
linux 下面抓包 :wireshark抓包流程
安装:yum install -y wireshark
[root@m01 ~]# arp -d 10.0.0.51
[root@m01 ~]# tshark -i eth1 -f arp
Running as user "root" and group "root". This could be dangerous.
Capturing on 'eth1'
  1 0.000000000 Vmware_bd:29:63 -> Vmware_c5:c1:17 ARP 42 Who has 172.16.1.51?  Tell 172.16.1.61
  2 0.000142710 Vmware_c5:c1:17 -> Vmware_bd:29:63 ARP 60 Who has 172.16.1.61?  Tell 172.16.1.51
  3 0.000157753 Vmware_bd:29:63 -> Vmware_c5:c1:17 ARP 42 172.16.1.61 is at 00:0c:29:bd:29:63
  4 0.000318272 Vmware_c5:c1:17 -> Vmware_bd:29:63 ARP 60 172.16.1.51 is at 00:0c:29:c5:c1:17
tshark (wireshark)
-i 指定网卡 默认第1个网卡(非lo)
-f 指定过滤规则
-w 保存抓包的内容到文件中
抓包过滤语法 man wireshark-filter
问题: arp协议 3层?2层?
ip --- > mac arp三层协议 工作在2层 3层ip----->2层mac地址
arp病毒 arp欺骗
原理
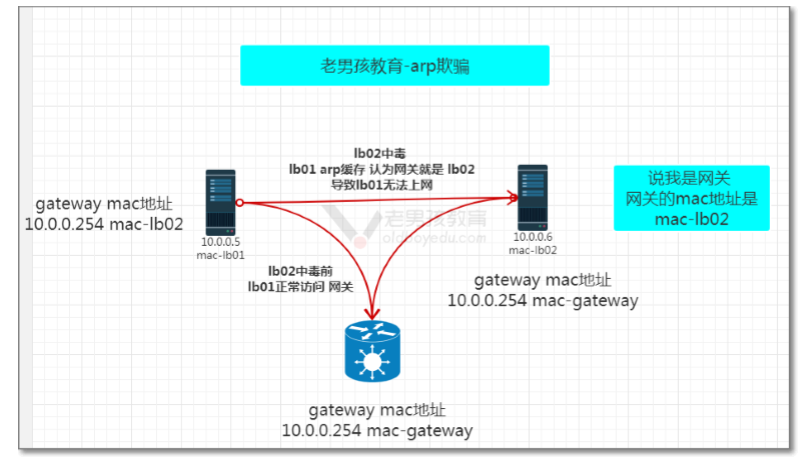
预防:
1.mac地址与ip地址绑定
2.使用企业安全软件
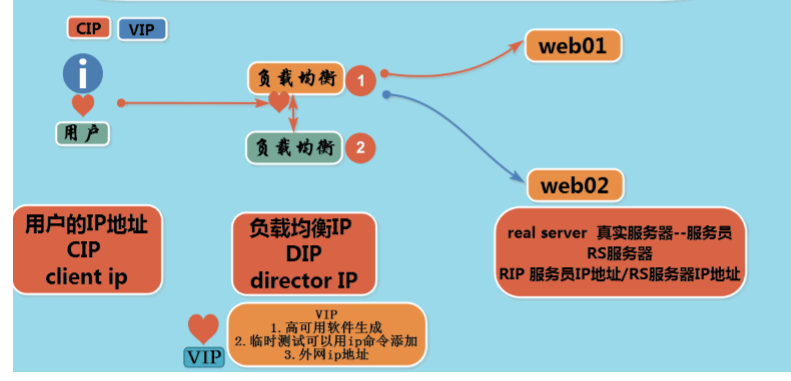
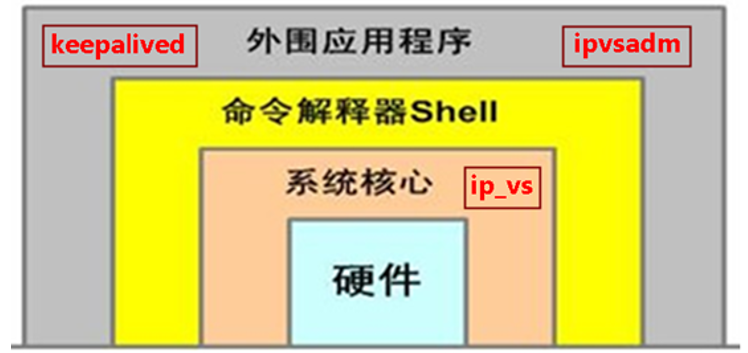
LVS相关名词
- CIP Client IP
- VIP Virtual -p
- DIP Director 负载均衡IP
- RS服务器 Real Server 真实服务器
- RIP Real Server IP 地址
LVS 4个模式
LVS Linux Virtual Server 章文嵩
lvs 被写到Linux 内核中 ip_vs
通过:keepalived (配置文件) 或ipvsadm (命名) 进行控制
ipvsadm ipvs admin
国产开源软件有
Sersync
Jumpserver
MyCA
DR模式
1.原理

2.特点:
- lvs dr模式中 负责修改目标IP(VIP)mac地址 改为后端RS服务器的mac
- dr模式中 lvs主要处理用户的请求,响应通过后端rs服务器直接给用户
- LVS 与 后端RS服务器要在同一个局域网(网段)
- DR模式中 RS服务器公网ip地址
- 需要注意RS节点的VIP的绑定(lo:vip/32)和ARP抑制问题。
- 由于DR模式的调度器仅进行了目的MAC地址的改写,因此,调度器LB无法改变请求报文的目的端 口。LVS DR模式的办公室在二层数据链路层(MAC),NAT模式则工作在三层网络层(IP)和四 层传输层(端口)
NAT 模式
1.原理
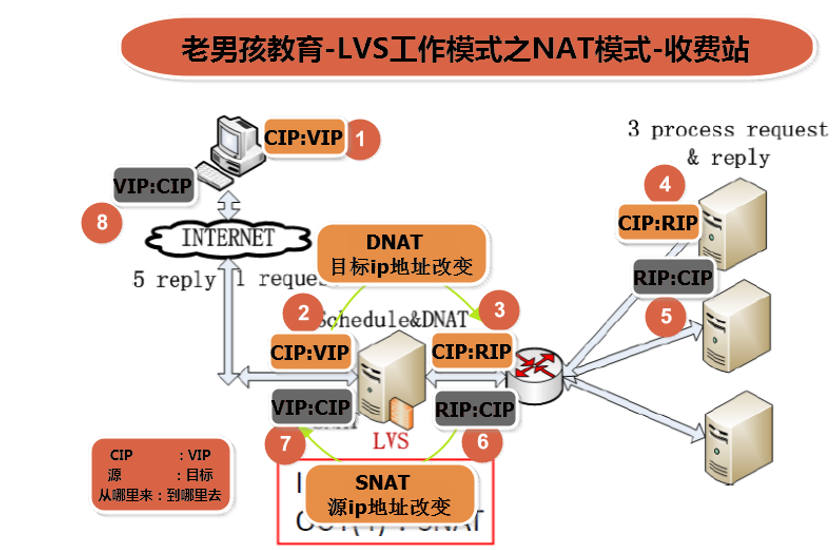
2.特点:
- NAT Network Address Translation 网络地址转换
- 开启内核转发功能 net.ipv4.ip_forward = 1 #/etc/sysctl.conf
- NAT模式中 可以实现 端口转发 请求80 后端转发为 8080
- lvs与后端RS服务器 可以不在一个局域网
TUN隧道模式
FULL NAT模式
http://zh.linuxvirtualserver.org
| ipvsadm | |
|---|---|
| -C | 清除所有规则 |
| -A | nginx创建池塘 |
| -t | tcp协议 |
| -s | scheduler 轮询算法 rr(轮询) wrr(加权轮询) |
| -p | persistent 会话保持的时间 20秒 默认是300s |
| -a | 添加RS服务器 (nginx server) |
| -r | 指定rs服务器ip |
| -g | --gatewaing 使用DR模式 Directing Routing |
| -w | weight 权重 |
| -n | 不把ip解析为服务名 |
| -l | 查看规则 |
LVS-DR模式
1.环境准备
| 主机名 | ipeth0 |
|---|---|
| lb01 | 10.0.0.5 |
| lb02 | 10.0.0.6 |
| web01 | 10.0.0.7 |
| web02 | 10.0.0.8 |
lb01 lb02
yum install -y ipvsadm ##这是管理lvs的,因为lvs在linux内核里
#关闭nginx负载均衡
#关闭keepalived
[root@lb01 ~]# yum install -y  ipvsadm
[root@lb01 ~]# systemctl stop nginx.service  keepalived.service
[root@lb01 ~]# systemctl disable nginx.service
Removed symlink /etc/systemd/system/multi-user.target.wants/nginx.service.
web01 web02
curl  10.0.0.[7-8]/oldboy.html
web01
web02
DR部署
lvs
加载内核模块
modprobe ip_vs #直接运行ipvsadm -ln
[root@lb02 ~]# ipvsadm -ln
IP Virtual Server version 1.2.1 (size=4096)
Prot LocalAddress:Port Scheduler Flags
  -> RemoteAddress:Port           Forward Weight ActiveConn InActConn
[root@lb02 ~]# lsmod |grep ip_vs
ip_vs                 145497  0
nf_conntrack          133095  1 ip_vs
libcrc32c              12644  3 xfs,ip_vs,nf_conntrack
[root@lb01 ~]# ping 10.0.0.3
 PING 10.0.0.3 (10.0.0.3) 56(84) bytes of data ##先确定ip没有被使用
[root@lb01 ~]# ip a add  10.0.0.3 dev eth0  label eth0:0
[root@lb01 ~]# ip a s eth0
2: eth0: <BROADCAST,MULTICAST,UP,LOWER_UP> mtu 1500 qdisc pfifo_fast state UP group default qlen 1000
    link/ether 00:0c:29:78:a3:c3 brd ff:ff:ff:ff:ff:ff
    inet 10.0.0.5/24 brd 10.0.0.255 scope global eth0
       valid_lft forever preferred_lft forever
    inet 10.0.0.3/24 scope global secondary eth0:0
       valid_lft forever preferred_lft forever
    inet6 fe80::20c:29ff:fe78:a3c3/64 scope link
       valid_lft forever preferred_lft forever
[root@lb01 ~]# ipvsadm -A -t 10.0.0.3:80 -s wrr -p 20  ##创建一个池塘指定tcp协议 指定wrr加权轮询,会话保持时间20秒
[root@lb01 ~]# ipvsadm -a -t 10.0.0.3:80 -r 10.0.0.7:80 -g -w 1   ##往池塘里添加主机,使用DR模式  权重为1
[root@lb01 ~]# ipvsadm -a -t 10.0.0.3:80 -r 10.0.0.8:80 -g -w 1
[root@lb01 ~]# ipvsadm -ln   ##查看规则
IP Virtual Server version 1.2.1 (size=4096)
Prot LocalAddress:Port Scheduler Flags
  -> RemoteAddress:Port           Forward Weight ActiveConn InActConn
TCP  10.0.0.3:80 wrr persistent 20
  -> 10.0.0.7:80                  Route   1      0          0
  -> 10.0.0.8:80                  Route   1      0          0
lvs规则配置备份与恢复
[root@lb01 ~]# ipvsadm-save -n
-A -t 10.0.0.3:80 -s wrr -p 20
-a -t 10.0.0.3:80 -r 10.0.0.7:80 -g -w 1
-a -t 10.0.0.3:80 -r 10.0.0.8:80 -g -w 1
[root@lb01 ~]# ipvsadm-save -n >/root/ipvsamd.rules
[root@lb01 ~]# ipvsadm -C  ##清除规则
[root@lb01 ~]# ipvsadm -ln
IP Virtual Server version 1.2.1 (size=4096)
Prot LocalAddress:Port Scheduler Flags
  -> RemoteAddress:Port           Forward Weight ActiveConn InActConn
[root@lb01 ~]# ipvsadm-restore </root/ipvsamd.rules
[root@lb01 ~]# ipvsadm -ln
IP Virtual Server version 1.2.1 (size=4096)
Prot LocalAddress:Port Scheduler Flags
  -> RemoteAddress:Port           Forward Weight ActiveConn InActConn
TCP  10.0.0.3:80 wrr persistent 20
  -> 10.0.0.7:80                  Route   1      0          0
  -> 10.0.0.8:80                  Route   1      0          0
RS服务器
配置虚拟VIP
抑制VIP
ip addr add 10.0.0.3/32 dev lo label lo:0

cat >>/etc/sysctl.conf<<EOF

net.ipv4.conf.all.arp_ignore = 1

net.ipv4.conf.all.arp_announce = 2

net.ipv4.conf.lo.arp_ignore = 1

net.ipv4.conf.lo.arp_announce = 2

EOF

sysctl -p
测试lvs负载均衡注意事项:
- 不要在 lvs本地进行测试
lvs使用在高并发 访问量巨大时候 不像nginx 访问量和用户量比较高 1:1
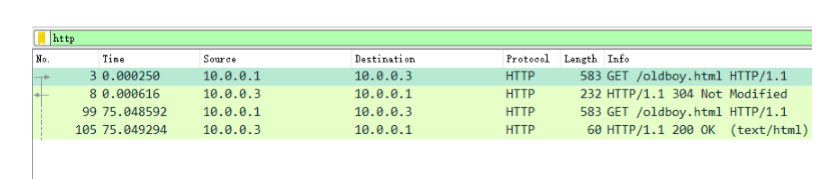 image.png
NAT模式部署
lb01配置成分发器:
1、打开路由转发功能
[root@lb01 ~]# vim /etc/sysctl.conf

改:net.ipv4.ip_forward = 0

为:net.ipv4.ip_forward = 1
让配置生效:
[root@lb01 ~]# sysctl -p
ipvsadm配置规则
创建池塘:
[root@lb01 ~]# ipvsadm -A -t 10.0.0.3:80 -s rr
 -A  添加虚拟服务器
-t   表示TCP的服务  VIP:PORT
-s  指定调度算法  rr表示round-robin 轮循
[root@lb01 ~]# ipvsadm -a -t 10.0.0.3:80 -r 10.0.0.7:80 -m
[root@lb01 ~]# ipvsadm -a -t 10.0.0.3:80 -r 10.0.0.8:80 -m
选项:

 -a   表示添加real server的地址
 -r    指定real server的IP地址
 -m  表示masquerade 也就是NAT方式的LVS
查看:
Ipvsadm命令,用于配置及查看内核IPVS表和算法的工具,类似于iptables
[root@lb01 ~]# ipvsadm -ln
IP Virtual Server version 1.2.1 (size=4096)
Prot LocalAddress:Port Scheduler Flags
  -> RemoteAddress:Port           Forward Weight ActiveConn InActConn
TCP  10.0.0.3:80 wrr
  -> 10.0.0.7:80                  Masq    1      0          0
  -> 10.0.0.8:80                  Masq    1      0          0
配置真实服务器
RealServer:在xuegod62和xuegod64上面配置:
准备:
1、配置IP:REAL SERVER自己的网络相关信息配置成如下:
web01: eth0:10.0.0.7 网关: 10.0.0.5
web02: eth0:10.0.0.8 网关: 10.0.0.5
测试vip
[root@lb01 ~]# curl 10.0.0.3
web02
[root@lb01 ~]# curl 10.0.0.3
web01
[root@lb01 ~]# curl 10.0.0.3
web02
[root@lb01 ~]# curl 10.0.0.3
web01
扩展ipvsadm 更多参数说明
-L -n ==> 查看规则,显示内核虚拟服务器表
-L -n -c ==> 查看客户端连接分发器和real server 的情况
[root@lb01 ~]# ipvsadm -L -n -c
IPVS connection entries
pro expire state       source             virtual            destination
TCP 01:16  TIME_WAIT   10.0.0.3:55164     10.0.0.3:80        10.0.0.7:80
TCP 01:11  TIME_WAIT   10.0.0.3:55156     10.0.0.3:80        10.0.0.7:80
TCP 01:14  TIME_WAIT   10.0.0.3:55158     10.0.0.3:80        10.0.0.8:80
TCP 01:15  TIME_WAIT   10.0.0.3:55160     10.0.0.3:80        10.0.0.7:80
TCP 01:15  TIME_WAIT   10.0.0.3:55162     10.0.0.3:80        10.0.0.8:80
选项:
-L -n --stats ==> 查看分发情况
-L -n --rate ==> 查看速率
-Z --zero 虚拟服务表计数器清零(清空当前的连接数量等)