给前端提供API接口+各种联调等,项目中使用的框架有spring全家桶、Jfinal等,学习了SpringBoot,配合Swagger2写Restful接口及文档非常方便简洁,以下是一些相关笔记。
目录
@PathVariable
当使用@RequestMapping URI template 样式映射时,@PathVariable能使传过来的参数绑定到路由上,这样比较容易写出restful api,看代码
    @RequestMapping(value="/{id}", method=RequestMethod.GET)
    public List<Map<String, Object>> getUser(@PathVariable Integer id) {
        return userService.getUserById(id);
    }
上面这个接口可通过get请求 http://xxxxx/1111来得到想要的数据,1111既是getUser的方法参数又是@RequestMapping的路由。如果方法参数不想写成和路由一样的应该怎么办?看代码:
    @RequestMapping(value="/{uid}", method=RequestMethod.GET)
    public List<Map<String, Object>> getUser(@PathVariable("uid") Integer id) {
        return userService.getUserById(id);
    }
在@PathVariable后面接入“uid”就可以了。
@PathVariable 映射 URL 绑定的占位符
带占位符的 URL 是 Spring3.0 新增的功能,该功能在SpringMVC 向 REST 目标挺进发展过程中具有里程碑的意义;
通过 @PathVariable 可以将 URL 中占位符参数绑定到控制器处理方法的入参中:URL 中的 {xxx} 占位符可以通过@PathVariable(“xxx“) 绑定到操作方法的入参中;
事例1:
SpringMVCTest.java
//@PathVariable可以用来映射URL中的占位符到目标方法的参数中
@RequestMapping("/testPathVariable/{id}")
    public String testPathVariable(@PathVariable("id") Integer id)
    {
        System.out.println("testPathVariable:"+id);
        return SUCCESS;
    }
index.jsp
<a href="springmvc/testPathVariable/1">testPathVariable</a>
事例2:
 @PostMapping("/userInfo/{user_id}/delete")
    @FalconMonitor(metric = "delete_userInfo_byUserId", type = MetricType.AVG_BY_TIME)
    public MyHttpResponse deleteUserInfoByUserId(@PathVariable("user_id") long UserId) {
    	//打印日志,请求deleteUserInfoByUserId方法,参数是UserId;
        logger.info("Enter method deleteUserInfoByUserId, user_id:{}", UserId);
        //校验UserId参数是否大于0,不成立抛异常"必需的长参数“user_id”必须是肯定的";
        checkArgument(UserId > 0, "Required long param 'user_id' must be positive.");
        //service方法
        userInfoService.deleteUserInfoByUserId(UserId);
        //封装返回信息
        MyHttpResponse response = MyHttpResponse.createSuccessResponse(null);
        //日志打印,方法deleteUserInfoByUserId请求结束,打印返回信息;
        logger.info("End method deleteUserInfoByUserId: {}", JSONUtils.writeValue(response));
        //返回结果
        return response;
    }
@PathVariable("xxx")测试:
@PathVariable("xxx")
通过 @PathVariable 可以将URL中占位符参数{xxx}绑定到处理器类的方法形参中@PathVariable(“xxx“)
@RequestMapping(value=”user/{id}/{name}”)
请求路径:http://localhost:8080/hello/show5/1/james
测试环境:
环境:jdk1.8 Tomcat8.5 idea2018 manven父工程子模块
步骤:
1、创建web工程、引入依赖
2、配置SpringMvc入口文件 --DispatcherServlet--为总调度、web.xml里配置
3、创建Springmvc.xml文件--理解为:适配器(这里不需要自已指定适配、springmvc会自动指定)--视图解析器
4、创建 业务处理器 Controller类
5、测试
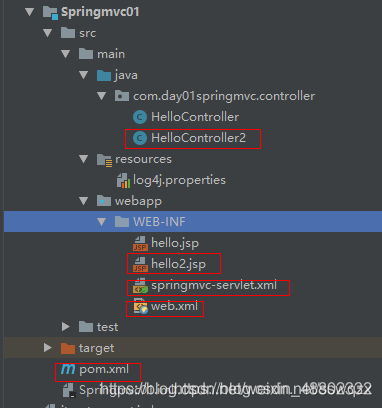
工程结构:
// 业务处理器HelloController.java
package com.day01springmvc.controller;
import org.springframework.stereotype.Controller;
import org.springframework.web.bind.annotation.*;
import org.springframework.web.servlet.ModelAndView;
/**
* @ Author :ShaoWei Sun.
* @ Date :Created in 20:58 2018/11/16
*/
@Controller
@RequestMapping("hello")
public class HelloController2 {
/**
*3、占位符映射
* 语法:@RequestMapping(value=”user/{userId}/{userName}”)
* 请求路径:http://localhost:8080/hello/show5/1/james
* @param ids
* @param names
* @return
*/
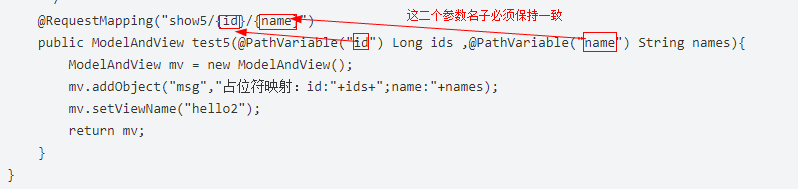
@RequestMapping("show5/{id}/{name}")
public ModelAndView test5(@PathVariable("id") Long ids ,@PathVariable("name") String names){
ModelAndView mv = new ModelAndView();
mv.addObject("msg","占位符映射:id:"+ids+";name:"+names);
mv.setViewName("hello2");
return mv;
}
测试:

@RequestParam
@RequestParam和@PathVariable的区别就在于请求时当前参数是在url路由上还是在请求的body上,例如有下面一段代码:
    @RequestMapping(value="", method=RequestMethod.POST)
    public String postUser(@RequestParam(value="phoneNum", required=true) String phoneNum ) String userName) {
        userService.create(phoneNum, userName);
        return "success";
    }
这个接口的请求url这样写:http://xxxxx?phoneNum=xxxxxx,也就是说被@RequestParam修饰的参数最后通过key=value的形式放在http请求的Body传过来,对比下上面的@PathVariable就很容易看出两者的区别了。
@RequestBody
@RequestBody能把简单json结构参数转换成实体类,如下代码:
    @RequestMapping(value = "/testUser", method = RequestMethod.POST)
    public String testUser(@RequestBody User user){
        System.out.print(user.getAge());
        return "success";
    }
参数为:
{"id":1,"user":"pkxutao","name":"name","age":18}