在各个操作系统之中实际上都会提供有一个copy命令,copy 源文件路径 目标文件路径。
题目:
现在要求通过java.io包中采用自定义程序的模式实现该功能,可以通过初始化参数设置拷贝的文件路径。
思路分析:
1、要进行拷贝的文件可能是文本文件或者是二进制文件,所以为了达到通用性,最好的方法是使用字节流访问;
2、由于要拷贝的文件有可能很大,那么肯定不能够将源文件全部读取进来后一次性输出,应该采用边读边写的模式;
3、要拷贝的目标文件有可能需要保存在目录之中,那么该目录还有可能不存在,需要创建。

代码实现
import java.io.*;
import java.util.Scanner;
class CopyUtil { //定义一个专门实现拷贝的工具类
private File srcFile; //拷贝的源文件路径
private File desFile; //拷贝的目标文件路径
public CopyUtil(String path[]) {
if (path.length != 2) {
System.out.println("错误,程序的输入参数不正确,格式为:“java CopyDemo 源文件路径名 目标文件路径名”");
System.exit(1);
}
//如果没有错误,则应该获取源文件路径与目标文件路径
this.srcFile = new File(path[0]);
this.desFile = new File(path[1]);
}
/*
* 实现拷贝处理
* @return 返回本次拷贝所花费时间
* 如果拷贝失败,则会有如下结果返回:
* @throws FileNotFoundException 源文件不存在
*
*
* */
public int copy() throws IOException{
long start = System.currentTimeMillis();
if (!this.srcFile.exists()) { //文件不存在
throw new FileNotFoundException("源文件不存在");
}
if (!this.desFile.getParentFile().exists()) {
this.desFile.getParentFile().mkdirs(); //创建目标父目录
}
InputStream input = null;
OutputStream output = null;
try {
input = new FileInputStream(this.srcFile);
output = new FileOutputStream(this.desFile);
byte data[] = new byte[1024]; //每次读取1024个内容
int len = 0; //保存读取的字节个数
/* do {
len = input.read(data); //向字节数组中读取数据
if (len != -1) {
output.write(data, 0, len);
}
} while (len != -1);*/
//和do{}while(); 功能一样
while ((len = input.read(data))!=-1){
output.write(data,0,len);
}
} catch (IOException e) {
throw e; //向上抛出异常
} finally {
if (input != null) {
try {
input.close();
} catch (IOException e) {
e.printStackTrace();
}
}
if (output != null) {
try {
output.close();
} catch (IOException e) {
e.printStackTrace();
}
}
}
long end = System.currentTimeMillis();
return (int)(end-start);
}
}
public class CopyDemo {
public static void main(String[] args){
Scanner sc=new Scanner(System.in);
String path[]=new String[2];
for (int i = 0; i < 2 ; i++) {
if (i==0){
System.out.println("请输入源文件路径:");
}else {
System.out.println("请输入目标文件路径:");
}
path[i]=sc.nextLine();
}
CopyUtil copyUtil = new CopyUtil(path); //实例化对象
try {
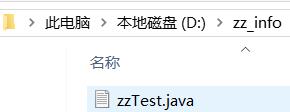
System.out.println("复制完成,用时:"+copyUtil.copy()+"ms"); //调用拷贝操作
} catch (IOException e) {
e.printStackTrace();
}
}
}
执行结果: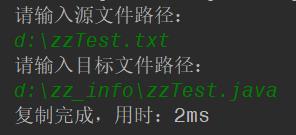
注意: 目标文件路径的编写一定要加上文件名
如果不加文件名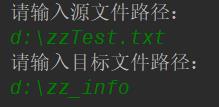
会报错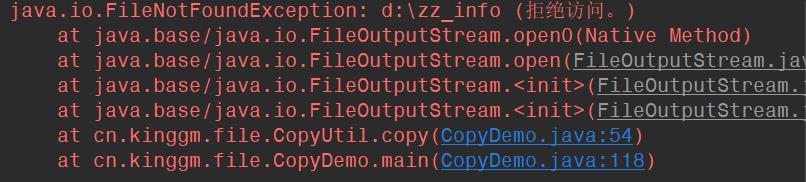
代码优化
以上的拷贝做法实际上是属于早期的一种实现方案,并且几乎所有开发人员都可以随意编写的,但是从JDK1.9开始在InputStream类中追加一个新的转换方法:
public long transferTo(OutputStream out)
throws IOException
从该输入流中读取所有字节,并按读取的顺序将字节写入给定的输出流。
(直接将输入流里面的内容直接转换到输出流里面)
例:观察新的转换方法
package cn.kinggm.file;

import java.io.*;

import java.util.Scanner;

/**
 * 作者: kinggm520 Email:731586355@qq.com
 * 时间:  2019-12-09 23:15
 */

class CopyUtil {  //定义一个专门实现拷贝的工具类

    private File srcFile; //拷贝的源文件路径
    private File desFile; //拷贝的目标文件路径

    public CopyUtil(String path[]) {
        if (path.length != 2) {
            System.out.println("错误,程序的输入参数不正确,格式为:“java CopyDemo 源文件路径名 目标文件路径名”");
            System.exit(1);
        }
        //如果没有错误,则应该获取源文件路径与目标文件路径
        this.srcFile = new File(path[0]);
        this.desFile = new File(path[1]);


    }

    /*
     * 实现拷贝处理
     * @return 返回本次拷贝所花费时间
     * 如果拷贝失败,则会有如下结果返回:
     * @throws FileNotFoundException 源文件不存在
     *
     *
     * */
    public int copy() throws IOException{
        long start = System.currentTimeMillis();

        if (!this.srcFile.exists()) { //文件不存在
            throw new FileNotFoundException("源文件不存在");
        }

        if (!this.desFile.getParentFile().exists()) {
            this.desFile.getParentFile().mkdirs();  //创建目标父目录
        }

        InputStream input = null;
        OutputStream output = null;


        try {
            input = new FileInputStream(this.srcFile);
            output = new FileOutputStream(this.desFile);
            input.transferTo(output); //该方法将输入流的内容全部转换到输出流内

        } catch (IOException e) {
               throw e; //向上抛出异常
        } finally {

            if (input != null) {
                try {
                    input.close();
                } catch (IOException e) {
                    e.printStackTrace();
                }
            }

            if (output != null) {
                try {
                    output.close();
                } catch (IOException e) {
                    e.printStackTrace();
                }
            }

        }
        long end = System.currentTimeMillis();

        return (int)(end-start);
    }


}


public class CopyDemo {

    public static void main(String[] args){

        Scanner sc=new Scanner(System.in);
        String path[]=new String[2];
        for (int i = 0; i < 2 ; i++) {
            if (i==0){
                System.out.println("请输入源文件路径:");
            }else {
                System.out.println("请输入目标文件路径:");
            }
            path[i]=sc.nextLine();
        }
        CopyUtil copyUtil = new CopyUtil(path); //实例化对象
        try {
            System.out.println("复制完成,用时:"+copyUtil.copy()+"ms");   //调用拷贝操作
        } catch (IOException e) {
            e.printStackTrace();
        }

    }


}
此时的转换操作是JDK1.9之后追加的处理模式,利用此类方法可以得到最好的处理性能。
但是请注意 在开发过程中可以这样写 但是在面试或者学习过程中千万别这样做
  while ((len = input.read(data))!=-1){
               output.write(data,0,len);
           }
这个循环才是整个代码的核心 一定要掌握
特别是面试的时候 如果让你写拷贝案例 一定要写上面第一种 切记
版权声明:本文为qq_37883866原创文章,遵循CC 4.0 BY-SA版权协议,转载请附上原文出处链接和本声明。