一、搭建SpringBoot开发环境
1. 安装好开发软件和Maven等
开发工具:Spring Tool Suite(TST)
Maven :3.3.9
jdk:1.8
2. 创建springboot项目(此功能需要联网)

3. pom.xml文件配置
<?xml version="1.0" encoding="UTF-8"?>
<project xmlns="http://maven.apache.org/POM/4.0.0" xmlns:xsi="http://www.w3.org/2001/XMLSchema-instance"
	xsi:schemaLocation="http://maven.apache.org/POM/4.0.0 http://maven.apache.org/xsd/maven-4.0.0.xsd">
	<modelVersion>4.0.0</modelVersion>
	<parent>
		<groupId>org.springframework.boot</groupId>
		<artifactId>spring-boot-starter-parent</artifactId>
		<version>2.1.3.RELEASE</version>
		<relativePath/> <!-- lookup parent from repository -->
	</parent>
	<groupId>com.vae</groupId>
	<artifactId>shiro</artifactId>
	<version>0.0.1-SNAPSHOT</version>
	<name>springboot-shiro</name>
	<description>Demo project for Spring Boot</description>

    <properties>
        <project.build.sourceEncoding>UTF-8</project.build.sourceEncoding>
        <project.reporting.outputEncoding>UTF-8</project.reporting.outputEncoding>
        <java.version>1.8</java.version>
    </properties>

	<dependencies>
		<!-- thymeleaf依赖 -->
        <dependency>
            <groupId>org.springframework.boot</groupId>
            <artifactId>spring-boot-starter-thymeleaf</artifactId>
        </dependency>

        <!-- Web支持:Spring web开发支持,servlet相关程序等 -->
        <dependency>
            <groupId>org.springframework.boot</groupId>
            <artifactId>spring-boot-starter-web</artifactId>
        </dependency>

		<dependency>
			<groupId>org.springframework.boot</groupId>
			<artifactId>spring-boot-starter</artifactId>
		</dependency>

		<dependency>
			<groupId>org.springframework.boot</groupId>
			<artifactId>spring-boot-starter-test</artifactId>
			<scope>test</scope>
		</dependency>
	</dependencies>

	<build>
		<plugins>
			<plugin>
				<groupId>org.springframework.boot</groupId>
				<artifactId>spring-boot-maven-plugin</artifactId>
			</plugin>
		</plugins>
	</build>

</project>
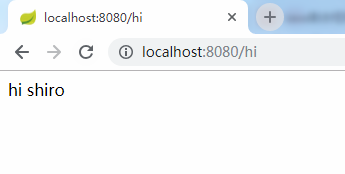
4. 编写测试Controller层
package com.vae.user.controller;

import org.springframework.web.bind.annotation.RequestMapping;
import org.springframework.web.bind.annotation.RestController;

@Controller
public class UserController {

	@RequestMapping("/hi")
	public String hi(){
		return "hi shiro";
	}
}
5. 启动spring boot启动类
package com.vae;

import org.springframework.boot.SpringApplication;
import org.springframework.boot.autoconfigure.SpringBootApplication;
/**
 * springboot启动类
 * @author vae
 *
 */
@SpringBootApplication
public class SpringbootShiroApplication {

	public static void main(String[] args) {
		SpringApplication.run(SpringbootShiroApplication.class, args);
	}
}
6. 浏览器访问http://localhost:8080/hi 测试
二、使用Thymeleaf页面模板
1. pom.xml 文件中添加 thymeleaf依赖
<!-- thymeleaf依赖 -->
<dependency>
    <groupId>org.springframework.boot</groupId>
    <artifactId>spring-boot-starter-thymeleaf</artifactId>
</dependency>
2. 在UserController中编写测试thymeleaf的方法
下面写了两种方式,第一种比较直观和优雅,第二种相对普遍且代码较少,且迎合从struts2
/**
* 方式一:返回ModelAndView
*/
@RequestMapping("/index")
public ModelAndView index() {
ModelAndView view = new ModelAndView();
// 设置跳转的视图 默认映射到 src/main/resources/templates/{viewName}.html
view.setViewName("index");
// 设置属性
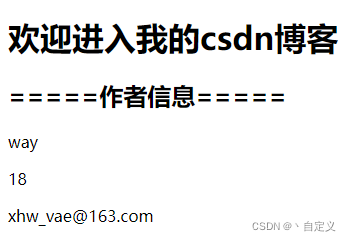
view.addObject("title", "我的templates页面");
view.addObject("desc", "欢迎进入我的csdn博客");
Author author = new Author();
author.setAge(18);
author.setEmail("xhw_vae@163.com");
author.setName("way");
view.addObject("author", author);
return view;
}
/**
* 方式二:返回String
* 注意:此方式不可以使用@RestController,@RestController 等价
* 于 @Controller 加上 @ResponseBody,@ResponseBody表示
* 该方法的返回不会被解析为跳转, 而是直接写入http响应正文。
*/
@RequestMapping("/index1")
public String index1(HttpServletRequest request) {
// TODO 与上面的写法不同,但是结果一致。
// 设置属性
request.setAttribute("title", "我的templates页面");
request.setAttribute("desc", "欢迎进入我的csdn博客");
Author author = new Author();
author.setAge(18);
author.setEmail("xhw_vae@163.com");
author.setName("way");
request.setAttribute("author", author);
// 返回的 index 则会映射到 src/main/resources/templates/index.html
return "index";
}
class Author {
private int age;
private String name;
private String email;
// 省略 get set
}3. 在resources/templates文件夹下新建index.html模板文件
可以看到 thymeleaf 是通过在标签中添加额外属性动态绑定数据的
<!DOCTYPE html>
<html xmlns="http://www.w3.org/1999/xhtml"
      xmlns:th="http://www.thymeleaf.org">
<head>
    <meta charset="UTF-8">
    <!-- 可以看到 thymeleaf 是通过在标签里添加额外属性来绑定动态数据的 -->
    <title th:text="${title}">Title</title>
    <!-- 在/resources/static/js目录下创建一个hello.js 用如下语法依赖即可-->
    <script type="text/javascript" th:src="@{/js/hello.js}"></script>
</head>
<body>
    <h1 th:text="${desc}">Hello World</h1>
    <h2>=====作者信息=====</h2>
        <p th:text="${author?.name}"></p>
        <p th:text="${author?.age}"></p>
        <p th:text="${author?.email}"></p>
</body>
</html>
4. 浏览器访问http://localhost:8080/index测试
三、shiro认证-ShiroConfig配置类
1. shiro的核心API
Subject:用户主体(关联SecurityManager,把操作交给SecurityManager)
SecurityManager:安全管理器(关联Realm)
Realm:shiro连接数据库的桥梁
2. Spring整合shiro
(1)添加shiro和spring整合依赖
        <!-- shiro和spring整合依赖 -->
        <dependency>
            <groupId>org.apache.shiro</groupId>
            <artifactId>shiro-spring</artifactId>
            <version>1.4.0</version>
        </dependency>
(2)自定义Realm类
package com.vae.shiro;

import org.apache.shiro.authc.AuthenticationException;
import org.apache.shiro.authc.AuthenticationInfo;
import org.apache.shiro.authc.AuthenticationToken;
import org.apache.shiro.authz.AuthorizationInfo;
import org.apache.shiro.realm.AuthorizingRealm;
import org.apache.shiro.subject.PrincipalCollection;

public class UserRealm extends AuthorizingRealm{

	/**
     * 授权逻辑
     */
	@Override
	protected AuthorizationInfo doGetAuthorizationInfo(PrincipalCollection arg0) {
		System.out.println("执行授权逻辑");
		return null;
	}

	/**
     * 认证逻辑
     */
	@Override
	protected AuthenticationInfo doGetAuthenticationInfo(AuthenticationToken arg0) throws AuthenticationException {
		System.out.println("执行认证逻辑");
		return null;
	}

}
(3)编写shiro配置类(基本结构)
package com.vae.shiro;

import org.apache.shiro.spring.web.ShiroFilterFactoryBean;
import org.apache.shiro.web.mgt.DefaultWebSecurityManager;
import org.springframework.beans.factory.annotation.Qualifier;
import org.springframework.context.annotation.Bean;
import org.springframework.context.annotation.Configuration;

/**
 * shiro的配置类
 * @author Administrator
 *
 */
@Configuration
public class ShiroConfig {
	/**
     * 创建ShiroFilterFactoryBean
     */
	@Bean
	public ShiroFilterFactoryBean getShiroFilterFactoryBean(@Qualifier("securityManager")DefaultWebSecurityManager securityManager) {
	ShiroFilterFactoryBean shiroFilterFactoryBean =new ShiroFilterFactoryBean();
//      设置安全管理器
		shiroFilterFactoryBean.setSecurityManager(securityManager);
		return shiroFilterFactoryBean;
	}

	/**
     * 创建DefaultWebSecurityManager
     */
	@Bean(name="securityManager")
	public DefaultWebSecurityManager getdefaultDefaultWebSecurityManager(@Qualifier("userRealm")UserRealm userRealm){
		DefaultWebSecurityManager securityManager=new DefaultWebSecurityManager();
		//关联Realm
		securityManager.setRealm(userRealm);
		return securityManager;
	}

	/**
     * 创建Realm
     */

	@Bean(name="userRealm")
	public UserRealm getRealm(){
		return new UserRealm();
	}
}
四、shiro认证-使用shiro过滤器实现认证资源拦截
1. 在templates下新建user/add.html和user/update.html
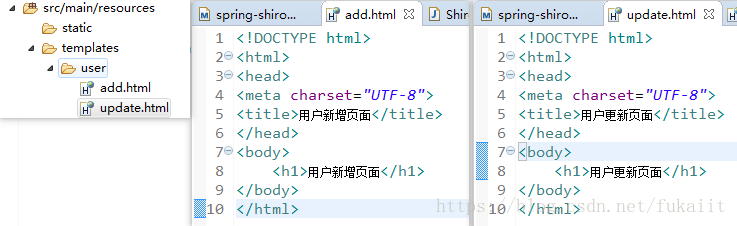
/user/add.html
<!DOCTYPE html>
<html>
<head>
    <meta charset="UTF-8">
    <title>用户新增页面</title>
</head>
<body>
    <h1>用户新增页面</h1>
</body>
</html>
/user/update.html
<!DOCTYPE html>
<html>
<head>
    <meta charset="UTF-8">
    <title>用户修改页面</title>
</head>
<body>
    <h1>用户修改页面</h1>
</body>
</html>
2. 在UserController中编写访问这两个页面的方法
	@RequestMapping("/add")
	public String add() {
		return "user/add";
	}

	@RequestMapping("/update")
	public String update() {
		return "user/update";
	}
3. 在index.html页面中添加这两个页面的超链接
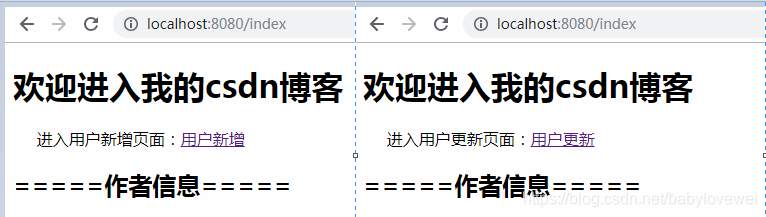
进入用户新增页面:<a href="add">用户新增</a>
进入用户更新页面:<a href="update">用户更新</a>重启测试http://localhost:8080/index可访问。

4. 修改ShiroConfig类的getShiroFilterFactoryBean方法中添加拦截
@Bean
public ShiroFilterFactoryBean getShiroFilterFactoryBean(@Qualifier("securityManager")DefaultWebSecurityManager securityManager) {
        ShiroFilterFactoryBean shiroFilterFactoryBean =new ShiroFilterFactoryBean();
        //设置安全管理器
        shiroFilterFactoryBean.setSecurityManager(securityManager);

        /*
         * 添加shiro内置过滤器,实现权限相关的url拦截
         * 常见过滤器:
         * anon:无需认证(登录)可以访问
         * authc:必须认证才可以访问
         * user:如果使用Remember Me的功能,可以直接访问
         * perms:该资源必须得到资源权限才可以访问
         * role:该资源必须得到角色权限才可以访问
         */
        Map<String, String> filterMap = new LinkedHashMap<>();
        filterMap.put("/add", "authc");
        filterMap.put("/update", "authc");
        shiroFilterFactoryBean.setFilterChainDefinitionMap(filterMap);
        return shiroFilterFactoryBean;
    }
拦截之后重启,再次访问发现:试图访问add或者update,会自动跳转到login.jsp页面 ,此时没有login.jsp所以会出现404的错误,继续操作后面步骤
| Filter | 解释 |
|---|---|
| anon | 无参,开放权限,可以理解为匿名用户或游客 |
| authc | 无参,需要认证 |
| logout | 无参,注销,执行后会直接跳转到shiroFilterFactoryBean.setLoginUrl(); 设置的 url |
| authcBasic | 无参,表示 httpBasic 认证 |
| user | 无参,表示必须存在用户,当登入操作时不做检查 |
| ssl | 无参,表示安全的URL请求,协议为 https |
| perms[user] | 参数可写多个,表示需要某个或某些权限才能通过,多个参数时写 perms[“user, admin”],当有多个参数时必须每个参数都通过才算通过 |
| roles[admin] | 参数可写多个,表示是某个或某些角色才能通过,多个参数时写 roles[“admin,user”],当有多个参数时必须每个参数都通过才算通过 |
| rest[user] | 根据请求的方法,相当于 perms[user:method],其中 method 为 post,get,delete 等 |
| port[8081] | 当请求的URL端口不是8081时,跳转到schemal://serverName:8081?queryString 其中 schmal 是协议 http 或 https 等等,serverName 是你访问的 Host,8081 是 Port 端口,queryString 是你访问的 URL 里的 ? 后面的参数 |
5. 修改拦截后跳转的页面
(1)在templates下新增login.html页面
(2)在ShiroConfig中shiroFilterFactoryBean方法中修改拦截后跳转的页面
//修改跳转的登录页面,不加此项就会跳转到login.jsp页面
shiroFilterFactoryBean.setLoginUrl("/toLogin");
(3)在UserController中添加toLogin方法
	@RequestMapping("/toLogin")
	public String toLogin() {
		return "login";
	}
测试,当没有权限跳转到该login.html页面
6. 用通配符拦截
filterMap.put("/index", "anon");
filterMap.put("/*", "authc");
五、shiro认证-实现用户登录功能
1. 修改完善之前的login.html页面
<!DOCTYPE html>
<html>
<head>
<meta charset="UTF-8">
<title>登录页面</title>
</head>
<body>
    <h1>登录页面</h1>
    <span style="color:red" th:text="${msg}"></span>
    <form method="post" action="login">
        <input type="text" name="username" /><br>
        <input type="password" name="password"><br>
        <input type="submit" name="submit" value="登录">
    </form>
</body>
</html>
2. 在UserController中编写/login请求,编写登录的处理逻辑
@RequestMapping("/login")
public String login(String username, String password, Model model) {
//使用shiro编写认证操作
//获取Subject
Subject subject = SecurityUtils.getSubject();
//封装用户数据
UsernamePasswordToken token = new UsernamePasswordToken(username, password);
//执行登录方法
try {
//只要执行login方法,就会去执行UserRealm中的认证逻辑
subject.login(token);
//如果没有异常,代表登录成功
//跳转到textThymeleaf页面,代表主页
return "redirect:/index";
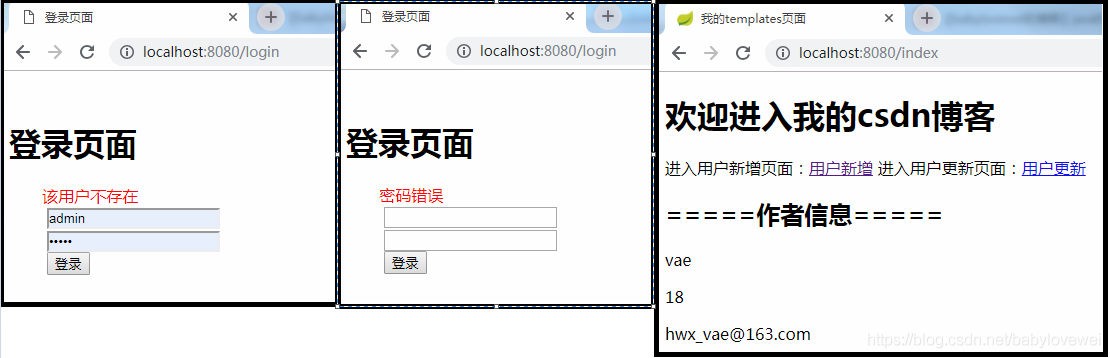
} catch (UnknownAccountException e) {
logger.info(username + "用户名不存在");
//登录失败
model.addAttribute("msg", "用户名不存在");
return "login";
} catch (IncorrectCredentialsException e) {
logger.info(username + "密码错误");
model.addAttribute("msg", "密码错误");
return "login";
}
}测试发现,并没有进入/login请求,是因为之前写的拦截器(/*)拦截了所有请求,再对/login请求放行,加入代码:
filterMap.put("/login", "anon");
重启测试,发现执行了认证逻辑,返回了用户名不存在异常。
3. 在UserRealm中编写shiro认证逻辑
    /**
     * 认证逻辑
     */
    @Override
    protected AuthenticationInfo doGetAuthenticationInfo(AuthenticationToken arg0) throws AuthenticationException {
        System.out.println("执行认证逻辑");

        //先写模拟数据进行验证,下一步再连接数据库,假设数据库的用户名和密码如下
        String dbusername = "vae";
        String dbpassword = "123456";

        //编写shiro判断逻辑,判断用户名和密码
        //1. 判断用户名
        UsernamePasswordToken token = (UsernamePasswordToken) arg0;
        if (!token.getUsername().equals(dbusername)) {
            //用户名不存在shiro底层会抛出UnknownAccountException
            return null;
        }
        //2. 判断密码,参数1:需要返回给login方法的数据;参数2:数据库密码,shiro会自动判断
        return new SimpleAuthenticationInfo("", dbpassword, "");
    }
4. 启动程序,进行测试
六、shiro认证-整合MyBatis完善用户登录
1. 导入Mybatis相关的依赖
        <!-- druid德鲁伊连接池 -->
		<dependency>
			<groupId>com.alibaba</groupId>
			<artifactId>druid</artifactId>
			<version>1.1.10</version>
		</dependency>

		<!-- mysql -->
		<dependency>
			<groupId>mysql</groupId>
			<artifactId>mysql-connector-java</artifactId>
		</dependency>

		<!-- Spring的MyBatis启动器 -->
		<dependency>
			<groupId>org.mybatis.spring.boot</groupId>
			<artifactId>mybatis-spring-boot-starter</artifactId>
			<version>1.1.1</version>
		</dependency>
2. 配置application.properties(src/main/resources下)
(1)创建数据库及用户表
CREATE DATABASE `shiro-demo` CHARACTER SET 'utf8mb4' COLLATE 'utf8mb4_general_ci'

CREATE TABLE `user` (
  `id` int(11) NOT NULL AUTO_INCREMENT COMMENT '主键id',
  `username` varchar(36) NOT NULL DEFAULT '' COMMENT '用户名',
  `password` varchar(36) NOT NULL DEFAULT '' COMMENT '密码',
  PRIMARY KEY (`id`)
) ENGINE=InnoDB DEFAULT CHARSET=utf8mb4 COMMENT='用户表';
(2)配置application.properties
spring.datasource.driverClassName=com.mysql.jdbc.Driver
spring.datasource.url=jdbc:mysql://localhost:3306/shiro-demo?characterEncoding=UTF-8&useSSL=false&serverTimezone=UTC
spring.datasource.username=root
spring.datasource.password=root

# 连接池配置
spring.datasource.type=com.alibaba.druid.pool.DruidDataSource

#mybatis mapper扫描位置
mybatis.mapper-locations=mapper/*.xml
3. 编写User实体类
package com.vae.user.entity;

public class User {
	private Integer id;
	private String username;
	private String password;

    //省略get和set方法
}
4. 编写接口UserDao.java
package com.vae.user.dao;

import com.vae.user.entity.User;

public interface UserDao {
	/**
	 * 根据username查找用户信息
	 * @param username
	 * @return
	 */
	User findByUsername(String username);
}
5. 编写UserMapper.xml映射文件
<?xml version="1.0" encoding="UTF-8"?>
<!DOCTYPE mapper PUBLIC "-//mybatis.org//DTD Mapper 3.0//EN" "http://mybatis.org/dtd/mybatis-3-mapper.dtd">
<!-- 此处指向dao接口 -->
<mapper namespace="com.vae.shiro.user.dao.UserDao">
  <!-- 此处指向实体类 -->
  <resultMap id="BaseResultMap" type="com.vae.shiro.user.entity.User">
    <id column="id" jdbcType="INTEGER" property="id" />
    <result column="username" jdbcType="VARCHAR" property="username" />
    <result column="password" jdbcType="VARCHAR" property="password" />
  </resultMap>
  <sql id="Base_Column_List">
    id, username, password
  </sql>

  <!-- 根据username查找用户信息 -->
  <select id="findByUsername" parameterType="java.lang.String" resultMap="BaseResultMap">
  	select
    <include refid="Base_Column_List" />
    from user
    where username= #{username,jdbcType=VARCHAR}
  </select>
</mapper>
6. 编写UserService.java业务接口
package com.vae.user.service;

import com.vae.user.entity.User;

public interface UserService {
	/**
	 * 根据username查找用户信息
	 * @param username
	 * @return
	 */
	User findByUsername(String username);
}
7. 编写UserServiceImpl.java业务实现类
package com.vae.user.service.impl;

import org.springframework.beans.factory.annotation.Autowired;
import org.springframework.stereotype.Service;

import com.vae.user.dao.UserDao;
import com.vae.user.entity.User;
import com.vae.user.service.UserService;

@Service
public class UserServiceImpl implements UserService{
	@Autowired
	private UserDao userDao;

	@Override
	public User findByUsername(String username) {
		return userDao.findByUsername(username);
	}

}
8. 在Application启动类添加@MapperScan注解,开启Mybatis的Mapper接口扫描
@MapperScan("com.vae.user.dao")9. 修改UserRealm.java,调用刚编写的业务
    @Autowired
	private UserService userService;
	/**
	 * 执行认证逻辑
	 */
	@Override
	protected AuthenticationInfo doGetAuthenticationInfo(AuthenticationToken arg0) throws AuthenticationException {
		System.out.println("执行认证逻辑");
		// 编写shiro判断逻辑,判断用户名和密码
		System.out.println(arg0.toString());
		// 1. 判断用户名
		UsernamePasswordToken token = (UsernamePasswordToken) arg0;
		User user = userService.findByUsername(token.getUsername());
		if (user==null) {
			//用户名不存在
			return null;//shiro底层会抛出UnknownAccountException
		}
		// 2. 判断密码
		// 参数1:需要返回给login方法的数据;参数2:数据库密码,shiro会自动判断
		return new SimpleAuthenticationInfo("", user.getPassword(), "");
	}
10. 测试
效果相同。
七、Shiro授权-使用Shiro过滤器实现授权页面拦截
1. 在ShiroConfig中添加过滤器
//授权过滤器:授权拦截后,shiro会自动跳转到未授权页面
filterMap.put("/add", "perms[user:add]");
filterMap.put("/*", "authc");
Tips:注意要写在/*之前,否则不会拦截
2. 添加设置未授权页面
(1)ShiroConfig中
//修改自动跳转的未授权页面
shiroFilterFactoryBean.setUnauthorizedUrl("/unAuth");
(2)UserController中
@RequestMapping("/unAuth")
public String unAuth() {
    return "unAuth";
}
(3)添加unAuth.html
<!DOCTYPE html>
<html xmlns="http://www.w3.org/1999/xhtml"
      xmlns:th="http://www.thymeleaf.org">
<head>
<meta charset="UTF-8">
<title>未授权页面</title>
</head>
<body>
    <h1>抱歉!您无权限访问!</h1>
</body>
</html>
3. 访问 http://localhost:8080/add 测试
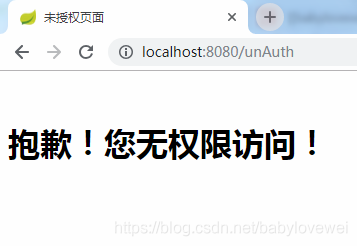
登录认证之后,访问/add页面会提示未授权,而/update可以正常访问。
八、Shiro授权-编写资源授权逻辑
刚才打印的log日志中可以看到,只要访问了需要授权访问的资源,就会执行UserRealm中的doGetAuthenticationInfo()方法,在该方法中给资源进行授权。
    /**
     * 执行授权逻辑
     */
    @Override
    protected AuthorizationInfo doGetAuthorizationInfo(PrincipalCollection arg0) {
        System.out.println("执行授权逻辑");

        //给资源进行授权
        SimpleAuthorizationInfo info=new SimpleAuthorizationInfo();
        //添加资源的授权字符串
        info.addStringPermission("user:add");

        return info;
    }
测试查看效果:日志中可以看到执行了该授权逻辑,现在可以访问/add了
九、Shiro授权-关联数据库动态授权
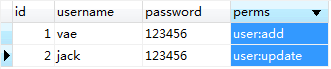
1. 修改数据表
给user表添加perms字段,插入两个测试用户
2. 一系列小修改
(1)User.java:添加perms属性和getter/setter
(2)UserDao.java:
public User findById(Integer id);(3)UserMapper.xml
  <!-- 根据id查找用户信息 -->
  <select id="findById" parameterType="java.lang.Integer" resultMap="BaseResultMap">
  	select
    <include refid="Base_Column_List" />
    from user
    where id = #{id,jdbcType=INTEGER}
  </select>
(4)UserService.java
public User findById(Integer id);(5)UserServiceImpl.java
    @Override
    public User findById(Integer id) {
        return userMapper.findById(id);
    }
(6)给/update添加资源拦截
filterMap.put("/update", "perms[user:update]");3. 修改UserRealm中的doGetAuthorizationInfo方法
    @Override
    protected AuthorizationInfo doGetAuthorizationInfo(PrincipalCollection arg0) {
        System.out.println("执行授权逻辑");

        //给资源进行授权
        SimpleAuthorizationInfo info=new SimpleAuthorizationInfo();
        /*//添加资源的授权字符串
        info.addStringPermission("user:add");*/

        //获取当前用户
        Subject subject=SecurityUtils.getSubject();
        User user=(User)subject.getPrincipal();
        //到数据库查询当前登录用户的授权字符串
        User dbUser=userService.findById(user.getId());//通过当前登录用户id查找的数据库用户

        info.addStringPermission(dbUser.getPerms());

        return info;
    }
将doGetAuthenticationInfo()方法的返回修改为
return new SimpleAuthenticationInfo(user,user.getPassword(),"");
因为User user=(User)subject.getPrincipal(); 所取得的当前登录用户就是从这里来的
4. 登录不同权限用户进行测试
各自有了各自的权限。
十、ThymeLeaf和shiro标签整合使用
1. 导入thymeleaf对shiro的扩展坐标
        <!-- 导入thymeleaf对shiro的扩展坐标 -->
        <dependency>
            <groupId>com.github.theborakompanioni</groupId>
            <artifactId>thymeleaf-extras-shiro</artifactId>
            <version>2.0.0</version>
        </dependency>
2. 配置ShiroDialect
ShiroConfig中
    @Bean
    public ShiroDialect getShiroDialect(){
        return new ShiroDialect();
    }
3. 在页面上使用shiro标签
<div shiro:hasPermission="user:add">
    进入用户新增页面:<a href="add">用户新增</a>
</div>
<div shiro:hasPermission="user:update">
    进入用户更新页面:<a href="update">用户更新</a>
</div>
4. 运行测试
不同权限用户登录,只显示了他有权限看到的内容。
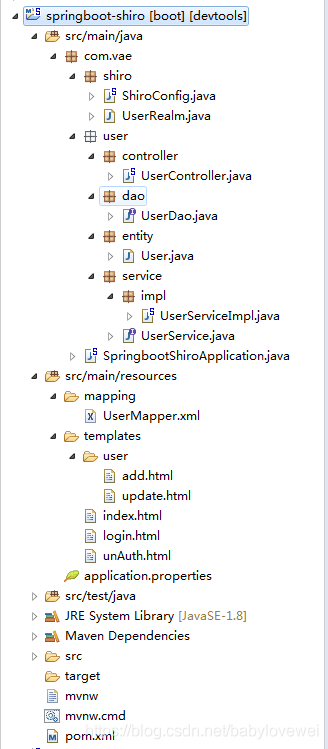
十一.项目完整目录