文章目录
1,Datax下载使用
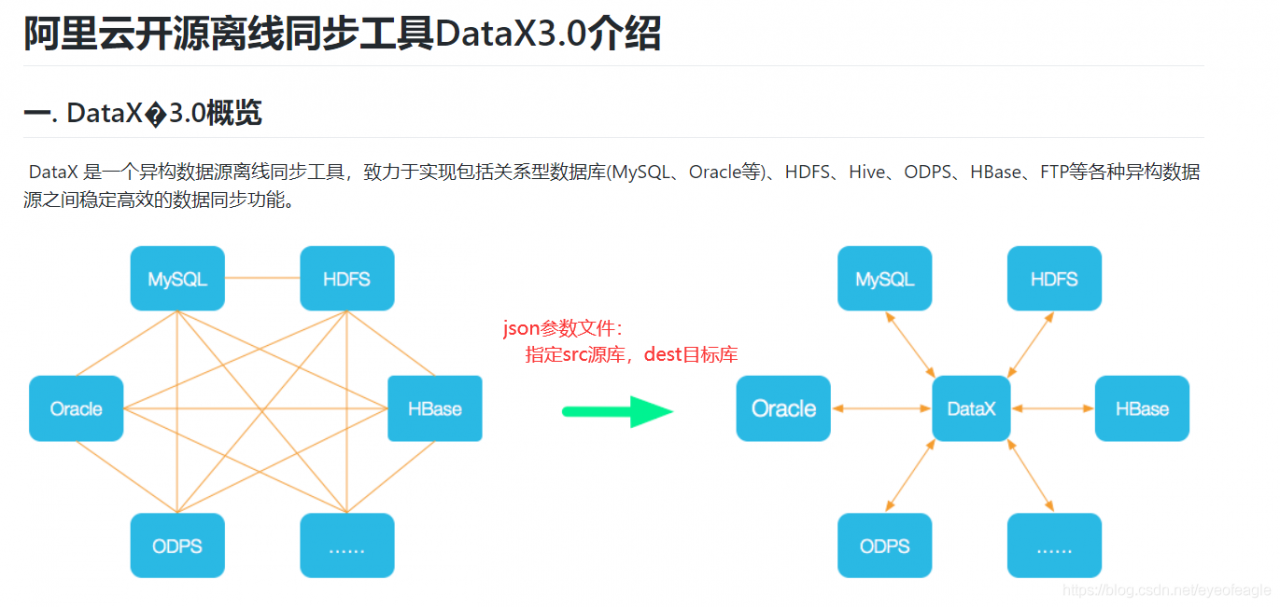
阿里巴巴开源-数据迁移工具:
- DataX简介-架构设计:
https://github.com/alibaba/DataX/blob/master/introduction.md - 用户指南:
https://github.com/alibaba/DataX/blob/master/userGuid.md
下载二进制包使用
下载,并解压到linux服务器某目录:http://datax-opensource.oss-cn-hangzhou.aliyuncs.com/datax.tar.gz
- 目录结构

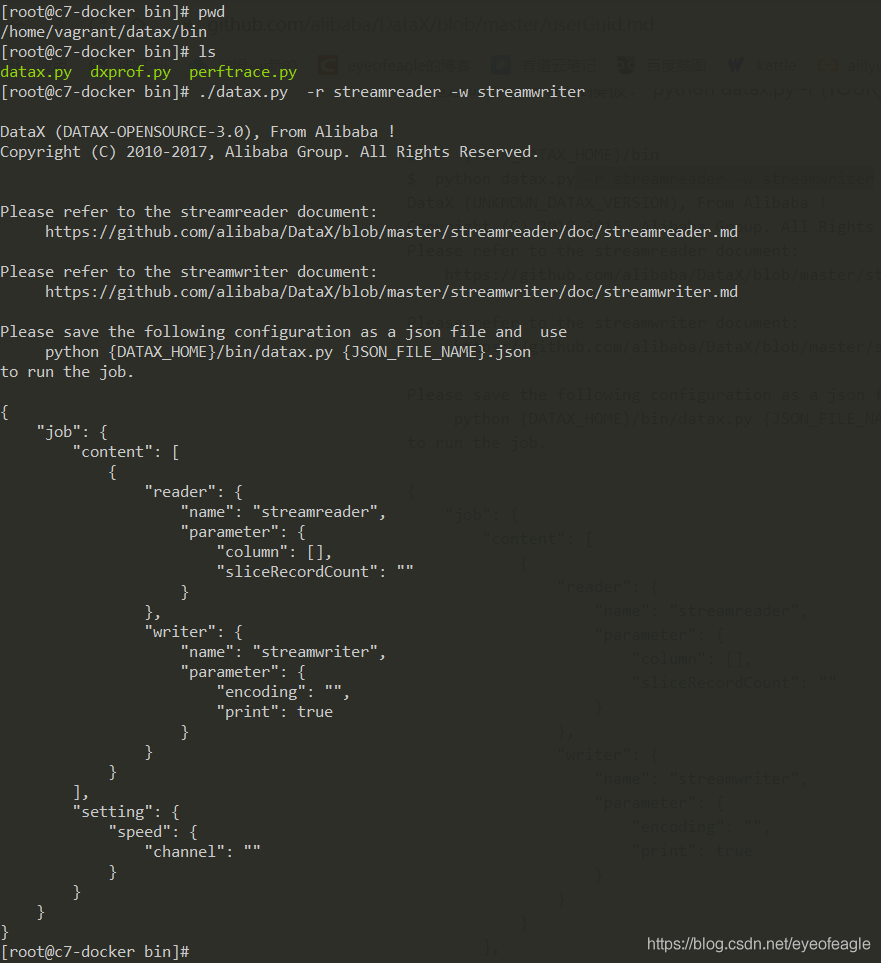
- 测试使用:参数结构(json形式)
2,关系型数据库,导入到Hbase
- RDBMs读取clob数据 (GBK编码的),导出到hbase 乱码问题:plugin-rdbms-util模块- ->reader.CommonRdbmsReader 修改相应字符编码
- hbase11xwriter 写 hbase,默认没有开启wal, 可以手动设置此参数 (walFlag)
"writer": {
          "name": "hbase11xwriter",
          "parameter": {
            "hbaseConfig": {
              "hbase.zookeeper.quorum": "218.245.1.135:2181"
            },
            "table": "t1",
            "mode": "normal",
            	"walFlag": "true",
            "column": [.....
从DataX主页:查看’Support Data Channels’ --> Hbase1.1: 写 ,查找hbase写入参数:https://github.com/alibaba/DataX
a,配置参考
sql查询结果: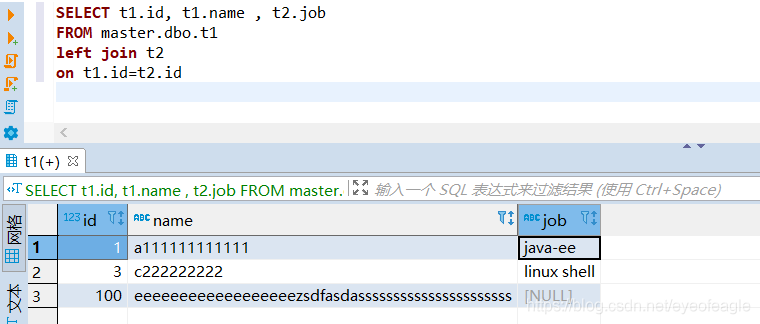
配置hbase写入任务参数:
hbase数据查询结果:
b,具体json参数如下
###### 查看目标服务器:hbase版本
[root@hbase-server oracle-packs]$ hbase version
Java HotSpot(TM) 64-Bit Server VM warning: Using incremental CMS is deprecated and will likely be removed in a future release
HBase 1.2.0-cdh5.12.0
Source code repository file:///data/jenkins/workspace/generic-package-rhel64-6-0/topdir/BUILD/hbase-1.2.0-cdh5.12.0 revision=Unknown
Compiled by jenkins on Thu Jun 29 04:42:07 PDT 2017
From source with checksum 6834049453a9459ccaf4cadbf9a54b2c


######从客户端机器操作DataX: 把关系型数据库(sqlserver,mysql,oracle)数据,抽取到hbase
###### 从sqlserver-> hbase:  选择hbase-writer, sqlserver-reader
[root@c7-docker bin]# cat ../conf/sqlserver_w_hbase.json
{
    "job":{
        "setting":{ "speed": { "channel":5  } },
        "content":[{
                "reader":{
                    "name":"sqlserverreader",
                    "parameter":{
                        "username":"sa",
                        "password":"XXXabc123$",
                        "connection":[
                            {
                                "jdbcUrl":[ "jdbc:sqlserver://192.168.56.101:1433"],
                                "querySql":[
                                    "SELECT t1.id, t1.name , t2.job
                                        FROM master.dbo.t1
                                        left join t2
                                        on t1.id=t2.id"
                                ]
                            }
                        ]
                    }
                },
                "writer":{
						"name":"hbase11xwriter",
						"parameter":{
							"hbaseConfig":{"hbase.zookeeper.quorum":"192.168.56.101:2181"},
							"table":"t",
							"mode":"normal",
							"rowkeyColumn":[ {"index":0,"type":"string"}   ],
							"column":[
									 {"index":1,"name":"f:name","type":"string"},
									 {"index":2,"name":"f:job","type":"string"}
								],
							"encoding":"utf-8"
						}
			    }
		 }]
    }
}

###### 从mysql-> hbase:  选择hbase-writer, mysql-reader
[root@c7-docker bin]# cat ../conf/mysql_w_hbase.json
...
             "reader": {
                    "name":"mysqlreader",
                    "parameter":{
                        "username":"root",
                        "password":"123456",
                        "connection":[
                            {
			  	  				"jdbcUrl":[   "jdbc:mysql://192.168.56.161:3306" ],
                                "querySql":[
                                    "select id,name from test.t1 where id > 2"
                                ]
                            }
                        ]
                    }
                },
...

###### 从oracle-> hbase:  选择hbase-writer, oracle-reader
[root@c7-docker bin]# cat ../conf/oracle_w_hbase.json
....
            "reader": {
                    "name": "oraclereader",
                    "parameter": {
                        "username": "system",
                        "password": "orcl",
                        "connection": [
                            {
			    				"jdbcUrl": [ "jdbc:oracle:thin:@192.168.56.101:1521:orcl" ],
                                "querySql": [
                                    " select id,name,\"data\" from bi.t1 where id < 1000"
                                ]
                            }
                        ]
                    }
                },

....
c,使用shell命令简化json配置
案例1:纯sql文本
#源SQL文件:数据源
[root@c7-docker jsons]# cat c.sql
SELECT id as id2,
name as name2,age age2
FROM t1

#目的:为了产生如下格式
{
	"name":"hbase11xwriter",
	"parameter":{
		"hbaseConfig":{"hbase.zookeeper.quorum":"192.168.56.101:2181"},
		"table":"t",
		"mode":"normal",
		"rowkeyColumn":[ {"index":0,"type":"string"}   ],
		"column":[
				 {"index":1,"name":"f:name","type":"string"},
				 {"index":2,"name":"f:job","type":"string"}
			],
		"encoding":"utf-8"
	}
}

[root@c7-docker jsons]# awk 'BEGIN{print "{ \"index\":1, \"name\":\"f:name\", \"type\":\"string\" },"}'
{ "index":1, "name":"f:name", "type":"string" },

[root@c7-docker jsons]#  cat c.sql |xargs \
 | sed -e 's@select\(.*,.*\)from .*@\1@i' \
 |sed 's@,@\n@g' \
 |awk 'NR!=1{print "{ \"index\":"NR-1", \"name\":\"f:"$NF"\", \"type\":\"string\" },"   }'
{ "index":1, "name":"f:name2", "type":"string" },
{ "index":2, "name":"f:age2", "type":"string" },
案例2:sql带注释的文本
[root@test-c6 ~]# cat a.txt
sqoop import --connect 'jdbc:sqlserver://192.168.56.10:1433;username=sa;password=123456;databasename=DB1' --query "
select
(CASE
         xxxxxx
	 xxxxxxxxx
	 xxxxxxxxx
	 ) AS ROWKEY,
c.field1 as  FIELD1     ,--备注1
c.field2 as FIELD2        ,--备注2
'01'   as   FIELD3,--备注3
'field3' as   FIELD4,--  备注4
a.field4  as FIELD5      ,--备注5
a.field5 as FIELD6 ,--备注6
field6   as FIELD7   ,--备注7
a.field7 as FIELD8       ,--备注8
a.field8 as FIELD9,--    备注9
field9 AS FIELD10,--     备注10
a.field10 AS FIELD11,--  备注11
a.field11 AS FIELD12,--        备注12
a.field12 AS FIELD13,--  备注13
a.field13 AS FIELD14,--  备注14
cast (b.field1 as nvarchar(MAX))AS FIELD15 --备注15
 from [dbo].[TABLE1] a with(nolock)
left join [dbo].[TABLE2] b with(nolock)  on a.fild1=b.fild1
left join [dbo].[TABLE3] c  with(nolock) on  c.fild2=a.fild2
left join [dbo].[TABLE4] d  with(nolock) on c.fild3 = d.fild3
where a.fild4 >=GETDATE()-3
and \$CONDITIONS " --hbase-table HBASE_TABLE --column-family f --hbase-row-key ROWKEY --verbose -m 1

[root@test-c6 ~]#  cat a.txt  \
 |awk -F'--'  '$0 !~ /sqoop/ {print $1}' \
 |xargs -d '\n' \
 |sed -e 's@.*select\(.*ROWKEY\),\(.*,.*\)from .*@ROWKEY,\2@i' \
 |sed 's@,@\n@g' \
 |awk 'NR!=1{print "{ \"index\":"NR-1", \"name\":\"f:"$NF"\", \"type\":\"string\" },"   }'

{ "index":1, "name":"f:FIELD1", "type":"string" },
{ "index":2, "name":"f:FIELD2", "type":"string" },
{ "index":3, "name":"f:FIELD3", "type":"string" },
{ "index":4, "name":"f:FIELD4", "type":"string" },
{ "index":5, "name":"f:FIELD5", "type":"string" },
{ "index":6, "name":"f:FIELD6", "type":"string" },
{ "index":7, "name":"f:FIELD7", "type":"string" },
{ "index":8, "name":"f:FIELD8", "type":"string" },
{ "index":9, "name":"f:FIELD9", "type":"string" },
{ "index":10, "name":"f:FIELD10", "type":"string" },
{ "index":11, "name":"f:FIELD11", "type":"string" },
{ "index":12, "name":"f:FIELD12", "type":"string" },
{ "index":13, "name":"f:FIELD13", "type":"string" },
{ "index":14, "name":"f:FIELD14", "type":"string" },
{ "index":15, "name":"f:FIELD15", "type":"string" },
3,hbase数据,导出到关系型数据库

[root@c7-docker bin]# cat jsons/hbase_w_mysql.json
{
    "job": {
        "setting": {
            "speed": {
                "channel": 1
            }
        },
        "content": [
            {
                "reader": {
                    "name": "hbase11xreader",
                    "parameter": {
                        "hbaseConfig": {
                            "hbase.zookeeper.quorum": "192.168.56.22:2181"
                        },
                        "table": "t",
                        "encoding": "utf-8",
                        "mode": "normal",
                        "column": [
                            {
                                "name": "rowkey",
                                "type": "string"
                            },
                            {
                                "name": "f: name",
                                "type": "string"
                            },
                             {
                                "name": "f: job",
                                "type": "string"
                            }

                        ],
                        "range": {
                            "startRowkey": "",
                            "endRowkey": "",
                            "isBinaryRowkey": true
                        }
                    }
                },
                "writer": {
                    "name":"mysqlwriter",
                    "parameter":{
                        "writeMode":"insert",
                        "username":"root",
                        "password":"123456",
                        "column":[
                            "id",
                            "name",
                            "job"
                        ],
                        "connection":[
                            {
                                "jdbcUrl":"jdbc:mysql://192.168.56.161:3306/test?useUnicode=true&characterEncoding=utf8",
                                "table":[
                                    "t2"
                                ]
                            }
                        ]
                    }
                }
            }
        ]
    }
}
4,调整任务内存
[root@localhost modules]# head /opt/datax/conf/core.json
{
    "entry": {
        "jvm": "-Xms1G -Xmx1G",
        "environment": {}
    },
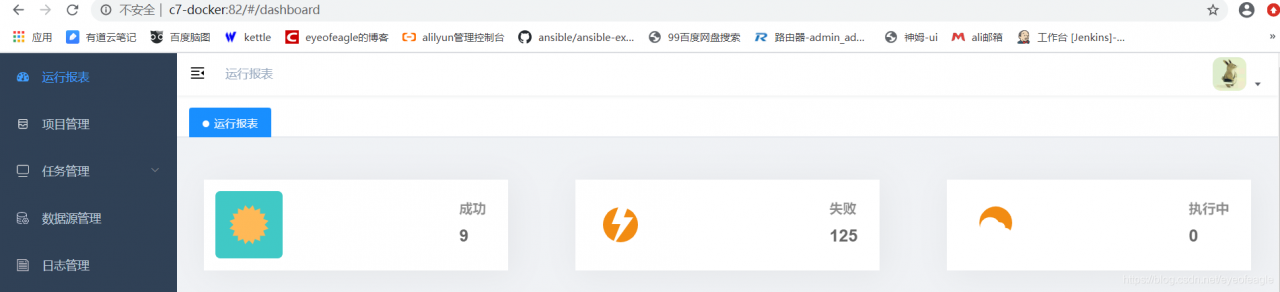
5,使用datax-web界面化操作datax
简介:https://github.com/WeiYe-Jing/datax-web
安装文档:https://github.com/WeiYe-Jing/datax-web/blob/master/doc/datax-web/datax-web-deploy.md
任务调度管理:xxl-job 架构 https://www.xuxueli.com/xxl-job/#%E4%BA%94%E3%80%81%E6%80%BB%E4%BD%93%E8%AE%BE%E8%AE%A1
- datax-web查看任务运行日志: passwd被加密,有时候需要获取明文密码快速测试数据库连接( datax-core模块:Engine类中有个过滤的方法filterSensitiveConfiguration,注释调用即可,再重新打包)
1, 下载源代码
2, 版本2.1.2连接hbase报错:找到admin模块得pom.xml, 注释hbase-protocol这个依赖
3,根据需要:修改DataxJsonServiceImpl,在hbase-writer时,jdbc-writer也自动生成列名
4,修改bug: BaseQueryTool 传入sysdate()这种函数时报错
5,重新编译打包

#默认dashboard只统计7天数据,可以修改mytatis配置,使其全部统计
[yskj@localhost ~]$ grep queryLogReport\" -A 6 /opt/datax-web-2.1.2/modules/datax-admin/conf/mybatis-mapper/JobLogReportMapper.xml
        <select id="queryLogReport" resultMap="JobLogReport">
                SELECT <include refid="Base_Column_List" />
                FROM job_log_report AS t
                ORDER BY t.trigger_day ASC
        </select>
                <!-- WHERE t.trigger_day between #{triggerDayFrom} and #{triggerDayTo} -->
6,datax-web前后端分离部署
前端使用nginx启动,后端去掉js单独启动
a, datax-admin启动参数:

b, 查看datax-admin的jar内容
[root@c7-docker ~]# jar -tvf /opt/datax-web-2.1.2/modules/datax-admin/lib/datax-admin-2.1.2.jar  |grep static
     0 Fri Sep 25 10:19:26 CST 2020 static/
     0 Fri Sep 25 10:19:26 CST 2020 static/static/
     0 Fri Sep 25 10:19:24 CST 2020 static/static/css/
     0 Fri Sep 25 10:19:26 CST 2020 static/static/js/
     0 Fri Sep 25 10:19:26 CST 2020 static/static/img/
     0 Fri Sep 25 10:19:26 CST 2020 static/static/fonts/
  5518 Fri Sep 25 10:19:24 CST 2020 static/index.html
 11383 Fri Sep 25 10:19:24 CST 2020 static/avatar.jpg
   271 Fri Sep 25 10:19:24 CST 2020 static/static/css/chunk-35691e96.f68efe2a.css
   631 Fri Sep 25 10:19:24 CST 2020 static/static/css/chunk-4ba76b80.35874984.css
 17826 Fri Sep 25 10:19:24 CST 2020 static/static/css/chunk-7d41a2d3.55a106d0.css
  9955 Fri Sep 25 10:19:24 CST 2020 static/static/css/chunk-52071f51.9a886743.css
   888 Fri Sep 25 10:19:24 CST 2020 static/static/css/chunk-7ff5eb73.adc8ba5c.css
  4748 Fri Sep 25 10:19:24 CST 2020 static/static/css/chunk-556562e8.b043920c.css
   745 Fri Sep 25 10:19:24 CST 2020 static/static/css/chunk-bb42af12.13821f5e.css
  2399 Fri Sep 25 10:19:24 CST 2020 static/static/css/chunk-753b0532.41eeb29d.css
251446 Fri Sep 25 10:19:24 CST 2020 static/static/css/app.b01abca2.css
....
c, 打包datax-admin的时候,把resources/static目录移除,只打包后台相关内容
d, 把resources/static放到服务器的nginx目录下
- 1, 配置nginx
[root@c7-docker ~]# cat /etc/nginx/conf.d/datax.conf
server {
    listen 82;
    # server_name _;
    location / {
        try_files $uri / /index.html;
        alias /usr/share/nginx/html/datax-web/;
        expires 24h;
    }

    location /api/ {
        proxy_pass http://localhost:65080;
          proxy_set_header X-Real-IP $remote_addr;
          proxy_set_header Host $host;
          proxy_set_header X-Forwarded-For $proxy_add_x_forwarded_for;
    }
}
- 2, 启动nginx, 和后台的datax-admin/executor服务
版权声明:本文为eyeofeagle原创文章,遵循CC 4.0 BY-SA版权协议,转载请附上原文出处链接和本声明。