- 记录自己的Ubuntu18.04系统是怎么进化的,也供有需要的网友参考。
1. 使用U盘安装Ubuntu 18.04
选择清除整个磁盘并安装
2. 系统设置
1. 更换软件源
应用程序–软件和更新–Ubuntu软件–下载自–其他站点,选择速度较快的站点。
2. 设置键盘快捷键
设置–设备–键盘
- 切换应用程序:Alt+Tab
- 在应用程序的窗口之间切换窗口:Super+Tab
3. 安装chrome
下载deb包双击安装。
4. ***
5. 安装百度输入法
- 安装fcitx框架
sudo apt install fcitx - 下载百度输入法,按安装文档操作即可。
要配置百度输入法,在候选词条中右击。
6. 安装cuda
wget https://developer.download.nvidia.com/compute/cuda/repos/ubuntu1804/x86_64/cuda-ubuntu1804.pin
sudo mv cuda-ubuntu1804.pin /etc/apt/preferences.d/cuda-repository-pin-600
wget https://developer.download.nvidia.com/compute/cuda/11.3.1/local_installers/cuda-repo-ubuntu1804-11-3-local_11.3.1-465.19.01-1_amd64.deb
sudo dpkg -i cuda-repo-ubuntu1804-11-3-local_11.3.1-465.19.01-1_amd64.deb
sudo apt-key add /var/cuda-repo-ubuntu1804-11-3-local/7fa2af80.pub
sudo apt-get update
sudo apt-get -y install cuda
7. 安装nccl
8. 安装cudnn
9. 安装ROS melodic/安装ROS2 eloquent(安裝colcon)
10. 安装Docker
11. 升级CMake版本
方法1:
方法2:
- 下载新版本CMake,注意下载Binary distributions,不需要编译
tar zxvf cmake-3.20.5-linux-x86_64.tar.gz- 修改
.bashrc,加入一句:export PATH=~/cmake-3.20.5-linux-x86_64/bin:$PATH,~为家目录路径 source .bashrc
注意,方法2无法修改su权限下的cmake版本
12. 安装boost
- 下载tar文件
- 解压并进入文件夹
./bootstrap.sh./b2sudo ./b2 install
13. 安装jetbrains产品(使用jetbrain toolbox)
1. CLion(2020.3.4版本)
- 使用自带cmake:bundled
- 提示找不到make, c和c++ compiler:
sudo apt install make g++
- 安装ROS-Robot Operating System插件:见另一篇博客。
2. PyCharm
3. 在Clion中使用git
1. 安装git
2. Share a project on GitHub
3. 问题
1. 提示Author identity unknown
  git config --global user.name "Your Name"
  git config --global user.email "you@example.com"
--global will make every git repository on your local machine for the current user use this (e.g. user.name) value. Overrides system config if this value is set.
--local (or just nothing, since this is the default) will make only the current git repository on your local machine use this (e.g. user.name) value. Overrides global and system config if this value is set.
--system will make every git repository on your local machine for all users use this (e.g. user.name) value.
2. 提示gnutls_handshake() failed: The TLS connection was non-properly terminated.
git config --global --unset http.proxy
git config --global --unset https.proxy
3. 个性化设置
- 修改字体为16号:
File | Settings | Editor | Font
File | Settings | Appearance&Behavior | Appearance | Use custom font - 开启工具栏:
View | Appearance | Toolbar - 设置快捷键:
File | Settings | Keymap:
Go to Declaration or Usages->F5
Step Out:Shift + F8->F6
Move Caret to Line End->Ctrl+;(此设置会与输入法管理器中Fcitx剪贴板快捷键冲突,修改剪贴板快捷键为Ctrl+') - 设置Editor Tab:
File | Settings | Editor | General | Editor Tabs:
Tab placement->Left
Opening Policy->Enable preview tab
Tab limit->50 - 安装CodeGlance插件。
- 打开“Externally added files can be added to Git.”提示:
File | Settings | Version Control | Confirmation | When files are created - 将
.cmake.in文件属性识别为.cmake文件
选中.cmake.in文件,File | File Properties | Associate with File Type...,File pattern:*.cmake.in,Open matching files in CLion:CMake
14. 安装numcpp
15. 安装vim;安装优化(tweak);安装kazam
sudo apt install vim
sudo apt install gnome-tweak-tool
sudo apt install kazam
16. 安装VMware
1. 安装
- 下载.bundle 文件
- 给.bundle文件添加可执行权限
sudo ./VMware-xxxxxx.bundle
2. 修改内存设置
sudo vmwareEdit | Preferences | Memory | Reserved Memory改为32768(32g)Edit | Preferences | Memory | Additional Memory改为Fit …
3. 安装Windows10虚拟机
- 虚拟机无法开机,提示“could not open /dev/vmmon:??? please make sure that the kernel moduel vmmon is load”:
修改bios–安全启动–关闭 - 虚拟机提示hardware graphics acceleration is not available
解决方法
17. 安装typora;安装sublime;安装有道词典
18. 安装VLC
sudo snap install vlc
19. 安装anaconda
- 下载 Anaconda3-2020.07-Linux-x86_64.sh
- 在下载目录运行
bash Anaconda3-2020.07-Linux-x86_64.sh,按提示安装(安装在~/anaconda3目录)
- 系统提示:
- To activate conda 's base environment in your current shell session:
(即eval "$(~/anaconda3/bin/conda shell.YOUR_SHELL_NAME hook)"eval "$(~/anaconda3/bin/conda shell.bash hook)")- To install conda 's shell functions for easier access, first activate, then:
conda init- If you 'd prefer that conda 's base environment not be activated on startup, set the auto_activate_base parameter to false:
conda config --set auto_activate_base false
20. 安装labelme(使用anaconda安装)
conda create --name=labelme python=3.6conda activate labelmepip install labelme
21. 添加swap分区
当前swap分区只有2G,不够
查看内存和swap分区大小:free -m
- 创建swap文件
cd /
sudo mkdir swap
cd swap
sudo dd if=/dev/zero of=swapfile bs=1M count=8k
/dev/zero:用于向swapfile写入字符0
count=8k:创建大小为8G的swapfile
完成后提示:
8589934592 bytes (8.6 GB, 8.0 GiB) copied, 3.52516 s, 2.4 GB/s
- 将生成的文件转换为swap文件
sudo mkswap swapfile
完成后提示:
mkswap: swapfile:不安全的权限 0644,建议使用 0600。
正在设置交换空间版本 1,大小 = 8 GiB (8589930496  个字节)
无标签, UUID=7482174e-f2e4-40ce-a4c8-abb20153f14d
sudo chmod 600 swapfile
- 激活swap文件
sudo swapon swapfile
卸载swap文件:sudo swapoff swapfile
- 开机自动挂载swap
sudo vim /etc/fstab
在文件最后加入:
/swap/swapfile swap swap defaults 0 0
22. 安装g2o
安装完别忘了sudo ldconfig
23. 安装Psensor,监控硬件温度
参考https://www.linuxprobe.com/ubuntu-cpu-temperature.html
安装依赖
sudo apt-get install lm-sensors hddtemp
检测硬件传感器
sudo sensors-detect
确认结果
sensors
安装Psensor
sudo apt-get install psensor
24. 安装uGet(类似于迅雷)(安装完下载文件失败,不知道是哪里出了问题)
sudo add-apt-repository ppa:plushuang-tw/uget-stable
sudo apt update
sudo apt install uget
sudo apt install uget aria2
26. 安装arp-scan
sudo apt-get install arp-scan
27. 安装PyTorch(使用anaconda安装)
git项目:https://github.com/pytorch/pytorch#from-source
- 安装依赖
conda install astunparse numpy ninja pyyaml mkl mkl-include setuptools cmake cffi typing_extensions future six requests dataclasses
conda install -c pytorch magma-cuda110  # 注意cuda版本
- 下载源码
git clone --recursive https://github.com/pytorch/pytorch
cd pytorch
# if you are updating an existing checkout
git submodule sync
git submodule update --init --recursive
- 安装
export CMAKE_PREFIX_PATH=${CONDA_PREFIX:-"$(dirname $(which conda))/../"}
python setup.py install
- 在pycharm中使用
File | Settings | Project | Python Interpreter | Add
选择Conda Environment->Existing environment,并指定base虚环境的python3.8解释器,如图所示。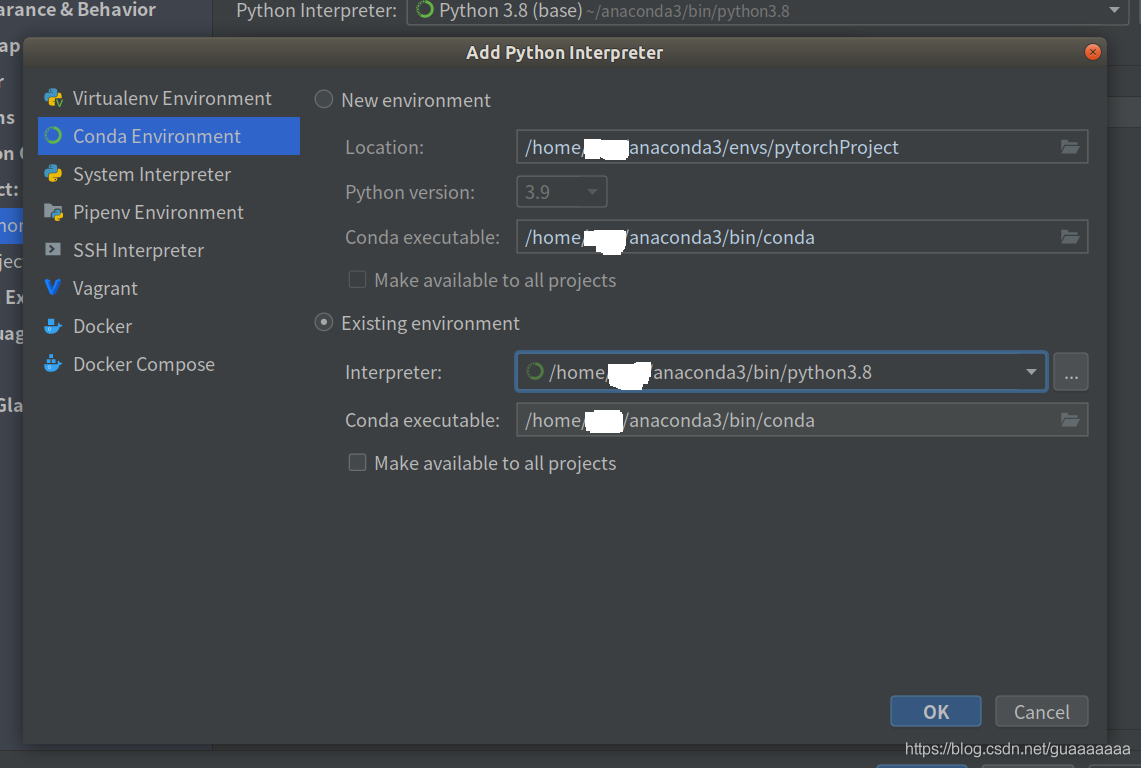
28. 安装scp
sudo apt-get install openssh-server
sudo apt-get install openssh-client
29. 安装eigen 3.3.9到~/libs/eigen
下载安装包,解压
mkdir build
cd build
cmake -DCMAKE_INSTALL_PREFIX=~/libs/eigen ..
make install
30. 安装PCL 1.12.1到~/libs/pcl
下载安装包,解压
mkdir build
cd build
cmake -DWITH_CUDA=OFF ..     # 不加这一步时编译报错:No CMAKE_CUDA_COMPILER could be found.
cmake -DCMAKE_INSTALL_PREFIX=~/libs/pcl ..
make -j12
make install
cmake时报了个错:No CMAKE_CUDA_COMPILER could be found.
解决方法:
cmake -DWITH_CUDA=OFF ..
make时又报了错:没有规则可制作目标 "/home/xxx/anaconda3/lib/libtbb.so"
推测是anaconda的库文件路径覆盖了系统库路径
解决方法:在编译时将/home/xxx/anaconda3/lib文件夹暂时修改为/home/xxx/anaconda3/_lib_,编译成功后再改回去
31. 安装opencv 4.5.3到~/libs/opencv
- 下载核心代码,解压得到opencv-master文件夹
wget -O opencv.zip https://github.com/opencv/opencv/archive/master.zip
unzip opencv.zip
- 下载附加模块,解压得到opencv_contrib-master文件夹,注意保证opencv与opencv_contrib的版本相同
wget -O opencv_contrib.zip https://github.com/opencv/opencv_contrib/archive/master.zip
unzip opencv_contrib.zip
- 新建opencv文件夹,将解压得到的opencv-master文件夹和opencv_contrib-master文件夹放入,执行:
mkdir build
cd build
cmake ../opencv-master
cmake -DOPENCV_EXTRA_MODULES_PATH=../opencv_contrib-master/modules ../opencv-master
cmake -DCMAKE_INSTALL_PREFIX=~/libs/opencv ../opencv-master
make -j12
sudo make install
32. 安装Valgrind
下载压缩包,解压,进入解压后的文件夹
./configure --prefix=/opt/valgrind
make
sudo make install
可执行文件位置:/opt/valgrind/bin/valgrind
上述方法还需自己配置环境,不如直接apt安装:
sudo apt install valgrind